Home>Technology and Computers>How To Make An Amazon Wish List


Technology and Computers
How To Make An Amazon Wish List
Published: February 28, 2024
Learn how to create an Amazon wish list for technology and computer products. Follow our step-by-step guide to start adding items today!
(Many of the links in this article redirect to a specific reviewed product. Your purchase of these products through affiliate links helps to generate commission for Noodls.com, at no extra cost. Learn more)
Table of Contents
Introduction
Creating an Amazon Wish List is a fantastic way to keep track of items you desire, whether it's for personal use, special occasions, or as a convenient way for friends and family to know what gifts you'd appreciate. This feature allows you to curate a personalized list of products from Amazon's extensive catalog, making it easier to manage and share your preferences with others.
By following a few simple steps, you can effortlessly compile a collection of items you're interested in, ensuring that you never miss out on the things that catch your eye. Whether it's the latest tech gadgets, trendy fashion accessories, or essential household items, an Amazon Wish List provides a convenient and organized way to keep track of your desired products.
In this guide, we will walk you through the process of creating and managing your Amazon Wish List, as well as sharing it with friends and family. By the end of this tutorial, you'll be equipped with the knowledge and skills to curate your personalized wish list and make the most of this valuable feature offered by Amazon. Let's dive in and explore the steps to create and manage your Amazon Wish List effectively.
Step 1: Sign in to Your Amazon Account
To begin creating your Amazon Wish List, the first step is to sign in to your Amazon account. If you don't have an account yet, you can easily create one by visiting the Amazon website and following the simple registration process. Once you have your account set up, follow these steps to sign in and get started on your wish list journey:
-
Visit the Amazon Website: Open your web browser and navigate to the Amazon website. You can do this by typing "www.amazon.com" into the address bar and hitting Enter.
-
Sign In: Look for the "Sign In" button at the top right corner of the Amazon homepage. Click on it to access the login page.
-
Enter Your Credentials: On the login page, enter the email address or mobile number associated with your Amazon account, followed by your password. Double-check to ensure that the information is accurate before proceeding.
-
Click Sign In: Once you've entered your login credentials, click the "Sign In" button to access your Amazon account.
-
Navigate to Your Account: After signing in, you'll be directed to your Amazon account dashboard. If you're not automatically redirected, look for the "Account & Lists" option at the top right corner of the page and click on it. From the dropdown menu, select "Your Account" to access your account settings.
By following these steps, you'll successfully sign in to your Amazon account, laying the groundwork for creating and managing your personalized wish list. With your account ready, you can now proceed to the next steps to start curating your desired items and organizing your wish list effectively.
Step 2: Find the Product You Want to Add
Once you've successfully signed in to your Amazon account, the next step is to find the product you want to add to your wish list. Amazon offers a vast selection of products across various categories, making it easy to discover items that pique your interest. Whether you're searching for the latest tech gadgets, fashion accessories, books, or household essentials, Amazon's extensive catalog ensures that you'll find what you're looking for. Here's how you can find and add products to your wish list:
Browsing Amazon's Website:
-
Navigate to the Amazon Homepage: After signing in, you'll be directed to the Amazon homepage. Use the search bar at the top of the page to enter keywords related to the product you want to add to your wish list. For example, if you're interested in adding a new cookbook to your wish list, you can type "cookbook" in the search bar and hit Enter.
-
Refine Your Search: Once you've entered your search terms, you can use the filters on the left-hand side of the page to refine your search results. You can filter by categories, brands, price range, customer ratings, and more to narrow down the options and find the perfect product to add to your wish list.
-
Browse Product Listings: Scroll through the product listings to explore the available options. Click on the products that catch your eye to view more details, including product descriptions, customer reviews, and images.
Using Amazon's Mobile App:
-
Open the Amazon App: If you prefer using the Amazon mobile app, open the app on your smartphone or tablet and sign in to your account.
-
Tap the Search Icon: Look for the search icon within the app and tap on it to enter your search terms.
-
Explore Product Options: Browse through the search results and tap on the products to view their details. You can swipe through images, read product descriptions, and check customer reviews to make an informed decision.
Read more: How To Find An Amazon Address
Adding Products to Your Wish List:
-
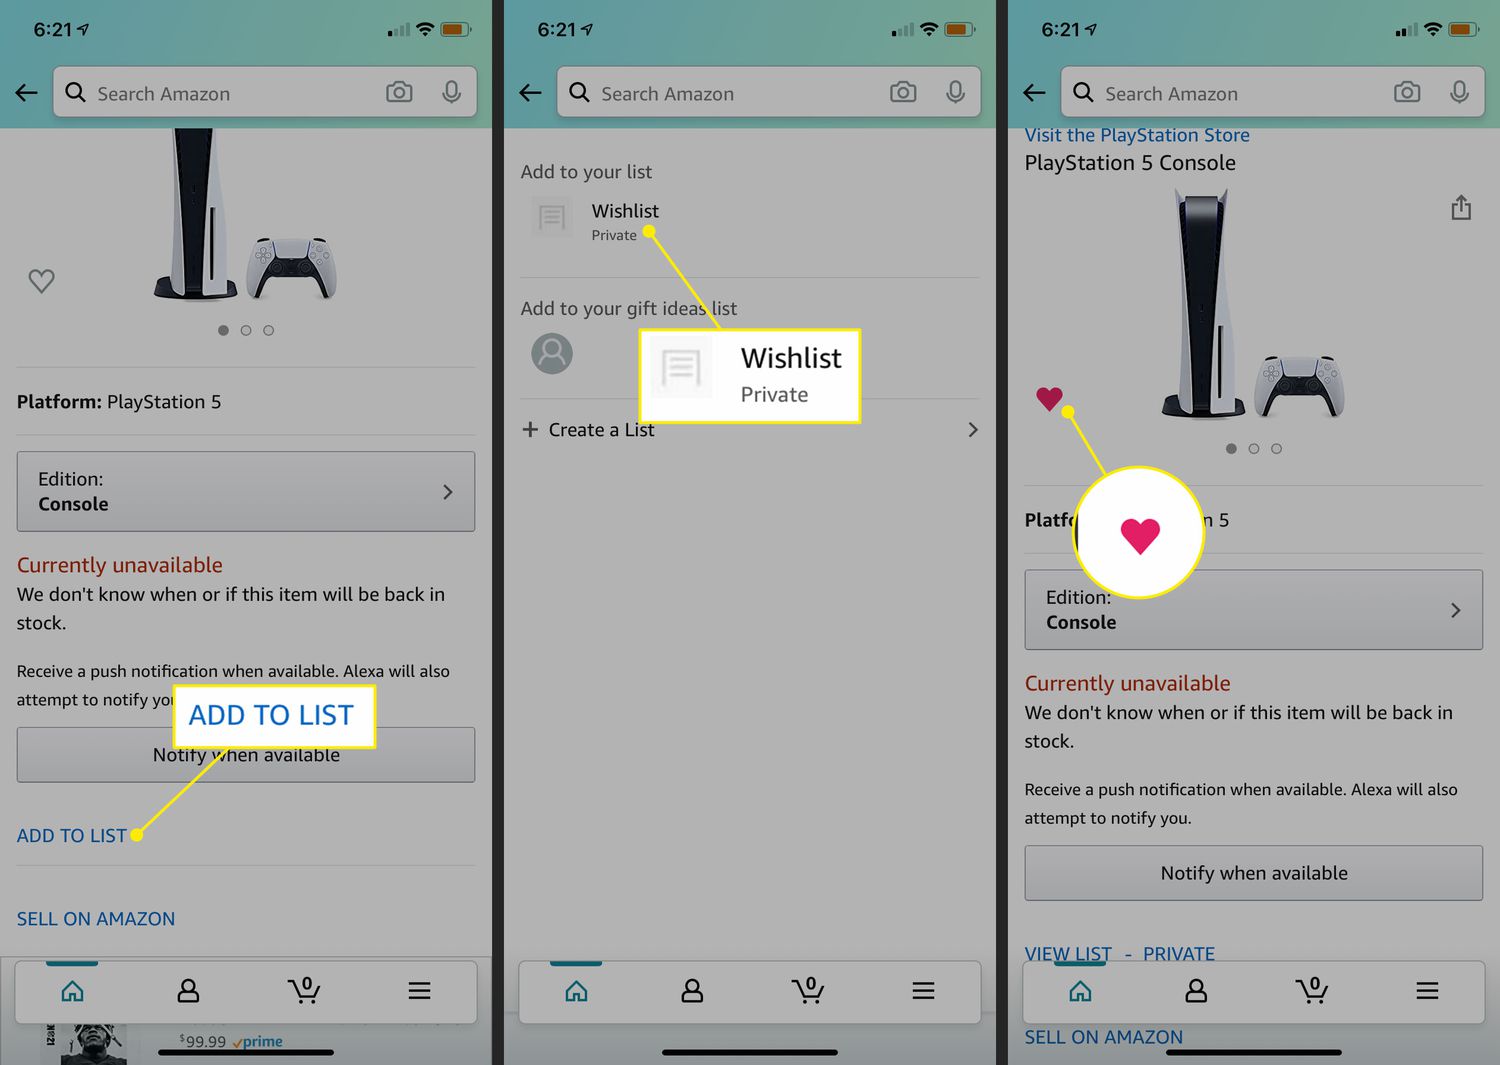
Click "Add to List": Once you've found the product you want to add to your wish list, look for the "Add to List" button located near the product details. Click on this button to add the product to your wish list.
-
Select Your Wish List: If you have multiple wish lists, you'll be prompted to select the specific wish list where you want to add the product. Choose the appropriate list, and the product will be successfully added.
By following these steps, you can easily find the products you want to add to your Amazon Wish List, whether you're using the website or the mobile app. With your desired items added to your wish list, you're one step closer to organizing and sharing your curated collection with others.
Step 3: Add the Product to Your Wish List
Once you've found the products that resonate with your preferences, adding them to your Amazon Wish List is a straightforward process. Whether it's the latest tech gadgets, trendy fashion accessories, or essential household items, adding products to your wish list ensures that you can easily keep track of the items you desire. Here's how you can seamlessly add products to your wish list:
Using the Amazon Website:
-
Navigate to Your Wish List: After finding a product you want to add, locate the "Add to List" button near the product details and click on it. A dropdown menu will appear, displaying your existing wish lists or giving you the option to create a new one.
-
Select Your Wish List: If you have multiple wish lists, choose the specific list where you want to add the product. This allows you to organize your desired items into different categories or occasions, such as "Tech Gadgets," "Fashion Finds," or "Birthday Wishlist."
-
Confirm the Addition: Once you've selected the appropriate wish list, the product will be successfully added. You'll receive a confirmation message, and the item will now appear in your chosen wish list.
Using the Amazon Mobile App:
-
Tap "Add to List": When viewing a product on the Amazon app, tap the "Add to List" button located near the product details. This action will prompt a selection of your existing wish lists or the option to create a new one.
-
Choose Your Wish List: If you have multiple wish lists, select the specific list where you want to add the product. This allows you to keep your desired items organized and easily accessible.
-
Verify the Addition: After selecting the appropriate wish list, the product will be added successfully. You'll receive a confirmation notification, and the item will be included in your chosen wish list.
By following these steps, you can effortlessly add products to your Amazon Wish List, ensuring that your desired items are neatly organized and easily accessible. Whether you're curating a list of gift ideas for special occasions or simply keeping track of products you wish to purchase in the future, the Amazon Wish List feature simplifies the process of managing and sharing your preferences with others.
Read more: How To Share Amazon Cart
Step 4: Organize Your Wish List
Once you've added products to your Amazon Wish List, it's essential to organize them effectively to ensure easy access and management. Organizing your wish list allows you to categorize items based on different criteria, making it convenient to prioritize, track, and update your desired products. Here's how you can efficiently organize your wish list on Amazon:
Create Customized Sections:
Amazon allows you to create customized sections within your wish list, enabling you to categorize items based on specific themes, occasions, or priorities. For example, you can create sections such as "Tech Gadgets," "Books to Read," "Home Essentials," or "Gift Ideas." By organizing your wish list into distinct sections, you can easily navigate through your desired products and identify items based on your preferences.
Prioritize Items:
Prioritizing items within your wish list helps you highlight the products that are of utmost importance or those you intend to acquire sooner. You can use the prioritization feature to mark certain items as high priority, medium priority, or low priority, allowing you to focus on the products that align with your immediate needs or preferences.
Add Notes and Descriptions:
Adding notes and descriptions to the items in your wish list provides valuable context and details about why you're interested in a particular product. Whether it's a specific color preference, size requirement, or a personal note about why you find the product appealing, including such details can help you and others understand the significance of each item on your list.
Read more: How To Change Country On Amazon
Remove or Archive Unwanted Items:
Regularly reviewing your wish list and removing or archiving unwanted items is crucial for maintaining an organized and relevant collection. As your preferences evolve, you may find that certain products are no longer of interest. By removing or archiving such items, you ensure that your wish list remains up to date and reflective of your current desires.
Utilize Filters and Sorting Options:
Amazon provides filtering and sorting options that allow you to arrange your wish list based on various parameters such as price, priority, date added, or category. Leveraging these features can streamline the process of organizing and managing your wish list, making it easier to locate specific items and make informed decisions.
By implementing these strategies, you can effectively organize your Amazon Wish List, ensuring that it remains a curated collection of products that align with your preferences and aspirations. Organizing your wish list not only enhances its usability but also enables you to derive maximum value from this convenient feature offered by Amazon.
Step 5: Share Your Wish List
Sharing your Amazon Wish List with friends and family is a wonderful way to communicate your preferences and provide them with thoughtful gift ideas for special occasions. Amazon offers seamless sharing options, allowing you to effortlessly share your wish list with others via email, social media, or direct links. Here's how you can share your wish list and make it accessible to those you wish to engage with:
Email Sharing:
When you're ready to share your wish list, navigate to your Amazon account and access your wish list dashboard. Look for the "Share" button, which typically appears near the top of your wish list page. Clicking on this button will prompt a menu that includes the option to share your wish list via email. Upon selecting the email sharing option, you can enter the email addresses of the individuals you want to share your wish list with, along with a personalized message if desired. Once you've composed your message and added the recipients' email addresses, simply click "Send" to share your wish list directly with them.
Read more: How To Cancel A Return On Amazon
Social Media Sharing:
Amazon also provides the option to share your wish list on various social media platforms, allowing you to reach a broader audience and engage with friends and followers. By clicking the social media sharing option within your wish list settings, you can seamlessly post your wish list on platforms such as Facebook, Twitter, and Pinterest. This enables your social network to view and engage with your curated collection, providing them with insights into your preferences and interests.
Direct Link Sharing:
For a more personalized approach, Amazon allows you to generate a direct link to your wish list, which you can share with specific individuals or include on your personal website or blog. By creating a direct link, you have the flexibility to control who has access to your wish list, ensuring that it reaches the intended recipients while maintaining privacy and exclusivity.
By leveraging these sharing options, you can effectively communicate your preferences and gift ideas with others, fostering meaningful connections and facilitating thoughtful gift-giving experiences. Whether it's for birthdays, holidays, or special milestones, sharing your Amazon Wish List empowers others to select gifts that resonate with your interests, ensuring that every gesture is thoughtful and appreciated.
Sharing your wish list is a simple yet impactful way to engage with your social circle and provide them with valuable insights into your preferences, ultimately enhancing the gift-giving experience for both you and those who wish to celebrate special moments with you.
Conclusion
In conclusion, creating and managing an Amazon Wish List offers a myriad of benefits, ranging from personal convenience to facilitating meaningful interactions with friends and family. By following the steps outlined in this guide, you can seamlessly curate a collection of desired products, organize them effectively, and share your preferences with others. The Amazon Wish List feature serves as a valuable tool for streamlining the process of tracking and acquiring items that align with your interests and needs.
As you navigate the process of creating and managing your wish list, it's important to approach it with a sense of creativity and personalization. Tailoring your wish list to reflect your unique preferences, aspirations, and lifestyle ensures that it becomes a true reflection of your desires. Whether you're compiling a list of books you've been eager to read, the latest tech innovations that catch your eye, or practical household items that would enhance your daily routine, your wish list becomes a curated representation of your tastes and interests.
Furthermore, the act of sharing your wish list with others fosters meaningful connections and simplifies the gift-giving experience for both parties. By providing friends and family with insights into your preferences, you empower them to select gifts that resonate with your interests, ensuring that every gesture is thoughtful and appreciated. The ability to share your wish list via email, social media, or direct links amplifies the reach of your preferences, allowing you to engage with a broader audience and facilitate genuine connections.
In essence, the Amazon Wish List feature transcends its practical utility, evolving into a platform for self-expression, thoughtful gifting, and social engagement. It embodies the spirit of discovery, enabling you to explore and curate a personalized collection of products that inspire and delight. Whether you're celebrating special occasions, expressing gratitude, or simply treating yourself, the wish list becomes a versatile tool that enhances the joy of giving and receiving.
By embracing the process of creating, organizing, and sharing your Amazon Wish List, you embark on a journey of self-discovery and meaningful connections, all while simplifying the art of gift-giving and receiving. As you continue to refine and update your wish list, remember that it's a reflection of your evolving preferences and a testament to the experiences and aspirations that shape your life. Embrace the power of your wish list, and let it serve as a conduit for genuine connections and thoughtful gestures.


