Home>Arts and Culture>How To Create A Spooky Skeleton Hand Drawing
Arts and Culture
How To Create A Spooky Skeleton Hand Drawing
Published: February 28, 2024
Learn how to create a spooky skeleton hand drawing with this step-by-step tutorial. Perfect for arts and culture enthusiasts looking for a fun and eerie project.
(Many of the links in this article redirect to a specific reviewed product. Your purchase of these products through affiliate links helps to generate commission for Noodls.com, at no extra cost. Learn more)
Table of Contents
Introduction
Creating a spooky skeleton hand drawing can be a thrilling and rewarding artistic endeavor. Whether you're an experienced artist or a beginner looking to explore the world of macabre art, this step-by-step guide will help you bring a touch of eerie charm to your artwork. The process of sketching a skeleton hand allows you to delve into the intricate details of anatomy and texture, while also embracing the darker side of artistic expression.
As you embark on this artistic journey, you'll have the opportunity to experiment with shading, perspective, and form, all while capturing the haunting essence of a skeletal hand. This drawing can serve as a captivating addition to your Halloween decorations, a striking piece of art for your portfolio, or simply a fun and challenging project to hone your drawing skills.
With a few essential materials and a creative mindset, you can bring a sense of spookiness to life on paper. So, gather your drawing supplies, prepare to unleash your creativity, and let's dive into the process of creating a spine-chilling skeleton hand drawing that is sure to captivate and intrigue.
Read more: How To Draw A Skeleton
Materials Needed
To bring your spooky skeleton hand drawing to life, you'll need a few essential materials to set the stage for your artistic exploration. Here's a comprehensive list of what you'll need to embark on this creative endeavor:
-
Drawing Paper: Select a smooth, heavyweight paper that can withstand the various techniques and mediums you'll be using to create your skeleton hand drawing. A paper with a weight of 90-140 lb will provide the ideal surface for your artwork.
-
Drawing Pencils: Invest in a range of graphite pencils, including H, HB, and 2B, to achieve a diverse spectrum of shading and line weights in your drawing. These pencils will allow you to capture the intricate details and shadows of the skeletal structure.
-
Eraser: A high-quality eraser is essential for refining your sketch and correcting any mistakes as you work on the details of the skeleton hand. A kneaded eraser is particularly useful for lifting graphite and creating subtle highlights.
-
Blending Stump: This tool will enable you to seamlessly blend and soften the shading in your drawing, adding depth and dimension to the skeletal hand.
-
Fine Liner Pens: Consider using fine liner pens with various tip sizes to add precise details and intricate textures to the skeleton hand, such as the bony contours and delicate crevices.
-
Reference Images: Gather reference images of skeletal hands to study the anatomical details and bone structure. These references will serve as valuable guides as you work on capturing the realistic features of the skeleton hand.
-
Inspiration and Creativity: While not a tangible material, tapping into your creativity and embracing the eerie inspiration around you will be crucial for infusing your drawing with a haunting allure. Allow your imagination to roam freely as you embark on this artistic journey.
By assembling these materials, you'll be well-equipped to embark on the process of sketching and bringing to life a spine-chilling skeleton hand drawing that will captivate and intrigue viewers with its macabre charm.
Step 1: Sketching the Basic Shape
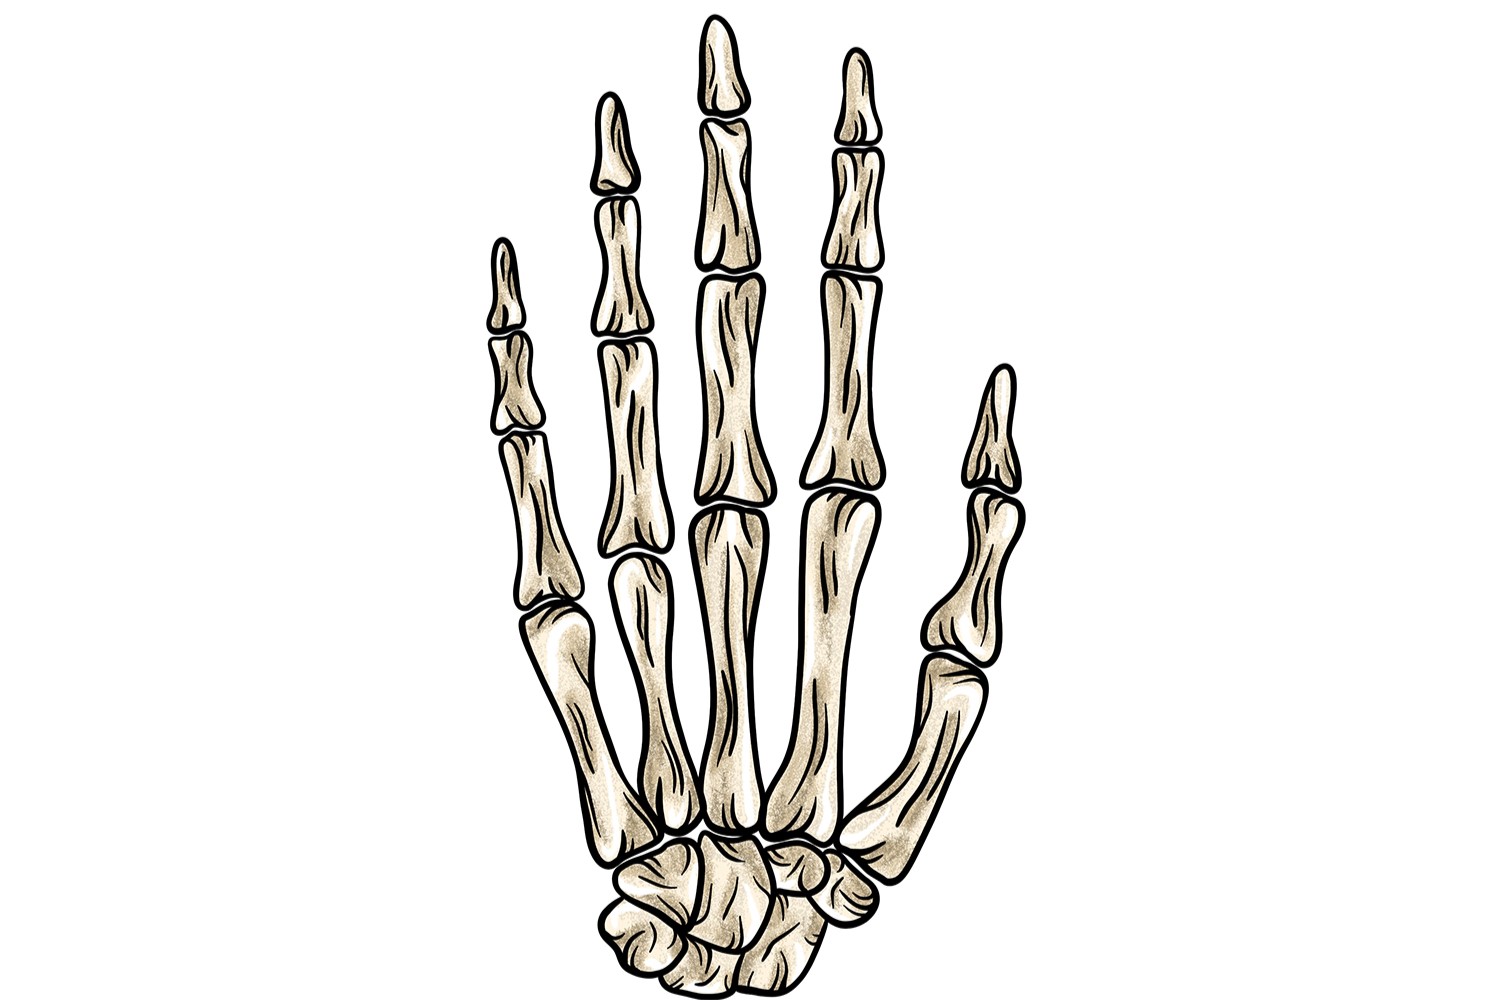
The first step in creating a spine-chilling skeleton hand drawing is to lay the foundation by sketching the basic shape of the hand. Begin by lightly sketching an outline of the hand's overall structure using a well-sharpened HB pencil. Pay close attention to the proportions and positioning of the fingers, palm, and wrist. A skeletal hand often features elongated and angular finger bones, so take your time to ensure the initial sketch captures the eerie essence of the skeletal anatomy.
As you sketch, keep in mind that the bones of the hand consist of the metacarpal bones in the palm, connected to the phalanges of the fingers. Focus on capturing the characteristic shapes and lengths of these bones, allowing the skeletal structure to emerge gradually on the paper. Pay attention to the curvature of the knuckles and the subtle tapering of the fingers, aiming to achieve a sense of anatomical accuracy in your initial sketch.
Once the basic outline is in place, refine the sketch by adding more definition to the individual bones and joints. Use a lighter touch to indicate the contours of the bones, allowing the lines to flow with a sense of fluidity and grace. This stage is about establishing the underlying framework of the skeleton hand, setting the stage for the intricate details and textures that will follow in the subsequent steps.
As you work on sketching the basic shape, don't be afraid to make adjustments and refine the proportions as needed. The initial sketch serves as a guide, providing a roadmap for the detailed work that will bring the skeleton hand to life. Take the time to study your reference images and observe the natural curves and angles of a skeletal hand, allowing these visual cues to inform the refinement of your sketch.
By the end of this step, you should have a well-defined and proportionate basic shape of the skeleton hand sketched on your drawing paper. This foundational sketch will serve as the canvas upon which you'll build the intricate details and haunting textures that will transform the hand into a captivating and eerie work of art. With the basic shape in place, you're ready to delve into the next phase of adding detail and texture to your spine-chilling skeleton hand drawing.
Step 2: Adding Detail and Texture
With the foundational sketch of the skeleton hand in place, it's time to infuse your drawing with intricate detail and haunting textures that will bring the skeletal anatomy to life on paper. This step is where the eerie allure of the skeletal hand begins to emerge, as you meticulously add depth, definition, and a sense of macabre realism to your artwork.
Start by focusing on the individual bones of the hand, refining the contours and edges to accentuate the bony structure. Pay close attention to the subtle variations in bone thickness and the delicate curves that define the skeletal anatomy. Use a range of graphite pencils, including 2B and 4B, to create nuanced shading that adds dimension to the bones, emphasizing the hollow spaces and protrusions characteristic of a skeletal hand.
As you work on adding detail, consider the intricate textures that define the surface of the bones. The porous and weathered appearance of skeletal remains can be captured through careful stippling and cross-hatching techniques. Experiment with varying pressure and pencil strokes to convey the rough, aged texture of the bones, infusing your drawing with an authentic sense of antiquity and mystery.
Furthermore, pay attention to the joints and ligaments that connect the bones, adding subtle indications of these connective tissues to enhance the anatomical accuracy of your drawing. Emphasize the knobby protrusions of the knuckles and the sinewy contours of the wrist, allowing these details to contribute to the overall haunting allure of the skeletal hand.
Incorporate fine liner pens with precise tip sizes to add intricate details such as the delicate crevices and subtle imperfections that characterize skeletal anatomy. These pens can be used to define the contours of individual bones, adding a level of precision and realism to your drawing that will captivate viewers with its macabre charm.
As you progress through this step, continually refer to your reference images to ensure that the details and textures you're adding align with the natural intricacies of a skeletal hand. Allow your creativity to flourish as you infuse your drawing with haunting details, embracing the eerie allure of the macabre subject matter.
By the end of this step, your skeleton hand drawing will have evolved with a newfound sense of depth, detail, and texture, capturing the haunting essence of skeletal anatomy with a captivating and macabre allure. With the intricate details in place, you're ready to proceed to the next phase of adding shadows and highlights, further enhancing the haunting realism of your spine-chilling artwork.
Step 3: Adding Shadows and Highlights
As you venture into the realm of adding shadows and highlights to your spine-chilling skeleton hand drawing, you're poised to imbue your artwork with a heightened sense of depth, drama, and haunting realism. This pivotal step will elevate the macabre allure of the skeletal anatomy, allowing you to masterfully manipulate light and shadow to evoke an eerie and captivating presence on the paper.
Begin by carefully studying your reference images to discern the play of light and shadow on skeletal hands. Observe how the bones cast distinct shadows, creating a stark contrast between light and dark. With this visual insight, use your graphite pencils to delicately shade the areas where shadows naturally fall, emphasizing the recesses between the bones and the hollow spaces within the skeletal structure. Employ a range of pencil grades, from 2B to 6B, to achieve varying depths of shadow, infusing your drawing with a sense of haunting dimension.
As you work on adding shadows, consider the source of light in your composition. Visualize how the light falls upon the skeletal hand and identify the areas that would be illuminated, as well as those that would be cast into shadow. By understanding the interplay of light and form, you can strategically enhance the three-dimensional quality of your drawing, evoking a sense of eerie realism that captivates the viewer.
In tandem with adding shadows, focus on incorporating highlights to accentuate the bony contours and protrusions of the skeletal hand. Utilize your eraser to gently lift graphite in areas where light would naturally strike, creating subtle highlights that emulate the reflective quality of bone surfaces. By carefully sculpting the interplay of light and highlights, you can infuse your drawing with a mesmerizing sense of luminosity, evoking the spectral allure of skeletal remains.
Furthermore, consider the concept of ambient occlusion, which refers to the subtle darkening that occurs in the crevices and recessed areas of an object. By skillfully integrating ambient occlusion into your drawing, you can enhance the realism of the skeletal hand, adding a nuanced depth that captivates the eye and evokes a sense of haunting authenticity.
As you meticulously add shadows and highlights, allow your creativity to guide the process, embracing the eerie allure of manipulating light and shadow to breathe life into your skeletal hand drawing. With this pivotal step, your artwork will transcend the ordinary, captivating viewers with its macabre charm and haunting realism, setting the stage for the final touches and details that will bring your spine-chilling creation to its haunting fruition.
Read more: How To Create A Plane Drawing
Step 4: Final Touches and Details
As you approach the culmination of your spine-chilling skeleton hand drawing, the stage is set for the infusion of final touches and details that will elevate your artwork to a haunting masterpiece. This pivotal step allows you to refine the nuances of your drawing, adding subtle intricacies and captivating details that will captivate viewers with the macabre allure of skeletal anatomy.
Begin by conducting a comprehensive review of your drawing, carefully scrutinizing the skeletal hand to identify areas that may benefit from refinement and enhancement. Pay close attention to the contours of the bones, the transitions between light and shadow, and the overall composition of the artwork. This critical assessment will guide your hand as you embark on the final phase of bringing your spine-chilling creation to its eerie fruition.
Refine the details of the skeletal anatomy, focusing on the delicate intricacies that define the haunting allure of the hand. Use fine liner pens with precision to accentuate the fine crevices, subtle imperfections, and intricate textures that characterize skeletal remains. By adding meticulous details, such as the weathered patina of the bones and the subtle irregularities that evoke the passage of time, you can infuse your drawing with a mesmerizing sense of antiquity and mystery.
Furthermore, consider the incorporation of subtle elements that enhance the haunting narrative of the skeletal hand. Delicately depict wisps of ethereal mist curling around the bony contours, or add subtle hints of aged parchment and faded ink to evoke an enigmatic atmosphere. These atmospheric details contribute to the storytelling aspect of your artwork, inviting viewers to immerse themselves in the eerie world you've created on paper.
As you add the final touches, allow your creativity to guide the process, embracing the macabre inspiration that infuses your drawing with a captivating and haunting allure. Consider the composition as a whole, ensuring that each detail contributes to the overall narrative of spectral beauty and antiquated charm.
With the completion of this step, your spine-chilling skeleton hand drawing will stand as a testament to your artistic prowess, captivating viewers with its haunting realism and macabre allure. Embrace the final touches and details as the brushstrokes that bring your creation to its eerie culmination, inviting viewers to immerse themselves in the captivating world of skeletal artistry.
Conclusion
In conclusion, the journey of creating a spine-chilling skeleton hand drawing is a captivating exploration of artistic expression and macabre allure. From the initial sketching of the skeletal structure to the meticulous addition of haunting details and the manipulation of light and shadow, this artistic endeavor offers a profound opportunity to delve into the eerie beauty of skeletal anatomy.
As the final touches and details are infused into the drawing, a haunting narrative unfolds, inviting viewers to immerse themselves in the spectral world captured on paper. The culmination of this creative process yields a mesmerizing work of art that transcends the ordinary, captivating the eye with its macabre charm and haunting realism.
The skeleton hand drawing serves as a testament to the artist's ability to evoke a sense of spectral beauty and antiquated allure, inviting viewers to contemplate the enigmatic narrative woven into the intricate details and haunting textures. It stands as a striking testament to the artist's skill in manipulating light and shadow to breathe life into skeletal anatomy, infusing the artwork with a captivating sense of depth and dimension.
Furthermore, the process of creating a spine-chilling skeleton hand drawing offers a profound opportunity for artistic growth and exploration. It allows the artist to hone their skills in capturing anatomical details, refining textures, and infusing their creations with a narrative that transcends the confines of traditional artistry.
Ultimately, the spine-chilling skeleton hand drawing serves as a captivating addition to the realm of macabre art, inviting viewers to embrace the eerie allure of skeletal beauty and immerse themselves in the haunting narrative depicted on paper. It stands as a testament to the artist's ability to evoke a sense of spectral beauty and antiquated allure, captivating the eye with its macabre charm and haunting realism.
In essence, the process of creating a spine-chilling skeleton hand drawing is a testament to the artist's ability to evoke a sense of spectral beauty and antiquated allure, inviting viewers to contemplate the enigmatic narrative woven into the intricate details and haunting textures. It stands as a striking testament to the artist's skill in manipulating light and shadow to breathe life into skeletal anatomy, infusing the artwork with a captivating sense of depth and dimension.