Home>Arts and Culture>How To Draw A Duck
Arts and Culture
How To Draw A Duck
Published: February 29, 2024
Learn how to draw a duck with easy step-by-step instructions. Explore your creativity and improve your artistic skills with this fun arts and culture tutorial.
(Many of the links in this article redirect to a specific reviewed product. Your purchase of these products through affiliate links helps to generate commission for Noodls.com, at no extra cost. Learn more)
Table of Contents
Introduction
Drawing is a wonderful way to express creativity and bring imagination to life. Whether you're an experienced artist or just starting out, learning how to draw a duck can be a fun and rewarding experience. Ducks are fascinating creatures with their distinctive features, and capturing their essence on paper can be both challenging and enjoyable.
In this step-by-step guide, you will learn how to draw a duck in a simple and approachable manner. By following these instructions and using your artistic flair, you can create a charming depiction of a duck that showcases your skills and creativity.
So, grab your drawing materials and get ready to embark on a delightful artistic journey. Whether you're drawing for pleasure or honing your artistic abilities, this tutorial will provide you with the guidance and inspiration you need to bring a delightful duck to life on paper. Let's dive in and explore the world of duck drawing together!
Materials Needed
Before you begin drawing your duck, it's essential to gather the necessary materials to ensure a smooth and enjoyable artistic process. Here's what you'll need:
-
Drawing Paper: Select a smooth, sturdy paper that can withstand pencil and ink without wrinkling or tearing. A standard sketch pad or drawing paper will work well for this project.
-
Pencils: Invest in a set of high-quality drawing pencils with varying lead hardness, such as 2H, HB, and 2B. These will allow you to achieve different line weights and shading effects.
-
Eraser: A soft, kneaded eraser is ideal for gently lifting graphite and making subtle corrections without damaging the paper.
-
Sharpener: Keep a reliable pencil sharpener on hand to ensure that your pencils are consistently sharp for precise lines and details.
-
Fine-tip Pen or Marker: Consider using a fine-tip pen or marker for outlining and adding bold, defined features to your duck drawing.
-
Reference Image: While not a physical material, having a reference image of a duck can be immensely helpful. You can use a printed picture or have one readily available on a digital device for visual guidance.
-
Optional Coloring Materials: If you plan to add color to your duck drawing, gather colored pencils, markers, or watercolor paints along with a suitable surface for coloring, such as watercolor paper or mixed media paper.
By ensuring that you have these materials at your disposal, you'll be well-prepared to embark on your duck drawing journey with confidence and creativity. With the right tools in hand, you can fully immerse yourself in the artistic process and bring your feathered friend to life on the page.
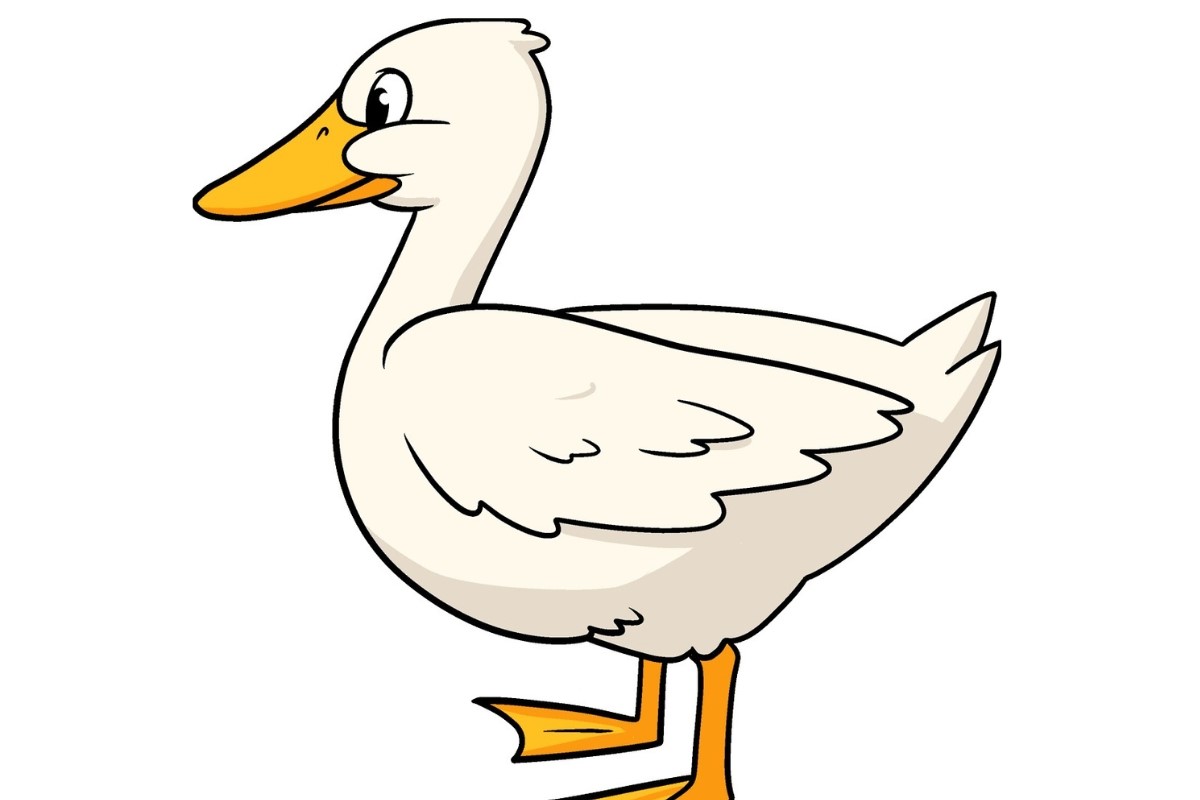
Step 1: Draw the Body
To begin drawing a duck, start by sketching the body using light, gentle strokes. The body of a duck is generally oval-shaped, slightly elongated, and tapered towards the tail. You can use a reference image to observe the proportions and contours of a duck's body, allowing you to capture its graceful form with accuracy.
Begin by drawing a large oval shape to represent the main body of the duck. This oval will serve as the foundational structure for your drawing. Next, lightly sketch a smaller oval at the rear of the larger oval to indicate the duck's tail. Ensure that the proportions of the body and tail align with the natural shape of a duck, maintaining a sense of symmetry and balance.
As you refine the body shape, pay attention to the curvature of the duck's back and the gentle slope towards the tail. Ducks have a distinctive posture, with their bodies exhibiting a graceful arc that adds to their charm. Capture this characteristic curve in your drawing, allowing the body to flow seamlessly into the tail.
Once you are satisfied with the basic body shape, use your pencil to add subtle details such as the indication of the duck's chest and the gentle suggestion of its wings folded against the body. These details will contribute to the overall realism and character of your duck drawing.
Remember, drawing the body sets the foundation for the rest of the duck's features, so take your time to ensure that the proportions and shapes are visually appealing and true to the essence of a duck. With the body sketched out, you are ready to move on to the next step and continue adding depth and personality to your delightful duck illustration.
Step 2: Add the Head and Beak
With the body of the duck sketched out, it's time to focus on adding the distinctive features that give the duck its unmistakable charm. The head and beak are central to capturing the essence of a duck, and paying attention to their shape and proportions will bring your drawing to life.
Begin by lightly sketching a small, rounded shape at the front of the body to represent the duck's head. Ducks have relatively small heads in proportion to their bodies, so ensure that the size of the head aligns harmoniously with the overall body structure. Take a moment to observe the gentle curves and contours of a duck's head in your reference image, allowing these details to guide your sketching process.
Next, it's time to add the defining feature of the duck: its beak. Ducks are known for their distinctive, slightly flattened beaks that vary in shape and size across different species. To capture the essence of a duck's beak, carefully sketch a tapered, triangular shape extending from the front of the head. Pay attention to the curvature of the beak and its relationship to the head, aiming to create a seamless transition between the two elements.
As you refine the shape of the beak, consider the subtle details such as the nostril openings and the gentle curve of the upper and lower mandibles. These nuanced features contribute to the character and expression of the duck, adding depth and realism to your drawing.
Once you are satisfied with the basic structure of the head and beak, take a moment to evaluate the overall proportions and positioning in relation to the body. Making any necessary adjustments at this stage will ensure that the head and beak harmonize with the rest of the drawing, creating a cohesive and captivating portrayal of a duck.
By adding the head and beak to your duck drawing, you have infused it with personality and character, capturing the distinctive features that make ducks so beloved. With this essential step complete, you are ready to move on to the next stage of the drawing process, continuing to refine and enhance your delightful duck illustration.
Step 3: Draw the Wings
Drawing the wings of a duck is a pivotal step in capturing the graceful and distinctive appearance of these avian creatures. The wings not only contribute to the overall symmetry of the duck but also add a sense of movement and elegance to the illustration. By focusing on the intricate details of the wings, you can bring depth and realism to your duck drawing, creating a captivating portrayal of this beloved waterfowl.
To begin, observe the reference image of a duck to familiarize yourself with the structure and positioning of the wings. Ducks have relatively large wings that are essential for their flight and buoyancy in water. Start by lightly sketching the basic outline of the wings, taking care to position them in a way that complements the body and conveys a sense of natural poise.
Ducks typically hold their wings close to their bodies when at rest, with the tips of the wings often extending slightly beyond the tail. Capture this characteristic posture by sketching the primary feather groups of the wings, paying attention to the gentle curvature and tapering of the feathers. This will create a sense of dimension and fluidity, enhancing the overall visual appeal of your duck drawing.
As you refine the wing structure, consider the overlapping layers of feathers and the subtle texture that they impart. Ducks possess a unique feather pattern that contributes to their charm, so take the time to add intricate details such as the feather edges and the suggestion of individual feathers within the wing structure. This attention to detail will elevate the realism of your drawing, infusing it with a sense of life and vibrancy.
Once the basic wing structure is in place, use your pencil to add shading and depth, emphasizing the areas of shadow and light to create a three-dimensional effect. Pay close attention to the wing's contours and the interplay of light and shadow, allowing the feathers to come to life on the page. By skillfully rendering the wings with shading and texture, you can evoke a sense of movement and grace, capturing the essence of a duck in flight or at rest.
With the wings skillfully drawn, your duck illustration will exude a sense of vitality and charm, showcasing the unique beauty of these remarkable birds. This essential step brings your duck drawing one step closer to completion, setting the stage for the final touches that will further enhance the overall appeal of your delightful duck illustration.
Read more: How To Draw People
Step 4: Add the Feet
Drawing the feet of a duck is a crucial aspect of capturing the essence of these waterfowl creatures. The feet of a duck are uniquely adapted for both swimming and walking, featuring webbed toes that facilitate graceful movement in water and on land. By focusing on the intricate details of the feet, you can bring a sense of realism and character to your duck drawing, further enhancing its visual appeal.
To begin, observe the reference image of a duck to familiarize yourself with the structure and positioning of the feet. Ducks have webbed feet that are specifically designed for navigating aquatic environments, allowing them to propel themselves through water with remarkable agility. Start by lightly sketching the basic outline of the feet, paying close attention to the webbing between the toes and the overall shape of the feet.
Ducks typically have three forward-pointing toes and one backward-pointing toe, each adorned with webbing that extends between the digits. Capture this distinctive foot structure by carefully outlining the individual toes and the webbing that connects them, ensuring that the proportions and positioning align with the natural form of a duck's feet. This attention to detail will contribute to the overall authenticity of your duck drawing, infusing it with a sense of life and vitality.
As you refine the foot structure, consider the subtle texture and contours of the webbing, adding depth and dimension to the feet. Ducks rely on their webbed feet for propulsion and stability in water, so take the time to convey the graceful curvature of the webbing and the nuanced details of the individual toes. This meticulous approach will elevate the realism of your drawing, imbuing it with a sense of movement and purpose.
Once the basic foot structure is in place, use your pencil to add shading and depth, emphasizing the areas of shadow and light to create a three-dimensional effect. Pay close attention to the contours of the feet and the interplay of light and shadow, allowing the webbing and toes to come to life on the page. By skillfully rendering the feet with shading and texture, you can evoke a sense of dynamism and grace, capturing the essence of a duck's remarkable adaptability in its natural habitat.
With the feet skillfully drawn, your duck illustration will exude a sense of charm and authenticity, showcasing the unique beauty of these remarkable waterfowl. This essential step brings your duck drawing one step closer to completion, setting the stage for the final touches that will further enhance the overall appeal of your delightful duck illustration.
Step 5: Add Details
As you approach the final stage of your duck drawing, it's time to focus on adding intricate details that will elevate the overall appeal and authenticity of your illustration. Paying attention to subtle nuances and textures will bring your duck to life on the page, infusing it with a sense of vibrancy and charm.
Begin by refining the contours and features of the duck's body, head, and wings. Take a moment to evaluate the proportions and shapes, making any necessary adjustments to ensure visual harmony and balance. Adding depth to the body through gentle shading and highlighting will create a sense of volume and dimension, enhancing the overall realism of your drawing.
Next, turn your attention to the intricate texture of the duck's feathers. Ducks possess a unique feather pattern that contributes to their visual allure. Use your pencil to delicately render the feather details, paying close attention to the arrangement and texture of the feathers. By skillfully capturing the subtle variations in feather size and placement, you can evoke a sense of softness and warmth, infusing your duck illustration with a lifelike quality.
As you add details to the head and beak, focus on conveying the duck's expression and character. Ducks have gentle, expressive eyes that convey a sense of curiosity and grace. Use your artistic skill to capture the essence of the duck's gaze, infusing the eyes with a sense of warmth and vitality. Pay attention to the curvature of the beak and the subtle texture of the nostrils, adding depth and definition to this central feature of the duck's visage.
Refine the wings by adding intricate feather details and subtle shading to convey a sense of movement and grace. Emphasize the curvature of the feathers and the interplay of light and shadow, allowing the wings to exude a sense of elegance and fluidity. By skillfully rendering the wings with attention to detail, you can evoke a sense of dynamic energy, capturing the essence of a duck in motion.
Finally, bring the feet to life by adding texture and dimension to the webbing and toes. Ducks rely on their webbed feet for propulsion and stability in water, so convey the graceful curvature of the webbing and the nuanced details of the individual toes. By skillfully rendering the feet with shading and texture, you can evoke a sense of dynamism and purpose, showcasing the adaptability of these remarkable waterfowl.
With the addition of these intricate details, your duck illustration will exude a sense of charm and authenticity, capturing the unique beauty of these beloved avian creatures. This final stage brings your duck drawing to completion, showcasing your artistic skill and attention to detail in creating a captivating portrayal of a delightful duck.
Conclusion
In conclusion, learning how to draw a duck is not only a delightful artistic endeavor but also a rewarding exploration of the natural beauty and charm of these beloved waterfowl. By following the step-by-step guide outlined in this tutorial, you have embarked on a creative journey that has allowed you to capture the essence of a duck with skill and imagination.
Throughout the drawing process, you have honed your ability to observe and interpret the distinctive features of a duck, from its graceful body and wings to its expressive head and webbed feet. Each step has provided an opportunity to refine your artistic technique, allowing you to infuse your duck illustration with a sense of vitality and authenticity.
As you brought the duck to life on the page, you embraced the nuances of feather texture, the gentle curvature of the beak, and the dynamic energy of the wings, culminating in a captivating portrayal of this remarkable avian creature. Your attention to detail and dedication to capturing the essence of a duck have resulted in a drawing that exudes charm and character, showcasing your artistic prowess and creativity.
Beyond the technical aspects of drawing, this tutorial has encouraged you to embrace the joy of artistic expression and the wonder of the natural world. Through the act of drawing a duck, you have connected with the beauty of nature, gaining a deeper appreciation for the grace and elegance of these remarkable birds.
Whether you are a seasoned artist or a novice enthusiast, the process of drawing a duck has allowed you to explore the intersection of art and nature, fostering a sense of creativity and wonder. As you admire your completed duck illustration, take pride in the skills you have cultivated and the unique personality you have infused into your artwork.
In the end, drawing a duck is not merely about creating a visual representation; it is about celebrating the spirit of these captivating creatures and embracing the joy of artistic expression. As you continue your artistic journey, carry the lessons and experiences from this tutorial with you, allowing them to inspire and enrich your future creative endeavors.
So, take a moment to admire your delightful duck drawing, knowing that you have skillfully captured the essence of these beloved waterfowl and celebrated the beauty of nature through your artistic vision. Embrace the joy of drawing, and let your creativity soar as you continue to explore the boundless world of art and expression.