Home>Arts and Culture>Unleash Your Inner Superhero With This DIY Spider-Man Web Shooter Prop!
Arts and Culture
Unleash Your Inner Superhero With This DIY Spider-Man Web Shooter Prop!
Published: February 11, 2024
Unleash your inner superhero with this DIY Spider-Man web shooter prop! Get creative and explore the arts and culture of crafting your own iconic superhero accessory.
(Many of the links in this article redirect to a specific reviewed product. Your purchase of these products through affiliate links helps to generate commission for Noodls.com, at no extra cost. Learn more)
Table of Contents
Introduction
Are you ready to unleash your inner superhero and swing into action like Spider-Man? With this DIY Spider-Man web shooter prop, you can bring the excitement of the beloved comic book and movie character to life. Imagine the thrill of shooting webs from your wrist and embarking on thrilling adventures, just like the iconic web-slinger himself.
Crafting your own Spider-Man web shooter is not only a fun and creative project, but it also allows you to channel your passion for arts and culture into a tangible, interactive creation. Whether you're a dedicated fan of the Spider-Man franchise or simply love engaging in hands-on DIY projects, this endeavor is sure to ignite your imagination and spark your creativity.
By following the step-by-step instructions and using readily available materials, you can bring this iconic superhero accessory to life. From assembling the base to testing your web shooter in action, each stage of the process promises an exhilarating experience that will leave you feeling like a true superhero.
Get ready to dive into the world of DIY craftsmanship and unleash your inner superhero as you embark on this thrilling journey to create your very own Spider-Man web shooter prop. Let's swing into action and bring the magic of the Marvel universe to life right in the comfort of your own home.
Materials Needed
To bring your DIY Spider-Man web shooter prop to life, you'll need a selection of materials that are easily accessible and simple to work with. These items will serve as the building blocks for your superhero accessory, allowing you to craft a functional and visually impressive web shooter. Here's a comprehensive list of the materials you'll need to get started on this exciting project:
-
Plastic Gloves: These will form the base of the web shooter and provide a comfortable and secure fit when worn on the wrist.
-
Plastic Bottles or Small Containers: These will be used to create the web cartridges that hold the web-slinging material.
-
Strong Adhesive: To securely attach the components of the web shooter and ensure its durability during use.
-
Elastic Bands or Velcro Strips: These will be used to create the wrist strap that holds the web shooter in place.
-
Hot Glue Gun and Glue Sticks: Essential for assembling the various components of the web shooter with precision and strength.
-
Silver and Black Spray Paint: To add the iconic metallic finish to the web shooter and achieve an authentic Spider-Man aesthetic.
-
Scissors and Craft Knife: These tools will be instrumental in cutting and shaping the materials to create the desired components of the web shooter.
-
String or Yarn: To simulate the appearance of webbing when the web shooter is activated, adding a realistic touch to the prop.
-
Markers or Paint: For adding intricate details and designs to the web shooter, enhancing its visual appeal.
-
Cardboard: To create templates and structural support for the web shooter components, ensuring a sturdy and well-defined final product.
By gathering these materials, you'll be fully equipped to embark on the exciting journey of constructing your very own Spider-Man web shooter prop. With these essential items at your disposal, you'll be ready to dive into the step-by-step process of bringing this iconic superhero accessory to life. Get ready to unleash your creativity and transform these materials into a remarkable DIY creation that captures the essence of Spider-Man's adventurous spirit.
Step 1: Assemble the Base
The first crucial step in creating your DIY Spider-Man web shooter prop is to assemble the base, which forms the foundation of the entire accessory. To begin, put on a pair of plastic gloves to serve as the base of the web shooter. These gloves will provide a comfortable and secure fit when worn on the wrist, ensuring that the web shooter remains in place during use.
Next, carefully select plastic bottles or small containers that will serve as the web cartridges, holding the web-slinging material. These containers should be proportionate to the size of the gloves, allowing for a seamless integration into the overall design. Using a craft knife, carefully cut and modify the containers to create openings that will accommodate the web-slinging mechanism.
Once the containers are prepared, use a strong adhesive to securely attach them to the top side of the gloves. This step is crucial in ensuring that the web cartridges are firmly affixed to the base, creating a cohesive and functional structure for the web shooter. Take care to allow sufficient time for the adhesive to set and bond the components effectively.
To add an authentic touch to the web shooter, consider using silver and black spray paint to achieve the iconic metallic finish associated with Spider-Man's web shooter. Apply the paint evenly to the base and containers, ensuring a uniform and visually striking appearance that captures the essence of the beloved superhero accessory.
As the paint dries, the base of your DIY Spider-Man web shooter prop will begin to take shape, embodying the distinctive look and feel of the iconic superhero accessory. This foundational component sets the stage for the subsequent steps in the construction process, laying the groundwork for a visually impressive and functional web shooter that will bring your superhero aspirations to life.
With the base assembled, you're one step closer to realizing your vision of becoming Spider-Man. The next stages of the project will build upon this foundation, culminating in a remarkable DIY creation that embodies the spirit of adventure and imagination. Get ready to take the next step in crafting your very own Spider-Man web shooter prop and bring the magic of the Marvel universe into your world.
Step 2: Create the Web Cartridges
Creating the web cartridges is a pivotal step in bringing your DIY Spider-Man web shooter prop to life. These essential components are integral to the functionality and visual appeal of the web shooter, simulating the iconic web-slinging mechanism associated with the beloved superhero. With careful attention to detail and creative ingenuity, you can craft web cartridges that capture the essence of Spider-Man's adventurous spirit.
To begin, select plastic bottles or small containers that will serve as the foundation for the web cartridges. These containers should be proportionate to the size of the gloves, ensuring a seamless integration into the overall design of the web shooter. Using a craft knife, carefully cut and modify the containers to create openings that will accommodate the web-slinging mechanism. Precision and attention to detail are crucial in this stage, as the functionality of the web cartridges hinges on their structural integrity and compatibility with the web-slinging material.
Once the containers are prepared, it's time to infuse them with the web-slinging material that will emulate Spider-Man's iconic webbing. This material can be created using string or yarn, carefully wound and arranged within the containers to resemble the appearance of webbing. The meticulous arrangement of the web-slinging material is essential in achieving a realistic and visually impressive effect, capturing the essence of Spider-Man's signature superpower.
After the web-slinging material is meticulously arranged within the containers, secure the openings with a strong adhesive to prevent any unraveling or displacement during use. This step ensures that the web-slinging material remains intact and ready for deployment when the web shooter is activated, adding a touch of authenticity to the prop.
To enhance the visual appeal of the web cartridges, consider using markers or paint to add intricate details and designs that evoke the aesthetic of Spider-Man's web technology. Whether it's adding intricate patterns or highlighting specific features, this creative touch will elevate the overall appearance of the web cartridges, capturing the essence of the beloved superhero accessory.
With the web cartridges meticulously crafted and infused with the web-slinging material, you've taken a significant stride in bringing the iconic web shooter to life. These meticulously crafted components embody the adventurous spirit of Spider-Man, setting the stage for the next stages of the project as you continue on your journey to unleash your inner superhero.
Step 3: Construct the Wrist Strap
The construction of the wrist strap is a pivotal stage in bringing your DIY Spider-Man web shooter prop to life. This essential component not only ensures the secure and comfortable attachment of the web shooter to your wrist but also adds an authentic touch to the overall aesthetic of the accessory. By meticulously crafting the wrist strap, you'll create a functional and visually impressive element that embodies the spirit of Spider-Man's iconic superhero accessory.
To begin, gather elastic bands or Velcro strips that will serve as the foundational materials for the wrist strap. These materials should provide a secure and adjustable fit, allowing for comfortable wear while ensuring that the web shooter remains firmly in place during use. Carefully measure and cut the bands or strips to the appropriate length, taking into account the dimensions of your wrist and the web shooter base to achieve a tailored and secure fit.
Next, affix the elastic bands or Velcro strips to the underside of the web shooter base using a strong adhesive or a hot glue gun. This step is crucial in ensuring that the wrist strap is securely integrated with the base, creating a cohesive and functional attachment that can withstand the rigors of superhero-inspired adventures. Take care to allow sufficient time for the adhesive to set, ensuring a durable and reliable connection between the wrist strap and the base.
As the wrist strap takes shape, consider adding additional embellishments or details to enhance its visual appeal and authenticity. Whether it's incorporating intricate designs, patterns, or color accents, these creative touches will elevate the overall aesthetic of the wrist strap, capturing the essence of Spider-Man's iconic accessory.
Once the wrist strap is meticulously crafted and securely attached to the web shooter base, test the fit and functionality to ensure that it provides a comfortable and secure attachment to your wrist. The adjustable nature of the strap should allow for a customized fit, accommodating different wrist sizes while maintaining a snug and reliable hold during use.
With the wrist strap expertly constructed and seamlessly integrated with the web shooter base, you've achieved a significant milestone in bringing your DIY Spider-Man web shooter prop to life. This essential component sets the stage for the final stages of the project, as you continue on your exhilarating journey to unleash your inner superhero and embark on thrilling adventures inspired by the iconic web-slinger himself.
Read more: Unleash Your Inner Wealth With ?????
Step 4: Attach the Web Shooter to the Wrist Strap
With the wrist strap expertly crafted and securely attached to the web shooter base, the next pivotal step in bringing your DIY Spider-Man web shooter prop to life is to seamlessly attach the web shooter to the wrist strap. This crucial stage ensures that the web shooter is securely and comfortably affixed to your wrist, ready to unleash its superhero potential at a moment's notice.
To begin, carefully position the web shooter base on the underside of your wrist, ensuring that it aligns comfortably and securely. The adjustable nature of the wrist strap should allow for a customized fit, accommodating different wrist sizes while maintaining a snug and reliable hold. This initial positioning is essential in determining the optimal placement of the web shooter, allowing for effortless deployment and use during your superhero-inspired adventures.
Once the positioning is finalized, affix the web shooter base to the wrist strap using a strong adhesive or a hot glue gun. This step ensures a durable and reliable connection between the web shooter and the wrist strap, preventing any displacement or detachment during use. Take care to allow sufficient time for the adhesive to set, ensuring a secure and long-lasting attachment that can withstand the dynamic movements associated with channeling your inner superhero.
As the web shooter becomes seamlessly integrated with the wrist strap, test the fit and functionality to ensure that it remains comfortable and secure during wear. Perform a range of movements to gauge the stability of the attachment, ensuring that the web shooter remains firmly in place and ready for action. This testing phase is crucial in verifying the reliability of the attachment, guaranteeing that the web shooter is primed for your superhero escapades.
With the web shooter expertly attached to the wrist strap, you've achieved a significant milestone in bringing your DIY Spider-Man web shooter prop to life. This seamless integration ensures that the web shooter is poised for action, ready to accompany you on thrilling adventures that capture the essence of the iconic web-slinger himself. As you prepare to test your creation in action, the final step of the project beckons, offering the opportunity to witness the magic of the Marvel universe come to life right at your fingertips.
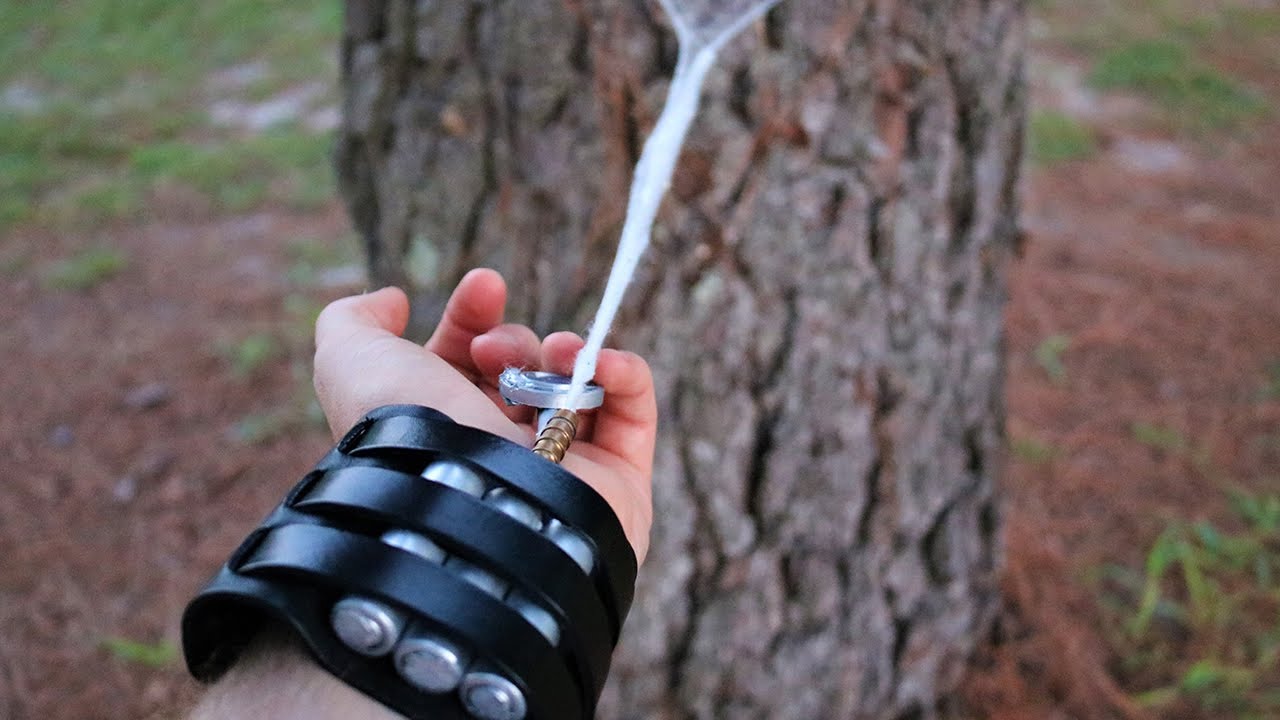
Step 5: Test Your Spider-Man Web Shooter
With the web shooter expertly attached to the wrist strap, it's time to embark on an exhilarating journey of testing your DIY Spider-Man web shooter prop. This pivotal step marks the culmination of your creative endeavor, offering the opportunity to witness the magic of the Marvel universe come to life right at your fingertips. As you prepare to put your creation to the test, anticipation and excitement build, setting the stage for a thrilling experience that captures the essence of the iconic web-slinger himself.
To begin the testing phase, ensure that the web cartridges are loaded with the web-slinging material, meticulously arranged to simulate the appearance of Spider-Man's signature webbing. With the web shooter securely affixed to your wrist, take a moment to familiarize yourself with the activation mechanism, ensuring that you're prepared to unleash the web-slinging action at a moment's notice.
As you assume the role of your favorite web-slinging superhero, visualize the dynamic movements and gestures that define Spider-Man's iconic web-slinging prowess. With a swift and confident motion, activate the web shooter, releasing the web-slinging material with a flourish that mirrors the agility and precision of the beloved superhero. Watch in awe as the simulated webbing extends from your wrist, capturing the essence of Spider-Man's adventurous spirit and infusing your surroundings with a sense of superhero magic.
Experiment with different activation techniques and movements, allowing the web shooter to become an extension of your superhero persona. Whether it's mimicking Spider-Man's iconic web-slinging poses or unleashing your own creative expressions, the testing phase offers an opportunity to immerse yourself in the thrill of embodying the beloved superhero.
As the web shooter responds to your commands, revel in the sense of empowerment and adventure that accompanies each activation. Whether you're engaging in imaginative play, showcasing your creation to fellow enthusiasts, or simply savoring the satisfaction of bringing a beloved superhero accessory to life, the testing phase promises an experience that transcends the boundaries of DIY craftsmanship.
With each successful activation, you'll witness the culmination of your efforts, as the DIY Spider-Man web shooter prop becomes a tangible manifestation of your creativity and passion for the Marvel universe. As you conclude the testing phase, take a moment to appreciate the journey that has led to this remarkable achievement, celebrating the fusion of arts, culture, and superhero fandom that defines this captivating DIY project.
As the web shooter rests securely on your wrist, you're now equipped to embark on thrilling adventures that capture the essence of Spider-Man's daring spirit. Whether it's engaging in imaginative role-play, showcasing your creation at themed events, or simply reveling in the satisfaction of bringing a beloved superhero accessory to life, your DIY Spider-Man web shooter prop stands as a testament to your ingenuity and creative spirit. As you prepare to embrace the superhero within, the web shooter serves as a tangible reminder of the magic that unfolds when arts, culture, and DIY craftsmanship converge in a celebration of creativity and imagination.
Conclusion
In conclusion, the journey of crafting your very own DIY Spider-Man web shooter prop has been a remarkable fusion of creativity, craftsmanship, and a deep appreciation for the iconic superhero. From assembling the base to meticulously crafting the web cartridges, constructing the wrist strap, and seamlessly integrating the web shooter, each step of the process has been a testament to your passion for arts, culture, and the thrilling world of superheroes.
As you reflect on the culmination of this exhilarating project, the web shooter stands as a tangible symbol of your dedication to channeling the spirit of Spider-Man and embracing the magic of the Marvel universe. The attention to detail, creative ingenuity, and hands-on craftsmanship have converged to bring forth a remarkable creation that captures the essence of the beloved web-slinger himself.
Beyond the tangible aspects of the web shooter, this DIY endeavor has been a journey of self-expression and imaginative exploration. It has offered a platform to immerse yourself in the world of DIY craftsmanship, infusing your passion for arts and culture with the excitement of bringing a beloved superhero accessory to life. The process has not only honed your creative skills but has also provided a gateway to engage with the vibrant community of superhero enthusiasts and DIY aficionados.
As you prepare to embark on thrilling adventures with your DIY Spider-Man web shooter prop, whether it's through imaginative role-play, showcasing your creation at themed events, or simply reveling in the satisfaction of bringing a beloved superhero accessory to life, the web shooter serves as a tangible reminder of the magic that unfolds when arts, culture, and DIY craftsmanship converge in a celebration of creativity and imagination.
In the end, the DIY Spider-Man web shooter prop stands as a testament to your ingenuity, creativity, and unwavering passion for the captivating world of superheroes. It embodies the spirit of adventure, the thrill of creative expression, and the enduring magic of the Marvel universe. As you prepare to unleash your inner superhero and embark on thrilling escapades, the web shooter stands as a remarkable creation that encapsulates the boundless possibilities that emerge when passion and creativity intertwine.
With the web shooter securely on your wrist, you're now equipped to embrace the superhero within and embark on adventures that capture the essence of Spider-Man's daring spirit. This DIY creation is a testament to your ingenuity and creative spirit, serving as a tangible reminder of the magic that unfolds when arts, culture, and DIY craftsmanship converge in a celebration of creativity and imagination.