Lifestyle
How To Clean AF1S
Published: February 27, 2024
Learn the best techniques for cleaning AF1S and keeping them looking fresh. Elevate your lifestyle with these essential sneaker care tips.
(Many of the links in this article redirect to a specific reviewed product. Your purchase of these products through affiliate links helps to generate commission for Noodls.com, at no extra cost. Learn more)
Table of Contents
Introduction
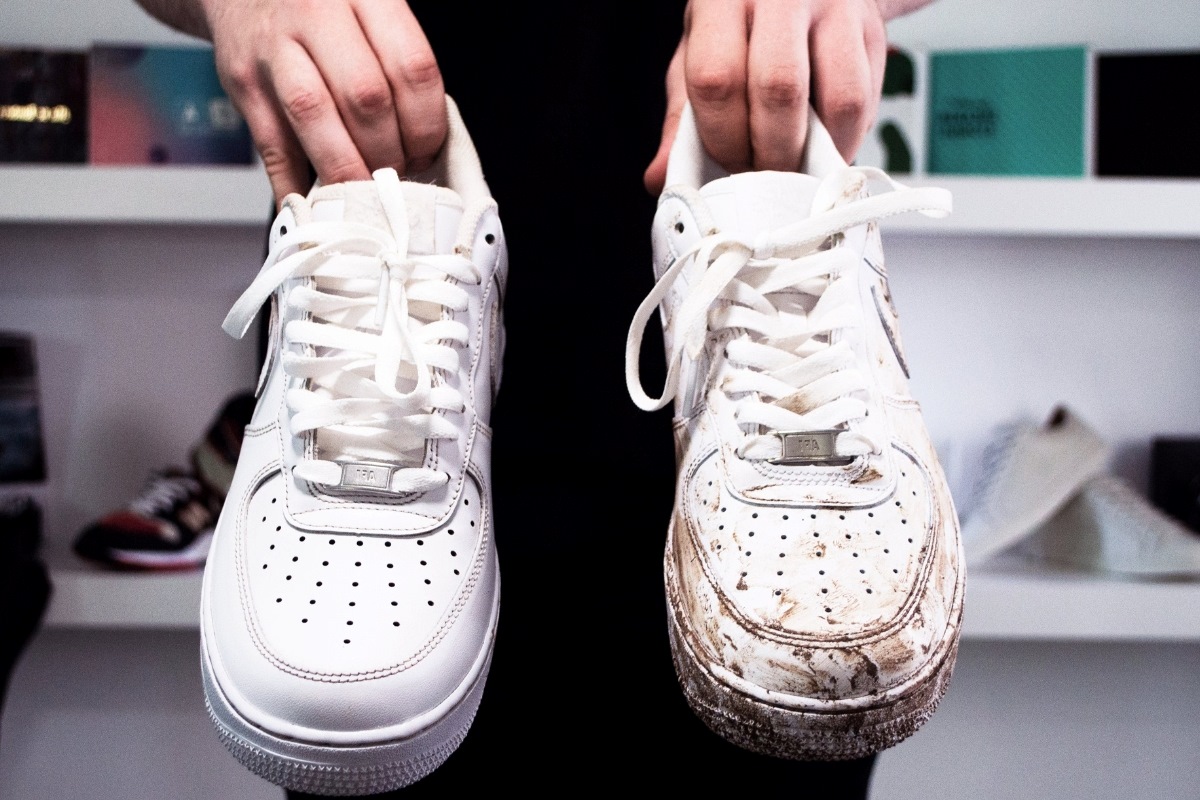
The Nike Air Force 1, commonly known as AF1s, is a timeless and iconic sneaker that has been a staple in the world of streetwear and fashion for decades. Whether you're a sneakerhead or simply appreciate classic footwear, keeping your AF1s clean is essential for maintaining their pristine appearance and longevity.
In this comprehensive guide, you will learn the step-by-step process of cleaning your AF1s to ensure they remain in top-notch condition. From removing the laces and insoles to scrubbing the soles, each stage of the cleaning process is crucial in revitalizing your beloved sneakers.
By following these instructions and using the recommended materials, you can effectively remove dirt, grime, and stains from your AF1s, restoring them to their original glory. Whether you're preparing for a special occasion or simply want to give your sneakers some much-needed TLC, this guide will equip you with the knowledge and techniques to keep your AF1s looking fresh and stylish.
So, grab your cleaning supplies and get ready to breathe new life into your AF1s. With a little effort and the right approach, you can elevate the appearance of your sneakers and take pride in rocking a pair of impeccably clean Nike Air Force 1s. Let's dive into the process and unleash the full potential of your beloved kicks!
Read more: AWS Reinvent 2020 Day 1 S3 Announcements
Materials Needed
To embark on the journey of restoring your AF1s to their former glory, you'll need a few essential materials to ensure a thorough and effective cleaning process. Here's a comprehensive list of the items you should gather before diving into the cleaning endeavor:
-
Mild Soap or Sneaker Cleaner: Select a gentle, non-abrasive soap or specialized sneaker cleaner to cleanse the fabric and leather components of your AF1s without causing damage. Avoid harsh chemicals that could potentially degrade the materials.
-
Soft-Bristled Brush: A soft-bristled brush, such as a shoe brush or an old toothbrush, will be instrumental in loosening and removing dirt and grime from the various textures of your AF1s. The soft bristles will help prevent any damage to the shoe's surface during the cleaning process.
-
Water: Clean, lukewarm water will be used in conjunction with the mild soap or sneaker cleaner to create a gentle cleaning solution. Ensure that the water is at a comfortable temperature to avoid any adverse effects on the materials.
-
Microfiber Cloth or Sponge: A microfiber cloth or sponge is ideal for applying the cleaning solution to the sneakers and gently scrubbing away stains and dirt. These materials are soft and non-abrasive, making them suitable for use on the delicate surfaces of the AF1s.
-
Laces: If your AF1s have removable laces, it's advisable to clean them separately. You can choose to hand wash the laces using the same mild soap and water solution, or you may opt to replace them with new laces for a fresh look.
-
Insoles: If the insoles of your AF1s are removable, consider cleaning them separately to eliminate any odors or buildup of dirt and sweat. A mild soap and water solution can be used to gently cleanse the insoles, followed by thorough drying.
-
Towel or Paper Towels: Having a towel or paper towels on hand will allow you to pat dry the sneakers after cleaning and rinsing. This step is crucial in removing excess moisture and expediting the drying process.
-
Ventilated Area: While not a physical material, a well-ventilated area is essential for the drying stage of the cleaning process. Ensure that you have access to a space with adequate airflow to facilitate the drying of your freshly cleaned AF1s.
By gathering these materials, you'll be fully equipped to embark on the cleaning journey and restore your AF1s to their pristine condition. With the right tools at your disposal, you can approach the cleaning process with confidence, knowing that you have everything you need to revitalize your beloved sneakers.
Step 1: Remove Laces and Insoles
Before delving into the cleaning process, the first crucial step in revitalizing your AF1s is to remove the laces and insoles. This initial preparation allows for thorough cleaning and ensures that every part of the sneakers receives the attention it deserves.
Start by gently untying the laces and carefully removing them from the eyelets of the shoes. If the laces are visibly soiled or stained, consider hand washing them separately using a mild soap and water solution. Alternatively, you may opt to replace them with fresh, clean laces for a renewed aesthetic appeal.
Next, if your AF1s are equipped with removable insoles, take them out of the shoes to address any accumulated dirt, sweat, or odors. By cleaning the insoles separately, you can effectively eliminate any lingering odors and maintain the overall freshness of your sneakers.
Removing the laces and insoles not only facilitates a more thorough cleaning process for the main components of the AF1s but also allows for targeted attention to these often-overlooked areas. Additionally, cleaning the laces and insoles separately ensures that every part of your sneakers receives the care and maintenance necessary to uphold their pristine condition.
By taking the time to remove the laces and insoles at the outset of the cleaning process, you set the stage for a comprehensive and meticulous restoration of your AF1s. This preparatory step paves the way for the subsequent cleaning procedures, allowing you to focus on rejuvenating the various elements of your beloved sneakers with precision and care.
With the laces and insoles removed, your AF1s are now primed for the next stages of the cleaning process, which will address the exterior surfaces and soles of the sneakers. By meticulously attending to each component, you can ensure that your AF1s emerge from the cleaning process looking revitalized and ready to make a stylish statement.
This initial step sets the tone for the thorough care and attention that will be dedicated to your AF1s throughout the cleaning journey, ultimately contributing to the longevity and visual appeal of these iconic sneakers.
Step 2: Brush Off Excess Dirt
After removing the laces and insoles, the next pivotal step in the process of rejuvenating your AF1s involves brushing off excess dirt and debris from the exterior surfaces of the sneakers. This crucial stage sets the foundation for a thorough and effective cleaning, ensuring that the subsequent steps can target ingrained dirt and stains with precision.
Begin by using a soft-bristled brush, such as a shoe brush or an old toothbrush, to gently loosen and remove any visible dirt, mud, or debris from the various textures of the AF1s. Employing a soft-bristled brush is essential to prevent any potential damage to the shoe's surfaces while effectively dislodging accumulated dirt.
Focus on brushing the entire exterior of the sneakers, paying particular attention to the seams, textured panels, and any areas where dirt may have become embedded. By methodically brushing off excess dirt, you pave the way for a more thorough and successful cleaning process, allowing subsequent steps to target deeper-seated grime and stains.
For textured or suede areas, utilize a specialized suede brush to delicately remove dirt and restore the nap of the material. Gently brush in one direction to lift and eliminate dirt, taking care not to excessively agitate the surface. This approach ensures that the unique textures and materials of your AF1s are treated with the utmost care and attention.
In cases where dirt is particularly stubborn or ingrained, a gentle back-and-forth motion with the brush can help dislodge the debris without causing damage. Exercise patience and precision, gradually working through areas with accumulated dirt to achieve a thorough cleaning.
By diligently brushing off excess dirt, you prepare the AF1s for the subsequent cleaning stages, setting the stage for a comprehensive restoration of your beloved sneakers. This meticulous approach ensures that the cleaning process addresses both surface-level dirt and deeper-seated grime, ultimately revitalizing the appearance of your AF1s.
With the excess dirt successfully brushed off, your AF1s are now primed for the next phase of the cleaning process, which will involve cleansing the sneakers with a mild soap and water solution. This methodical progression sets the tone for a thorough and effective restoration, allowing you to breathe new life into your AF1s and maintain their timeless appeal.
Step 3: Clean with Mild Soap and Water
With the excess dirt and debris brushed off, it's time to delve into the heart of the cleaning process by utilizing a gentle yet effective combination of mild soap and water. This pivotal step is instrumental in lifting stains, eliminating grime, and restoring the overall cleanliness of your AF1s without compromising the integrity of the materials.
To begin, prepare a cleaning solution by combining a small amount of mild soap with clean, lukewarm water. It's crucial to opt for a mild soap that is non-abrasive and suitable for use on a variety of materials, including leather, fabric, and rubber. Avoid harsh detergents or cleaners that may cause damage to the surfaces of your sneakers.
Using a soft microfiber cloth or sponge, dampen it with the prepared cleaning solution. Gently wring out any excess liquid to ensure that the cloth or sponge is damp but not dripping. This cautious approach prevents excessive moisture from saturating the materials of the AF1s during the cleaning process.
With the dampened cloth or sponge in hand, delicately begin to clean the exterior surfaces of the sneakers. Employ gentle, circular motions to target areas with visible stains or discoloration, gradually working your way across the entire shoe. Take care to address textured panels, seams, and any intricate details, ensuring that the cleaning solution reaches all areas in need of attention.
For particularly stubborn stains or heavily soiled areas, a bit of extra patience and persistence may be required. By consistently and gently applying the cleaning solution, you can effectively lift and remove ingrained dirt and blemishes, gradually restoring the pristine appearance of your AF1s.
Throughout the cleaning process, periodically rinse the cloth or sponge and refresh the cleaning solution as needed. This approach ensures that you are consistently working with a clean and effective cleaning tool, allowing you to maintain the integrity of the materials and achieve optimal results.
As you progress through the cleaning stage, periodically assess the effectiveness of the process, paying attention to areas that may require additional attention. By methodically cleaning with mild soap and water, you can gradually witness the transformation of your AF1s as they shed accumulated dirt and stains, revealing their inherent beauty.
This meticulous cleaning process sets the stage for the subsequent steps, ensuring that your AF1s receive the thorough care and attention necessary to revitalize their appearance. With the cleaning stage completed, your sneakers are now prepared for the next crucial phase of the restoration journey, bringing them one step closer to reclaiming their original allure.
Read more: How To Lace Jordan 1
Step 4: Scrub the Soles
As you progress through the comprehensive cleaning process for your AF1s, it's essential to dedicate focused attention to the soles of the sneakers. The soles are not only a prominent feature of the AF1s but also bear the brunt of daily wear, accumulating dirt, grime, and discoloration over time. By meticulously scrubbing the soles, you can effectively restore their original luster and ensure that your entire pair of sneakers exudes a revitalized appeal.
To initiate the sole-cleansing process, begin by preparing a specialized cleaning solution tailored for rubber and textured surfaces. This solution can be created by combining mild soap or sneaker cleaner with water, forming a gentle yet effective mixture that is suitable for addressing the unique needs of the soles. The goal is to create a solution that can effectively lift dirt and stains without compromising the integrity of the rubber.
Armed with the prepared cleaning solution and a soft-bristled brush, such as a shoe brush or an old toothbrush, focus on scrubbing the soles of your AF1s with deliberate and methodical motions. Pay particular attention to the treads, grooves, and textured areas, ensuring that the cleaning solution penetrates and cleanses these intricate features thoroughly.
As you scrub, be mindful of applying consistent but gentle pressure to dislodge dirt and grime without causing damage to the rubber soles. The goal is to lift accumulated debris and restore the original color and texture of the soles, enhancing the overall aesthetic appeal of your AF1s.
For stubborn or hard-to-reach areas within the treads and grooves, consider using the bristles of the brush to access and cleanse these intricate spaces. This meticulous approach ensures that every part of the soles receives the attention necessary to achieve a comprehensive cleaning.
Periodically rinse the brush and refresh the cleaning solution as needed, allowing you to maintain the effectiveness of the cleaning process. By systematically scrubbing the soles, you can witness the gradual transformation of your AF1s as the accumulated dirt and discoloration are lifted, revealing the inherent vibrancy of the soles.
Upon completing the sole-cleansing stage, take a moment to assess the overall cleanliness and appearance of the soles. By diligently scrubbing and cleansing these vital components of your AF1s, you have contributed to the comprehensive restoration of your beloved sneakers, ensuring that they exude a renewed sense of freshness and style.
With the soles now revitalized, your AF1s are poised for the final stages of the cleaning process, bringing them one step closer to reclaiming their timeless allure and making a bold statement with every step.
Step 5: Air Dry and Reassemble
With the comprehensive cleaning process complete, the final step in the journey of restoring your AF1s involves allowing the sneakers to air dry and reassembling them for a triumphant return to your collection. This pivotal stage is essential for ensuring that the materials of the AF1s dry thoroughly and that every component is meticulously reassembled, culminating in a rejuvenated and pristine pair of sneakers.
To commence the air drying process, place your freshly cleaned AF1s in a well-ventilated area with ample airflow. Avoid direct sunlight or artificial heat sources, as excessive heat can potentially damage the materials of the sneakers. Allowing the AF1s to air dry naturally at room temperature facilitates the gradual evaporation of moisture, ensuring that the fabrics, leather, and rubber components dry uniformly and without adverse effects.
As the sneakers air dry, it's crucial to maintain patience and refrain from hastening the process. While the temptation to expedite the drying time may arise, allowing the AF1s to dry at their own pace is instrumental in preserving their structural integrity and appearance. This patient approach ensures that your sneakers emerge from the cleaning process in optimal condition, ready to make a stylish statement.
Throughout the air drying period, periodically check the sneakers to gauge their progress. Gently touch the materials to assess their dryness, taking note of any areas that may require additional time to fully dry. By attentively monitoring the drying process, you can ensure that your AF1s receive the care and consideration necessary for a successful restoration.
Once the AF1s are thoroughly dry, it's time to reassemble them, bringing together the various components to complete the revitalization journey. Begin by reinserting the clean insoles into the sneakers, ensuring a snug and comfortable fit. Next, carefully lace up your AF1s, taking care to achieve an even and aesthetically pleasing lacing pattern that complements the overall appearance of the sneakers.
As you reassemble your AF1s, take a moment to appreciate the transformation they have undergone. The meticulous cleaning process has revitalized your beloved sneakers, allowing them to reclaim their original allure and stand as a testament to the enduring appeal of the Nike Air Force 1. With the AF1s now fully reassembled, they are ready to take their place in your collection, exuding a renewed sense of freshness and style.
By allowing your AF1s to air dry and reassembling them with care and attention to detail, you have completed the journey of restoring your sneakers to their pristine condition. The dedication and meticulous approach taken throughout the cleaning process have culminated in a revitalized pair of AF1s, ready to accompany you on your stylish endeavors and make a bold statement with every step.
Conclusion
In conclusion, the journey of cleaning and revitalizing your Nike Air Force 1s has been a testament to the enduring appeal and timeless style of these iconic sneakers. By following the comprehensive guide and employing the recommended materials and techniques, you have embarked on a transformative process that has breathed new life into your beloved AF1s.
Throughout the meticulous cleaning process, each step has played a crucial role in restoring the pristine appearance and overall freshness of your sneakers. From removing the laces and insoles to scrubbing the soles and allowing the AF1s to air dry, every stage has contributed to the comprehensive rejuvenation of these iconic shoes.
As you reassemble your freshly cleaned AF1s, you are greeted with a renewed sense of pride and satisfaction, knowing that your sneakers have been meticulously cared for and revitalized. The dedication and attention to detail invested in the cleaning process have not only preserved the visual appeal of the AF1s but also extended their longevity, ensuring that they continue to make a stylish statement for years to come.
The revitalized AF1s now stand as a testament to the enduring legacy of this iconic sneaker, embodying a timeless blend of style, comfort, and cultural significance. Whether you're preparing to showcase your sneakers on a special occasion or simply relishing the renewed freshness of your everyday footwear, the revitalized AF1s are poised to accompany you on your stylish endeavors with confidence and flair.
By embracing the process of cleaning and rejuvenating your AF1s, you have not only preserved the visual appeal of these iconic sneakers but also deepened your connection to the culture and heritage surrounding the Nike Air Force 1. The journey of revitalizing your AF1s serves as a celebration of individuality, self-expression, and the enduring allure of classic footwear.
As you lace up your revitalized AF1s and take your first steps, you can do so with the knowledge that your sneakers have been meticulously cared for and restored to their original glory. The comprehensive cleaning process has not only revitalized the appearance of your AF1s but also reignited your appreciation for these timeless and iconic sneakers.
In the end, the journey of cleaning and revitalizing your AF1s transcends the realm of footwear maintenance, emerging as a celebration of style, culture, and the enduring legacy of the Nike Air Force 1. With your revitalized AF1s at the forefront of your collection, you are poised to make a bold and stylish statement, embodying the timeless allure and cultural significance of these iconic sneakers.