Home>Home and Garden>How To Attach Headboard To Bed Frame

Home and Garden
How To Attach Headboard To Bed Frame
Published: March 1, 2024
Learn how to easily attach a headboard to a bed frame with our simple step-by-step guide. Enhance your home and garden with this quick DIY project.
(Many of the links in this article redirect to a specific reviewed product. Your purchase of these products through affiliate links helps to generate commission for Noodls.com, at no extra cost. Learn more)
Table of Contents
Introduction
Attaching a headboard to a bed frame is a simple yet impactful way to enhance the aesthetic appeal and functionality of your bedroom. Whether you're looking to add a touch of elegance, create a cozy ambiance, or simply prevent your pillows from slipping through the gap, securing a headboard to your bed frame can transform the entire look and feel of your sleeping space.
By following a few straightforward steps and using the right tools and materials, you can easily accomplish this task without the need for professional assistance. This article will guide you through the process, providing clear instructions and valuable tips to ensure a successful headboard attachment.
With the right approach, attaching a headboard to your bed frame can be a rewarding and satisfying DIY project. It allows you to personalize your bedroom according to your unique style and preferences, creating a comfortable and inviting retreat where you can unwind and relax after a long day.
Whether you have a wooden, metal, or upholstered headboard, the process of attaching it to your bed frame remains relatively consistent. By understanding the steps involved and the tools required, you can confidently tackle this project, adding a personalized touch to your bedroom decor.
In the following sections, we will explore the tools and materials needed for this project, followed by a detailed walkthrough of each step, from measuring and marking the attachment points to securing the headboard in place. Let's embark on this DIY journey and transform your bedroom into a cozy and stylish haven.
Read more: How To Get Rid Of Fleas In Bed
Tools and materials needed
Before embarking on the process of attaching a headboard to a bed frame, it's essential to gather the necessary tools and materials to ensure a smooth and efficient installation. Here's a comprehensive list of items you'll need for this project:
Tools:
- Tape Measure: A reliable tape measure is crucial for accurately determining the dimensions of your headboard and bed frame, allowing you to identify the precise attachment points.
- Pencil or Marker: Having a pencil or marker on hand will enable you to mark the designated spots for drilling and attachment, ensuring precision throughout the process.
- Power Drill: A power drill equipped with the appropriate drill bits is essential for creating pilot holes in the headboard and bed frame, facilitating the attachment process.
- Screwdriver: Depending on the type of screws used, a screwdriver (manual or electric) will be necessary for securing the headboard to the bed frame firmly.
- Level: To ensure that the headboard is aligned and straight during installation, a level will help you achieve a balanced and visually appealing result.
- Wrench or Socket Set: If your bed frame requires bolts or nuts for attachment, a wrench or socket set will be indispensable for tightening and securing the fasteners.
Materials:
- Screws or Bolts: Depending on the design of your bed frame and headboard, you'll need an appropriate quantity of screws or bolts to fasten the headboard securely in place.
- Washers: If your attachment hardware requires additional support or spacing, washers can be used to distribute the pressure and prevent damage to the headboard or bed frame.
- Anchors (if necessary): For wall-mounted headboards or bed frames that require extra stability, anchors may be needed to ensure a secure and durable attachment.
- Wood Glue (optional): In some cases, applying wood glue to the attachment points can provide added reinforcement, especially for wooden headboards and frames.
By ensuring that you have these tools and materials readily available, you'll be well-prepared to proceed with the headboard attachment process, minimizing interruptions and ensuring a successful outcome. With these essentials at your disposal, you can confidently move on to the next steps, ready to transform your bedroom with a stylish and securely attached headboard.
Step 1: Measure and mark the attachment points
The initial step in attaching a headboard to a bed frame involves precise measurement and marking of the attachment points. This crucial phase sets the foundation for a secure and visually appealing installation. Here's a detailed walkthrough of this essential step:
-
Assess the Headboard and Bed Frame: Begin by examining the dimensions and design of your headboard and bed frame. Take note of any pre-drilled holes or existing attachment mechanisms on the headboard and frame, as these may influence the placement of new attachment points.
-
Determine the Attachment Height: Measure the desired height for the headboard attachment, ensuring that it aligns with your aesthetic preferences and the overall proportions of the bed. Typically, the attachment point is positioned a few inches above the top of the mattress to allow the headboard to stand out prominently.
-
Locate the Studs or Wall Anchors (if applicable): If your headboard is wall-mounted or requires additional support, use a stud finder to locate the wall studs behind the bed. Alternatively, if wall anchors are necessary, identify the ideal placement for these anchors to ensure optimal stability.
-
Mark the Attachment Points: With the assistance of a tape measure and a pencil or marker, carefully mark the precise locations for the attachment points on both the headboard and bed frame. Ensure that the markings are level and symmetrical to maintain a balanced appearance.
-
Account for Hardware and Fasteners: If your headboard and bed frame require specific hardware or fasteners for attachment, take into account the size and positioning of these components when marking the attachment points. This consideration ensures that the hardware aligns seamlessly during the installation process.
-
Double-Check the Measurements: Before proceeding to the next phase, double-check all measurements and markings to verify their accuracy. This precautionary step minimizes the risk of errors during drilling and attachment, ultimately contributing to a seamless and hassle-free installation process.
By meticulously measuring and marking the attachment points, you establish a solid foundation for the subsequent stages of attaching the headboard to the bed frame. This meticulous approach sets the stage for a successful and visually pleasing installation, ensuring that the headboard enhances the overall ambiance of your bedroom while providing sturdy support for years to come.
Step 2: Pre-drill holes in the headboard
After accurately marking the attachment points on the headboard and bed frame, the next crucial step is to pre-drill holes in the headboard. This preparatory phase is essential for facilitating the seamless attachment of the headboard to the bed frame, ensuring precision and minimizing the risk of damage to the materials. Here's a detailed walkthrough of this pivotal step:
-
Select the Appropriate Drill Bit: Begin by selecting a drill bit that matches the size of the screws or bolts intended for securing the headboard to the bed frame. The chosen drill bit should create pilot holes that accommodate the fasteners without compromising the structural integrity of the headboard.
-
Secure the Headboard: Place the headboard on a stable surface, ensuring that it is well-supported and positioned to allow for safe and controlled drilling. If the headboard is particularly large or heavy, enlisting the assistance of a second person can provide added stability during this process.
-
Align the Drill Bit: With the selected drill bit secured in the power drill, carefully align it with the marked attachment points on the headboard. Ensure that the drill bit is perpendicular to the surface of the headboard to create straight and accurately positioned pilot holes.
-
Drill Pilot Holes: Gently apply pressure to the drill and create pilot holes at each marked attachment point on the headboard. Exercise caution to prevent splintering or cracking of the material, especially if the headboard is crafted from wood or other delicate materials.
-
Maintain Consistent Depth: Pay attention to the depth of the pilot holes, aiming to achieve a depth that allows the screws or bolts to penetrate the headboard without protruding excessively. This uniformity ensures a secure and flush attachment without compromising the visual appeal of the headboard.
-
Clear Debris: After drilling the pilot holes, use a soft brush or cloth to remove any debris or sawdust from the interior of the holes. This step prepares the headboard for the subsequent attachment process, ensuring that the fasteners can be inserted smoothly and securely.
By meticulously pre-drilling holes in the headboard, you establish the groundwork for a seamless and secure attachment to the bed frame. This careful preparation minimizes the risk of damage to the headboard and ensures that the subsequent attachment process proceeds smoothly, culminating in a visually appealing and structurally sound installation.
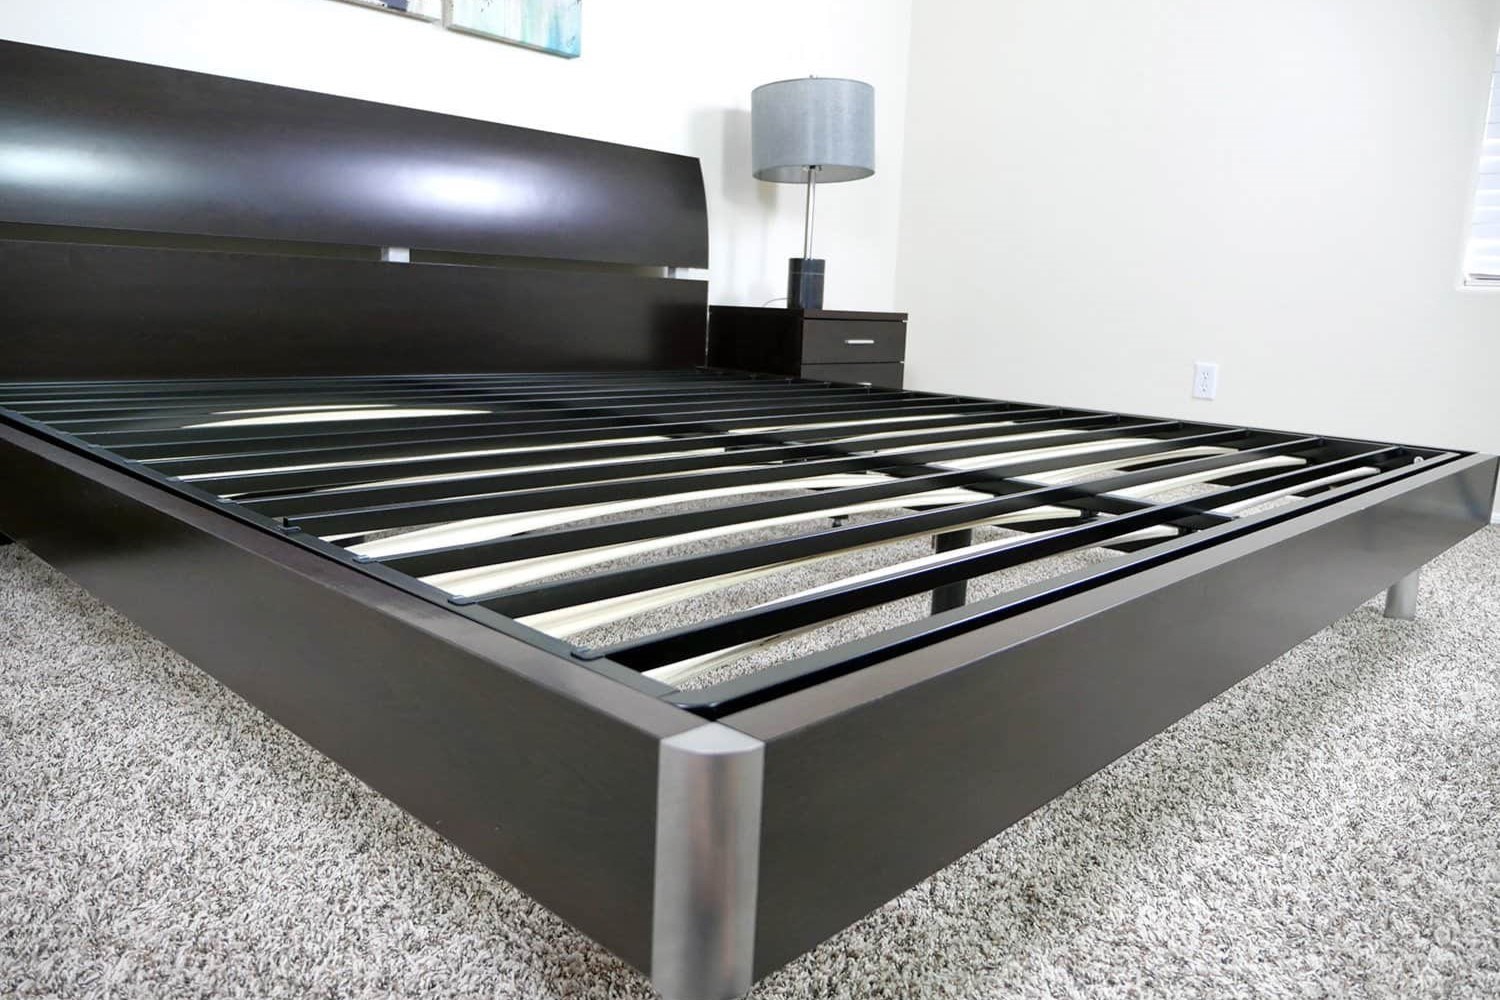
Step 3: Attach the headboard to the bed frame
With the attachment points marked and the headboard prepped with pilot holes, the next pivotal step is to attach the headboard to the bed frame. This phase of the installation process brings the vision of a complete bed ensemble one step closer to reality. Here's a detailed guide on how to seamlessly execute this crucial step:
-
Position the Headboard: Begin by positioning the headboard against the bed frame, ensuring that the marked attachment points align with the corresponding points on the frame. Enlist the assistance of a second person if necessary, especially when dealing with larger or heavier headboards, to ensure precise alignment and support.
-
Insert the Fasteners: With the headboard securely positioned, insert the appropriate screws or bolts through the pre-drilled pilot holes in the headboard. Align the fasteners with the corresponding attachment points on the bed frame, allowing them to penetrate the frame and establish a firm connection with the headboard.
-
Tighten the Fasteners: Utilize a screwdriver or wrench, as per the fastener type, to securely tighten the screws or bolts. Exercise caution to avoid over-tightening, as this can potentially damage the headboard or bed frame. Instead, aim for a snug fit that ensures stability without compromising the integrity of the materials.
-
Verify Alignment: Throughout the attachment process, periodically verify the alignment of the headboard with the bed frame. Use a level to ensure that the headboard is straight and balanced, making any necessary adjustments to guarantee a visually appealing and symmetrical installation.
-
Check Stability: Once all fasteners are securely in place, gently test the stability of the attached headboard. Apply light pressure to different areas of the headboard to confirm that it is firmly anchored to the bed frame, with no wobbling or shifting. This step ensures that the attachment is robust and durable, providing long-term support for the headboard.
By meticulously following these steps, you can seamlessly attach the headboard to the bed frame, bringing your bedroom decor vision to life. This phase marks a significant milestone in the installation process, setting the stage for the final step of securing the headboard in place. With the headboard now firmly attached to the bed frame, the transformation of your sleeping space is well underway, reflecting your unique style and creating a cozy haven for relaxation and rejuvenation.
Step 4: Secure the headboard in place
With the headboard successfully attached to the bed frame, the final critical step involves securing it in place to ensure long-term stability and structural integrity. This phase not only enhances the visual appeal of the bed ensemble but also contributes to a safe and comfortable sleeping environment. Here's a detailed guide on how to effectively and securely fasten the headboard in its designated position:
-
Evaluate Attachment Stability: Before proceeding with securing the headboard, assess the overall stability of the attachment. Confirm that the headboard is firmly anchored to the bed frame and that there is no noticeable shifting or instability. This preliminary evaluation sets the stage for the subsequent securing process.
-
Apply Additional Support (if necessary): Depending on the design and weight of the headboard, it may be beneficial to apply additional support to reinforce the attachment. This can be achieved by inserting shims or spacers between the headboard and the bed frame, providing extra stability and minimizing potential movement over time.
-
Utilize Wood Glue (optional): For wooden headboards and frames, applying a small amount of wood glue to the attachment points can offer added reinforcement. This optional step enhances the bond between the headboard and bed frame, contributing to a more robust and durable attachment.
-
Check Fastener Tightness: Verify that all screws or bolts used to attach the headboard are securely tightened. Periodically inspect the fasteners to ensure that they remain snug and stable, making any necessary adjustments to maintain the integrity of the attachment.
-
Inspect Alignment and Leveling: Use a level to confirm that the headboard is perfectly aligned and level with the bed frame. This meticulous attention to detail ensures a visually appealing and symmetrical installation, enhancing the overall aesthetic of the bed ensemble.
-
Reinforce Wall-Mounted Headboards (if applicable): If the headboard is wall-mounted, ensure that any additional support, such as wall anchors, is firmly in place. This step is crucial for maintaining the stability and safety of the wall-mounted headboard, preventing any potential hazards.
By meticulously executing these steps, you can effectively secure the headboard in place, ensuring a visually pleasing, stable, and durable installation. This final phase marks the culmination of the headboard attachment process, transforming your bedroom into a personalized and inviting sanctuary. With the headboard securely in place, you can now revel in the enhanced comfort and aesthetic appeal of your thoughtfully adorned sleeping space.
Conclusion
In conclusion, the process of attaching a headboard to a bed frame represents a transformative endeavor that elevates the visual appeal and functionality of your bedroom. By meticulously following the outlined steps and utilizing the recommended tools and materials, you can achieve a seamless and rewarding installation, culminating in a personalized and inviting sleeping space.
The journey begins with careful measurement and marking of the attachment points, setting the stage for a precise and visually appealing installation. This meticulous approach ensures that the headboard aligns harmoniously with the bed frame, creating a balanced and aesthetically pleasing ensemble.
Pre-drilling holes in the headboard serves as a pivotal preparatory step, facilitating the seamless attachment of the headboard to the bed frame. This careful preparation minimizes the risk of damage to the materials and ensures a secure and durable installation that withstands the test of time.
The subsequent attachment of the headboard to the bed frame marks a significant milestone in the transformation of your bedroom. By aligning the attachment points and securing the fasteners, you bring your vision of a complete and stylish bed ensemble one step closer to reality.
Finally, the process concludes with the crucial step of securing the headboard in place, ensuring long-term stability and structural integrity. By evaluating attachment stability, applying additional support if necessary, and meticulously inspecting alignment and leveling, you solidify the foundation for a comfortable and visually appealing sleeping space.
In essence, the attachment of a headboard to a bed frame transcends the realm of practicality, offering an opportunity to infuse your bedroom with your unique style and personality. Whether you opt for a sleek modern design, a rustic wooden headboard, or an opulent upholstered piece, the attachment process allows you to tailor your sleeping space to reflect your individual taste and preferences.
As you embark on this DIY journey, remember that the process is not merely about securing a headboard to a bed frame; it's about creating a sanctuary where you can unwind, relax, and rejuvenate. With the headboard securely in place, you can revel in the enhanced comfort and aesthetic allure of your thoughtfully adorned sleeping space, basking in the satisfaction of a successful and rewarding installation.