Home>Home and Garden>How To Solder Wires
Home and Garden
How To Solder Wires
Published: March 1, 2024
Learn how to solder wires like a pro with our step-by-step guide. Perfect for DIY projects and home repairs. Master the art of soldering in no time!
(Many of the links in this article redirect to a specific reviewed product. Your purchase of these products through affiliate links helps to generate commission for Noodls.com, at no extra cost. Learn more)
Table of Contents
Introduction
Soldering wires is a fundamental skill that can be incredibly useful for various home and garden projects. Whether you're repairing a lamp, creating a custom electronic device, or working on a DIY home improvement project, knowing how to solder wires effectively is essential. Soldering involves joining two or more metal components using a filler metal, known as solder, which melts at a relatively low temperature to create a strong and permanent bond.
Mastering the art of soldering wires not only allows you to make durable and reliable electrical connections but also opens up a world of creative possibilities. With the right tools, materials, and techniques, you can confidently tackle a wide range of electrical and electronic projects, making repairs and customizations with ease.
In this comprehensive guide, we will walk you through the step-by-step process of soldering wires, from the essential safety precautions to the final inspection of the soldered connection. By the end of this article, you will have a solid understanding of the soldering process and the confidence to take on your own wiring projects with precision and skill.
Let's dive into the world of soldering and discover the techniques and tips that will empower you to create strong and reliable electrical connections for your home and garden projects.
Read more: How To Wire A Light Switch
Safety Precautions
Before embarking on any soldering project, it is crucial to prioritize safety to prevent accidents and ensure a smooth and successful soldering experience. Soldering involves working with high temperatures and potentially hazardous materials, so taking the necessary precautions is paramount. Here are the essential safety measures to observe:
-
Work in a Well-Ventilated Area: Soldering produces fumes that can be harmful if inhaled. Always work in a well-ventilated space to minimize exposure to these fumes. If possible, use a fume extractor or position a fan to direct the fumes away from your working area.
-
Eye Protection: Wear safety goggles to shield your eyes from any solder splashes or debris that may occur during the soldering process. This simple precaution can prevent eye injuries and ensure a safe working environment.
-
Heat-Resistant Surface: Place your soldering iron on a heat-resistant surface when not in use. This prevents accidental burns and minimizes the risk of fire hazards. Additionally, ensure that the work surface is non-flammable and stable to avoid accidents.
-
Fire Safety: Keep a fire extinguisher within reach in case of accidental fires. While soldering, it's essential to be prepared for any unforeseen circumstances. Having a fire extinguisher nearby provides peace of mind and ensures that you can quickly address any potential fire hazards.
-
Proper Handling of Equipment: Handle the soldering iron and other tools with care. The soldering iron reaches high temperatures and can cause severe burns if mishandled. Always use the provided stand to hold the iron when not in use, and never touch the hot tip or metal components directly.
-
Avoid Contact with Hot Surfaces: Be mindful of hot surfaces, including the soldering iron and freshly soldered connections. Accidental contact with these hot surfaces can result in burns. Allow sufficient time for the soldered components to cool before handling them.
-
Organize Your Workspace: Keep your work area organized and free of clutter. This minimizes the risk of accidents and ensures that you can work efficiently without any unnecessary distractions.
By adhering to these safety precautions, you can create a secure and controlled environment for soldering wires, allowing you to focus on the task at hand while minimizing the risk of accidents or injuries. Prioritizing safety sets the foundation for a successful and enjoyable soldering experience.
Tools and Materials Needed
Soldering wires effectively requires the use of specific tools and materials to ensure precision and reliability in the electrical connections. Before diving into the soldering process, it's essential to gather the necessary items to set the stage for a successful project. Here's a comprehensive list of the tools and materials you'll need:
Tools:
- Soldering Iron: A soldering iron is the primary tool used to heat the solder and create the electrical connection. Choose a soldering iron with adjustable temperature settings to accommodate different wire gauges and solder types.
- Soldering Iron Stand: This stand provides a safe place to rest the hot soldering iron when not in use, preventing accidental burns and minimizing the risk of fire hazards.
- Wire Cutters/Strippers: These tools are essential for preparing the wires by cutting them to the required length and stripping off the insulation to expose the conductive metal.
- Third Hand Tool: A third hand tool with adjustable arms and alligator clips assists in holding the wires and components in place during the soldering process, allowing for precise and stable positioning.
- Solder Sucker or Desoldering Pump: In case of mistakes or rework, a solder sucker or desoldering pump helps remove excess solder and correct any errors in the soldered connections.
- Safety Goggles: Protect your eyes from potential solder splashes and debris with safety goggles, ensuring a safe working environment.
- Fume Extractor or Ventilation Fan: To minimize exposure to soldering fumes, use a fume extractor or position a ventilation fan to direct the fumes away from your working area.
Materials:
- Solder: Choose a high-quality solder with a rosin core, typically containing a combination of tin and lead or lead-free alloys. The most common diameters are 0.8mm and 1mm, suitable for various wire gauges.
- Electrical Wires: Select the appropriate gauge and type of wires for your specific project. Stranded wires are often preferred for flexibility and durability in electrical connections.
- Flux: Flux aids in the soldering process by promoting the flow of solder and enhancing the bond between the metal surfaces, ensuring a strong and reliable connection.
- Heat-Shrink Tubing: After soldering the wires, use heat-shrink tubing to insulate and protect the soldered connection, providing electrical insulation and mechanical strength.
- Sponge or Brass Tip Cleaner: Keep the soldering iron tip clean and free of oxidation by using a damp sponge or brass tip cleaner, ensuring optimal heat transfer and soldering performance.
By assembling these essential tools and materials, you'll be well-equipped to embark on your soldering project with confidence and precision. Each item plays a crucial role in the soldering process, contributing to the creation of durable and reliable electrical connections for your home and garden endeavors.
Read more: How To Wire A Doorbell
Preparing the Wires
Before diving into the actual soldering process, it's crucial to properly prepare the wires to ensure a strong and reliable electrical connection. Effective preparation sets the stage for a successful soldering experience and contributes to the overall durability of the connection. Here's a detailed guide on how to prepare the wires for soldering:
Step 1: Selecting the Right Wires
Choose the appropriate gauge and type of wires for your specific project. Consider the electrical requirements, environmental factors, and the intended application of the soldered connection. Stranded wires are often preferred for their flexibility and durability, making them suitable for a wide range of home and garden projects.
Step 2: Measuring and Cutting
Carefully measure and cut the wires to the required length using wire cutters. Ensure that the cut ends are clean and free from frayed strands, as this promotes a secure and reliable solder joint. Precision in cutting the wires contributes to a neat and professional-looking soldered connection.
Step 3: Stripping the Insulation
Using wire strippers, carefully remove a small section of the insulation from the ends of the wires. Take caution to avoid damaging the conductive metal strands while stripping the insulation. The exposed metal should be clean and free from any insulation remnants to facilitate a strong bond during the soldering process.
Read more: How To Wire A 4-Way Switch
Step 4: Tinning the Wires
Tinning the wires involves applying a thin layer of solder to the exposed metal strands. This step not only helps prevent oxidation of the metal but also promotes better solder flow and adhesion during the soldering process. Hold the soldering iron against the wire and apply a small amount of solder, ensuring that the entire exposed area is evenly coated.
Step 5: Inspecting the Prepared Wires
After completing the preparation steps, visually inspect the wires to ensure that they are clean, properly cut, and evenly tinned. Any irregularities or imperfections should be addressed before proceeding to the soldering phase, as thorough preparation is key to achieving a reliable and durable electrical connection.
By meticulously preparing the wires for soldering, you lay the foundation for a successful and long-lasting electrical connection. Attention to detail in this phase contributes to the overall quality of the soldered joint, ensuring that your home and garden projects are equipped with robust and dependable electrical connections.
Tinning the Iron
Tinning the soldering iron tip is a crucial step in the soldering process, as it directly impacts the efficiency and effectiveness of creating strong and reliable electrical connections. The term "tinning" refers to the act of coating the soldering iron tip with a thin layer of solder, which serves multiple purposes in facilitating the soldering of wires.
To begin tinning the iron, it's essential to ensure that the soldering iron is heated to the appropriate operating temperature. Different types of solder require specific temperature settings for optimal performance, so adjusting the soldering iron to the recommended temperature range is crucial. Once the iron reaches the desired temperature, it's ready for tinning.
With the soldering iron heated and ready, the next step is to clean the iron tip to remove any oxidation or debris that may have accumulated. This can be achieved by using a damp sponge or a specialized brass tip cleaner. By gently wiping the iron tip on the sponge or brass cleaner, any contaminants are effectively removed, allowing for better solder adhesion and heat transfer.
After cleaning the iron tip, it's time to apply a small amount of solder to tin the tip. Hold the solder wire against the iron tip and allow the heat to melt the solder, ensuring that the entire tip is evenly coated. The solder should flow smoothly and evenly, creating a shiny and uniform layer on the iron tip. This tinning process helps protect the iron tip from oxidation, maintains its heat conductivity, and promotes the efficient transfer of heat to the wires during soldering.
Properly tinning the soldering iron tip ensures that it remains in optimal condition for creating clean and effective solder joints. The tinned tip facilitates the smooth flow of solder onto the wires, promoting strong adhesion and reliable electrical connections. Additionally, a well-tinned iron tip contributes to the longevity of the soldering iron, as it helps prevent corrosion and maintains the iron's performance over time.
By mastering the art of tinning the soldering iron, you set the stage for successful soldering projects, ensuring that your electrical connections are robust, durable, and built to last. This foundational step in the soldering process paves the way for precise and reliable wire soldering, empowering you to tackle a wide range of home and garden projects with confidence and skill.
Soldering the Wires
With the wires properly prepared and the soldering iron tinned, it's time to proceed with the pivotal step of soldering the wires. This process involves creating a secure and permanent electrical connection by joining the prepared wires using molten solder. Follow these steps to effectively solder the wires:
-
Positioning the Wires: Place the prepared wires in a stable and secure position, ensuring that they are aligned and held firmly in place. A third hand tool with adjustable arms and alligator clips can be immensely helpful in securing the wires, allowing for precise positioning during the soldering process.
-
Applying Flux: Before soldering, apply a small amount of flux to the exposed metal strands of the wires. Flux promotes the flow of solder and enhances the bond between the metal surfaces, ensuring a strong and reliable connection. It also helps prevent oxidation during the soldering process, contributing to the overall quality of the solder joint.
-
Heating the Wires: With the wires and flux in place, gently touch the tip of the soldering iron to the wires, applying heat to the metal strands. The heat from the soldering iron will gradually raise the temperature of the wires, preparing them to accept the molten solder.
-
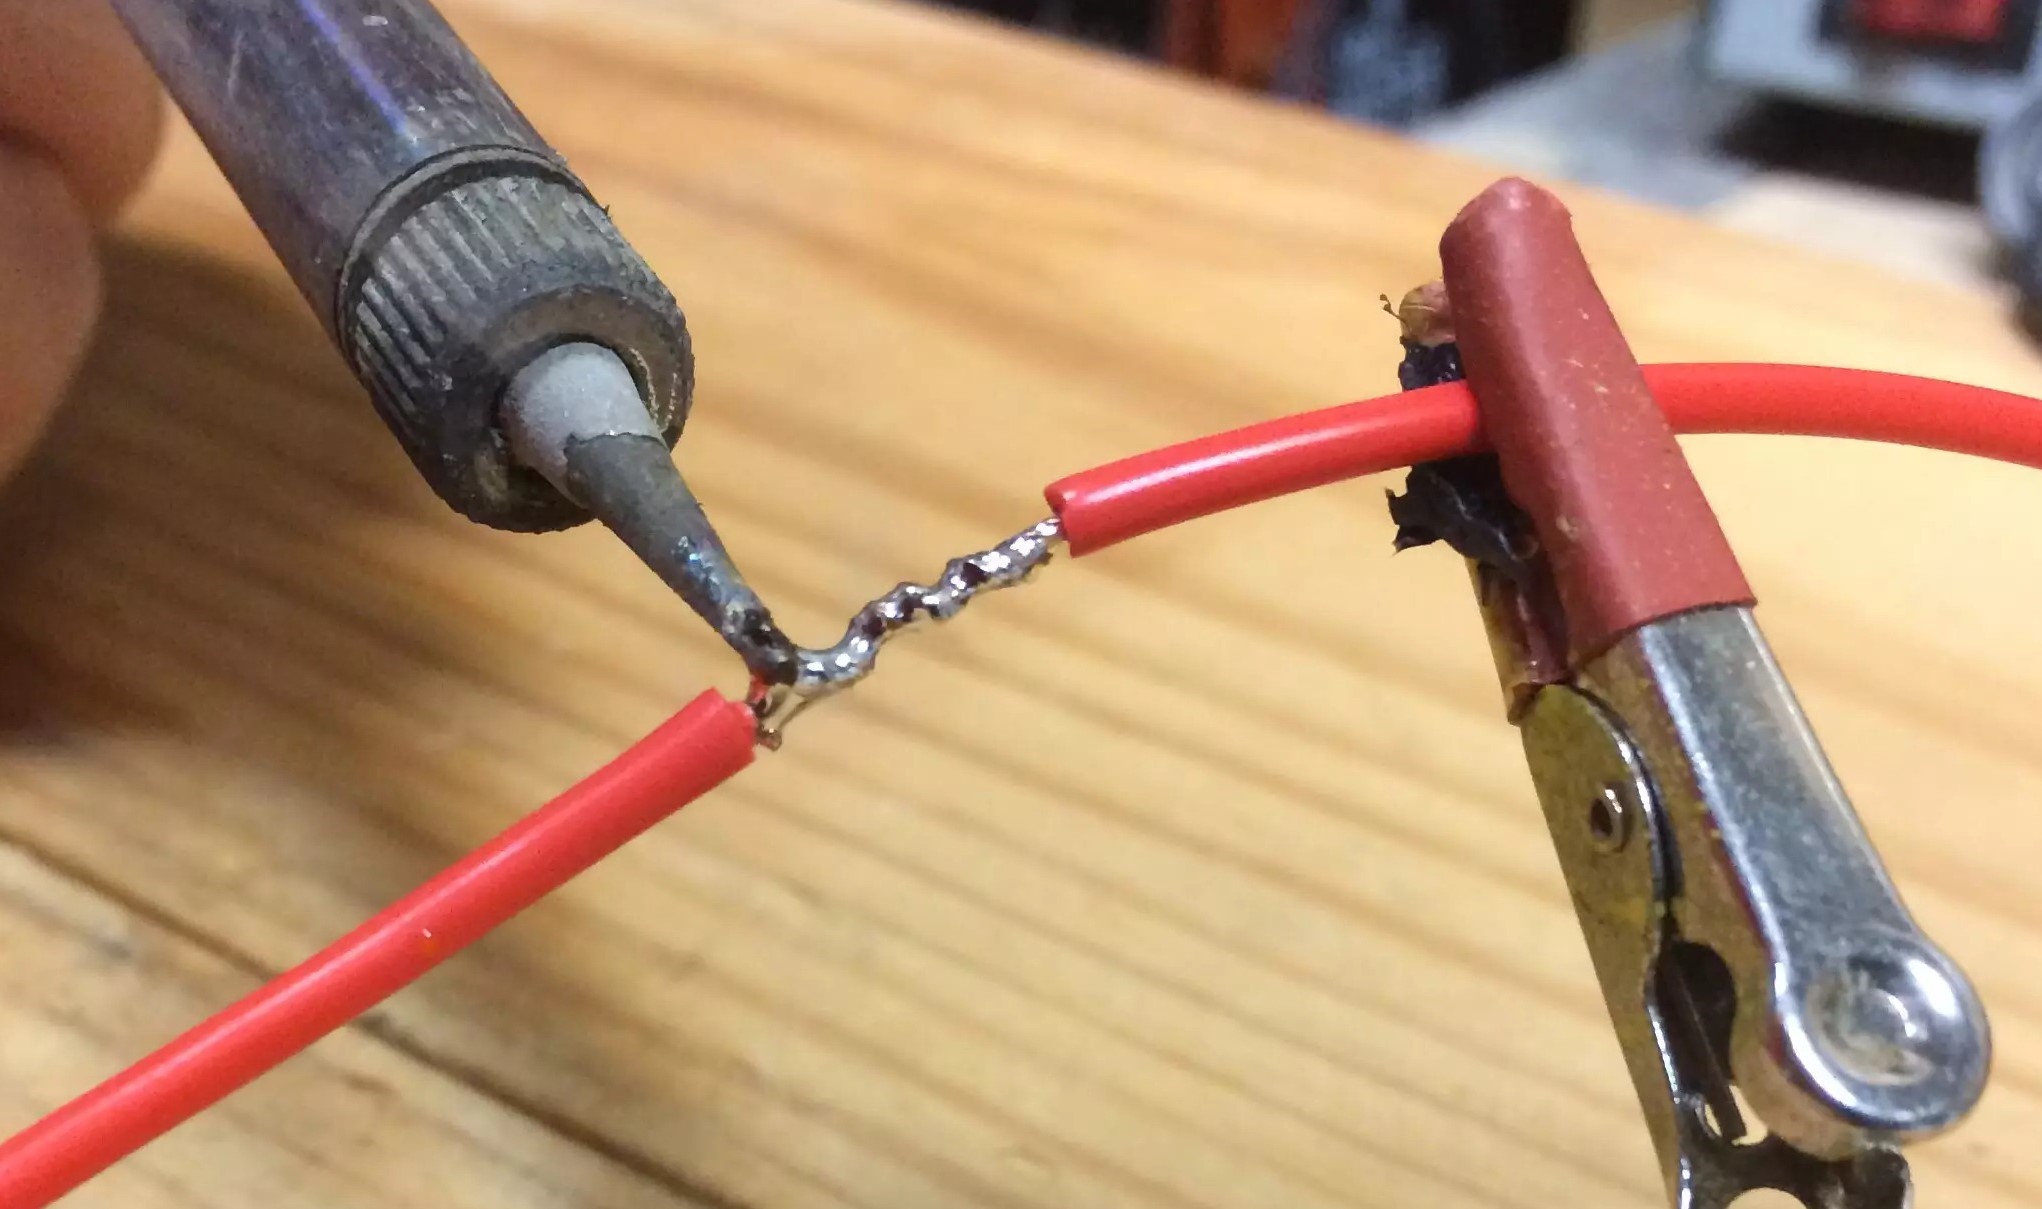
Applying Solder: Once the wires reach the appropriate temperature, touch the solder to the junction of the wire and soldering iron. The solder should melt and flow smoothly onto the wires, creating a strong and uniform bond. Ensure that the solder flows evenly and covers the entire junction, forming a solid and reliable connection.
-
Cooling and Solidifying: After applying the solder, allow the soldered connection to cool and solidify naturally. Avoid moving or disturbing the wires during this crucial phase, as it can compromise the integrity of the solder joint. The cooling process ensures that the solder solidifies into a durable and secure bond between the wires.
-
Inspecting the Soldered Connection: Once the soldered connection has cooled, visually inspect the joint to ensure that the solder has formed a smooth and shiny bond. Check for any irregularities or cold solder joints, which may appear dull or uneven. A well-executed solder joint should exhibit a clean and uniform appearance, indicating a strong and reliable electrical connection.
By following these steps, you can effectively solder wires with precision and confidence, creating durable and dependable electrical connections for your home and garden projects. Mastering the art of soldering wires opens up a world of creative possibilities, allowing you to tackle a wide range of electrical and electronic endeavors with skill and proficiency.
Inspecting the Soldered Connection
Inspecting the soldered connection is a critical step in the soldering process, as it ensures the integrity and reliability of the electrical joint. A thorough inspection allows you to verify the quality of the soldered connection, identify any potential issues, and make necessary adjustments to guarantee a strong and durable bond between the wires. Here's a detailed exploration of the inspection process and its significance in achieving high-quality soldered connections.
Visual Examination
Upon completing the soldering process, visually inspect the soldered connection to assess its overall quality. A well-executed solder joint should exhibit a smooth and shiny appearance, indicating that the solder has flowed evenly and formed a solid bond between the wires. Look for any signs of irregularities, such as lumps, gaps, or excess solder, which may compromise the integrity of the connection. Additionally, ensure that the solder has fully encapsulated the wire junction, providing a secure and robust electrical bond.
Joint Strength and Flexibility
Test the strength and flexibility of the soldered connection by gently tugging on the wires. A properly soldered joint should withstand moderate tension without breaking or exhibiting any signs of weakness. Additionally, assess the flexibility of the connection, particularly in applications where the wires may be subject to movement or vibration. A reliable solder joint maintains its structural integrity while allowing for necessary flexibility, ensuring long-term durability in various operating conditions.
Electrical Continuity
Verify the electrical continuity of the soldered connection using a multimeter or continuity tester. By measuring the resistance across the soldered joint, you can confirm that the electrical pathway is uninterrupted and that the solder has effectively bonded the wires. A low resistance reading indicates a solid electrical connection, while a high or fluctuating resistance may signal a faulty solder joint that requires rework. Testing for electrical continuity provides assurance that the soldered connection meets the functional requirements of the intended electrical circuit.
Insulation and Protection
Inspect the surrounding area of the soldered joint to ensure that the insulation and protection of the wires remain intact. If heat-shrink tubing was used to insulate the soldered connection, verify that it has been properly applied and securely covers the solder joint. This step is crucial for maintaining electrical insulation and safeguarding the soldered connection from environmental factors, mechanical stress, and potential short circuits.
Rework and Corrections
In the event of any identified irregularities or deficiencies in the soldered connection, be prepared to perform rework and make necessary corrections. This may involve removing excess solder, addressing cold solder joints, or reinforcing the connection to meet the desired quality standards. Reworking the soldered joint ensures that any imperfections are rectified, resulting in a reliable and long-lasting electrical bond between the wires.
By meticulously inspecting the soldered connection, you can validate the quality and reliability of the electrical joint, ensuring that it meets the highest standards of craftsmanship and functionality. This thorough examination not only confirms the success of the soldering process but also provides the assurance of a durable and dependable electrical connection for your home and garden projects.
Conclusion
In conclusion, mastering the art of soldering wires opens up a world of creative possibilities for home and garden enthusiasts. By following the comprehensive guide outlined in this article, you have gained valuable insights into the essential techniques and best practices for soldering wires effectively. From prioritizing safety precautions to meticulously inspecting the soldered connections, each step in the soldering process contributes to the creation of durable and reliable electrical joints.
Soldering wires is not just a technical skill; it is an empowering craft that allows you to take on a wide range of electrical and electronic projects with confidence and precision. Whether you are repairing a lamp, customizing electronic devices, or embarking on DIY home improvement endeavors, the ability to create strong and permanent electrical connections through soldering is a valuable asset.
By adhering to crucial safety measures, such as working in a well-ventilated area, wearing eye protection, and handling equipment with care, you establish a secure and controlled environment for soldering. Prioritizing safety not only safeguards against potential hazards but also sets the foundation for a successful and enjoyable soldering experience.
Equipped with the necessary tools and materials, including a quality soldering iron, wire cutters, solder, and flux, you are prepared to embark on a wide range of wiring projects. The meticulous preparation of wires, tinning of the soldering iron, and precise soldering techniques ensure that the resulting electrical connections are robust, durable, and built to last.
The inspection of soldered connections serves as the final checkpoint, validating the quality and reliability of the electrical joints. By conducting a thorough visual examination, testing for joint strength and electrical continuity, and ensuring proper insulation and protection, you can confidently verify the success of the soldering process and the durability of the connections.
In essence, the art of soldering wires embodies craftsmanship, precision, and practicality. It empowers you to bring your creative ideas to life, make essential repairs, and customize electrical components with skill and proficiency. With a solid understanding of soldering techniques and a commitment to safety and quality, you are well-prepared to embark on a wide range of home and garden projects, knowing that your electrical connections are built to withstand the test of time.