Home>Home and Garden>How To Wire A Light Switch
Home and Garden
How To Wire A Light Switch
Published: March 4, 2024
Learn how to wire a light switch in your home and garden with our step-by-step guide. Upgrade your lighting with ease and safety.
(Many of the links in this article redirect to a specific reviewed product. Your purchase of these products through affiliate links helps to generate commission for Noodls.com, at no extra cost. Learn more)
Table of Contents
Introduction
Wiring a light switch is a fundamental skill that empowers homeowners to make simple electrical upgrades and repairs within their homes. Whether you're replacing an old, worn-out switch or installing a new one, understanding the process is essential for maintaining a safe and functional electrical system. By learning how to wire a light switch, you can enhance the ambiance of your living spaces and gain a sense of accomplishment from mastering a practical home improvement task.
This comprehensive guide will walk you through the step-by-step process of wiring a light switch, providing clear instructions and valuable insights to ensure a successful outcome. From the essential tools and materials required to the crucial safety precautions that must be observed, this article will equip you with the knowledge and confidence to tackle this project with ease.
As you embark on this journey, it's important to approach the task with a focused and patient mindset. While the process may seem daunting at first, rest assured that with the right guidance and attention to detail, you'll be able to complete the task efficiently and safely. By following the outlined steps and understanding the principles behind wiring a light switch, you'll be well on your way to enhancing the functionality and aesthetics of your home's lighting system.
So, roll up your sleeves, gather your tools, and let's delve into the world of electrical wiring as we demystify the process of installing and replacing a light switch. With a methodical approach and a commitment to safety, you'll soon be able to confidently navigate the intricacies of electrical work, empowering yourself to take on more advanced home improvement projects in the future.
Read more: How To Wire A 4-Way Switch
Tools and materials needed
Before embarking on the task of wiring a light switch, it's essential to gather the necessary tools and materials to ensure a smooth and efficient process. Here's a comprehensive list of items you'll need to have on hand:
Tools:
- Screwdriver Set: A set of flathead and Phillips screwdrivers will be indispensable for removing the cover plate and manipulating the wires.
- Wire Stripper: This tool is essential for safely removing the insulation from the electrical wires, allowing for proper connections.
- Voltage Tester: A non-contact voltage tester or a multimeter will help you verify that the power is indeed turned off before beginning work, ensuring your safety.
- Needle-Nose Pliers: These will come in handy for bending and shaping the wires as needed during the installation process.
- Wire Cutter: A reliable wire cutter will enable you to trim the wires to the appropriate length, facilitating secure connections.
- Electrical Tape: This is used to insulate wire connections and provide an extra layer of protection.
Materials:
- New Light Switch: Whether you're replacing an old switch or installing a new one, ensure that you have the appropriate type of switch for your specific lighting setup.
- Wire Nuts: These are essential for securely connecting the wires together, safeguarding against loose connections and potential electrical hazards.
- Electrical Box: If you're installing a new switch, you'll need an electrical box to house the wiring and provide a secure mounting point for the switch.
- Cover Plate: If you're replacing an existing switch, consider updating the cover plate for a fresh, cohesive look.
- Electrical Wires: Depending on the specific requirements of your lighting setup, you may need additional electrical wires to ensure proper connections.
By ensuring that you have these tools and materials readily available, you'll be well-prepared to tackle the task of wiring a light switch with confidence and precision. With a focus on safety and attention to detail, you'll set the stage for a successful and rewarding home improvement endeavor.
Safety precautions
When it comes to working with electrical systems, prioritizing safety is paramount. Before undertaking any electrical project, including wiring a light switch, it's crucial to adhere to a set of essential safety precautions to minimize the risk of accidents and ensure a secure working environment.
-
Turn off the power: Before initiating any work on the light switch, it's imperative to turn off the power supply to the circuit at the breaker box. This step is non-negotiable and serves as the primary safeguard against electrical shocks and potential hazards. Use a voltage tester to verify that the power is indeed off before proceeding with the task.
-
Handle wires with care: When dealing with electrical wires, always treat them with caution and respect. Avoid touching exposed wires with bare hands and ensure that the insulation remains intact throughout the process. Additionally, use appropriate tools, such as wire strippers and needle-nose pliers, to manipulate the wires safely and effectively.
-
Avoid overloading circuits: Understanding the electrical load on a circuit is crucial for preventing overloads and potential fire hazards. Be mindful of the wattage ratings for the light fixtures connected to the switch and ensure that the circuit can safely accommodate the load.
-
Use proper insulation: When making wire connections, it's essential to utilize wire nuts and electrical tape to insulate the connections thoroughly. This extra layer of protection helps prevent accidental contact with live wires and minimizes the risk of short circuits.
-
Work in a dry environment: Moisture and electrical work don't mix. Ensure that the work area is dry and free from any sources of water or dampness. This precaution is vital for preventing electrical malfunctions and safeguarding against potential shocks.
-
Follow local electrical codes: Familiarize yourself with the electrical codes and regulations specific to your location. Adhering to these guidelines ensures that the wiring work meets safety standards and minimizes the risk of electrical hazards.
By diligently observing these safety precautions, you'll create a secure and controlled environment for wiring a light switch. Prioritizing safety not only protects you from potential harm but also contributes to the successful completion of the project. Always approach electrical work with a safety-first mindset, and take the necessary precautions to mitigate risks and ensure a safe and rewarding home improvement experience.
Read more: How To Solder Wires
Step 1: Turn off the power
Before embarking on any electrical work, the first and most critical step is to ensure that the power supply to the circuit is completely turned off. This is a non-negotiable safety measure that must be rigorously followed to prevent the risk of electrical shocks and potential hazards. Failing to cut off the power can result in dangerous situations, making this step an absolute priority.
To begin, locate your home's main electrical panel or breaker box. This is typically situated in a garage, basement, or utility room. Once you've identified the panel, carefully remove the cover to reveal the array of circuit breakers or fuses inside. Each breaker or fuse is responsible for controlling the power supply to specific areas or appliances within your home.
Next, you'll need to identify the circuit breaker that corresponds to the lighting circuit where the light switch is located. In some cases, the breakers may be clearly labeled, indicating which areas or devices they control. If the breakers are not labeled, you may need to enlist the assistance of a partner to help you identify the correct breaker while you test the switch to confirm when the power is successfully turned off.
Using a non-contact voltage tester or a multimeter, carefully test the light switch and the surrounding area to verify that there is no electrical current present. This step is crucial for ensuring that the power is indeed turned off before proceeding with any work. By double-checking and confirming the absence of voltage, you'll mitigate the risk of accidental shocks and create a safe working environment.
Once you've confirmed that the power is off, it's advisable to place a piece of tape over the breaker switch to prevent it from being accidentally turned back on while you're working. This simple yet effective precaution adds an extra layer of safety, providing you with peace of mind as you proceed with the task at hand.
By diligently following these steps to turn off the power, you'll establish a secure working environment and minimize the risk of electrical accidents. Prioritizing safety at this initial stage sets the foundation for a successful and hazard-free experience as you proceed with wiring the light switch.
Step 2: Remove the old switch
With the power supply to the circuit safely turned off, you can proceed to the next crucial step: removing the old light switch. This process involves carefully disconnecting the existing switch from the electrical wiring and preparing the junction box for the installation of the new switch.
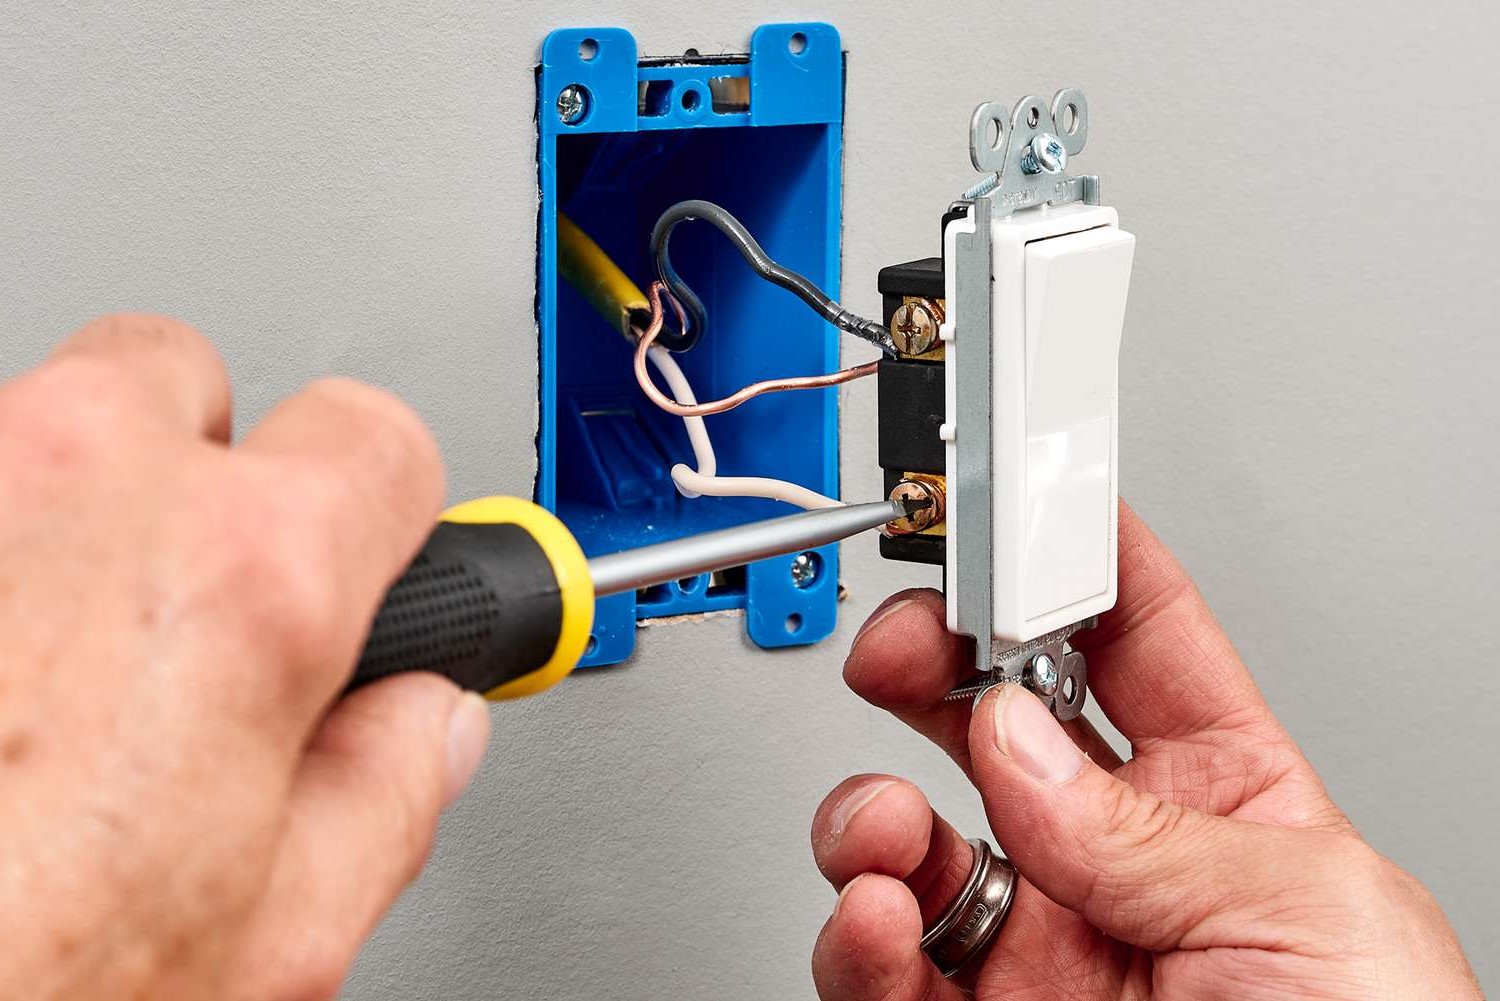
To begin, use a screwdriver to remove the cover plate of the switch, exposing the inner components. Once the cover plate is removed, you'll be able to see the switch mounting screws and the electrical wires connected to the switch terminals. Take note of the arrangement of the wires and the positioning of the switch within the junction box, as this will provide valuable guidance when installing the new switch.
Next, using a screwdriver, carefully loosen and remove the mounting screws that secure the switch to the junction box. As you do this, be mindful of any resistance or tension caused by the wires connected to the switch. Once the mounting screws are removed, gently pull the switch away from the junction box, allowing the wires to extend outward.
With the switch now detached from the junction box, it's essential to identify and take note of the specific wires connected to the switch terminals. Typically, you'll encounter three wires: a live or hot wire (usually black), a neutral wire (often white or gray), and a ground wire (typically green or bare copper). Carefully observe the color-coding and positioning of these wires, as this information will be invaluable when connecting the new switch.
Using a voltage tester, double-check the wires to ensure that there is no electrical current present. This additional precaution provides an extra layer of safety and minimizes the risk of accidental shocks as you handle the wires.
Once you've confirmed that the wires are safe to work with, carefully loosen the terminal screws on the switch to release the wires. Take note of the specific terminals to which each wire is connected, as this information will be crucial when connecting the new switch.
With the wires disconnected from the old switch, gently guide them back into the junction box, ensuring that they are free from any obstructions or entanglements. At this point, the old switch has been successfully removed, and the junction box is ready for the installation of the new switch.
By meticulously following these steps to remove the old switch, you'll lay the groundwork for a seamless transition to the installation of the new switch. Prioritizing precision and attention to detail at this stage sets the stage for a successful and efficient wiring process.
Step 3: Identify the wires
With the old switch removed and the junction box prepared for the installation of the new switch, the next critical step in wiring a light switch is to identify and understand the specific wires within the junction box. This process involves discerning the function and color-coding of each wire, ensuring that you have a clear understanding of how they will be connected to the new switch.
As you peer into the junction box, you'll likely encounter three primary wires: the live or hot wire, the neutral wire, and the ground wire. Understanding the role of each wire is essential for making accurate and secure connections when installing the new switch.
The live or hot wire, often colored black, carries the electrical current from the power source to the light fixture. This wire is responsible for delivering the essential power needed to illuminate the light. It's crucial to identify this wire accurately, as it will be connected to the appropriate terminal on the new switch to ensure proper functionality.
The neutral wire, typically white or gray, serves as the return path for the electrical current, completing the circuit and allowing for the safe flow of electricity. While the neutral wire may not be connected directly to the switch in all configurations, it's important to identify and understand its presence within the junction box.
The ground wire, commonly green or bare copper, is a vital safety feature that provides a path for electrical faults to be safely directed to the ground, minimizing the risk of electrical shocks and ensuring the integrity of the electrical system. Identifying and acknowledging the presence of the ground wire is crucial for maintaining a secure and compliant wiring setup.
In some cases, you may encounter additional wires, such as traveler wires in a three-way switch configuration or load wires in a setup involving multiple light fixtures. It's essential to carefully observe and document the presence of any additional wires, noting their color-coding and positioning within the junction box.
By meticulously identifying and understanding the specific wires within the junction box, you'll gain valuable insights that will inform the successful installation of the new switch. Taking the time to discern the function and characteristics of each wire sets the stage for a precise and secure wiring process, ensuring that the new switch is seamlessly integrated into the electrical system.
Step 4: Connect the new switch
With the old switch removed and a clear understanding of the wires within the junction box, you're now ready to proceed with connecting the new light switch. This pivotal step involves carefully and methodically establishing secure connections between the electrical wires and the terminals on the new switch, ensuring proper functionality and safety.
Begin by examining the new light switch and familiarizing yourself with its components. Most light switches feature terminal screws for connecting the live, neutral, and ground wires, as well as a grounding screw for securing the ground wire. Take note of any additional features or indicators on the switch that may guide the connection process.
Next, identify the specific terminals on the new switch and their corresponding functions. Typically, the terminals are labeled to indicate their intended purpose, such as "hot," "neutral," and "ground." Familiarizing yourself with these labels will facilitate accurate and secure connections, minimizing the risk of errors during the installation process.
Carefully guide the electrical wires from the junction box toward the new switch, ensuring that they are free from any tangles or obstructions. Take note of the color-coding and positioning of each wire, aligning them with the corresponding terminals on the switch based on their functions.
Using a wire stripper, carefully remove a small portion of insulation from the end of each wire, exposing a sufficient length of conductor for secure connections. Exercise caution to avoid damaging the conductors while stripping the insulation, as this can compromise the integrity of the connections.
With the wires prepared, begin connecting them to the appropriate terminals on the new switch. Securely fasten the live wire to the designated terminal, typically labeled "hot" or "live," using a screwdriver to tighten the terminal screw and establish a firm connection. Repeat this process for the neutral wire, ensuring that it is securely fastened to the corresponding terminal on the switch.
If the switch features a ground terminal, connect the ground wire to this terminal, securing it with the grounding screw to establish a reliable ground connection. The ground wire plays a crucial role in ensuring the safety and integrity of the electrical system, making it essential to create a secure and robust connection.
Once all the wires are securely connected to the new switch, carefully position the switch within the junction box, aligning it with the mounting screw holes. Use the provided mounting screws to secure the switch to the junction box, ensuring that it is firmly and evenly positioned.
With the new switch securely installed and the wires properly connected, you've successfully completed the crucial step of connecting the new light switch. By prioritizing precision and attention to detail throughout the process, you've established a reliable and functional electrical connection, setting the stage for the final step of testing the switch to ensure its proper operation.
Read more: How To Wire A Doorbell
Step 5: Test the switch
With the new light switch securely connected and installed, the final critical step in the process of wiring a light switch is to test the functionality of the switch. This pivotal step involves verifying that the connections are secure, the switch operates as intended, and the lighting system responds appropriately to the switch's activation.
To begin the testing process, carefully position the cover plate over the new switch and use a screwdriver to fasten it in place, ensuring a snug and secure fit. The cover plate serves as a protective barrier, safeguarding the internal components of the switch and providing a finished, polished look to the installation.
Once the cover plate is in place, restore the power supply to the circuit by returning to the main electrical panel or breaker box. Carefully locate the corresponding circuit breaker and switch it back to the "on" position, restoring electrical power to the lighting circuit. As you do this, remain vigilant and observant, ensuring that there are no signs of sparking, arcing, or unusual sounds emanating from the junction box or the switch.
With the power restored, proceed to test the functionality of the new switch. Carefully press the switch to activate the lighting system, observing the response of the light fixture connected to the switch. Take note of any flickering, dimming, or irregular behavior exhibited by the light, as these may indicate potential issues with the wiring or the switch's operation.
If the light responds as expected, illuminating promptly and consistently when the switch is activated, this indicates that the connections have been successfully established, and the switch is functioning correctly. Conversely, if the light fails to illuminate, flickers intermittently, or exhibits erratic behavior, this may signal a wiring issue or a faulty switch connection that requires further attention.
In the event of any irregularities or unexpected behavior during the testing process, it's crucial to revisit the connections and ensure that the wires are securely fastened to the appropriate terminals on the switch. Additionally, double-check the positioning and integrity of the wires within the junction box, ensuring that they are free from any damage or interference that may impede proper functionality.
By diligently testing the switch and observing the response of the lighting system, you'll gain valuable insights into the success of the wiring process and the overall functionality of the new switch. Prioritizing thorough testing and careful observation ensures that any potential issues are promptly identified and addressed, allowing for a safe, reliable, and efficient lighting system within your home.
Conclusion
In conclusion, mastering the art of wiring a light switch is a valuable skill that empowers homeowners to take control of their home's electrical systems while enhancing the functionality and ambiance of their living spaces. Throughout this comprehensive guide, we've delved into the step-by-step process of wiring a light switch, from the essential tools and materials needed to the critical safety precautions that must be observed. By following the outlined steps and embracing a safety-first mindset, you can confidently navigate the intricacies of electrical work, ensuring a successful and rewarding home improvement experience.
As you embark on the journey of wiring a light switch, it's essential to approach the task with patience, precision, and a commitment to safety. Turning off the power at the breaker box, removing the old switch, identifying the wires, connecting the new switch, and testing its functionality are all integral components of the process. Each step contributes to the seamless and secure installation of the new switch, culminating in a reliable and efficient lighting system within your home.
By prioritizing safety precautions, such as turning off the power supply and handling wires with care, you create a secure working environment that minimizes the risk of electrical accidents. Additionally, understanding the function and color-coding of the electrical wires within the junction box is crucial for making accurate and secure connections when installing the new switch. Through meticulous attention to detail and a methodical approach, you can ensure that the connections are secure and the switch operates as intended, providing a reliable control mechanism for your lighting system.
As you complete the final testing phase and observe the response of the lighting system to the new switch, you gain valuable insights into the success of the wiring process. Thorough testing and careful observation allow for the prompt identification and resolution of any potential issues, ensuring a safe, reliable, and efficient lighting system within your home.
In mastering the art of wiring a light switch, you not only gain a practical skill that contributes to the maintenance and enhancement of your home but also cultivate a sense of confidence and empowerment in tackling electrical projects. By embracing the knowledge and insights gained from this guide, you're well-equipped to navigate the intricacies of electrical work, paving the way for future home improvement endeavors with a sense of accomplishment and proficiency.