Home>Automotive>How To Reset The Oil Light In Your Vehicle
Automotive
How To Reset The Oil Light In Your Vehicle
Published: February 26, 2024
Learn how to easily reset the oil light in your vehicle with our step-by-step guide. Keep your automotive maintenance on track and avoid unnecessary trips to the mechanic.
(Many of the links in this article redirect to a specific reviewed product. Your purchase of these products through affiliate links helps to generate commission for Noodls.com, at no extra cost. Learn more)
Table of Contents
Introduction
Resetting the oil light in your vehicle is a crucial maintenance task that ensures your engine continues to operate at peak performance. The oil light, also known as the oil change indicator, serves as a reminder to replace the engine oil at regular intervals. Over time, the oil becomes contaminated with dirt and debris, leading to decreased lubrication and potential damage to the engine components. Therefore, resetting the oil light after an oil change is essential to accurately monitor the next service interval.
Understanding how to reset the oil light empowers vehicle owners to take control of their maintenance schedule and avoid potential engine issues. While the process may vary slightly depending on the make and model of your vehicle, the fundamental steps remain consistent across most cars and trucks. By following a few simple procedures, you can reset the oil light and ensure that your vehicle continues to run smoothly and efficiently.
In the following sections, we will delve into the step-by-step process of resetting the oil light in your vehicle. From locating the oil light to pressing the reset button, each step is essential in maintaining the health and longevity of your engine. By familiarizing yourself with these procedures, you can confidently address the oil light reset without the need for a professional mechanic, saving both time and money.
Whether you drive a compact sedan, a rugged SUV, or a powerful pickup truck, staying informed about essential maintenance tasks such as resetting the oil light is crucial for preserving the performance and reliability of your vehicle. With this knowledge at your disposal, you can take proactive measures to ensure that your engine remains in optimal condition, allowing you to enjoy a smooth and trouble-free driving experience.
Now, let's embark on this insightful journey to discover the step-by-step process of resetting the oil light in your vehicle, empowering you to take charge of your vehicle's maintenance needs.
Read more: How To Reset The Oil Life On A Honda Accord
Step 1: Locate the Oil Light
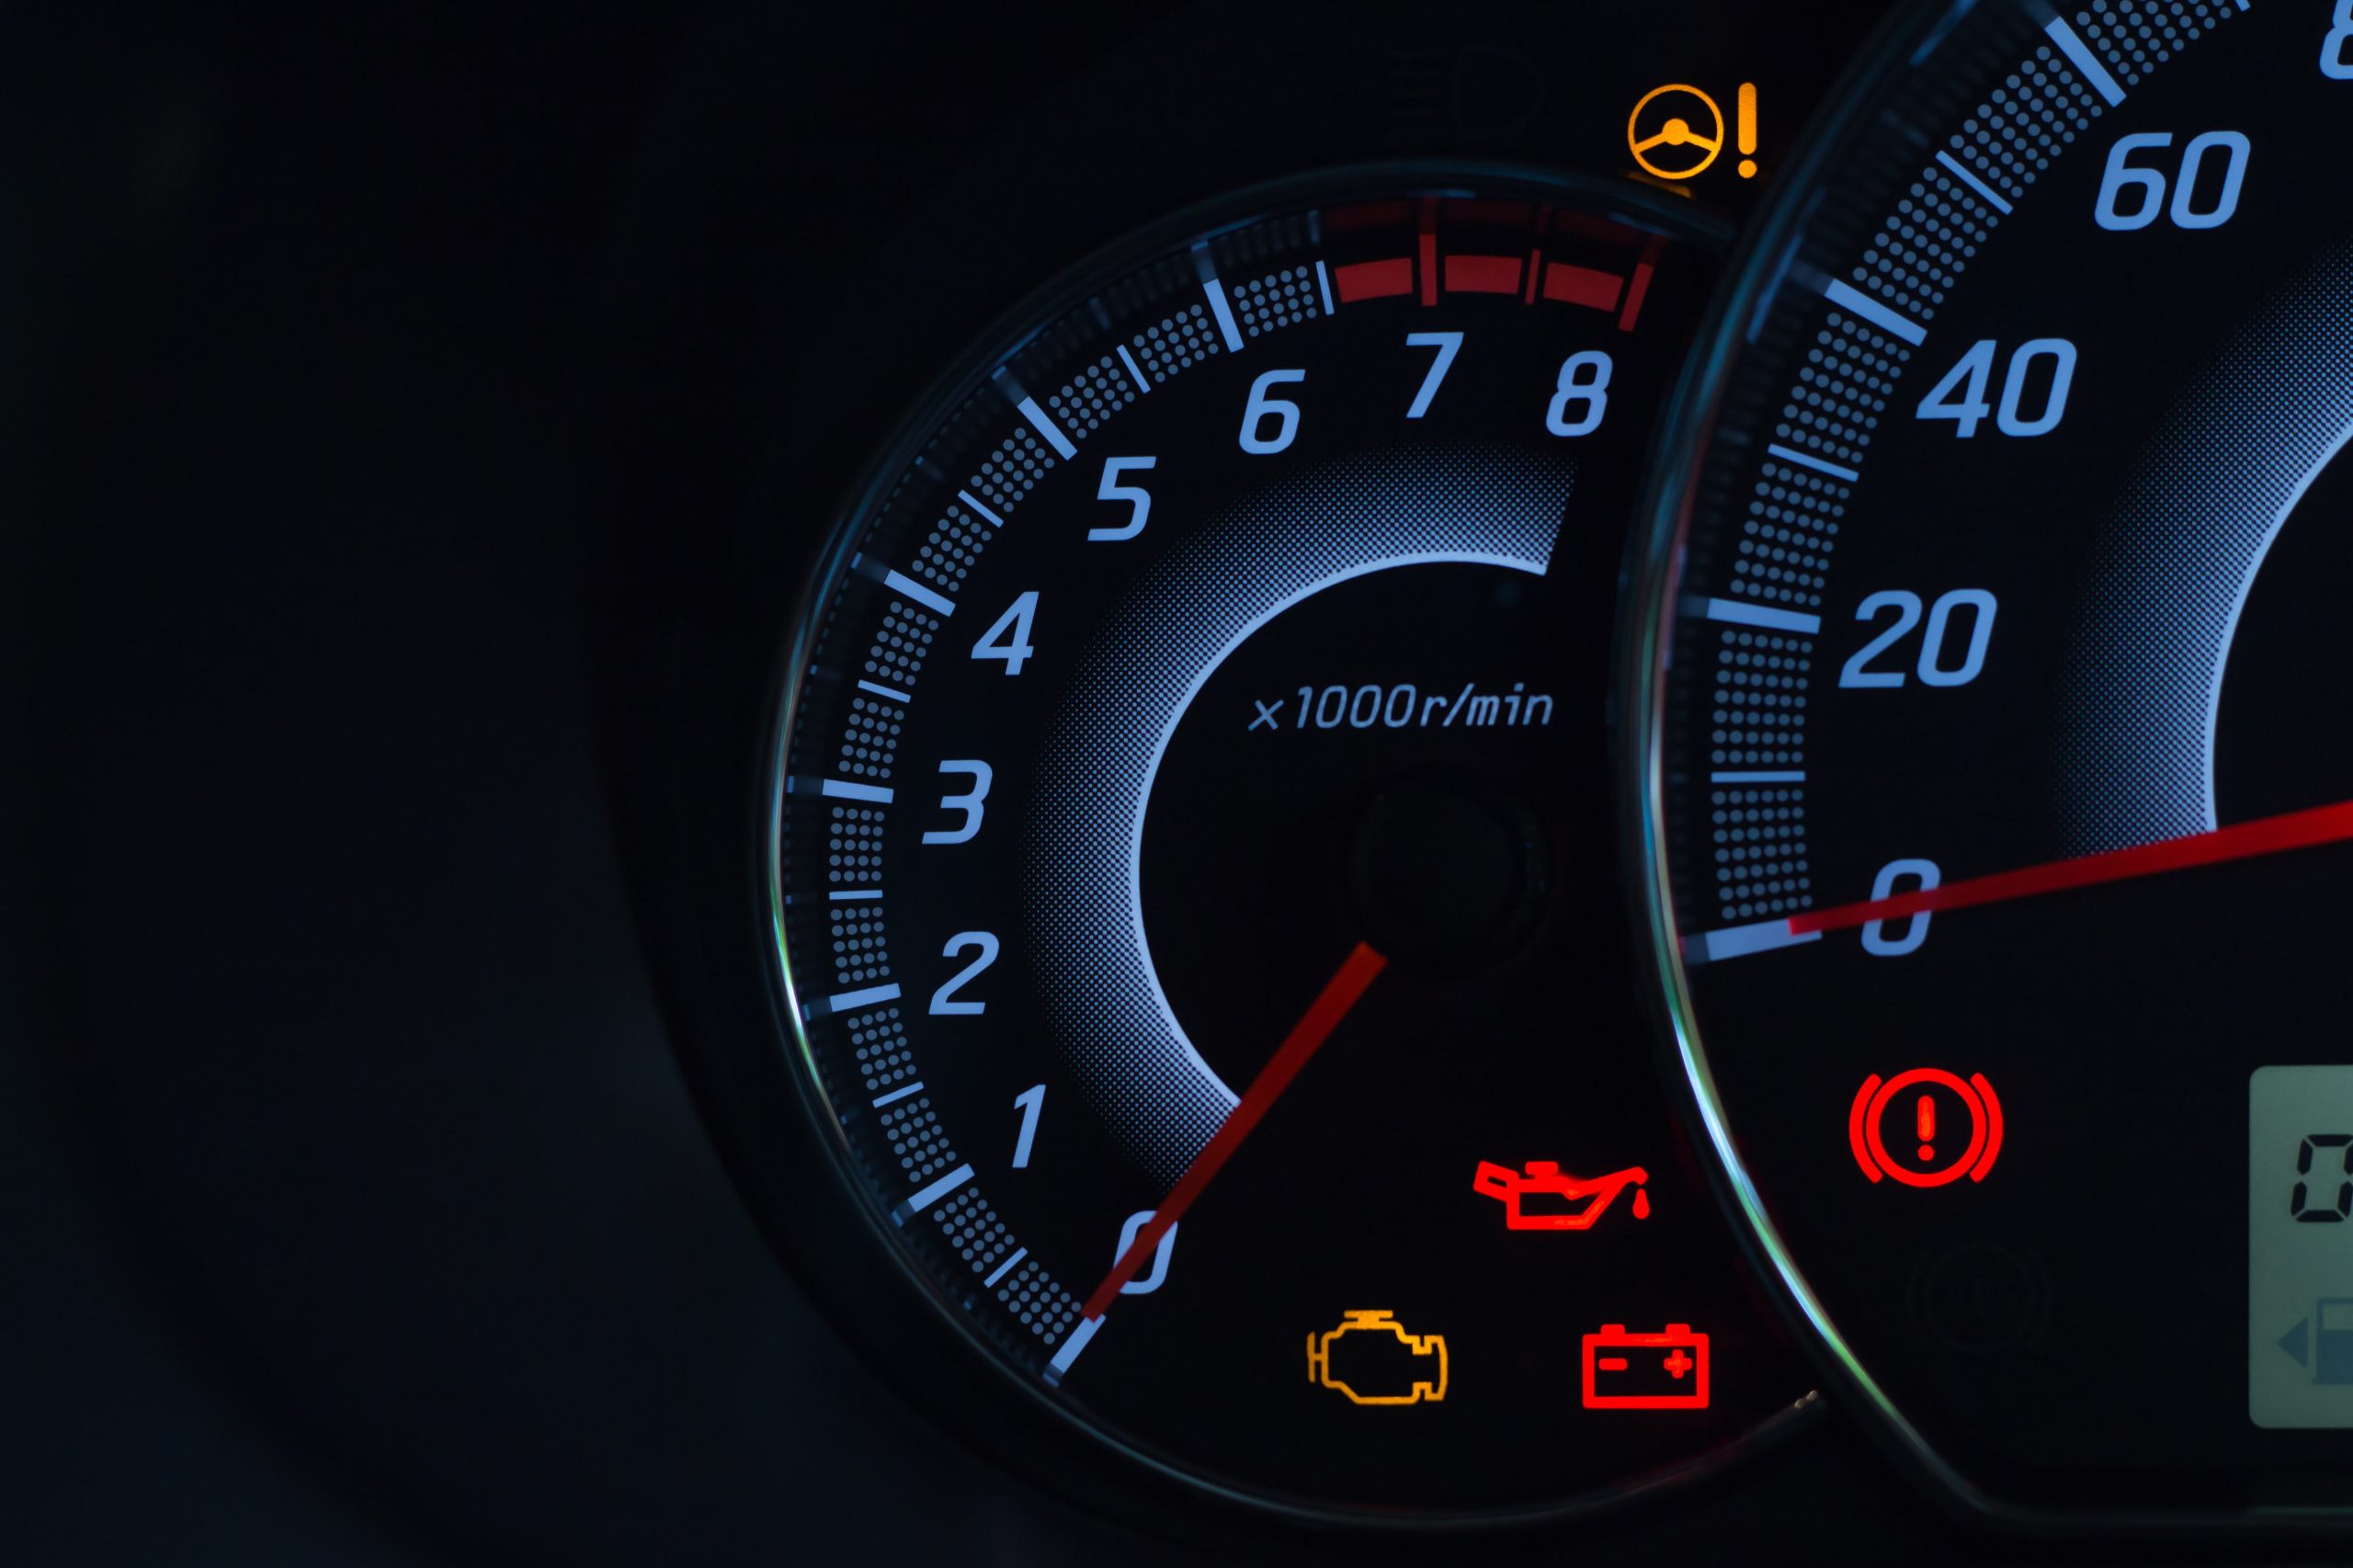
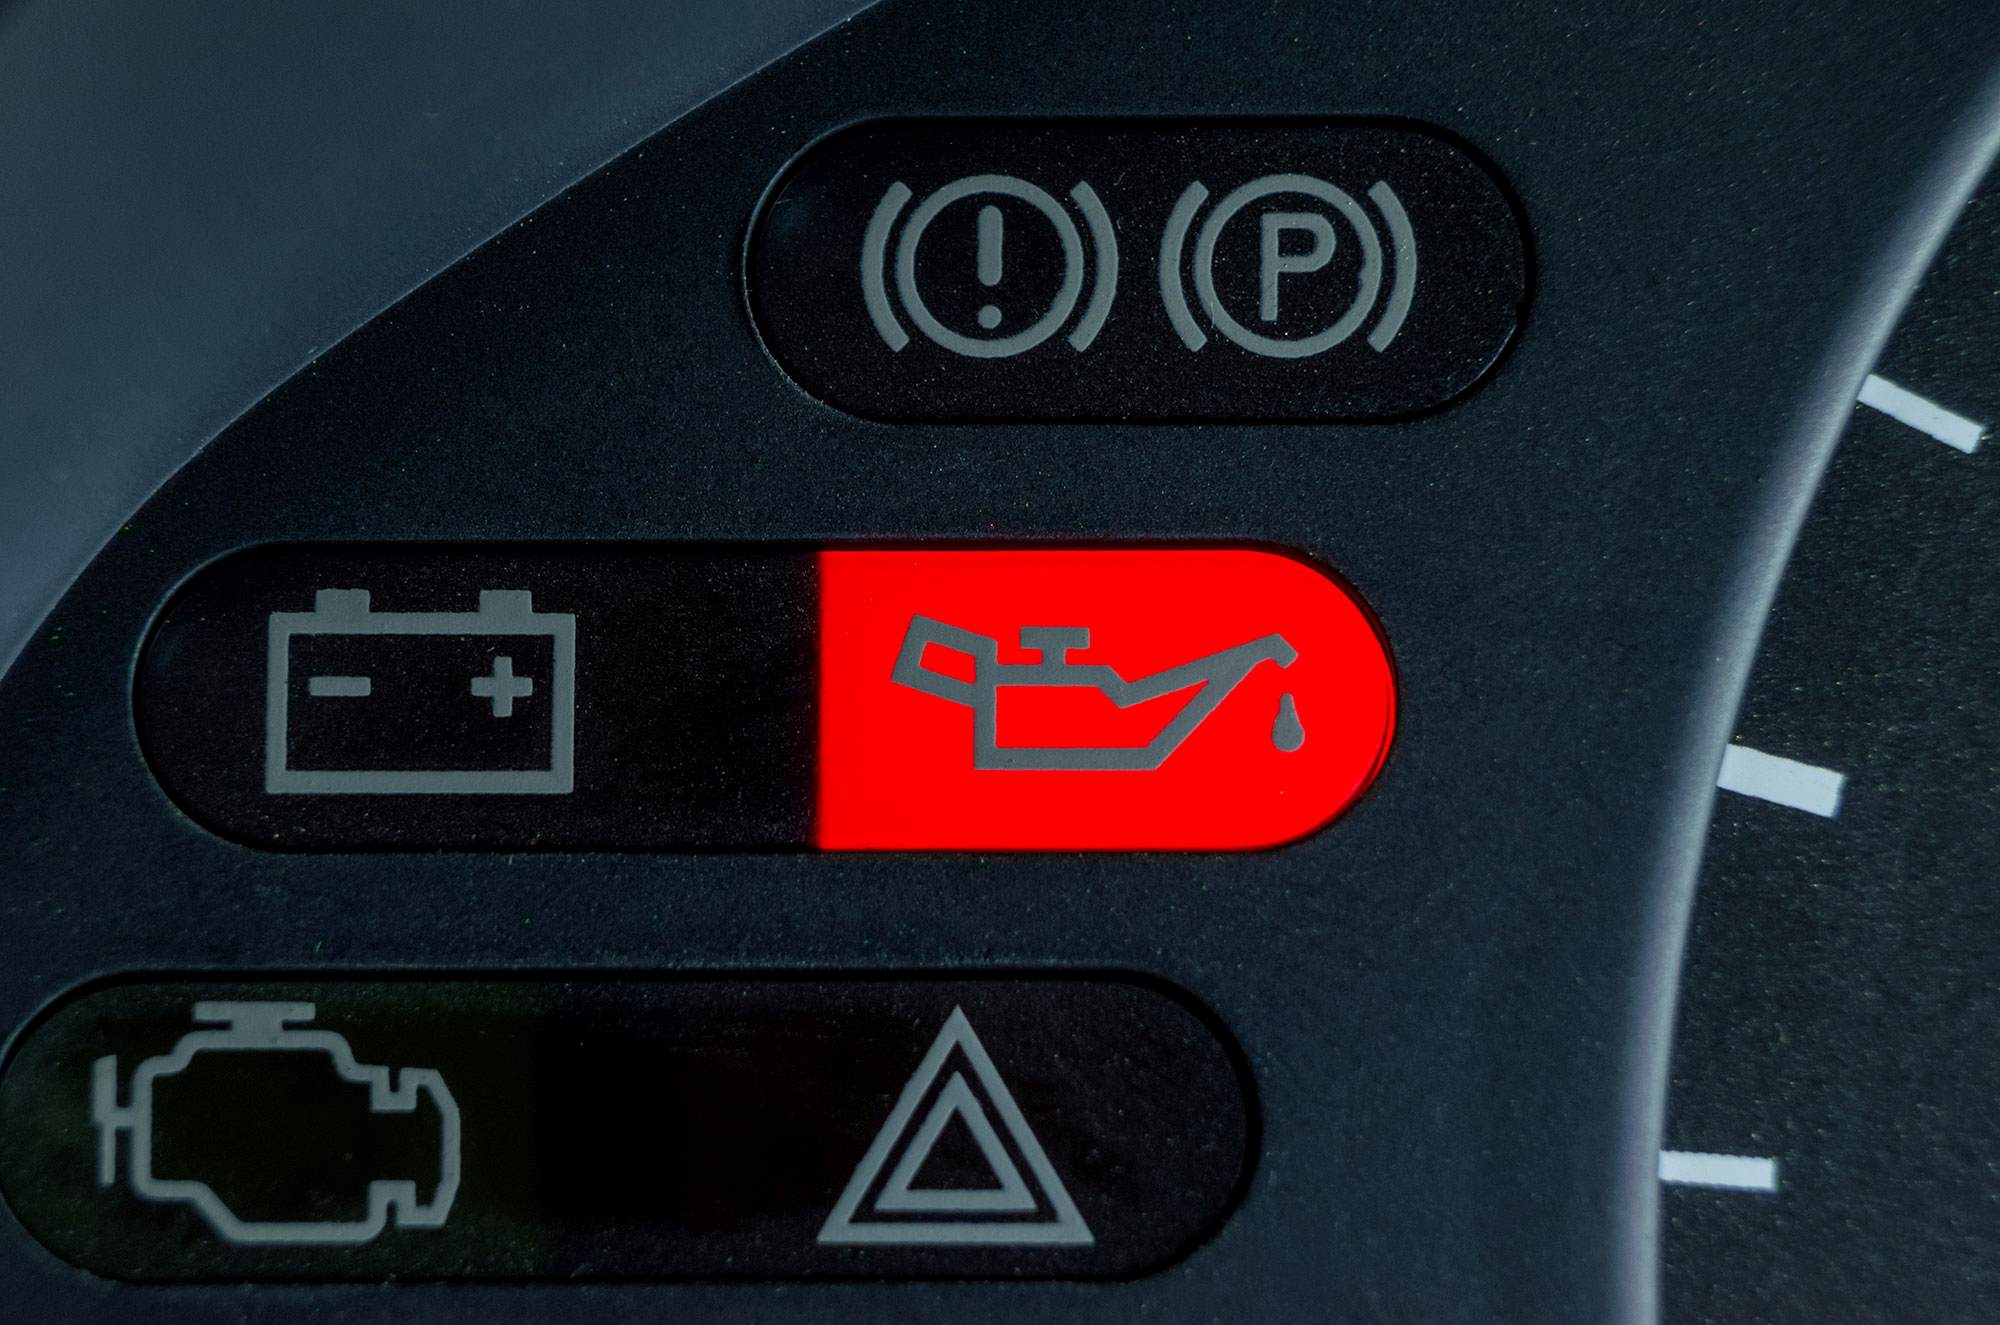
Locating the oil light in your vehicle is the first crucial step in the process of resetting it. The oil light serves as a vital indicator that notifies you when the engine oil needs to be changed. It is typically represented by an icon resembling an oil can or the word "OIL" and is situated on the instrument panel of your vehicle.
To locate the oil light, start by taking a seat in the driver's position and ensuring that the vehicle is stationary. Next, insert the key into the ignition and turn it to the "On" position without starting the engine. As the dashboard lights illuminate, look for the oil light among the cluster of indicators. Depending on the vehicle make and model, the oil light may appear as a small icon or a text display.
In some vehicles, the oil light may briefly illuminate when the ignition is turned on, serving as a self-check function. However, if the oil light remains illuminated or flashes while the engine is running, it indicates a potential issue with the oil pressure or level, requiring immediate attention.
Once you have identified the oil light, take note of its location on the instrument panel. Some vehicles may have the oil light positioned prominently in the center of the dashboard, while others may integrate it within the gauge cluster. Familiarizing yourself with the precise location of the oil light ensures that you can easily access it when proceeding to reset it after an oil change.
By successfully locating the oil light, you have completed the initial step in the process of resetting it. This foundational knowledge sets the stage for the subsequent steps, allowing you to proceed with confidence and precision as you navigate through the oil light reset procedure.
With the oil light identified, you are now prepared to move on to the next step, which involves checking the oil level to ensure that it meets the manufacturer's specifications. This critical inspection ensures that the engine is adequately lubricated, setting the stage for a seamless oil light reset process.
Stay tuned as we delve into the next step, guiding you through the essential process of checking the oil level and preparing for the successful reset of the oil light in your vehicle.
Step 2: Check the Oil Level
Checking the oil level in your vehicle is a fundamental aspect of maintaining engine health and ensuring optimal performance. The engine oil serves as a vital lubricant that reduces friction between moving parts, prevents overheating, and protects against wear and corrosion. Therefore, monitoring the oil level is essential to safeguard the engine's longevity and efficiency.
To begin the process of checking the oil level, park your vehicle on a level surface and allow the engine to cool down for a few minutes. This ensures that the oil has settled in the oil pan, providing an accurate measurement. Next, open the vehicle's hood and locate the engine oil dipstick, which is typically distinguished by a brightly colored handle, often in yellow or orange, to facilitate easy identification.
Once you have located the dipstick, carefully remove it from the engine and wipe it clean using a lint-free cloth or paper towel. Reinsert the dipstick fully into the oil reservoir, ensuring a secure fit, and then withdraw it once again to examine the oil level. The dipstick is marked with indicators denoting the minimum and maximum oil levels, allowing you to gauge the current oil quantity.
Inspect the oil coating on the dipstick to assess its color and consistency. Fresh, clean engine oil typically has a translucent amber hue, while oil that appears dark or gritty may indicate the need for an oil change. Additionally, the oil level should fall within the designated range on the dipstick, ensuring that it meets the manufacturer's specifications for proper engine lubrication.
If the oil level is below the minimum mark on the dipstick, it is advisable to add the appropriate type of engine oil to bring it to the optimal level. Conversely, if the oil level exceeds the maximum mark, it may be necessary to drain the excess oil to prevent overfilling, which can lead to engine damage and reduced efficiency.
By meticulously checking the oil level and assessing the oil quality, you gain valuable insights into the engine's condition and can take proactive measures to maintain its performance. This thorough examination sets the stage for the subsequent steps in the oil light reset process, ensuring that the engine is primed for continued operation at peak efficiency.
With the oil level successfully checked and verified, you are now prepared to proceed to the next step, which involves turning on the ignition to initiate the oil light reset procedure. Stay tuned as we delve into the subsequent steps, guiding you through the seamless process of resetting the oil light in your vehicle.
Step 3: Turn on the Ignition
Turning on the ignition is a pivotal step in the process of resetting the oil light in your vehicle. By engaging the ignition, you initiate the sequence that allows you to access the vehicle's internal systems and navigate through the reset procedure. This step is essential for establishing the connection between the vehicle's electronic control unit (ECU) and the oil light, enabling you to proceed with the reset process seamlessly.
To begin, ensure that your vehicle is parked in a safe and stationary position, with the transmission in the "Park" or "Neutral" position, depending on the vehicle's configuration. With the engine off, insert the key into the ignition and turn it to the "On" position without starting the engine. As the dashboard lights illuminate, including the oil light, you establish the necessary power supply to engage the vehicle's electronic systems.
As the ignition is activated, take a moment to observe the dashboard indicators, including the oil light. The oil light may illuminate briefly as part of the system's self-check function, confirming that the oil light reset procedure can be initiated. It is important to note that the specific sequence for accessing the reset function may vary depending on the vehicle's make and model.
Engaging the ignition also allows you to access the vehicle's onboard computer system, which stores essential data and diagnostic information. This connectivity is crucial for executing the oil light reset, as it enables you to interact with the vehicle's internal controls and navigate through the reset process with precision and accuracy.
By turning on the ignition, you establish the foundation for the subsequent steps in the oil light reset procedure, setting the stage for a seamless transition to the next phase. This pivotal step ensures that the vehicle's electronic systems are primed and ready for the reset process, empowering you to take control of your vehicle's maintenance needs with confidence and proficiency.
With the ignition successfully engaged, you are now prepared to progress to the next step, which involves pressing the reset button to initiate the oil light reset. Stay tuned as we delve into the subsequent steps, guiding you through the comprehensive process of resetting the oil light in your vehicle, ensuring that your engine remains in optimal condition for continued performance and reliability.
Step 4: Press the Reset Button
Pressing the reset button is a pivotal action that facilitates the reset of the oil light in your vehicle, marking a crucial stage in the maintenance process. The reset button, often located within the vehicle's instrument panel or accessible through the multifunction display, serves as the gateway to initiating the oil light reset procedure. By engaging this button, you activate the vehicle's internal systems, allowing you to navigate through the reset process with precision and efficiency.
To begin, locate the reset button within the instrument panel or on the multifunction display, depending on the vehicle's make and model. The reset button may be labeled with terms such as "Reset," "Oil," or "Service," and is designed to provide a user-friendly interface for accessing essential maintenance functions. Once you have identified the reset button, ensure that the ignition is turned on to enable access to the vehicle's internal controls.
With the reset button within reach and the ignition engaged, press and hold the reset button for a few seconds to initiate the oil light reset process. Depending on the vehicle's design, you may need to hold the button for a specific duration or navigate through the multifunction display menu to access the reset function. As you press the reset button, the oil light indicator may respond by flashing, changing color, or displaying a confirmation message on the instrument panel.
Engaging the reset button establishes communication between the vehicle's electronic control unit (ECU) and the oil light, signaling the commencement of the reset procedure. This interaction allows you to convey the necessary commands to the vehicle's internal systems, ensuring that the oil light is reset in accordance with the manufacturer's specifications. As the reset process unfolds, you may observe visual cues or prompts on the instrument panel, indicating that the oil light reset is in progress.
By pressing the reset button with precision and confidence, you take proactive measures to maintain the health and performance of your vehicle's engine. This decisive action empowers you to address the oil light reset without the need for professional assistance, saving both time and resources. As the reset procedure nears completion, you are poised to transition to the final step, which involves turning off the ignition to finalize the oil light reset process.
With the reset button successfully engaged, you have navigated through a critical phase of the oil light reset procedure, setting the stage for the seamless transition to the subsequent step. This proactive approach ensures that your vehicle remains in optimal condition, allowing you to enjoy a smooth and trouble-free driving experience.
Now, let's proceed to the next step, guiding you through the essential process of turning off the ignition to complete the oil light reset in your vehicle, marking the culmination of this comprehensive maintenance task.
Read more: How To Reset Oil Life Honda Civic
Step 5: Turn off the Ignition
Turning off the ignition serves as the final step in completing the oil light reset process, marking the culmination of this essential maintenance task. After successfully engaging the reset button and initiating the reset procedure, turning off the ignition signifies the completion of the reset sequence, ensuring that the oil light is reset in accordance with the manufacturer's specifications.
To proceed with turning off the ignition, release the reset button if it was held during the reset process. With the reset procedure initiated, turn the key in the ignition to the "Off" position, effectively shutting down the vehicle's electrical systems. As the dashboard lights and indicators deactivate, including the oil light, you confirm that the reset process has been successfully executed.
By turning off the ignition, you finalize the reset of the oil light, signaling that the vehicle's internal systems have acknowledged the reset command and updated the oil change interval. This critical step ensures that the vehicle's maintenance schedule is accurately reflected, allowing you to proceed with confidence knowing that the oil light has been reset in alignment with the engine's service requirements.
As the ignition is turned off, take a moment to observe the instrument panel, ensuring that the oil light is no longer illuminated. The absence of the oil light indicator signifies that the reset process has been completed, providing a visual confirmation that the oil light has been reset and the engine is primed for continued operation.
With the ignition successfully turned off, you have effectively concluded the oil light reset process, empowering you to take proactive measures in maintaining the health and performance of your vehicle's engine. This meticulous approach ensures that the oil light is reset in accordance with the manufacturer's guidelines, allowing you to drive with confidence and peace of mind, knowing that your vehicle is equipped to deliver optimal performance.
By following the comprehensive steps outlined in this guide, you have gained valuable insights into the process of resetting the oil light in your vehicle, enabling you to address this essential maintenance task with proficiency and precision. With the oil light successfully reset, you can embark on your driving adventures with the assurance that your vehicle's engine is primed for continued reliability and efficiency.
Conclusion
In conclusion, mastering the process of resetting the oil light in your vehicle empowers you to take proactive measures in maintaining the health and performance of your engine. By following the step-by-step procedures outlined in this guide, you have acquired valuable insights into this essential maintenance task, ensuring that your vehicle remains in optimal condition for continued reliability and efficiency.
The journey to reset the oil light begins with locating the indicator on the instrument panel, followed by checking the oil level to ensure proper lubrication. Turning on the ignition initiates the reset process, paving the way for pressing the reset button to convey the necessary commands to the vehicle's internal systems. Finally, turning off the ignition signifies the completion of the reset sequence, providing a visual confirmation that the oil light has been reset in alignment with the engine's service requirements.
By familiarizing yourself with these procedures, you have taken a proactive stance in preserving the performance and longevity of your vehicle's engine. This knowledge empowers you to address the oil light reset without the need for professional assistance, saving both time and resources while ensuring that your vehicle continues to run smoothly and efficiently.
As you embark on your driving adventures, the successful reset of the oil light serves as a testament to your commitment to vehicle maintenance. By staying informed about essential tasks such as resetting the oil light, you demonstrate a proactive approach to vehicle care, ensuring that your engine remains in optimal condition for the road ahead.
With the oil light reset completed, you can drive with confidence and peace of mind, knowing that your vehicle is equipped to deliver optimal performance. This comprehensive guide has equipped you with the knowledge and proficiency to navigate through the oil light reset process, empowering you to take charge of your vehicle's maintenance needs with confidence and precision.
As you continue to prioritize the health and performance of your vehicle, the ability to reset the oil light stands as a testament to your dedication to proactive maintenance. By mastering this essential task, you ensure that your vehicle remains primed for continued reliability, allowing you to enjoy a smooth and trouble-free driving experience.
In closing, the successful reset of the oil light marks a significant milestone in your journey as a vehicle owner, signifying your commitment to maintaining the health and performance of your engine. With this knowledge at your disposal, you are well-equipped to navigate through the maintenance needs of your vehicle, ensuring that it continues to operate at peak efficiency for the miles ahead.