Home>Technology and Computers>How To Reset IPhone
Technology and Computers
How To Reset IPhone
Published: March 5, 2024
Learn how to reset your iPhone with our comprehensive guide. Get step-by-step instructions and troubleshooting tips for technology and computers.
(Many of the links in this article redirect to a specific reviewed product. Your purchase of these products through affiliate links helps to generate commission for Noodls.com, at no extra cost. Learn more)
Table of Contents
Introduction
Resetting your iPhone can be a useful solution for various issues, such as sluggish performance, software glitches, or the need to erase all data before selling or giving away your device. It's akin to hitting the reset button on a malfunctioning gadget, often resolving persistent problems and restoring your iPhone to a fresh, out-of-the-box state.
Before delving into the reset process, it's crucial to understand the importance of backing up your iPhone. This step ensures that your valuable data, including photos, contacts, messages, and app settings, is safely stored and can be easily restored after the reset. Without a backup, resetting your iPhone could lead to irreversible data loss, which is a situation best avoided.
Once your data is safely backed up, the reset process involves erasing all content and settings on your iPhone, essentially reverting it to its original state. This can be a powerful troubleshooting tool, particularly when your device is plagued by persistent issues that seem impervious to other fixes.
After the reset, you have the option to restore your iPhone from the backup, effectively bringing back all your data and settings. This final step ensures that your iPhone is not only reset but also reinstated with your familiar setup, making the transition seamless and hassle-free.
In the following sections, we will delve into the detailed steps for backing up your iPhone, the various methods for resetting your device, and the process of restoring your iPhone from a backup. By the end of this guide, you will be equipped with the knowledge and confidence to navigate the iPhone reset process with ease and efficiency.
Backing Up Your iPhone
Backing up your iPhone is a crucial preparatory step before initiating a reset. This process ensures that your valuable data, including photos, contacts, messages, and app settings, is securely stored and can be easily restored after the reset. With the importance of this step in mind, let's explore the various methods for backing up your iPhone.
iCloud Backup
iCloud offers a convenient and automatic backup solution for your iPhone. To enable iCloud backup, ensure that your device is connected to a Wi-Fi network and plugged into a power source. Then, follow these simple steps:
-
Access Settings: Open the "Settings" app on your iPhone and tap on your name at the top of the screen.
-
iCloud: Tap "iCloud" and then "iCloud Backup."
-
Enable iCloud Backup: Toggle the "iCloud Backup" switch to the on position. Your iPhone will now automatically back up to iCloud when connected to Wi-Fi and power.
iTunes Backup
If you prefer a local backup stored on your computer, iTunes provides a reliable solution. Here's how to create an iTunes backup for your iPhone:
-
Connect to Computer: Use a USB cable to connect your iPhone to a computer with the latest version of iTunes installed.
-
Launch iTunes: Open iTunes if it doesn't launch automatically upon connecting your iPhone.
-
Backup: Click on the iPhone icon in the top-left corner of the iTunes window. Under the "Backups" section, select "This Computer" and click "Back Up Now."
Backup Verification
Regardless of the backup method you choose, it's essential to verify that the backup was successful. To do this, follow these steps:
-
iCloud Backup: Navigate to "Settings" > [Your Name] > "iCloud" > "iCloud Backup" and ensure that the "Last Backup" time and date are recent.
-
iTunes Backup: In iTunes, go to "Edit" (Windows) or "iTunes" (Mac) > "Preferences" > "Devices" and verify that your iPhone backup is listed with the correct date and time.
By following these steps, you can ensure that your iPhone data is securely backed up, providing peace of mind as you proceed with the reset process.
Remember, a backup is your safety net, preserving your precious data and settings, and enabling a seamless restoration after the reset. With your iPhone securely backed up, you are now ready to explore the various methods for resetting your device.
Read more: How To Reset Garbage Disposal
Resetting Your iPhone
Resetting your iPhone is a powerful troubleshooting tool that can effectively address a wide range of issues, from persistent software glitches to sluggish performance. It essentially involves erasing all content and settings on your device, reverting it to its original state. Before proceeding with the reset, it's important to understand the different methods available for resetting your iPhone.
Method 1: Software Reset
A software reset, also known as a soft reset or force restart, is a quick and straightforward method to resolve minor software hiccups without erasing your data. The process varies slightly depending on the iPhone model:
-
For iPhone 8 and later models:
- Press and release the volume up button.
- Press and release the volume down button.
- Press and hold the side button until the Apple logo appears.
-
For iPhone 7 and 7 Plus:
- Simultaneously press and hold the volume down button and the side button until the Apple logo appears.
-
For iPhone 6s and earlier models:
- Simultaneously press and hold the home button and the top (or side) button until the Apple logo appears.
Method 2: Factory Reset
A factory reset, also known as a hard reset, involves erasing all content and settings on your iPhone, essentially restoring it to its original, out-of-the-box state. This method is particularly useful when your device is plagued by persistent issues that seem impervious to other fixes. To perform a factory reset:
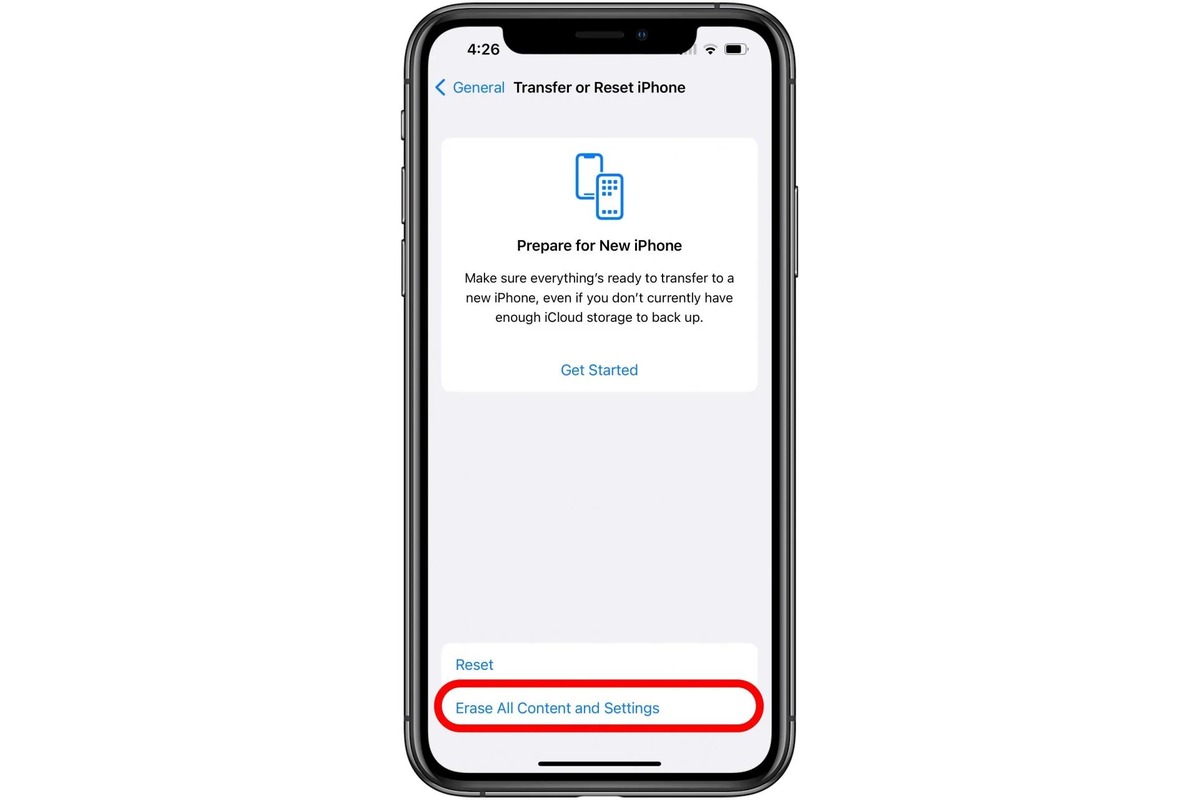
- Open the "Settings" app on your iPhone.
- Tap "General" and scroll down to select "Reset."
- Choose "Erase All Content and Settings" and enter your passcode if prompted.
- Confirm the action and wait for the process to complete.
It's important to note that a factory reset irreversibly erases all data on your iPhone, so it's crucial to have a recent backup before proceeding with this method.
Method 3: Using iTunes
If your iPhone is unresponsive or you're unable to access the Settings app, you can use iTunes on a computer to initiate the reset:
- Connect your iPhone to a computer and open iTunes (or Finder on macOS Catalina and later).
- Select your iPhone when it appears in iTunes.
- Click "Restore iPhone" and confirm the action.
Regardless of the method you choose, it's essential to understand the implications of resetting your iPhone. While a software reset preserves your data, a factory reset and iTunes restore result in the complete erasure of your device. Therefore, it's crucial to weigh the necessity of the reset against the potential loss of data.
By familiarizing yourself with these methods, you can confidently navigate the iPhone reset process, effectively addressing software issues and restoring your device to optimal performance.
Read more: How To Reset Nespresso Vertuo
Restoring Your iPhone from a Backup
Restoring your iPhone from a backup is the final step in the reset process, ensuring that your valuable data and settings are seamlessly reinstated on your device. Whether you've performed a software reset or a factory reset, the restoration process allows you to bring back your photos, contacts, messages, app settings, and more, effectively recreating your familiar iPhone experience.
iCloud Backup Restoration
If you backed up your iPhone using iCloud, the restoration process is straightforward and can be initiated directly from your device. Here's how to restore your iPhone from an iCloud backup:
-
Erase All Content and Settings: After resetting your iPhone, follow the initial setup prompts until you reach the "Apps & Data" screen.
-
Select Restore from iCloud Backup: Tap on "Restore from iCloud Backup" and sign in to your iCloud account using your Apple ID and password.
-
Choose Backup: Select the most relevant backup from the list of available iCloud backups. Consider the backup date and size to ensure you're restoring from the most recent and comprehensive backup.
-
Wait for Restoration: The restoration process will begin, and your iPhone will restart once the process is complete. Ensure that your device is connected to a Wi-Fi network and plugged into a power source during the restoration.
iTunes Backup Restoration
If you opted for an iTunes backup, the restoration process involves using iTunes on a computer to bring back your data and settings. Here's how to restore your iPhone from an iTunes backup:
-
Connect to Computer: Connect your iPhone to the computer that you used to create the iTunes backup.
-
Launch iTunes: Open iTunes if it doesn't launch automatically upon connecting your iPhone.
-
Select Your iPhone: When your iPhone appears in iTunes, select it.
-
Choose Backup: Under the "Backups" section, click on "Restore Backup" and select the most relevant backup from the list.
-
Wait for Restoration: iTunes will begin restoring your iPhone from the selected backup. Ensure that your iPhone remains connected to the computer until the process is complete.
By following these steps, you can effectively restore your iPhone from a backup, ensuring that your data and settings are seamlessly reinstated. This final step completes the reset process, allowing you to enjoy your familiar iPhone experience with all your valuable content intact.