Home>Home and Garden>How To Harvest Sunflower Seeds
Home and Garden
How To Harvest Sunflower Seeds
Published: March 2, 2024
Learn how to harvest sunflower seeds at home with our comprehensive guide. Discover the best techniques and tips for a successful harvest in your home and garden.
(Many of the links in this article redirect to a specific reviewed product. Your purchase of these products through affiliate links helps to generate commission for Noodls.com, at no extra cost. Learn more)
Table of Contents
Introduction
Harvesting sunflower seeds is a rewarding and enjoyable process that allows you to gather the fruits of your labor and enjoy the nutritional benefits of these versatile seeds. Sunflowers, with their vibrant yellow petals and towering stems, are not only a beautiful addition to any garden but also a source of delicious and nutritious seeds. Whether you're a seasoned gardener or a novice enthusiast, learning how to harvest sunflower seeds is a valuable skill that can provide you with a bountiful supply of seeds for snacking, cooking, or even planting in the next growing season.
In this comprehensive guide, we will walk you through the step-by-step process of harvesting sunflower seeds, from waiting for the sunflowers to mature to properly storing the seeds for future use. By following these simple yet essential steps, you can ensure that your sunflower seeds are of the highest quality and ready to be enjoyed in a variety of ways. So, roll up your sleeves, put on your gardening gloves, and let's delve into the fascinating world of harvesting sunflower seeds.
Read more: How To Harvest Lettuce
Step 1: Wait for the sunflowers to mature
Before embarking on the exciting journey of harvesting sunflower seeds, it's crucial to exercise patience and allow the sunflowers to reach full maturity. This initial step sets the stage for a successful harvest and ensures that the seeds are at their peak quality.
As you observe your sunflower patch, you'll notice the gradual transformation of the flower heads. Initially, the vibrant yellow petals of the sunflower will be in full bloom, attracting bees and adding a cheerful touch to your garden. However, as the days pass, the petals will begin to wilt and fall away, revealing the central disk of the sunflower, which contains the developing seeds.
A key indicator of maturity is when the back of the sunflower head turns from green to a yellowish or brown color. This signifies that the seeds are ripening and reaching their full potential. Additionally, the once plump and firm seeds will start to shrink and become more compact, indicating that they are drying out and becoming suitable for harvest.
It's important to monitor the progress of the sunflowers regularly during this stage, as timing is crucial for optimal seed development. Waiting for the sunflowers to mature fully ensures that the seeds will be flavorful, nutritious, and viable for future planting if desired.
During this waiting period, take the time to appreciate the natural beauty of the sunflowers and the intricate process of seed development. Observing the gradual transformation of the flower heads can be a meditative and awe-inspiring experience, deepening your connection to the natural world and the cycles of growth and renewal.
By allowing the sunflowers to mature fully, you are setting the foundation for a successful harvest and ensuring that the seeds will be of the highest quality. This patience and attentiveness to the natural rhythms of the sunflowers will be rewarded as you move on to the next steps of the harvesting process, ready to reap the benefits of your patience and care.
Step 2: Cut the sunflower heads
Once the sunflowers have reached full maturity and the seeds are ready for harvest, it's time to gather the bountiful heads for the next phase of the process. Cutting the sunflower heads is a crucial step that requires precision and care to ensure that the seeds are collected efficiently and without damage.
To begin, prepare a sharp pair of garden shears or a sturdy knife, ensuring that the cutting tool is clean and free from any debris that could contaminate the seeds. Approach the sunflower patch with a sense of anticipation, ready to gather the fruits of your labor and continue the journey towards a plentiful harvest.
Select the sunflower heads that exhibit the telltale signs of maturity, such as a yellowish or brown color on the back of the head and shrinking, compact seeds. Carefully grasp the sunflower head with one hand, supporting the stem, and position the cutting tool at the base of the head where it meets the main stem.
With a steady and deliberate motion, make a clean cut through the stem, ensuring that the sunflower head is detached without causing unnecessary damage to the seeds. As you complete each cut, place the harvested sunflower heads in a designated container or basket, ready to be transported to the next stage of the process.
As you move through the sunflower patch, relish the satisfaction of gathering the heads that hold the promise of delicious and nutritious seeds. The act of cutting the sunflower heads signifies the culmination of the growing season and the transition to the rewarding task of collecting the seeds that will enrich your culinary endeavors and future gardening ventures.
By approaching this step with attentiveness and precision, you are setting the stage for a successful harvest and ensuring that the seeds remain intact and viable for consumption or future planting. With the sunflower heads in hand, you are ready to proceed to the next phase of the process, eager to continue the journey towards a plentiful supply of sunflower seeds.
Step 3: Dry the sunflower heads
After the sunflower heads have been harvested, the next critical step in the process of harvesting sunflower seeds is to ensure that the heads are thoroughly dried. Drying the sunflower heads is essential for preserving the seeds and preventing mold or rot, ultimately contributing to the longevity and quality of the harvested seeds.
To begin the drying process, find a well-ventilated and dry area where the sunflower heads can be hung or placed to air dry. Ideally, this location should be protected from direct sunlight to prevent any potential damage to the seeds from excessive heat. A cool, dry environment will facilitate the gradual drying of the sunflower heads, allowing the seeds to mature and develop their characteristic flavor and texture.
One effective method for drying sunflower heads is to hang them upside down in a well-ventilated area. Using twine or string, securely tie the sunflower stems to a horizontal support, such as a clothesline or a sturdy rod. By hanging the sunflower heads upside down, any remaining moisture in the heads will be able to escape, promoting thorough drying and reducing the risk of mold or spoilage.
Alternatively, if hanging the sunflower heads is not feasible, they can be laid out on a clean and dry surface, such as a wire rack or a screen, ensuring that there is ample space between each head to allow for proper airflow. This method also facilitates the gradual evaporation of moisture from the heads, contributing to the overall drying process.
As the sunflower heads dry, monitor them regularly to ensure that the process is proceeding effectively. Depending on the environmental conditions, the drying process may take several weeks to complete. During this time, the heads will gradually lose moisture, and the seeds will continue to mature, resulting in a desirable flavor and texture.
Throughout the drying period, take the opportunity to appreciate the natural beauty of the sunflower heads and the intricate patterns and textures of the developing seeds. The gradual transformation from freshly harvested heads to dried, mature seeds is a testament to the resilience and abundance of nature, offering a captivating display of the life cycle of the sunflowers.
By dedicating attention to the proper drying of the sunflower heads, you are ensuring that the seeds will be preserved in optimal condition, ready to be enjoyed in various culinary applications or stored for future planting. The thorough drying of the sunflower heads sets the stage for the next crucial step in the process: removing the seeds from the heads in preparation for storage and consumption.
Step 4: Remove the seeds from the sunflower heads
Once the sunflower heads have been thoroughly dried, the next pivotal step in the process of harvesting sunflower seeds is to delicately remove the seeds from the heads. This step requires patience and precision to ensure that the seeds are extracted without damage, preserving their quality and viability for consumption or future planting.
To begin the process of seed removal, prepare a clean and spacious work area where you can comfortably handle the sunflower heads and collect the seeds. You may want to lay down a large sheet of paper or a clean cloth to capture any stray seeds and facilitate easy cleanup. Additionally, have a container ready to hold the extracted seeds, ensuring that it is clean and dry to maintain the integrity of the seeds.
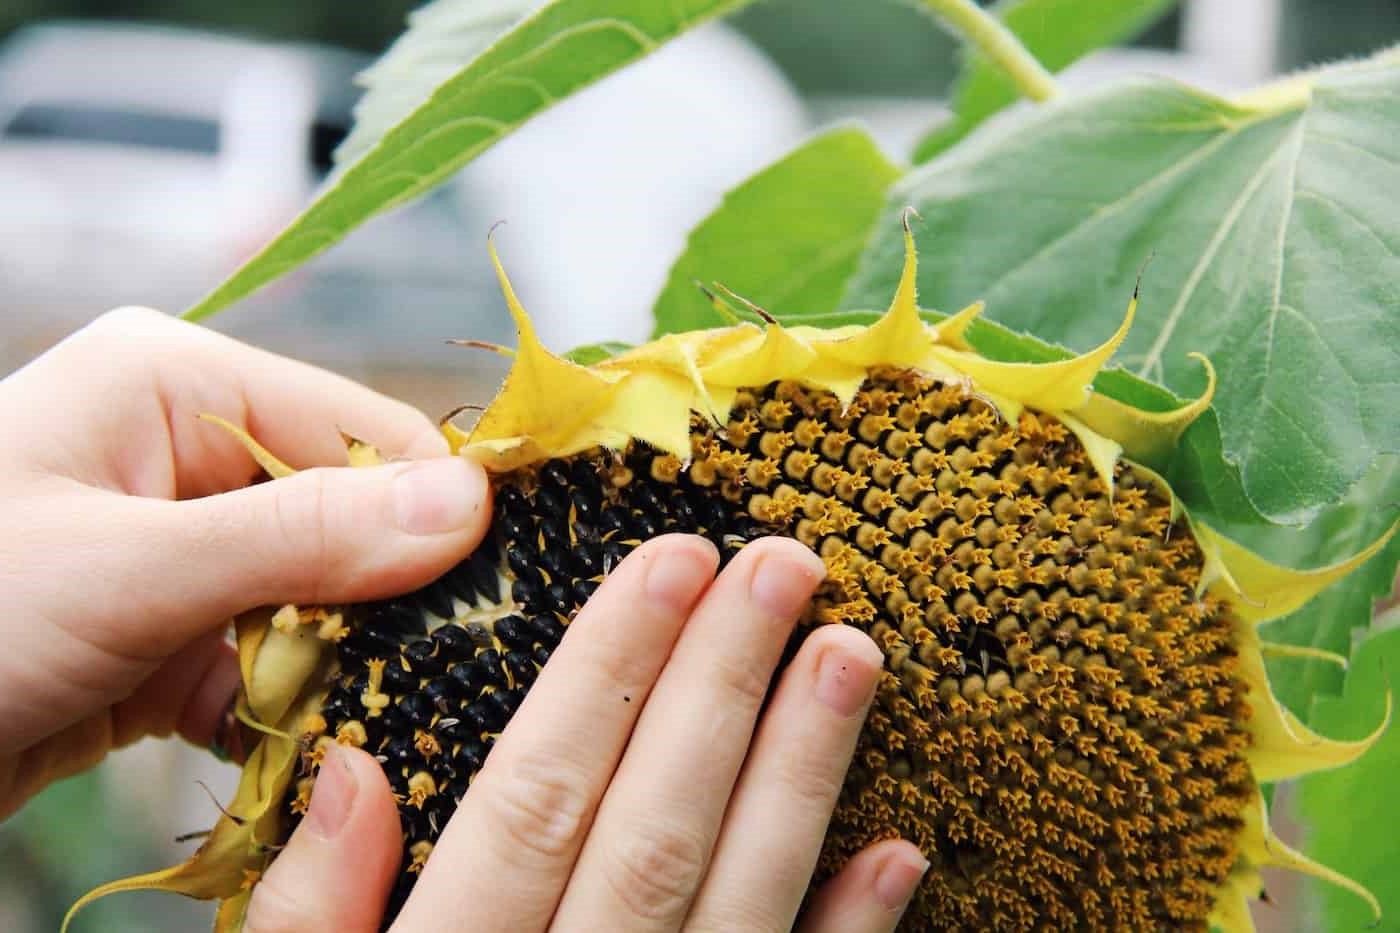
Gently hold a dried sunflower head in one hand, cradling it with care to prevent any unnecessary breakage or spillage of the seeds. With your other hand, use your fingers or a small tool to begin loosening the seeds from the central disk of the sunflower head. As you work your way around the head, the seeds should start to dislodge easily, falling into the container below.
Continue this process methodically, rotating the sunflower head and gently coaxing the seeds free from their attachment points. Exercise caution to avoid applying excessive force, as this could lead to damage to the seeds or the central disk. The goal is to extract the seeds with minimal disruption, preserving their shape and integrity.
As you remove the seeds, take a moment to appreciate their rich color and distinctive shape, a testament to the natural beauty and abundance of the sunflowers. The act of extracting the seeds is a tactile and rewarding experience, connecting you to the fruits of your gardening efforts and the potential for culinary exploration.
Once all the seeds have been carefully removed from the sunflower heads, take a moment to inspect them for any remaining pieces of debris or chaff. Gently sift through the seeds, discarding any extraneous material to ensure that the seeds are clean and ready for storage or immediate use.
By approaching the task of seed removal with attentiveness and care, you are preserving the quality and viability of the sunflower seeds, setting the stage for their next phase of utilization. With the seeds successfully extracted, you are ready to proceed to the final step in the process: storing the sunflower seeds for future enjoyment and potential planting.
Step 5: Store the sunflower seeds
After the meticulous process of harvesting and preparing the sunflower seeds, it is essential to store them properly to maintain their freshness, flavor, and viability for future use. Proper storage ensures that the seeds remain in optimal condition, whether they are destined for culinary endeavors or reserved for planting in the next growing season.
To begin, ensure that the harvested sunflower seeds are completely dry before proceeding with the storage process. Any residual moisture could lead to mold or spoilage, compromising the quality of the seeds. Once you have confirmed that the seeds are thoroughly dried, it's time to select suitable containers for storage.
Choose clean, airtight containers that are specifically designed for storing seeds. Mason jars, food-grade plastic containers, or resealable bags are excellent options for preserving the seeds. It's important to use containers that can effectively prevent moisture and air from reaching the seeds, safeguarding them against degradation.
Before transferring the seeds to the chosen containers, take a moment to inspect them for any remaining debris or impurities. Remove any stray pieces of chaff or plant material, ensuring that the seeds are clean and free from contaminants. This attention to detail contributes to the longevity and quality of the stored seeds.
Once the seeds have been inspected and cleaned, carefully transfer them to the selected containers, taking care not to crush or damage the delicate seeds. Fill the containers with the seeds, leaving some headspace to accommodate any potential expansion or settling of the seeds. Seal the containers tightly to create a secure and protective environment for the seeds.
Label the containers with the date of harvest and any relevant details, such as the sunflower variety or specific characteristics of the seeds. This information will be valuable when planning for future use or when sharing the seeds with fellow gardening enthusiasts. Additionally, consider including any special notes or observations that may be helpful for reference.
Store the sealed containers of sunflower seeds in a cool, dark, and dry location to maintain their quality and viability. A pantry, cupboard, or cellar with consistent temperature and humidity levels is ideal for preserving the seeds. Avoid exposure to direct sunlight or fluctuating temperatures, as these factors can compromise the integrity of the seeds.
By following these meticulous steps for storing sunflower seeds, you are ensuring that the seeds remain in prime condition, ready to enhance your culinary creations or contribute to the next season's garden. The careful attention to storage details reflects your dedication to preserving the fruits of your labor and maximizing the potential of the harvested sunflower seeds.