Home>Arts and Culture>How To Draw A Braid
Arts and Culture
How To Draw A Braid
Published: February 29, 2024
Learn how to draw a beautiful braid with step-by-step instructions and tips. Enhance your arts and culture skills with this easy tutorial.
(Many of the links in this article redirect to a specific reviewed product. Your purchase of these products through affiliate links helps to generate commission for Noodls.com, at no extra cost. Learn more)
Table of Contents
Introduction
Drawing a braid can seem like a daunting task, but with the right guidance and a bit of practice, you can master this intricate and beautiful hairstyle in no time. Whether you're an aspiring artist, a fashion enthusiast, or simply looking to add a touch of flair to your illustrations, learning how to draw a braid can be a rewarding and enjoyable experience.
In this step-by-step guide, we will explore the art of drawing a braid, breaking down the process into simple and manageable steps. By following along, you will gain a deeper understanding of the structure and flow of a braid, allowing you to create stunning and lifelike braided hairstyles in your artwork.
So, grab your drawing materials, clear your workspace, and let's embark on this creative journey together. With a bit of patience and a willingness to learn, you'll soon be adding captivating braids to your artistic repertoire. Let's dive in and unravel the secrets of drawing a mesmerizing braid!
Read more: How To Create Bubble Braids
Materials Needed
Before we begin our artistic endeavor, it's essential to gather the necessary materials to bring our vision to life. Here's what you'll need to embark on your braid-drawing journey:
-
Drawing Paper: Select a smooth, sturdy paper that can withstand the various pencil strokes and erasures involved in the drawing process. A heavier weight paper will provide better support and durability.
-
Drawing Pencils: A set of high-quality drawing pencils in varying lead grades (ranging from 2H to 6B) will allow you to achieve different levels of shading and detailing in your braid illustration.
-
Eraser: A soft, kneaded eraser is ideal for gently lifting graphite and creating subtle highlights within the braid. Additionally, a precision eraser pen can be handy for refining intricate details.
-
Blending Stump: This tool aids in seamlessly blending and smudging graphite, enabling you to achieve smooth transitions and soft textures within the braid.
-
Reference Images: While not a physical material, having reference images of braided hairstyles can provide valuable visual guidance and inspiration as you work on your drawing.
-
Drawing Board or Surface: A firm drawing board or a smooth, flat surface to support your drawing paper and provide a stable foundation for your artwork.
-
Good Lighting: Adequate lighting is crucial for accurately observing the details of your drawing and ensuring that your shading and proportions are on point.
By ensuring that you have these materials at your disposal, you'll be well-equipped to delve into the art of drawing a braid with confidence and creativity. With these tools in hand, you're ready to embark on the exciting journey of bringing a captivating braid to life on paper.
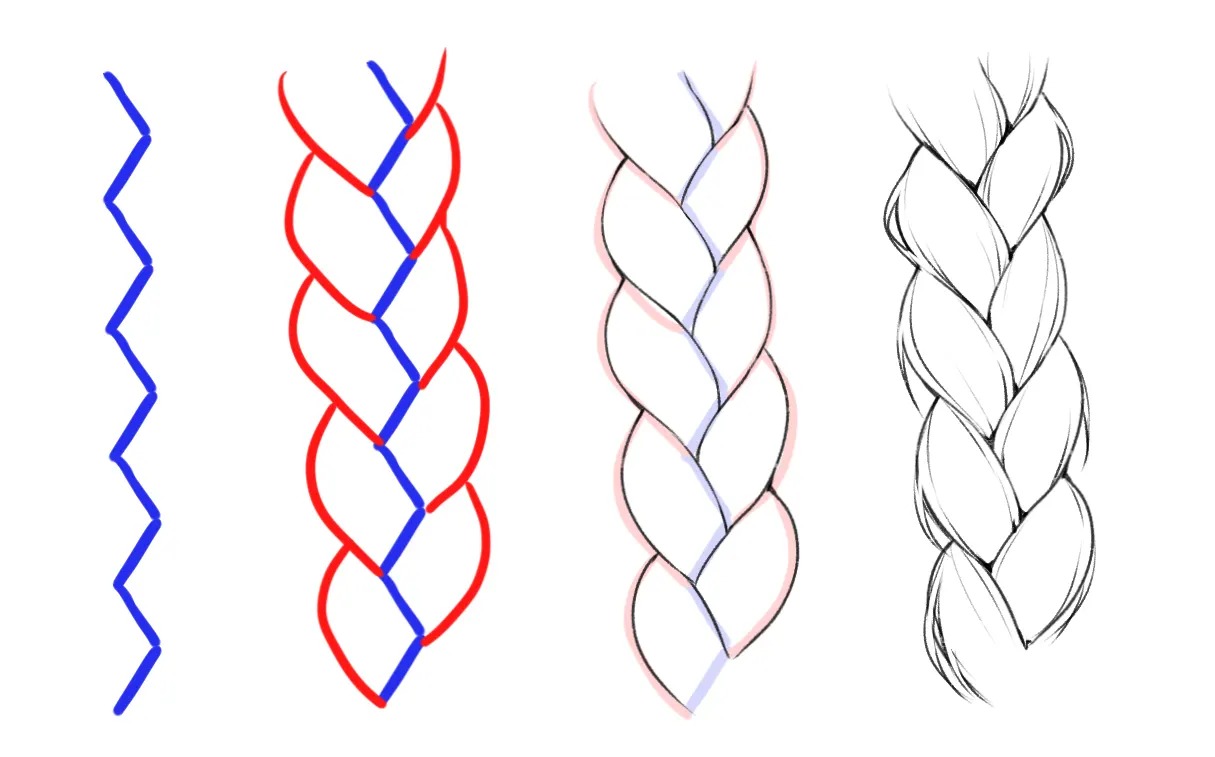
Step 1: Draw the Center Line
To commence the process of drawing a braid, the first step is to establish the central line that will serve as the foundational guide for the braid's structure. This central line will dictate the direction and flow of the individual sections of the braid, laying the groundwork for a well-proportioned and visually appealing final result.
Begin by lightly sketching a straight vertical line down the center of your drawing paper using a well-sharpened pencil. This line will act as the core axis of the braid, enabling you to maintain symmetry and balance as you construct the intricate interweaving strands. It's important to keep the initial line faint and easily erasable, as it will serve as a reference rather than a definitive feature of the finished braid.
As you draw the central line, envision the overall shape and size of the braid you intend to create. Consider whether the braid will cascade down the center of the page or curve gently to one side, as this will influence the placement and angle of the subsequent braid sections. The central line serves as the backbone of the braid, guiding the trajectory of each individual strand and ensuring a harmonious composition.
While drawing the central line, maintain a light touch and remain open to adjustments. The goal at this stage is to establish a clear path for the braid's formation without committing to rigid details. By keeping the central line subtle and adaptable, you'll have the flexibility to refine and enhance its positioning as you progress through the subsequent steps of the drawing process.
With the central line in place, you've laid the groundwork for the braid's structure, setting the stage for the intricate weaving of its individual sections. This foundational element will serve as a visual anchor, guiding the organic flow and graceful arrangement of the braid's interlacing strands. As you move forward, the central line will continue to inform and shape the evolving composition, leading you toward the creation of a captivating and lifelike braid illustration.
Step 2: Add the First Section
With the central line serving as our guiding axis, we now embark on the next phase of our braid-drawing journey: adding the first section of the braid. This pivotal step sets the tone for the intricate interlacing of strands that will define the braid's visual allure and complexity.
Commencing from the top of the central line, envision the initial segment of the braid as it gracefully descends from its starting point. Using a well-sharpened pencil, delicately sketch the outer contours of the first section, paying close attention to the curvature and thickness of the individual strand. As the braid begins to take shape, consider the subtle undulations and variations in width that lend a natural and organic quality to the braided composition.
As you delineate the outer edges of the first section, visualize the underlying structure of the braid, envisioning the interplay of strands as they weave in and out of the central axis. This mental imagery will inform the placement and trajectory of the section, ensuring a harmonious integration with the overarching braid design.
While adding the first section, embrace the fluidity and grace inherent in the braiding process. Allow your pencil strokes to flow with a gentle and confident touch, capturing the elegant curvature and subtle nuances that define the braid's aesthetic appeal. As the section takes form, remain attuned to the interplay of light and shadow, employing varying degrees of pressure to convey depth and dimension within the braid.
As the first section emerges on the page, take a moment to assess its alignment and proportion in relation to the central line. Strive for a balanced and symmetrical presentation, ensuring that the section harmonizes seamlessly with the overarching braid structure. Embrace the opportunity to refine and adjust the contours, refining the section's shape and flow to achieve a visually captivating and cohesive result.
With the addition of the first section, the braid begins to manifest its captivating allure, laying the groundwork for the intricate weaving of subsequent strands. This initial segment serves as a testament to the artistry and precision involved in capturing the essence of a braided hairstyle, setting the stage for the unfolding beauty that awaits in the subsequent steps of our drawing endeavor.
Step 3: Add the Second Section
As we continue our artistic exploration of drawing a braid, the addition of the second section marks a pivotal juncture in the evolution of our braided composition. Building upon the foundational central line and the graceful contours of the first section, the introduction of the second segment infuses the braid with depth and intricacy, further enriching its visual allure.
Commencing from the top of the central line, envision the trajectory of the second section as it gracefully intertwines with the existing braid structure. With a poised pencil, delicately delineate the outer edges of the second segment, mirroring the natural curvature and thickness of a braided strand. Embrace the fluidity and grace inherent in the braiding process, allowing your pencil strokes to convey the seamless interweaving of strands with a gentle and confident touch.
As the second section takes shape, visualize the interplay of light and shadow, employing varying degrees of pressure to imbue the braid with depth and dimension. Emphasize the subtle undulations and variations in width, capturing the organic quality that defines the braided composition. Align the contours of the second section with precision, ensuring a harmonious integration with the overarching braid design while maintaining a balanced and symmetrical presentation.
Consider the interlocking rhythm of the braid's strands, envisioning the graceful convergence and divergence that imbue the composition with a sense of movement and vitality. As the second section unfolds on the page, embrace the opportunity to refine and adjust its contours, infusing the braid with a captivating and cohesive aesthetic. Each stroke of the pencil contributes to the evolving tapestry of the braid, weaving a visual narrative that celebrates the artistry and precision of this timeless hairstyle.
With the addition of the second section, the braid blossoms into a captivating tapestry of interlacing strands, each contributing to the mesmerizing allure of the overall composition. This pivotal step sets the stage for the seamless integration of subsequent sections, propelling our braid-drawing endeavor toward a visually stunning and lifelike portrayal of this timeless hairstyle.
Read more: How To Do Box Braids
Step 4: Add the Third Section
As we venture into the realm of the third section, our braid-drawing odyssey reaches a crescendo of intricacy and elegance. Building upon the graceful foundation established by the central line and the preceding sections, the addition of the third segment infuses the braid with a heightened sense of depth and dimension, further enriching its visual allure.
Commencing from the top of the central line, envision the trajectory of the third section as it seamlessly intertwines with the existing braid structure. With a poised pencil, delicately delineate the outer edges of the third segment, mirroring the natural curvature and thickness of a braided strand. Embrace the fluidity and grace inherent in the braiding process, allowing your pencil strokes to convey the seamless interweaving of strands with a gentle and confident touch.
As the third section takes shape, visualize the interplay of light and shadow, employing varying degrees of pressure to imbue the braid with depth and dimension. Emphasize the subtle undulations and variations in width, capturing the organic quality that defines the braided composition. Align the contours of the third section with precision, ensuring a harmonious integration with the overarching braid design while maintaining a balanced and symmetrical presentation.
Consider the interlocking rhythm of the braid's strands, envisioning the graceful convergence and divergence that imbue the composition with a sense of movement and vitality. As the third section unfolds on the page, embrace the opportunity to refine and adjust its contours, infusing the braid with a captivating and cohesive aesthetic. Each stroke of the pencil contributes to the evolving tapestry of the braid, weaving a visual narrative that celebrates the artistry and precision of this timeless hairstyle.
With the addition of the third section, the braid blossoms into a captivating tapestry of interlacing strands, each contributing to the mesmerizing allure of the overall composition. This pivotal step sets the stage for the seamless integration of subsequent sections, propelling our braid-drawing endeavor toward a visually stunning and lifelike portrayal of this timeless hairstyle.
Step 5: Add the Final Section
As we approach the culmination of our braid-drawing journey, the addition of the final section represents the crowning touch that brings our intricate composition to fruition. Building upon the graceful interweaving of the preceding segments, the final section infuses the braid with a sense of completion and harmony, culminating in a visually captivating portrayal of this timeless hairstyle.
Commencing from the top of the central line, envision the trajectory of the final section as it elegantly converges with the existing braid structure. With a poised pencil, delicately delineate the outer edges of the concluding segment, mirroring the natural curvature and thickness of a braided strand. Embrace the fluidity and grace inherent in the braiding process, allowing your pencil strokes to convey the seamless interweaving of strands with a gentle and confident touch.
As the final section takes shape, visualize the interplay of light and shadow, employing varying degrees of pressure to imbue the braid with depth and dimension. Emphasize the subtle undulations and variations in width, capturing the organic quality that defines the braided composition. Align the contours of the final section with precision, ensuring a harmonious integration with the overarching braid design while maintaining a balanced and symmetrical presentation.
Consider the culmination of the braid's journey, where each strand gracefully converges to form a unified and captivating whole. As the final section unfolds on the page, embrace the opportunity to refine and adjust its contours, infusing the braid with a captivating and cohesive aesthetic. Each stroke of the pencil contributes to the evolving tapestry of the braid, weaving a visual narrative that celebrates the artistry and precision of this timeless hairstyle.
With the addition of the final section, the braid blossoms into a captivating tapestry of interlacing strands, each contributing to the mesmerizing allure of the overall composition. This pivotal step sets the stage for the seamless integration of subsequent sections, propelling our braid-drawing endeavor toward a visually stunning and lifelike portrayal of this timeless hairstyle.
Final Touches and Details
With the completion of the braid's foundational structure, it's time to infuse the illustration with the final touches and intricate details that will elevate it to a captivating and lifelike portrayal of a braided hairstyle. This phase allows for the refinement of nuances and the addition of subtle elements that enhance the overall visual impact of the braid.
Begin by assessing the overall composition of the braid, ensuring that each section harmonizes seamlessly with the central line and with one another. Pay attention to the flow and rhythm of the strands, refining any areas that may benefit from subtle adjustments to achieve a balanced and cohesive presentation.
Next, focus on the texture and dimension of the braid, employing varying degrees of shading and blending to convey the interplay of light and shadow. Emphasize the gentle undulations and interwoven nature of the strands, infusing the braid with a sense of depth and tactile realism. Utilize a blending stump to achieve smooth transitions and soft textures, enhancing the organic quality of the braided composition.
As you refine the shading and texture, consider the interplay of highlights and shadows to accentuate the three-dimensional form of the braid. Delicately lift graphite with a kneaded eraser to create subtle highlights along the raised portions of the strands, adding a luminous quality to the illustration. This attention to light and shadow contributes to the overall depth and realism of the braid, imbuing it with a captivating sense of vitality.
Incorporate fine details such as wisps of hair escaping the braid, adding a touch of natural spontaneity to the composition. These delicate strands can be delicately rendered to evoke a sense of movement and softness, further enhancing the lifelike quality of the braid. Additionally, consider the incorporation of decorative elements such as hair accessories or embellishments, if applicable, to infuse the braid with individuality and character.
Finally, step back and assess the braid as a whole, ensuring that the final touches and details coalesce into a visually compelling and harmonious portrayal of this timeless hairstyle. Embrace the opportunity to refine and enhance the illustration, infusing it with a captivating allure that celebrates the artistry and intricacy of a beautifully braided hairstyle.
Conclusion
In conclusion, mastering the art of drawing a braid is a gratifying journey that combines precision, creativity, and a deep appreciation for the intricate beauty of braided hairstyles. Through the step-by-step process outlined in this guide, you have embarked on a creative odyssey, unraveling the secrets of capturing the essence of a braid with pencil and paper.
As you navigated through the foundational steps of drawing the central line and adding each section of the braid, you delved into the nuanced interplay of form, rhythm, and texture that define the captivating allure of a braided hairstyle. Each pencil stroke served as a testament to your artistic vision, weaving a visual narrative that celebrates the grace and elegance inherent in this timeless hair artistry.
The final touches and details provided an opportunity to infuse the braid with depth, dimension, and subtle intricacies, elevating the illustration to a lifelike portrayal of a braided hairstyle. From delicately blending shadows to capturing the natural spontaneity of wisps of hair, you honed your skills in conveying the tactile realism and organic beauty of a braid.
As you reflect on your journey of drawing a braid, remember that practice and patience are key companions in the pursuit of artistic mastery. Embrace the opportunity to experiment with different braid styles, explore diverse shading techniques, and infuse your illustrations with personal flair and creativity. Each stroke of the pencil is an invitation to immerse yourself in the artistry of braided hairstyles, celebrating their timeless appeal and cultural significance.
Whether you aspire to incorporate braids into fashion illustrations, portrait sketches, or thematic artworks, the skills you've cultivated in drawing a braid will serve as a valuable asset in your artistic repertoire. As you continue to refine your craft, may the mesmerizing allure of braided hairstyles inspire and enrich your creative endeavors, infusing your artwork with a touch of elegance and sophistication.
So, as you embark on future artistic explorations, carry with you the knowledge and experience gained from drawing a braid, and let the grace and intricacy of this timeless hairstyle continue to weave its magic through your artistic expressions. With each stroke of the pencil, may you unravel new dimensions of beauty and creativity, celebrating the art of drawing a braid as a testament to the enduring allure of artistic craftsmanship.