Lifestyle
How To Create Bubble Braids
Published: March 2, 2024
Learn how to create trendy bubble braids to elevate your lifestyle. Follow our step-by-step guide for a stylish and chic look.
(Many of the links in this article redirect to a specific reviewed product. Your purchase of these products through affiliate links helps to generate commission for Noodls.com, at no extra cost. Learn more)
Table of Contents
Introduction
Bubble braids are a trendy and versatile hairstyle that adds a touch of whimsy and charm to any look. This playful and eye-catching style is perfect for various occasions, from casual outings to formal events. Whether you're looking to elevate your everyday hairstyle or add a unique flair to a special occasion, mastering the art of creating bubble braids can be a game-changer for your hair repertoire.
With their fun and youthful appeal, bubble braids have gained popularity across social media platforms and red carpets alike. This hairstyle offers a delightful twist on traditional braids, infusing a sense of creativity and individuality into your overall appearance. The best part? Bubble braids are surprisingly simple to create, making them accessible to individuals of all hair types and skill levels.
By following a few straightforward steps and incorporating your personal flair, you can effortlessly achieve this charming hairstyle. Whether you have long, short, straight, or curly hair, bubble braids can be customized to suit your unique style preferences. Additionally, this hairstyle allows for experimentation with various accessories, such as colorful elastics, ribbons, or hairpins, to further personalize your look.
In this comprehensive guide, we will walk you through the step-by-step process of creating stunning bubble braids. From preparing your hair to adding the final touches, you'll gain valuable insights and tips to help you master this delightful hairstyle. So, grab your hair tools and let's embark on this exciting journey to discover the art of crafting captivating bubble braids that will leave you feeling confident and stylish.
Step 1: Prep Your Hair
Before diving into the intricate process of creating bubble braids, it's essential to prepare your hair adequately. Proper preparation sets the foundation for a flawless and long-lasting hairstyle. Here's a detailed breakdown of the essential steps to prep your hair for bubble braids:
1. Wash and Condition
Begin by washing your hair with a nourishing shampoo and conditioner to ensure that your locks are clean, soft, and manageable. Opt for a conditioner that provides ample moisture to prevent tangles and facilitate smooth braiding.
2. Detangle Gently
After washing, gently detangle your hair using a wide-tooth comb or a specialized detangling brush. Starting from the ends and working your way up to the roots, carefully remove any knots or tangles to create a smooth canvas for braiding.
3. Apply a Leave-In Conditioner or Detangler
To further ease the braiding process and enhance the overall health of your hair, apply a leave-in conditioner or detangler. This step helps to minimize friction, reduce breakage, and promote a sleek and polished finish for your bubble braids.
Read more: How To Draw Bubbles
4. Section Your Hair
Next, section your hair according to your desired parting and the number of bubble braids you intend to create. Using a tail comb, divide your hair into neat, equal sections, ensuring that each part is manageable and easy to work with during the braiding process.
5. Protect Your Hair (Optional)
If you have particularly delicate or textured hair, consider applying a heat protectant or lightweight hair oil to shield your strands from potential damage during the styling process. This extra layer of protection can help maintain the integrity of your hair while achieving stunning bubble braids.
By meticulously prepping your hair with these fundamental steps, you'll set the stage for a successful bubble braid hairstyle. With your hair primed and ready, you can confidently proceed to the next steps, knowing that your locks are in optimal condition for creating beautiful and resilient bubble braids.
Step 2: Create Sections
Creating well-defined sections is a crucial aspect of achieving impeccable bubble braids. This step sets the stage for precision and organization, ensuring that each braid is uniform and visually striking. Here's a detailed exploration of the process of creating sections for your bubble braids:
-
Determine the Number of Sections: Begin by deciding on the number of bubble braids you wish to incorporate into your hairstyle. This decision will influence the division of your hair into individual sections. Whether you opt for a few large bubble braids or numerous smaller ones, envision the final look you aim to achieve.
-
Use a Tail Comb: Equip yourself with a tail comb, which features a fine, pointed end for precise parting. Starting from the front of your head, gently guide the tail comb along the desired parting lines, ensuring that the sections are evenly distributed and symmetrical. This meticulous approach contributes to the overall polished appearance of your bubble braids.
-
Secure Each Section: As you create each section, use hair clips or elastic bands to secure the remaining hair out of the way. This practice prevents confusion and tangling, allowing you to focus on braiding one section at a time. Additionally, securing the sections keeps the hair organized and facilitates a seamless braiding process.
-
Maintain Consistency: Strive for consistency in the size and placement of each section. Uniform sections contribute to a balanced and harmonious final look, elevating the aesthetic appeal of your bubble braids. Pay close attention to the alignment and width of the sections, ensuring that they align with your vision for the hairstyle.
-
Consider Your Hair Type: Tailor the size and number of sections to complement your hair type and texture. For thicker hair, you may opt for fewer, broader sections to accommodate the volume, while finer hair may benefit from smaller, more numerous sections. Adapting the sections to suit your hair type ensures that your bubble braids are tailored to your unique attributes.
By meticulously creating well-defined sections, you lay the groundwork for flawless bubble braids that exude elegance and precision. This thoughtful approach sets the stage for a seamless transition to the next step, where you will bring your bubble braids to life with creativity and artistry.
Step 3: Create Bubble Braids
Creating bubble braids is the heart of this captivating hairstyle, allowing you to infuse your personal style and creativity into each intricately woven section. This step-by-step process transforms ordinary braids into delightful, eye-catching bubbles, adding a touch of whimsy and charm to your overall look. Here's a comprehensive guide to help you master the art of crafting stunning bubble braids:
Read more: How To Create A Plane Drawing
1. Begin with a Traditional Braid
Commence the braiding process by crafting a traditional three-strand braid in the first section of hair. Secure the base of the braid with a small, clear elastic band to hold it in place. This initial braid serves as the foundation for creating the distinctive bubble effect.
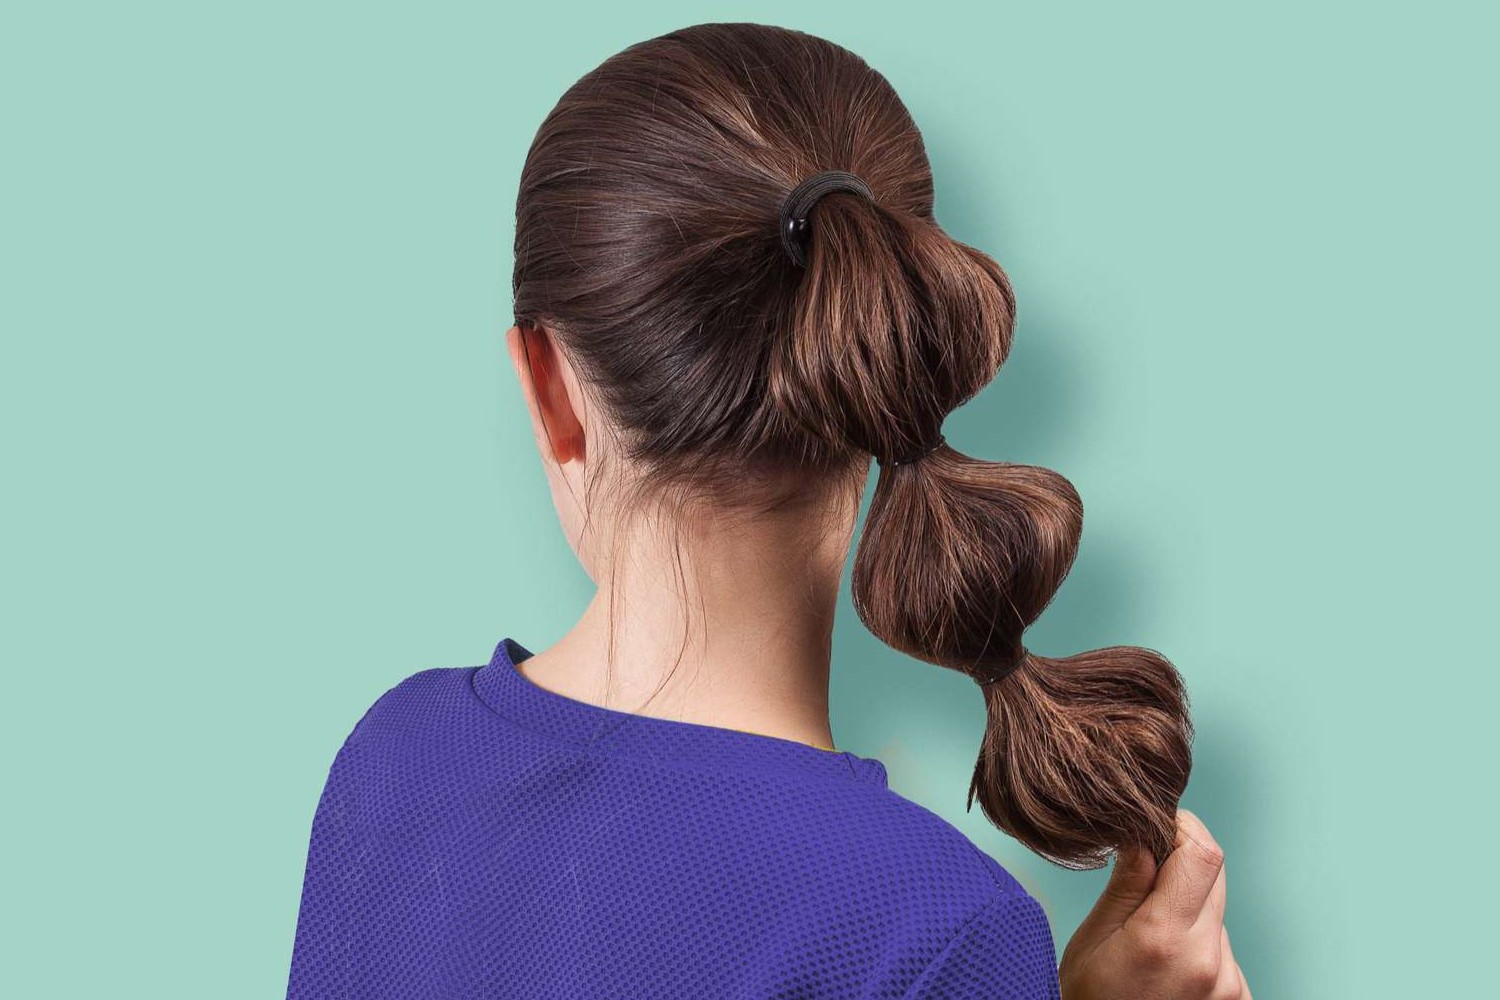
2. Create the Bubble Effect
To achieve the characteristic bubble appearance, gently tug and loosen the braid at regular intervals along its length. Carefully pull each section of the braid outward, creating small, rounded "bubbles" between the secured sections. Ensure that the bubbles are evenly spaced and maintain a consistent size to achieve a polished and cohesive look.
3. Secure the Bubbles
Once you have created the desired number of bubbles along the braid, secure each one with clear elastic bands. Placing an elastic band around each bubble maintains its shape and prevents it from unraveling, preserving the intricate pattern you've meticulously crafted.
4. Enhance the Volume (Optional)
For those seeking added volume and dimension, gently tug and expand each bubble to create a fuller and more pronounced effect. This optional step allows you to customize the appearance of your bubble braids, tailoring them to your preferred level of volume and visual impact.
Read more: How To Draw A Braid
5. Repeat the Process
Continue the braiding and bubbling process with each pre-sectioned portion of hair, ensuring that each bubble braid aligns seamlessly with the previous one. Consistency in the size and spacing of the bubbles contributes to a harmonious and visually striking end result.
6. Personalize with Accessories (Optional)
To further elevate your bubble braids, consider incorporating decorative hair accessories, such as colorful elastics, ribbons, or hairpins. These embellishments add a playful and personalized touch to your hairstyle, allowing you to express your individual style and creativity.
By following these detailed steps, you'll master the art of creating captivating bubble braids that exude charm and sophistication. With each bubble meticulously crafted and secured, you'll unveil a stunning hairstyle that showcases your creativity and attention to detail. Now that you've perfected the creation of bubble braids, it's time to add the finishing touches to complete your enchanting look.
Step 4: Secure the Ends
Once you have meticulously crafted the charming bubble braids, it's crucial to ensure that the ends are securely fastened to maintain the integrity of the hairstyle. This final step adds a polished and professional touch, preventing the braids from unraveling and preserving the intricate bubble pattern you've artfully created.
To secure the ends of your bubble braids, follow these essential guidelines:
1. Clear Elastic Bands
Utilize small, clear elastic bands to secure the ends of each bubble braid firmly. Carefully gather the remaining hair at the bottom of the braid and fasten it with an elastic band, ensuring a snug and secure hold. The transparency of the elastic bands seamlessly blends with your hair, maintaining a seamless and refined appearance.
Read more: How To Do Box Braids
2. Even Distribution
Ensure that the elastic bands are distributed evenly across the ends of the bubble braids, maintaining consistency in both placement and tension. This uniform approach contributes to a cohesive and visually appealing result, preventing any irregularities in the overall presentation of the hairstyle.
3. Gentle Handling
Handle the ends of the bubble braids with care to avoid disrupting the carefully crafted bubbles. Gently gather the hair and secure it with the elastic band, taking care not to overly tighten or distort the bubbles. This delicate approach preserves the intricate texture of the bubble braids while providing a secure and enduring hold.
4. Conceal the Bands (Optional)
For a seamless and polished finish, consider concealing the elastic bands at the ends of the bubble braids. Gently tuck the bands beneath the braids or strategically position them to blend with the surrounding hair, creating a seamless transition and a refined aesthetic. This optional step adds a professional touch to your bubble braids, elevating the overall presentation.
By diligently securing the ends of each bubble braid, you ensure that your hairstyle remains intact and visually captivating throughout the day. With the ends firmly fastened, you can confidently showcase your stunning bubble braids, knowing that they are impeccably crafted and securely held in place.
Now that you've perfected the art of securing the ends of your bubble braids, you're one step closer to flaunting a captivating and enchanting hairstyle that reflects your creativity and attention to detail.
Step 5: Final Touches
As you approach the final stage of creating stunning bubble braids, it's time to add the finishing touches that will elevate your hairstyle to a new level of charm and sophistication. These subtle yet impactful details will enhance the overall presentation of your bubble braids, ensuring that every aspect of the hairstyle reflects your unique style and creativity.
Read more: How To Create A Stitch Drawing
1. Refine the Shape
Take a moment to assess the overall shape and symmetry of your bubble braids. Gently adjust the position of individual bubbles to achieve a balanced and harmonious appearance. Fine-tune the arrangement of the bubbles, ensuring that they flow seamlessly from the roots to the ends of each braid. This meticulous attention to detail contributes to a polished and refined final look.
2. Smooth Flyaways
Using a small amount of lightweight hair serum or a fine-toothed comb, gently smooth any stray hairs or flyaways along the length of the bubble braids. This step imparts a sleek and polished finish, ensuring that your hairstyle exudes a sense of elegance and precision. By taming any unruly strands, you'll achieve a flawless and immaculate presentation.
3. Add Decorative Elements (Optional)
For those seeking an extra touch of flair, consider incorporating decorative elements into your bubble braids. Delicate hair accessories, such as shimmering hairpins, floral clips, or intricately designed barrettes, can be strategically placed to accentuate the charm of the bubble braids. These embellishments add a touch of whimsy and individuality, allowing you to personalize your hairstyle with creative flair.
4. Final Assessment
Take a moment to step back and assess the overall impact of your bubble braids. Ensure that each braid is consistent in size, shape, and positioning, creating a cohesive and visually captivating result. This final assessment allows you to make any last-minute adjustments, ensuring that your bubble braids reflect your desired aesthetic and style preferences.
Read more: How To Mix Colors To Create Red
5. Setting Spray (Optional)
To prolong the longevity of your bubble braids and maintain their pristine appearance throughout the day, consider applying a light mist of flexible hold hairspray. This gentle setting spray helps secure the bubbles in place while imparting a subtle sheen to your hairstyle. It ensures that your bubble braids remain intact and alluring, allowing you to showcase your impeccable styling with confidence.
By meticulously attending to these final touches, you'll unveil a captivating and enchanting hairstyle that reflects your creativity and attention to detail. With each bubble braided to perfection and every detail refined, your bubble braids will exude elegance and charm, leaving you feeling confident and stylish.
Now that you've added the final touches to your bubble braids, you're ready to showcase this delightful hairstyle with pride and grace.
Conclusion
In conclusion, mastering the art of creating bubble braids opens up a world of endless styling possibilities, allowing you to infuse your hair with a touch of whimsy and charm. This captivating hairstyle transcends trends, offering a timeless and versatile look that can be tailored to suit various occasions and personal preferences. By following the step-by-step guide outlined in this comprehensive tutorial, you've gained valuable insights into the meticulous process of crafting stunning bubble braids.
As you embark on your journey to perfecting bubble braids, remember that practice and patience are key. Embrace the opportunity to experiment with different variations, from the number of bubbles in each braid to the incorporation of decorative accessories. This experimentation allows you to unleash your creativity and personalize your bubble braids, resulting in a hairstyle that truly reflects your unique style and personality.
Furthermore, the adaptability of bubble braids makes them accessible to individuals with diverse hair types and textures. Whether you have long, short, straight, or curly hair, you can effortlessly embrace the beauty of bubble braids and make them your own. This inclusivity underscores the universal appeal of this enchanting hairstyle, fostering a sense of empowerment and self-expression for individuals of all backgrounds.
As you perfect your bubble braiding technique, don't hesitate to explore additional styling options. Consider incorporating vibrant ribbons, delicate floral accents, or intricately designed hairpins to elevate your bubble braids to new heights. These embellishments serve as a delightful means of personalizing your hairstyle, allowing you to showcase your creativity and individuality with every braid.
Ultimately, the journey to mastering bubble braids is a celebration of self-expression and artistry. With each carefully crafted bubble and every refined detail, you're not only creating a captivating hairstyle but also embracing a form of creative expression that reflects your unique identity. Whether you're preparing for a casual day out or a special event, your bubble braids will exude elegance and charm, leaving a lasting impression wherever you go.
So, embrace the joy of crafting bubble braids, and let your creativity flow as you embark on this enchanting hairstyling adventure. With each braid, you're not just creating a hairstyle – you're weaving a story of individuality, confidence, and style. Let your bubble braids become a reflection of your inner radiance and a testament to the beauty of self-expression.