Home>Technology and Computers>How To Create A Total Row In Excel

Technology and Computers
How To Create A Total Row In Excel
Published: February 24, 2024
Learn how to create a total row in Excel to quickly calculate and display the sum, average, or other functions for your data. Master the technology and computers aspect of Excel effortlessly.
(Many of the links in this article redirect to a specific reviewed product. Your purchase of these products through affiliate links helps to generate commission for Noodls.com, at no extra cost. Learn more)
Table of Contents
Introduction
Excel is a powerful tool for organizing and analyzing data, and one of its most useful features is the ability to create a total row. Whether you're working with financial figures, inventory data, or any other type of information that requires calculations, the total row can quickly provide you with the sum, average, count, and other functions for your data set. This feature not only saves time but also ensures accuracy in your calculations.
In this article, we will guide you through the step-by-step process of creating a total row in Excel. By following these instructions, you will be able to effortlessly generate the total row for your data, allowing you to gain valuable insights and make informed decisions based on the calculated results.
Excel's total row feature is particularly beneficial for individuals and businesses that rely on data analysis for budgeting, forecasting, and performance tracking. Whether you are a finance professional, a small business owner, a student, or anyone who deals with numbers, mastering the creation of a total row will undoubtedly boost your productivity and efficiency in handling data within Excel.
Now, let's dive into the detailed steps to create a total row in Excel, empowering you to harness the full potential of this versatile spreadsheet software.
Read more: How To Freeze A Row In Excel
Step 1: Open your Excel spreadsheet
To begin the process of creating a total row in Excel, the first step is to open the Excel spreadsheet containing the data that you want to analyze. Launch Microsoft Excel on your computer, and either create a new spreadsheet or open an existing one that contains the dataset for which you want to generate the total row.
Upon opening Excel, you will be greeted by a blank workbook, ready for you to input your data. If you are working with an existing spreadsheet, simply navigate to the location where the file is saved and open it within the Excel application.
Once the spreadsheet is open, take a moment to review the data that you will be working with. Ensure that the information is organized in a clear and structured manner, as this will facilitate the process of creating the total row later on. If you need to make any adjustments or additions to the data before proceeding, feel free to do so at this stage.
It's important to note that Excel provides a user-friendly interface, allowing you to easily navigate through your data and perform various operations. Whether you are a beginner or an experienced user, Excel's intuitive layout and functionality make it convenient to work with datasets of any size and complexity.
By opening your Excel spreadsheet and familiarizing yourself with the data, you have completed the first step towards creating a total row. This initial preparation sets the stage for the subsequent steps, where you will select the data range and apply the total row feature to perform calculations and generate valuable insights from your dataset.
Step 2: Select the data range
After opening your Excel spreadsheet and reviewing the data, the next crucial step in creating a total row is to select the data range that you want to analyze. The data range represents the specific cells or columns within your spreadsheet from which you intend to generate the total row. This selection is fundamental as it determines the scope of the calculations that will be applied when the total row is created.
To select the data range, follow these simple yet essential steps:
-
Position your cursor: Click on the cell that represents the starting point of your data range. This could be the top-left cell of the dataset, such as cell A1, or any other cell that marks the beginning of the range you wish to include in the total row.
-
Drag to highlight the range: While holding down the left mouse button, drag your cursor across the cells that you want to encompass within the data range. As you do this, you will notice that the selected cells become highlighted, indicating that they are included in the range.
-
Adjust the selection: If your data range spans multiple columns or rows, continue dragging your cursor to cover all the necessary cells. Excel provides the flexibility to select contiguous or non-contiguous ranges, allowing you to tailor the selection to your specific data layout.
-
Review the selection: Once you have highlighted the desired data range, take a moment to review the selected cells and ensure that they accurately represent the dataset you want to analyze. It's important to verify the inclusivity of the selection, as any cells omitted from the range will not be factored into the total row calculations.
By meticulously selecting the data range, you are laying the groundwork for the subsequent steps in creating the total row. This deliberate and precise selection process sets the stage for accurate and meaningful calculations, enabling you to derive valuable insights from your dataset.
Excel's intuitive interface and selection tools make it seamless to choose the data range, regardless of the size or complexity of your dataset. Whether you are working with a small set of numbers or a large-scale dataset, Excel's functionality empowers you to efficiently select the data range with ease and precision.
With the data range now selected, you are ready to proceed to the next step, where you will utilize Excel's features to insert the total row and perform calculations based on the chosen dataset.
Step 3: Click on the "Insert" tab
Once you have selected the data range in your Excel spreadsheet, the next step is to navigate to the "Insert" tab within the Excel ribbon. The "Insert" tab houses a variety of powerful tools and features that enable you to enhance the structure and functionality of your spreadsheet. By accessing this tab, you will be able to seamlessly incorporate the total row into your dataset, setting the stage for comprehensive calculations and analysis.
To proceed with this step, follow the instructions below:
-
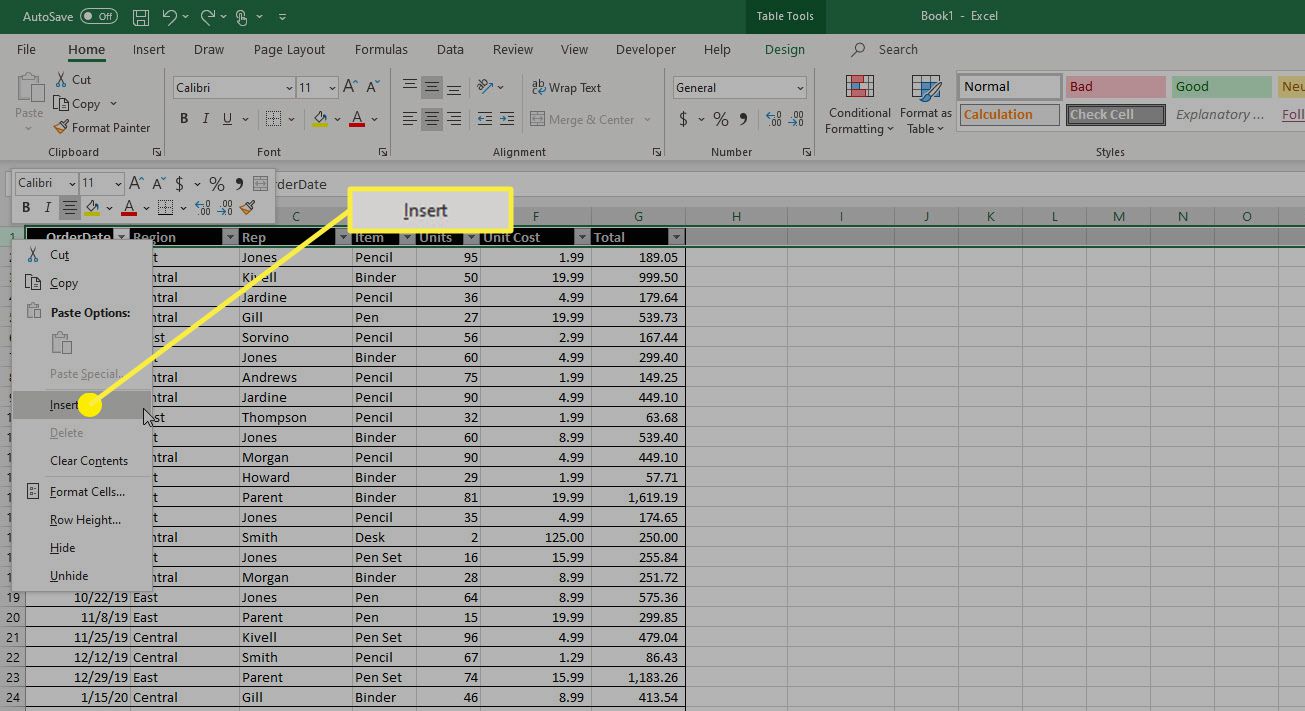
Locate the "Insert" tab: At the top of the Excel window, you will find the ribbon, which is divided into several tabs, each containing specific groups of commands related to various aspects of spreadsheet management. Among these tabs is the "Insert" tab, which is typically positioned between the "Home" and "Page Layout" tabs. Click on the "Insert" tab to access its array of functions and tools.
-
Explore the available options: Upon clicking on the "Insert" tab, you will be presented with a range of options designed to facilitate the insertion of various elements into your spreadsheet. These options include tables, charts, illustrations, and other features that contribute to the visual and structural aspects of your data presentation. While these options are valuable in their own right, our focus at this stage is on leveraging the "Table" feature to create the total row.
-
Prepare for the next step: As you familiarize yourself with the "Insert" tab and its offerings, it's essential to prepare for the subsequent actions that will lead to the creation of the total row. By understanding the layout and functionality of the "Insert" tab, you will be well-equipped to seamlessly proceed to the next step, where you will utilize the "Table" feature to incorporate the total row into your dataset.
Navigating to the "Insert" tab is a pivotal stage in the process of creating a total row in Excel. This step sets the stage for leveraging the powerful features available within the tab, enabling you to seamlessly integrate the total row functionality into your spreadsheet. With the "Insert" tab at your disposal, you are poised to move forward and harness the full potential of Excel's capabilities to enhance your data analysis and decision-making processes.
Step 4: Click on "Table"
After navigating to the "Insert" tab in Excel, the next pivotal step in creating a total row is to click on the "Table" feature. This action initiates the process of converting your selected data range into a structured table, setting the stage for seamless integration of the total row and streamlined data analysis.
To execute this step effectively, follow the straightforward instructions below:
-
Locate the "Table" option: Within the "Insert" tab, you will find the "Table" option among the array of features available for enhancing your spreadsheet. The "Table" command is designed to transform your selected data range into a visually distinct and organized table format, providing numerous benefits for data management and analysis.
-
Click on "Table": Once you have located the "Table" option, click on it to initiate the conversion process. This action prompts Excel to present you with a dialog box or a set of options, allowing you to specify the details of your data range and customize the appearance and functionality of the resulting table.
-
Confirm the selection: After clicking on "Table," you may be prompted to confirm the selection of your data range. This confirmation step ensures that the table will encompass the precise cells and columns that you intend to include in the total row calculations. Review the selected range and proceed to confirm the conversion to a table format.
By clicking on "Table," you are taking a significant stride towards integrating the total row functionality into your Excel spreadsheet. This action not only transforms your data range into a structured and visually appealing table but also lays the groundwork for applying advanced calculations and functions to derive valuable insights from your dataset.
Excel's "Table" feature offers a host of advantages, including automatic formatting, dynamic range expansion, and built-in filtering and sorting capabilities. By leveraging this functionality, you are not only creating a total row but also enhancing the overall usability and visual presentation of your data, thereby facilitating a more efficient and insightful data analysis process.
With the "Table" feature activated, you are now poised to proceed to the next step, where you will enable the total row within the table and specify the desired functions for calculating the summary values based on your dataset. This seamless transition from selecting the data range to converting it into a table marks a pivotal stage in the process of creating a total row, setting the stage for comprehensive data analysis and informed decision-making within Excel.
Read more: How To Move Rows In Excel
Step 5: Check the "Total Row" box
Having transformed your selected data range into a structured table, the next crucial step in creating a total row in Excel is to enable the "Total Row" feature within the table. This action initiates the inclusion of a dedicated row at the bottom of the table, where you can specify the desired functions to calculate summary values for your dataset. By activating the "Total Row" feature, you are setting the stage for comprehensive calculations and analysis, empowering you to derive valuable insights and make informed decisions based on the calculated results.
To enable the "Total Row" feature, follow these straightforward instructions:
-
Locate the "Total Row" checkbox: Within the structured table that you have created, navigate to the top-right corner of the table. Here, you will find a checkbox labeled "Total Row," which is designed to activate the inclusion of the dedicated row for summary calculations. The checkbox is positioned within the table design options, allowing you to seamlessly toggle the visibility of the total row based on your analysis requirements.
-
Check the "Total Row" checkbox: Click on the "Total Row" checkbox to enable this feature within the table. Upon checking the box, you will notice that a new row appears at the bottom of the table, distinctly set apart from the main data rows. This dedicated row is where you will specify the functions to be applied for calculating summary values, such as sum, average, count, and more, based on the data within the respective columns.
-
Prepare for function selection: With the "Total Row" feature activated, you are now poised to specify the functions that will be applied to calculate the summary values for your dataset. This step involves utilizing the drop-down menu within each column of the total row to select the desired function, tailoring the calculations to suit the specific data and analysis requirements.
By checking the "Total Row" checkbox, you are seamlessly integrating this powerful feature into your structured table, paving the way for comprehensive calculations and analysis. The inclusion of the dedicated total row not only enhances the visual presentation of your data but also empowers you to derive meaningful insights and make informed decisions based on the calculated summary values. With the "Total Row" feature enabled, you are now ready to proceed to the next step, where you will specify the functions for each column within the total row, customizing the calculations to suit your data analysis needs.
Step 6: Use the drop-down menu to select the function for each column
With the "Total Row" feature enabled in your Excel table, you are now ready to specify the functions that will be applied to calculate the summary values for each column within the total row. This step involves leveraging the intuitive drop-down menu provided in each column of the total row, allowing you to select the desired function that best suits the nature of the data and your analysis requirements.
To proceed with this step, follow these straightforward instructions:
-
Navigate to the Total Row: Direct your attention to the newly added total row at the bottom of your table. Each column within the total row features a small drop-down arrow, typically positioned at the right-hand side of the cell. Clicking on this arrow will reveal a list of available functions that can be applied to calculate summary values for the respective column.
-
Access the drop-down menu: Click on the drop-down arrow within the first cell of the total row, corresponding to the column for which you want to specify the calculation function. Upon clicking the arrow, a menu will appear, presenting you with a range of functions to choose from. These functions include sum, average, count, minimum, maximum, and more, providing you with diverse options to tailor the calculations to your specific data analysis needs.
-
Select the appropriate function: Review the list of functions presented in the drop-down menu and select the one that aligns with the type of data and the insights you aim to derive. For instance, if you are analyzing a column of numerical values and wish to obtain the total sum, you would select the "Sum" function from the drop-down menu. Similarly, for a column of quantitative data, the "Average" function may be more suitable to calculate the mean value.
-
Repeat for each column: Proceed to click on the drop-down arrow in the subsequent cells of the total row, one for each column in your table. For every column, select the function that best serves your analytical objectives, ensuring that the calculations accurately reflect the nature of the data and the insights you seek to gain.
By utilizing the drop-down menu to select the function for each column within the total row, you are customizing the calculations to precisely meet your data analysis requirements. This tailored approach ensures that the summary values derived from the total row accurately reflect the characteristics of your dataset, empowering you to make informed decisions and gain valuable insights from your data analysis within Excel.
Step 7: Press "Enter" to apply the total row
After specifying the desired functions for each column within the total row, the final step in creating a total row in Excel involves pressing the "Enter" key to apply the calculated summary values to the respective cells. This simple yet pivotal action triggers the execution of the specified functions, leading to the instantaneous generation of the summary values within the total row.
To execute this step effectively, follow these straightforward instructions:
-
Position the cursor: After customizing the functions for each column within the total row, position the cursor in the cell where you have specified the first function. This cell represents the intersection of the total row and the respective column for which the function has been selected.
-
Press "Enter": With the cursor in place, press the "Enter" key on your keyboard to apply the specified function to the corresponding column. Upon pressing "Enter," Excel will promptly execute the calculation, generating the summary value based on the data within the column and displaying the result in the respective cell of the total row.
-
Review the results: After pressing "Enter," take a moment to review the calculated summary values that have been populated within the total row. Verify that the displayed values accurately reflect the calculations you intended to apply, ensuring that the summary values align with the nature of the data and the analytical insights you seek to derive.
By pressing "Enter" to apply the total row, you are finalizing the process of generating the summary values based on the specified functions, culminating in a comprehensive and insightful analysis of your dataset. This action marks the completion of the total row creation process, empowering you to leverage the calculated summary values to make informed decisions, gain valuable insights, and effectively communicate the analytical outcomes derived from your data within Excel.
Executing this final step seamlessly integrates the calculated summary values into the total row, enhancing the visual presentation of your dataset and providing a clear and concise representation of the analytical results. With the total row now populated with the summary values, you are well-equipped to utilize the insights gained from the calculations to inform your decision-making processes and drive informed actions based on the analyzed data within Excel.
Conclusion
In conclusion, mastering the creation of a total row in Excel equips users with a powerful tool for efficient data analysis and informed decision-making. By following the step-by-step process outlined in this guide, individuals can seamlessly integrate the total row feature into their spreadsheets, enabling them to derive valuable insights and perform comprehensive calculations based on their datasets.
The process begins with opening the Excel spreadsheet and selecting the data range, setting the stage for the subsequent steps. Navigating to the "Insert" tab and clicking on "Table" transforms the selected range into a structured table, providing a visually distinct format for data analysis. Enabling the "Total Row" feature within the table initiates the inclusion of a dedicated row at the bottom, where users can specify the desired functions for calculating summary values.
Utilizing the drop-down menu to select the function for each column within the total row allows for tailored calculations, ensuring that the summary values accurately reflect the nature of the data and the analytical objectives. Finally, pressing "Enter" applies the specified functions, culminating in the instantaneous generation of the summary values within the total row.
The ability to create a total row in Excel holds significant benefits for individuals and businesses across various domains. From financial analysts performing budgeting and forecasting to small business owners tracking inventory and sales data, the total row feature streamlines the process of deriving meaningful insights from datasets, ultimately contributing to informed decision-making and improved operational efficiency.
Furthermore, the intuitive nature of Excel's interface and functionality ensures that users of all levels, from beginners to experienced professionals, can leverage the total row feature to enhance their data analysis capabilities. The seamless integration of the total row not only facilitates accurate calculations but also enhances the visual presentation of the dataset, providing a clear and concise representation of the analytical outcomes.
In essence, the creation of a total row in Excel empowers users to unlock the full potential of their datasets, enabling them to make data-driven decisions with confidence. By harnessing the capabilities of the total row feature, individuals can streamline their data analysis processes, gain valuable insights, and drive informed actions based on the calculated results, ultimately contributing to improved productivity and strategic decision-making within Excel.