Home>Food and Cooking>How To Cut A Bell Pepper
Food and Cooking
How To Cut A Bell Pepper
Published: February 28, 2024
Learn the best techniques for cutting a bell pepper with our step-by-step guide. Perfect your food prep skills and elevate your cooking game today!
(Many of the links in this article redirect to a specific reviewed product. Your purchase of these products through affiliate links helps to generate commission for Noodls.com, at no extra cost. Learn more)
Table of Contents
Introduction
Bell peppers are not only vibrant and flavorful additions to a variety of dishes, but they also offer a wealth of essential nutrients. Whether you're preparing a colorful salad, a sizzling stir-fry, or a hearty pasta dish, knowing how to cut a bell pepper properly is a fundamental skill in the kitchen. By mastering the art of slicing and dicing this versatile vegetable, you can elevate the visual appeal and taste of your culinary creations.
In this comprehensive guide, we will walk you through the step-by-step process of cutting a bell pepper with precision and ease. From gathering the necessary tools and ingredients to storing any unused portions, you'll gain valuable insights that will empower you to handle bell peppers with confidence and finesse.
By the end of this tutorial, you'll be equipped with the knowledge and skills to effortlessly incorporate bell peppers into your cooking repertoire. So, grab your cutting board and knife, and let's embark on this flavorful journey of mastering the art of cutting a bell pepper!
Step 1: Gather the necessary tools and ingredients
Before diving into the art of cutting a bell pepper, it's essential to gather the tools and ingredients that will facilitate a seamless and efficient preparation process. Here's what you'll need:
Tools:
- Cutting Board: Select a sturdy and spacious cutting board to provide ample room for maneuvering the bell pepper and the knife.
- Chef's Knife: Opt for a sharp chef's knife with a long blade, as it will enable clean and precise cuts through the bell pepper.
- Bowl or Compost Bin: Have a bowl or compost bin ready for collecting the discarded pepper tops, seeds, and membrane.
Ingredients:
- Fresh Bell Pepper: Choose a firm, glossy bell pepper with vibrant colors, such as red, green, or yellow, depending on your preference and recipe requirements.
By ensuring that these tools and ingredients are readily available, you can streamline the process of cutting a bell pepper and set the stage for a successful culinary endeavor. Now that you've assembled the necessary items, it's time to move on to the next step in our bell pepper cutting journey.
Step 2: Wash the bell pepper
Before delving into the intricate task of cutting a bell pepper, it's crucial to initiate the process by thoroughly washing the vegetable. This step is essential for removing any potential dirt, residue, or pesticides that may be present on the outer surface of the pepper. By adhering to proper washing techniques, you can ensure that the bell pepper is clean and safe for consumption.
To begin, place the bell pepper under cool running water. Gently rub the surface of the pepper with your fingers, ensuring that all areas are thoroughly rinsed. This simple yet effective method helps to dislodge any impurities that may be clinging to the outer skin of the pepper.
Next, using a produce brush or a clean cloth, delicately scrub the entire surface of the bell pepper. Pay special attention to the crevices and indentations, as these areas are prone to trapping dirt and debris. By employing a gentle yet thorough approach, you can effectively cleanse the pepper and prepare it for the subsequent cutting process.
Once you have diligently washed the bell pepper, pat it dry with a clean kitchen towel or paper towel. This step helps to remove excess moisture, ensuring that the pepper is primed for cutting. Additionally, a dry surface provides better traction for the knife, facilitating precise and controlled cuts during the slicing or dicing phase.
By meticulously washing the bell pepper, you not only eliminate potential contaminants but also uphold the principles of food safety and hygiene. This foundational step sets the stage for a seamless and enjoyable cooking experience, allowing you to harness the full potential of the bell pepper in your culinary creations.
With the bell pepper now clean and ready for the next phase, let's proceed to the subsequent step in our journey of mastering the art of cutting this vibrant and versatile vegetable.
Step 3: Cut off the top of the bell pepper
To begin the process of cutting a bell pepper, the initial step involves removing the top portion of the vegetable. This preparatory step sets the stage for accessing the inner cavity of the pepper and facilitates the extraction of the seeds and membrane. By executing this step with precision and care, you can lay the foundation for seamless slicing or dicing of the bell pepper.
-
Positioning the Pepper: Place the washed and dried bell pepper on a stable cutting board, ensuring that it rests securely to prevent any rolling or shifting during the cutting process. This stable positioning is essential for maintaining control and stability while wielding the knife.
-
Identifying the Top: Orient the bell pepper so that the stem end is facing upward. The top of the bell pepper is characterized by the stem, which is typically distinguished by a small, protruding knob at the center of the vegetable. This visual cue serves as a guide for identifying the precise location of the top.
-
Cutting Technique: With a firm grip on the bell pepper, carefully insert the tip of a sharp chef's knife just below the stem, ensuring a clean and straight incision. Apply gentle pressure as you guide the knife around the circumference of the stem, effectively removing the top portion of the bell pepper in a single fluid motion.
-
Discarding the Top: Once the top has been cleanly severed from the bell pepper, set it aside in a designated bowl or compost bin. This discarded portion, including the stem and any attached greenery, can be repurposed for composting or discarded as per your preference.
By adeptly executing this step, you have successfully prepared the bell pepper for the subsequent phase of the cutting process. With the top removed, the inner cavity of the pepper is now accessible, paving the way for the next critical step of extracting the seeds and membrane.
With the top of the bell pepper expertly removed, you are now poised to advance to the subsequent step in our journey of mastering the art of cutting this vibrant and versatile vegetable.
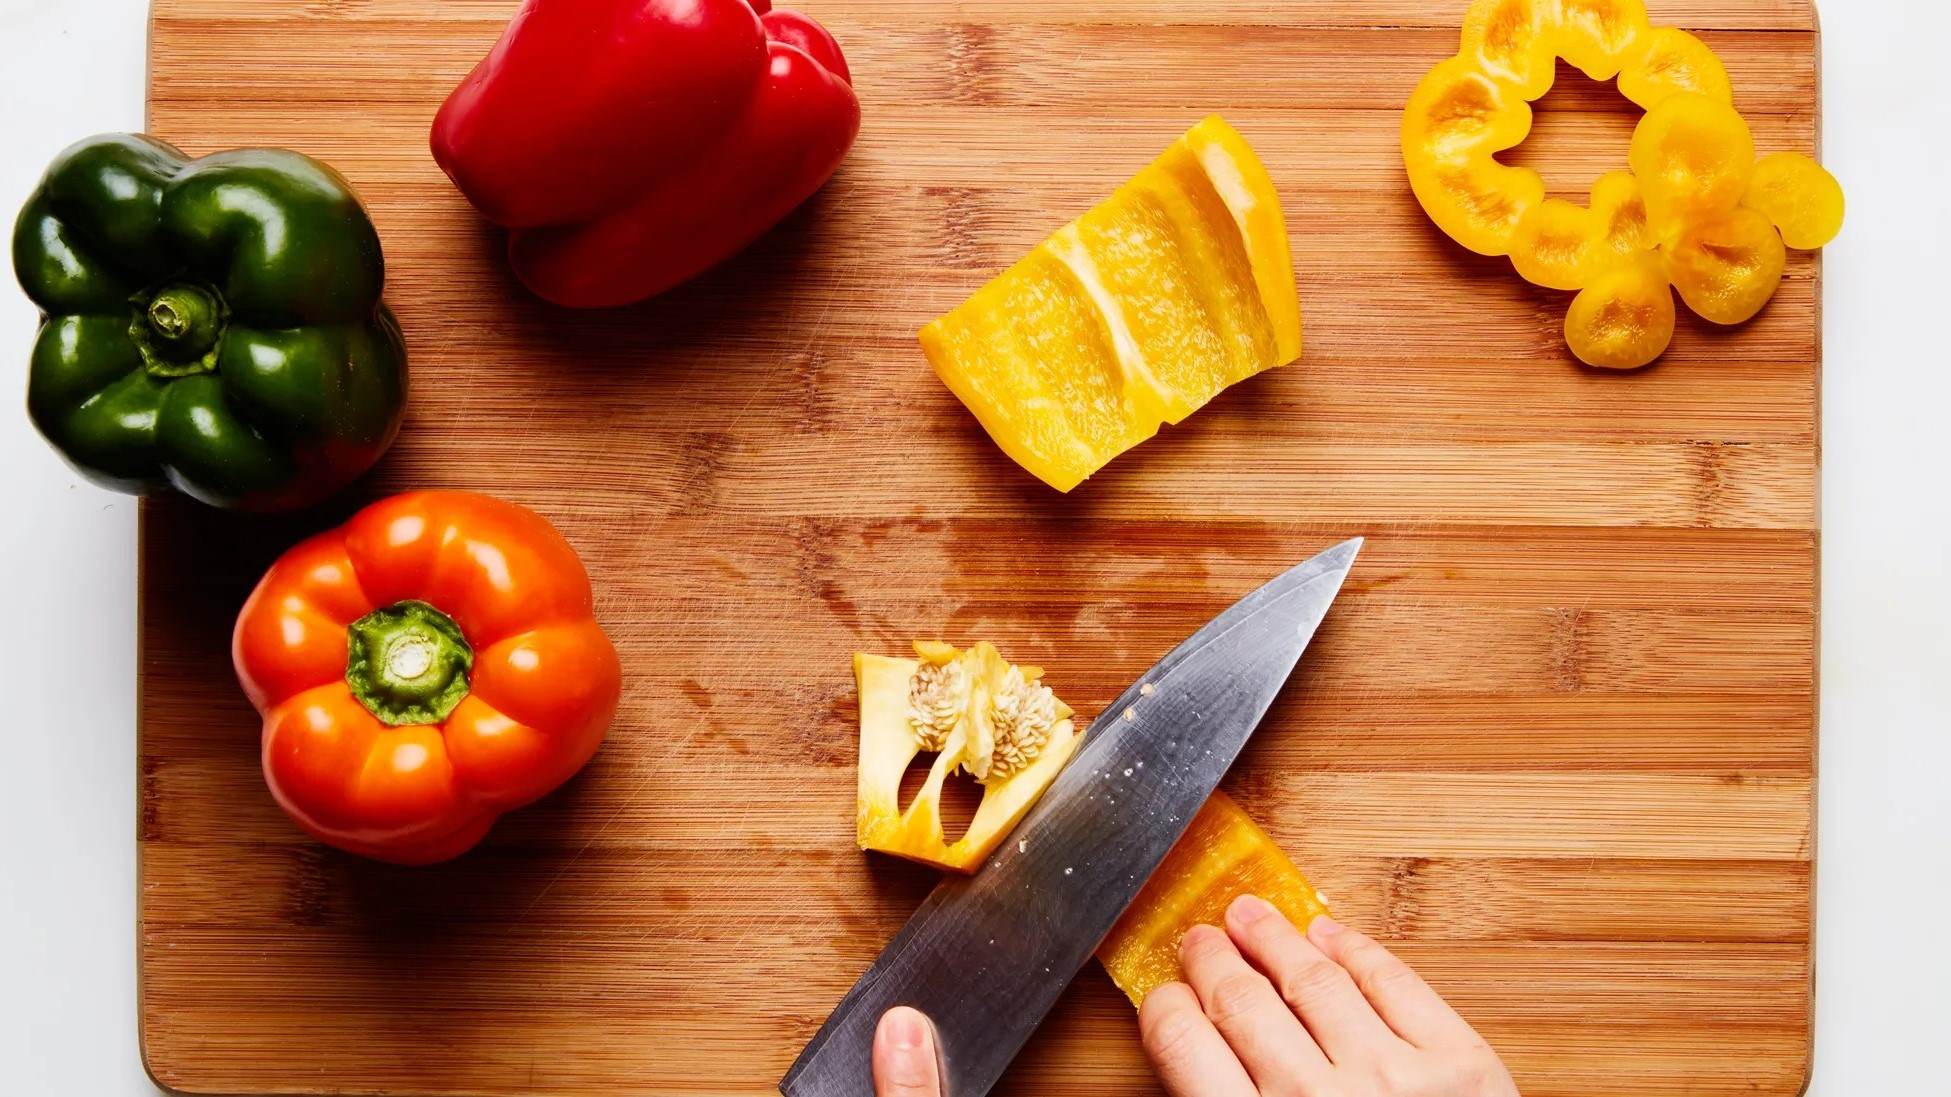
Step 4: Remove the seeds and membrane
With the top of the bell pepper expertly removed, the next crucial step in the cutting process involves extracting the seeds and membrane from the inner cavity of the vegetable. This preparatory phase is essential for eliminating the bitter and fibrous components of the pepper, thereby enhancing its texture and flavor. By executing this step with precision and attention to detail, you can ensure that the bell pepper is primed for seamless incorporation into a myriad of culinary creations.
To embark on this phase of the cutting process, follow these steps:
-
Accessing the Inner Cavity: With the top of the bell pepper removed, the inner cavity is now exposed. Gently grasp the pepper and orient it so that the open end faces upward, allowing for easy access to the interior.
-
Removing the Seeds: Using your fingers or a small spoon, carefully scoop out the cluster of seeds nestled within the cavity of the bell pepper. Employ a gentle yet deliberate motion to dislodge the seeds, ensuring that the surrounding flesh remains intact.
-
Extracting the Membrane: Once the seeds have been removed, focus on extracting the thin, translucent membrane that lines the interior of the pepper. This membrane, while edible, can impart a slightly bitter taste and a tough texture, detracting from the overall palatability of the pepper.
-
Rinsing the Cavity: After the seeds and membrane have been successfully removed, rinse the interior cavity of the bell pepper under cool running water. This step helps to eliminate any residual seeds or membrane fragments, leaving behind a clean and pristine surface.
By meticulously executing these steps, you have effectively prepared the bell pepper for the final phase of the cutting process. The removal of the seeds and membrane not only enhances the visual appeal of the pepper but also sets the stage for seamless slicing or dicing, allowing the vibrant colors and crisp texture of the pepper to shine through in your culinary endeavors.
With the seeds and membrane expertly extracted, you are now poised to advance to the subsequent step in our journey of mastering the art of cutting this vibrant and versatile vegetable.
Step 5: Slice or dice the bell pepper
With the bell pepper meticulously prepped, the stage is set for the transformative process of slicing or dicing this vibrant vegetable. Whether you opt for uniform slices to adorn a fresh salad or finely diced pieces to infuse flavor into a savory stir-fry, the manner in which you cut the bell pepper can significantly impact the visual appeal and texture of your culinary creations. Let's delve into the nuanced art of slicing or dicing a bell pepper with precision and finesse.
Slicing the Bell Pepper
- Stabilizing the Pepper: Place the bell pepper on the cutting board, ensuring that it rests securely to prevent any rolling or shifting during the slicing process. This stable positioning is essential for maintaining control and stability while wielding the knife.
- Selecting the Thickness: Determine the desired thickness of the slices based on your recipe requirements. Whether you prefer thin, delicate slices for a light and refreshing dish or thicker cuts to impart a robust crunch, tailor the thickness to suit your culinary vision.
- Cutting Technique: With a sharp chef's knife, carefully slice through the bell pepper in smooth, fluid motions. Employ a gentle yet firm grip on the knife, allowing the blade to glide through the pepper with precision. Ensure consistent thickness across all slices for uniformity in your presentation.
Read more: How To Cut A Cantaloupe
Dicing the Bell Pepper
- Prepping for Dicing: After stabilizing the bell pepper on the cutting board, decide on the size of the dice based on your recipe's specifications. Whether you aim for small, uniform cubes for a visually appealing garnish or larger pieces to add substance to a dish, envision the end result as you prepare to dice the pepper.
- Cutting Technique: With a deft hand, guide the knife through the bell pepper, creating long strips of the desired width. Then, carefully stack the strips and proceed to cut across them, producing uniform cubes. Maintain a steady rhythm and focus on precision to achieve evenly diced pieces that elevate the visual and textural allure of your culinary masterpiece.
By deftly executing the art of slicing or dicing a bell pepper, you have unlocked the potential to infuse your culinary creations with vibrant colors, crisp textures, and tantalizing flavors. Whether you adorn a salad with elegantly sliced peppers or infuse a stir-fry with meticulously diced pieces, the versatility of the bell pepper shines through in every dish, adding a touch of culinary artistry to your gastronomic endeavors.
Step 6: Store any unused portions
After the bell pepper has been expertly sliced or diced to fulfill the culinary requirements of your current dish, it's essential to address the storage of any remaining portions. By implementing proper storage techniques, you can prolong the freshness and quality of the unused bell pepper, ensuring that it remains primed for future culinary endeavors. Whether you have a surplus of sliced peppers from a vibrant salad or a handful of diced pieces from a savory stir-fry, these storage guidelines will empower you to minimize waste and maximize the utility of this versatile vegetable.
Refrigeration
If you find yourself with leftover bell pepper slices or diced pieces, refrigeration is the optimal method for preserving their freshness. To begin, transfer the unused portions into an airtight container or resealable plastic bag, ensuring that the container is appropriately sized to accommodate the peppers without excessive empty space. This snug fit minimizes exposure to air, thereby preserving the crispness and flavor of the bell pepper.
Before sealing the container, consider placing a paper towel or a clean, dry cloth in the vicinity of the peppers. This absorbent material helps to mitigate excess moisture, preventing the bell peppers from becoming soggy during refrigeration. Once the container is securely sealed, label it with the current date to facilitate easy tracking of the storage timeline.
Subsequently, place the container of bell pepper portions in the refrigerator, ideally within the crisper drawer to maintain optimal humidity levels. By adhering to these refrigeration guidelines, you can extend the shelf life of the bell pepper, ensuring that it remains fresh and vibrant for future culinary endeavors.
Freezing
In scenarios where you anticipate a prolonged duration before utilizing the remaining bell pepper portions, freezing offers a viable solution for long-term preservation. To prepare the peppers for freezing, arrange the slices or diced pieces on a parchment-lined baking sheet, ensuring that they are spaced apart to prevent clumping. Place the baking sheet in the freezer for a few hours, allowing the bell pepper portions to firm up.
Once the bell pepper portions are partially frozen, transfer them into a freezer-safe container or resealable freezer bag. Squeeze out excess air before sealing the container, and label it with the date of freezing. This meticulous approach to freezing ensures that the bell pepper portions remain well-preserved and readily accessible for future culinary endeavors.
By embracing these storage techniques, you can harness the full potential of the bell pepper, minimizing waste and maximizing its utility in your culinary repertoire. Whether you opt for refrigeration to maintain short-term freshness or freezing to secure long-term preservation, these storage guidelines empower you to savor the vibrant flavors and nutritional benefits of bell peppers in a variety of culinary creations.