Home>Home and Garden>How To Cut Hardie Board
Home and Garden
How To Cut Hardie Board
Published: March 5, 2024
Learn the best techniques for cutting Hardie board in your home and garden projects. Get expert tips and advice for a clean and precise cut.
(Many of the links in this article redirect to a specific reviewed product. Your purchase of these products through affiliate links helps to generate commission for Noodls.com, at no extra cost. Learn more)
Table of Contents
Introduction
Cutting Hardie board, also known as cement board, is a crucial skill for any DIY enthusiast or professional contractor working on home improvement projects. Hardie board is a durable and versatile building material commonly used for siding, flooring, and tile backing. Its composition of cement, sand, and cellulose fibers makes it resistant to moisture, mold, and fire, making it an ideal choice for areas prone to high humidity or extreme weather conditions.
Mastering the art of cutting Hardie board is essential for achieving precise and clean installations, ensuring that the finished project not only looks professional but also withstands the test of time. Whether you are replacing old siding, installing a new floor, or renovating a bathroom, knowing how to cut Hardie board properly will significantly impact the overall quality and longevity of the final result.
In this comprehensive guide, we will walk you through the step-by-step process of cutting Hardie board with precision and safety in mind. From understanding the necessary tools and materials to implementing the correct techniques, this guide will equip you with the knowledge and confidence to tackle your next home improvement project with ease.
By following the instructions outlined in this guide, you will be able to achieve accurate cuts on Hardie board, minimizing waste and potential errors. Additionally, we will highlight essential safety precautions to ensure that you approach the task with the utmost care and protection. With the right tools, techniques, and mindset, you can master the art of cutting Hardie board and elevate the quality of your home improvement endeavors.
Read more: How To Cut Cement Board
Safety Precautions
When working with Hardie board, prioritizing safety is paramount to prevent accidents and ensure a smooth cutting process. The following safety precautions should be strictly adhered to:
-
Protective Gear: Before commencing any cutting activities, ensure that you are equipped with the necessary protective gear. This includes safety goggles to shield your eyes from dust and debris, a respirator or dust mask to prevent inhalation of harmful particles, and work gloves to safeguard your hands from sharp edges and splinters.
-
Work Area Ventilation: It is crucial to work in a well-ventilated area to minimize the inhalation of dust and fumes generated during the cutting process. If working indoors, consider using a fan or opening windows to improve air circulation. For outdoor projects, choose a location with adequate airflow to disperse airborne particles effectively.
-
Dust Management: Cutting Hardie board produces a significant amount of dust, which can be hazardous if inhaled. To mitigate this risk, consider using a dust collection system or a vacuum equipped with a HEPA filter to capture airborne particles. Alternatively, dampening the board with a mist of water before cutting can help reduce dust production.
-
Proper Handling: Always handle Hardie board with care, as the edges can be sharp and abrasive. When transporting or maneuvering the board, use proper lifting techniques to avoid strain or injury. Additionally, be mindful of the board's weight to prevent overexertion.
-
Tool Safety: Ensure that the cutting tools are in optimal condition before use. Sharp blades are essential for clean and precise cuts, so inspect them for any damage or dullness. When not in use, store the tools in a secure location to prevent accidental contact and maintain their sharpness.
-
Mindful Cutting: Approach the cutting process with focus and attentiveness. Avoid distractions and maintain a steady posture while operating the cutting tools. Always follow the manufacturer's guidelines for the specific cutting tool being used and exercise caution to prevent accidental slips or mishaps.
By adhering to these safety precautions, you can create a secure and controlled environment for cutting Hardie board, minimizing the risk of accidents and ensuring a successful and injury-free home improvement project.
Tools and Materials Needed
To effectively cut Hardie board, you will need a specific set of tools and materials designed to facilitate precise and safe cutting. By ensuring that you have the following items at your disposal, you can streamline the cutting process and achieve professional-quality results.
Tools:
-
Circular Saw with a Diamond-Tipped Blade: A circular saw equipped with a diamond-tipped blade is essential for cutting Hardie board. The diamond-tipped blade is specifically designed to effortlessly slice through the dense composition of the board, providing clean and accurate cuts. When selecting a circular saw, opt for one with adjustable depth settings to accommodate various thicknesses of Hardie board.
-
Fiber Cement Shears: Fiber cement shears are specialized cutting tools tailored for working with Hardie board. These shears feature sharp blades designed to smoothly cut through the tough material, offering an alternative to power tools for smaller cutting tasks or intricate shapes.
-
Utility Knife: A sturdy utility knife with a sharp blade is indispensable for scoring and marking Hardie board before cutting. This tool allows for precise incisions and ensures that the board can be accurately snapped along the scored line.
-
Straight Edge or T-Square: A straight edge or T-square is crucial for marking straight cutting lines on the Hardie board. This ensures that your cuts are precise and aligned, contributing to the overall quality of the installation.
-
Clamps: Secure clamps are essential for stabilizing the Hardie board during the cutting process. They help prevent movement and ensure that the board remains steady and secure, minimizing the risk of errors or accidents.
-
Dust Mask or Respirator: Given the significant amount of dust generated when cutting Hardie board, a dust mask or respirator is vital for protecting your respiratory system from inhaling harmful particles.
Materials:
-
Hardie Board: Of course, you will need the Hardie board itself, available in various dimensions and thicknesses to suit different project requirements.
-
Marker or Pencil: A marker or pencil is necessary for marking cutting lines on the Hardie board, allowing for accurate and clear guidelines before cutting.
-
Safety Goggles: Protecting your eyes from dust, debris, and potential splinters is crucial, making safety goggles an essential component of your cutting arsenal.
-
Work Gloves: Durable work gloves provide protection from sharp edges and splinters, ensuring that your hands remain safe and shielded during the cutting process.
By assembling these tools and materials, you will be well-equipped to tackle the task of cutting Hardie board with confidence and precision, setting the stage for a successful and professional-grade home improvement project.
Read more: How To Clean Wooden Cutting Board
Step 1: Measure and Mark
Before initiating the cutting process, it is crucial to accurately measure and mark the Hardie board to ensure precise cuts and proper alignment. This initial step sets the foundation for the entire cutting process, influencing the overall quality and fit of the board in the intended installation area.
To begin, carefully measure the dimensions of the area where the Hardie board will be installed, whether it is for siding, flooring, or any other application. Use a measuring tape to obtain precise measurements, taking into account any necessary allowances for overlaps, joints, or specific installation requirements.
Once the measurements are determined, transfer them onto the Hardie board using a marker or pencil. Utilize a straight edge or T-square to create straight and accurate cutting lines, ensuring that the dimensions align with the intended installation area. It is essential to double-check the measurements and markings to avoid errors that could lead to ill-fitting or misaligned cuts.
In situations where intricate shapes or angles are required, take extra care to mark the board accordingly, using the appropriate tools and techniques to achieve the desired configurations. Accurate marking is fundamental to achieving seamless transitions and precise fits, especially when working with Hardie board for intricate designs or custom installations.
Furthermore, if multiple pieces of Hardie board are needed for the project, ensure that each piece is clearly marked with its designated measurements and orientation to avoid confusion during the cutting and installation phases. This meticulous approach minimizes the risk of errors and streamlines the overall workflow, resulting in a cohesive and professional outcome.
By meticulously measuring and marking the Hardie board, you establish a solid foundation for the subsequent cutting steps, setting the stage for accurate and seamless cuts that align with the project's specifications. This attention to detail and precision at the outset of the cutting process lays the groundwork for a successful and visually appealing installation, showcasing the professional craftsmanship and meticulous planning involved in the project.
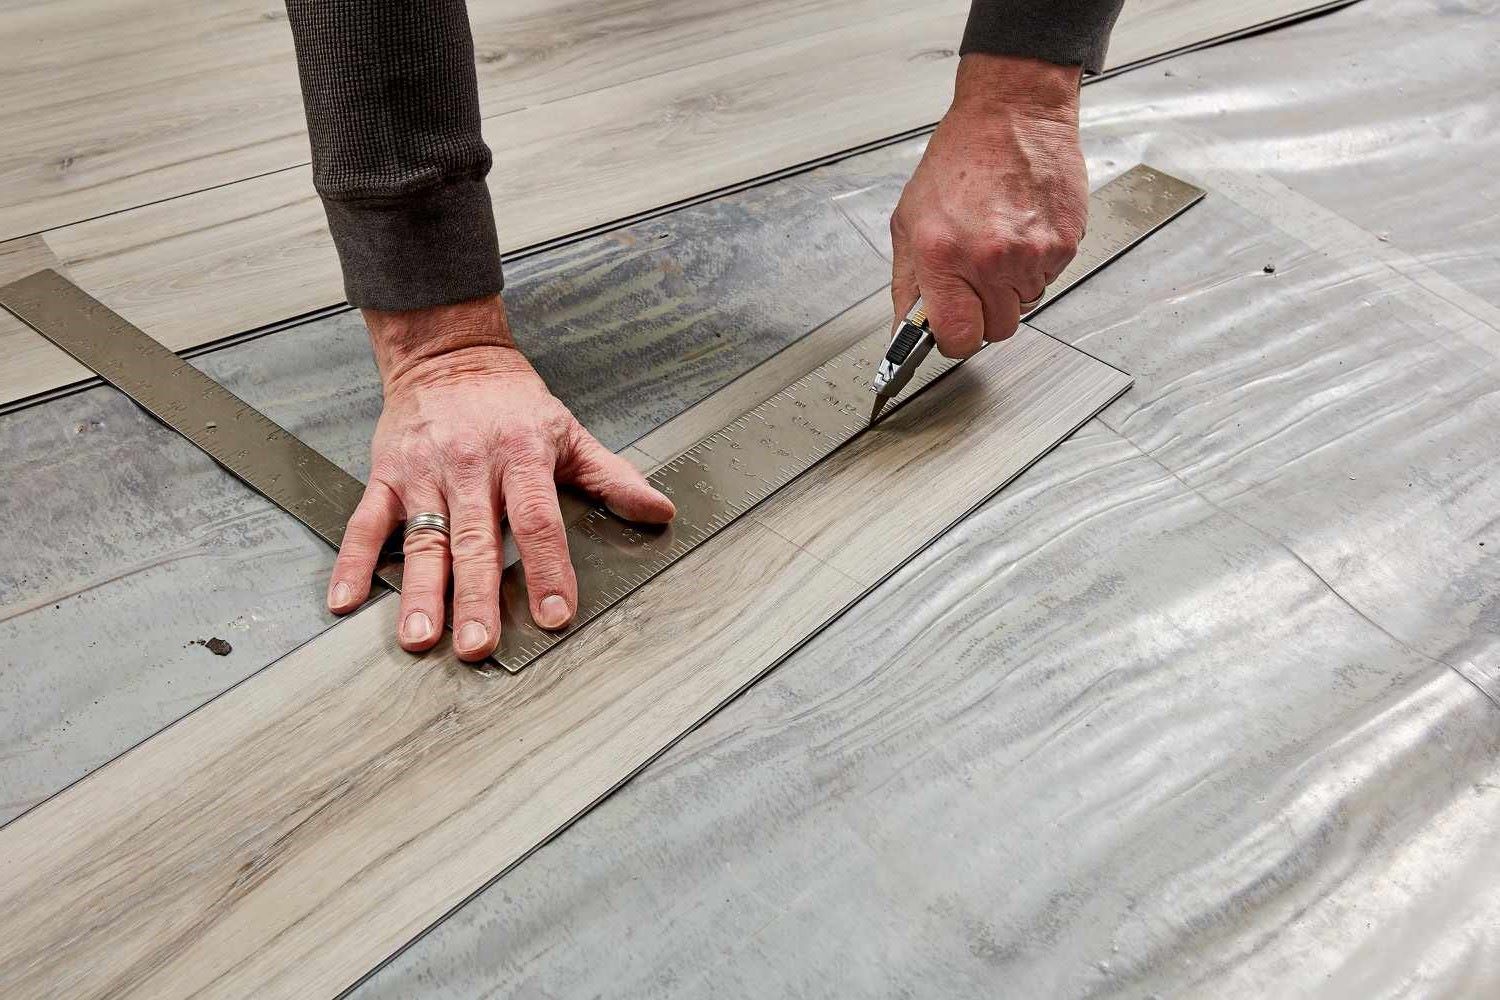
Step 2: Score the Board
Scoring the Hardie board is a critical preparatory step that facilitates clean and precise cuts, ensuring that the board can be accurately snapped along the intended cutting line. This technique involves creating a shallow groove or score along the surface of the board, effectively weakening the material at the designated cutting line without fully penetrating it. By scoring the board, you create a controlled breaking point that allows for a clean and accurate separation, minimizing the risk of chipping or splintering the board during the cutting process.
To score the Hardie board, begin by positioning the board on a stable and flat surface, ensuring that it is securely held in place to prevent movement during the scoring and cutting steps. Using a sharp utility knife with a new or sharpened blade, carefully align the blade along the marked cutting line, applying firm and consistent pressure to create a shallow incision. It is essential to maintain a steady hand and follow the marked line precisely to achieve a uniform score across the board's surface.
When scoring the board, it is advisable to make multiple passes with the utility knife, gradually deepening the groove with each successive stroke. This incremental approach allows for greater control and precision, ensuring that the score line is sufficiently defined without risking excessive force that could lead to unintended damage or irregularities in the board's surface.
Additionally, when scoring Hardie board, it is important to consider the board's thickness and adjust the scoring depth accordingly. Thicker boards may require slightly deeper scores to facilitate a clean break, while thinner boards necessitate more delicate scoring to avoid over-penetration. Adhering to these considerations ensures that the scored line effectively weakens the board without compromising its structural integrity, setting the stage for a seamless cutting process.
By scoring the Hardie board with precision and care, you create a defined breaking point that simplifies the subsequent cutting step, allowing for controlled separation along the designated line. This methodical approach minimizes the risk of splintering or jagged edges, resulting in clean and professional-looking cuts that contribute to the overall quality and visual appeal of the installation.
Step 3: Snap the Board
After scoring the Hardie board along the designated cutting line, the next crucial step involves snapping the board to achieve a clean and precise separation. This technique allows for controlled breakage along the scored line, ensuring that the board separates smoothly without causing splintering or irregular edges.
To snap the Hardie board, carefully position the scored line along the edge of a flat surface, such as a workbench or table, with the excess portion of the board extending beyond the surface's edge. This setup provides support for the majority of the board while allowing the scored section to overhang, facilitating a controlled breakage point.
With the scored line positioned at the edge, apply gentle and even pressure to the excess portion of the board, gradually encouraging the board to break along the scored line. It is essential to exert consistent pressure along the entire length of the scored line, ensuring that the breakage occurs uniformly without causing abrupt or uneven separation.
As the pressure is applied, the Hardie board will begin to yield along the scored line, eventually reaching a point where it cleanly separates into two pieces. It is crucial to maintain a steady and controlled approach, avoiding sudden or forceful movements that could lead to unintended damage or jagged edges.
In situations where the board's thickness or density requires additional force to achieve separation, consider using a supportive tool, such as a flat piece of wood or a specialized board-breaking tool, to assist in the snapping process. This auxiliary support can help distribute the pressure evenly along the scored line, promoting a clean and controlled breakage without compromising the integrity of the board.
By snapping the Hardie board with precision and care, you ensure that the separation occurs cleanly and uniformly, resulting in two distinct pieces that align with the intended cutting line. This methodical approach minimizes the risk of splintering or uneven edges, contributing to the overall quality and professional finish of the cut board.
Mastering the art of snapping the Hardie board is essential for achieving clean and precise separations, setting the stage for seamless installations and professional-grade results. This technique, when executed with attention to detail and controlled force, ensures that the cut board meets the project's specifications, enhancing the overall aesthetic and functionality of the installation.
Step 4: Cut the Board
Once the Hardie board is scored and snapped along the designated cutting line, the final step involves refining the cut and addressing any remaining sections that require trimming. This critical phase ensures that the board's edges are clean, precise, and tailored to fit the installation area with accuracy and finesse.
To cut the board with precision, utilize a circular saw equipped with a diamond-tipped blade, specifically designed to effortlessly slice through the dense composition of the Hardie board. Before initiating the cutting process, ensure that the circular saw is set to the appropriate depth to accommodate the board's thickness, minimizing the risk of over-penetration or incomplete cuts.
Position the scored Hardie board on a stable and secure surface, taking care to support the board adequately to prevent movement during the cutting process. Align the circular saw with the scored cutting line, maintaining a steady hand and posture to ensure a straight and uniform cut. Activate the saw and guide it along the marked line, allowing the diamond-tipped blade to smoothly and decisively slice through the board with controlled precision.
As the circular saw progresses along the cutting line, maintain a consistent pace and pressure to facilitate a clean and accurate cut. It is essential to exercise caution and focus throughout the cutting process, avoiding abrupt movements or deviations from the marked line to ensure that the resulting edge is smooth and aligned with the project's specifications.
In situations where intricate or curved cuts are required, maneuver the circular saw with deliberate and controlled movements, adjusting the cutting angle as necessary to achieve the desired shape or configuration. Exercise patience and attentiveness when navigating complex cuts, as meticulous precision is crucial for achieving seamless and professional-grade results.
Upon completing the cutting process, inspect the edges of the Hardie board to ensure that they are clean, uniform, and free from splintering or irregularities. Address any rough or uneven sections with a rasp or sanding block, refining the edges to achieve a polished and professional finish that seamlessly integrates with the installation area.
By mastering the art of cutting the Hardie board with precision and care, you ensure that the board's edges are tailored to perfection, contributing to a seamless and visually appealing installation. This final step, when executed with attention to detail and meticulous precision, elevates the overall quality and professional finish of the project, showcasing the craftsmanship and expertise involved in working with Hardie board.
Conclusion
Mastering the art of cutting Hardie board is a valuable skill that empowers DIY enthusiasts and professional contractors to elevate the quality and precision of their home improvement projects. By following the comprehensive guide outlined in this article, individuals can approach the task of cutting Hardie board with confidence, precision, and safety at the forefront of their endeavors.
Throughout the cutting process, from measuring and marking to scoring, snapping, and finalizing the cuts, attention to detail and meticulous precision are paramount. By adhering to the safety precautions and utilizing the necessary tools and materials, individuals can create a secure and controlled environment for cutting Hardie board, minimizing the risk of accidents and ensuring a successful and injury-free project.
The step-by-step instructions provided in this guide offer a systematic approach to cutting Hardie board, emphasizing the importance of accurate measurements, precise scoring, controlled snapping, and refined cutting techniques. By meticulously measuring and marking the Hardie board, individuals establish a solid foundation for the subsequent cutting steps, setting the stage for accurate and seamless cuts that align with the project's specifications.
Scoring the Hardie board with care and precision creates a defined breaking point that simplifies the subsequent cutting step, allowing for controlled separation along the designated line. This methodical approach minimizes the risk of splintering or jagged edges, resulting in clean and professional-looking cuts that contribute to the overall quality and visual appeal of the installation.
Snapping the Hardie board with precision and care ensures that the separation occurs cleanly and uniformly, resulting in two distinct pieces that align with the intended cutting line. This methodical approach minimizes the risk of splintering or uneven edges, contributing to the overall quality and professional finish of the cut board.
Finally, cutting the Hardie board with precision and care ensures that the board's edges are tailored to perfection, contributing to a seamless and visually appealing installation. This final step, when executed with attention to detail and meticulous precision, elevates the overall quality and professional finish of the project, showcasing the craftsmanship and expertise involved in working with Hardie board.
In conclusion, mastering the art of cutting Hardie board is a testament to the dedication and skill required to achieve professional-grade results in home improvement projects. By embracing the techniques and principles outlined in this guide, individuals can embark on their cutting endeavors with confidence, knowing that they possess the knowledge and expertise to handle Hardie board with precision, safety, and finesse.