Home>Home and Garden>How To Cut Vinyl Flooring
Home and Garden
How To Cut Vinyl Flooring
Published: February 29, 2024
Learn the best techniques for cutting vinyl flooring in your home and garden. Discover tips for achieving precise cuts and professional-looking results.
(Many of the links in this article redirect to a specific reviewed product. Your purchase of these products through affiliate links helps to generate commission for Noodls.com, at no extra cost. Learn more)
Table of Contents
Introduction
Cutting vinyl flooring is a crucial skill for any DIY enthusiast or homeowner looking to renovate their space. Whether you're updating a kitchen, bathroom, or any other area, knowing how to cut vinyl flooring properly can make a significant difference in the overall outcome of your project. Vinyl flooring is a popular choice due to its durability, water resistance, and ease of maintenance. Learning the art of cutting vinyl flooring will empower you to customize the material to fit any room's dimensions, corners, or obstacles, ensuring a seamless and professional-looking installation.
Understanding the nuances of cutting vinyl flooring is essential for achieving a polished and visually appealing result. This process involves precise measurements, the use of specialized tools, and a careful approach to ensure that the flooring fits snugly against walls, cabinets, and other fixtures. By mastering the techniques of cutting vinyl flooring, you can elevate the aesthetic appeal of your space while also increasing its functionality and value.
In this comprehensive guide, we will delve into the intricacies of cutting vinyl flooring, providing step-by-step instructions, essential tips, and valuable insights to help you navigate this task with confidence. From preparing the work area to measuring and cutting the vinyl flooring to installing the cut pieces, we will cover every aspect of the process, empowering you to tackle this project with ease and precision. By the end of this guide, you will have the knowledge and skills needed to cut vinyl flooring like a seasoned professional, enabling you to transform your living space with finesse and flair.
Read more: How To Remove Vinyl Flooring
Tools and Materials Needed
Before embarking on the task of cutting vinyl flooring, it's essential to gather the necessary tools and materials to ensure a smooth and efficient process. Here's a comprehensive list of items you'll need to have on hand:
Tools:
- Utility Knife: A sharp utility knife equipped with a retractable blade is indispensable for cutting vinyl flooring with precision. Ensure that the blade is sharp to facilitate clean and accurate cuts.
- Tape Measure: Accurate measurements are crucial when cutting vinyl flooring to fit specific dimensions. A reliable tape measure will help you determine the exact length and width of the flooring required for each section.
- Straight Edge: A sturdy straight edge, such as a metal ruler or T-square, is essential for guiding the utility knife during cutting, ensuring straight and even cuts.
- Pencil or Marker: Marking the vinyl flooring with a pencil or marker allows you to indicate the cutting lines clearly, minimizing errors and ensuring a tailored fit.
- Safety Glasses: Protect your eyes from debris and particles during the cutting process by wearing safety glasses. This precaution is crucial for maintaining safety and preventing potential eye injuries.
Materials:
- Vinyl Flooring: The specific type and design of vinyl flooring required for your project, ensuring that you have sufficient material to cover the designated area.
- Underlayment (if applicable): Depending on the installation requirements, you may need an underlayment to provide cushioning and support for the vinyl flooring.
- Adhesive (if applicable): If your vinyl flooring requires adhesive for installation, ensure that you have the appropriate adhesive recommended by the manufacturer.
- Flooring Spacers (if applicable): If you're installing floating vinyl flooring, flooring spacers will help maintain the necessary expansion gap between the flooring and the walls.
By assembling these essential tools and materials, you'll be well-equipped to tackle the task of cutting vinyl flooring with confidence and precision. Having the right equipment at your disposal will streamline the process and contribute to the successful execution of your flooring project.
Preparing the Work Area
Before diving into the process of cutting vinyl flooring, it's crucial to prepare the work area meticulously. This preparatory phase sets the foundation for a seamless and efficient cutting process, ensuring that the flooring fits snugly and harmoniously within the designated space. Here's a detailed breakdown of the essential steps involved in preparing the work area for cutting vinyl flooring:
Read more: How To Remove Iron On Vinyl
Clearing the Space:
Begin by clearing the room or area where the vinyl flooring will be installed. Remove any furniture, appliances, or obstacles that may obstruct the cutting and installation process. Clearing the space provides ample room to maneuver and work with the vinyl flooring, allowing for unobstructed measurements and cuts.
Cleaning and Leveling:
Thoroughly clean the subfloor to remove any debris, dust, or imperfections that could affect the installation of the vinyl flooring. Ensure that the subfloor is level and free of any bumps or irregularities, as these can impact the stability and appearance of the flooring. Use a leveling compound if necessary to create a smooth and even surface for the vinyl flooring.
Acclimating the Vinyl Flooring:
If the vinyl flooring has been stored in a different environment, allow it to acclimate to the room's temperature and humidity for the recommended duration. Acclimating the flooring helps prevent expansion or contraction after installation, ensuring a stable and long-lasting result.
Layout Planning:
Carefully plan the layout of the vinyl flooring, taking into account the positioning of cabinets, fixtures, and transitions to other flooring materials. Determine the starting point for the installation and visualize how the flooring will flow throughout the space. This step is crucial for optimizing the visual appeal and functionality of the flooring layout.
Read more: How To Get Paint Off Hardwood Floors
Subfloor Preparation:
Depending on the type of subfloor, such as concrete or wood, ensure that it is adequately prepared for the installation of the vinyl flooring. Apply the necessary underlayment or adhesive according to the manufacturer's guidelines, providing a suitable foundation for the flooring material.
By meticulously preparing the work area, you set the stage for a successful and precise cutting process. This proactive approach minimizes potential challenges and ensures that the vinyl flooring installation progresses smoothly, resulting in a polished and professional outcome.
Measuring and Cutting Vinyl Flooring
Accurate measurements and precise cuts are pivotal when working with vinyl flooring. The process of measuring and cutting vinyl flooring demands meticulous attention to detail and a methodical approach to ensure that the flooring fits seamlessly within the designated space. Here's a comprehensive breakdown of the essential steps involved in measuring and cutting vinyl flooring:
Measuring the Space:
Begin by measuring the dimensions of the area where the vinyl flooring will be installed. Use a tape measure to determine the length and width of the space, accounting for any alcoves, angles, or irregularities that may impact the flooring layout. It's crucial to measure each section of the space individually to accommodate potential variations in dimensions.
Adding Allowance for Expansion:
When measuring the vinyl flooring, it's important to factor in the recommended allowance for expansion. Vinyl flooring, especially in areas prone to temperature and humidity fluctuations, requires a small gap around the perimeter to accommodate expansion and contraction. Refer to the manufacturer's guidelines to determine the specific expansion allowance required for the type of vinyl flooring being installed.
Read more: How To Relax Pelvic Floor Muscles
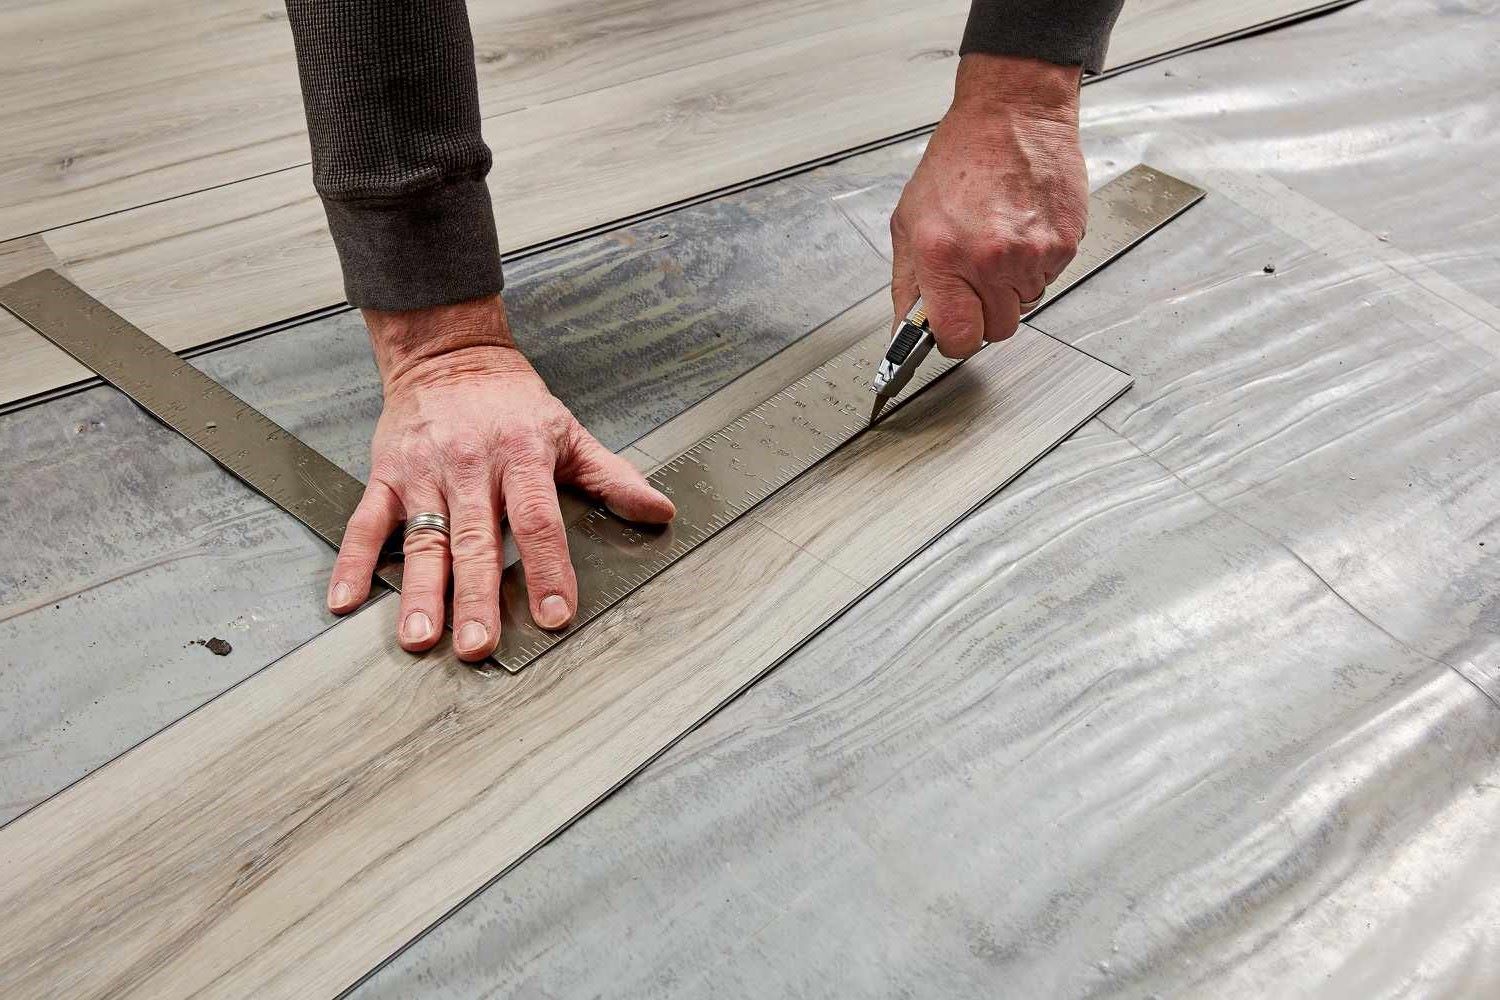
Marking and Cutting the Vinyl Flooring:
Once the measurements are accurately recorded, transfer the dimensions onto the vinyl flooring using a pencil or marker. Use a straight edge, such as a metal ruler or T-square, to create precise cutting lines on the flooring material. When cutting the vinyl flooring, ensure that the blade of the utility knife is sharp to facilitate clean and accurate cuts. Exercise caution and apply consistent pressure to achieve smooth and straight cuts along the marked lines.
Cutting Complex Shapes and Angles:
In scenarios where the vinyl flooring needs to fit around obstacles, corners, or irregular shapes, create a template using paper or cardboard to trace the exact contours onto the flooring material. Carefully transfer the template onto the vinyl flooring and use the utility knife to make intricate cuts, ensuring a tailored fit around the specific features of the space.
Verifying the Fit:
After cutting the vinyl flooring pieces according to the measured dimensions, verify the fit within the space. Place the cut pieces in their respective positions to ensure that they align accurately and seamlessly with the surrounding elements. Make any necessary adjustments or refinements to the cuts to achieve a precise and snug fit.
By meticulously following these steps, you can master the art of measuring and cutting vinyl flooring with precision and finesse. This meticulous approach ensures that the flooring seamlessly integrates with the space, resulting in a visually stunning and professionally executed installation.
Installing the Cut Pieces
Once the vinyl flooring has been accurately measured and cut to fit the designated space, the next crucial step is the installation of the cut pieces. This phase demands meticulous attention to detail and a methodical approach to ensure that the flooring is laid out seamlessly and securely. Here's a comprehensive guide to installing the cut pieces of vinyl flooring:
Read more: How To Get Paint Off The Floor
Preparing the Subfloor:
Before laying the cut pieces of vinyl flooring, ensure that the subfloor is clean, dry, and free of any debris. If an underlayment is required, carefully follow the manufacturer's guidelines for its installation. Additionally, if adhesive is necessary, apply it evenly and consistently to create a stable foundation for the vinyl flooring.
Positioning the Cut Pieces:
Begin by positioning the cut pieces of vinyl flooring within the designated space, ensuring that they align accurately with the layout plan. Pay close attention to the orientation and positioning of each piece to maintain a cohesive and visually appealing arrangement. If flooring spacers are needed to maintain the expansion gap, place them strategically along the edges of the flooring.
Securing the Cut Pieces:
Once the cut pieces are positioned correctly, press them firmly and evenly onto the subfloor, ensuring a secure bond. If adhesive is used, follow the recommended drying and setting time to allow the flooring to adhere properly. Use a roller or a tapping block to ensure that the cut pieces are firmly seated and free of air pockets or wrinkles.
Seaming and Transitioning:
In scenarios where multiple pieces of vinyl flooring are required to cover the entire space, pay careful attention to the seams and transitions between the pieces. Ensure that the seams are tight and inconspicuous, creating a seamless appearance. If transitioning to other flooring materials, use appropriate transition strips or moldings to achieve a polished and professional look.
Read more: How To Cut A Watermelon
Verifying the Alignment:
After installing the cut pieces, verify the alignment and positioning to ensure that the flooring layout adheres to the initial plan. Check for any discrepancies or irregularities and make necessary adjustments to maintain a uniform and harmonious appearance.
By following these meticulous steps, you can successfully install the cut pieces of vinyl flooring, achieving a polished and professional result. This phase is integral to the overall installation process, contributing to the durability, functionality, and aesthetic appeal of the vinyl flooring within your space.
Tips for Cutting Vinyl Flooring
When it comes to cutting vinyl flooring, precision and attention to detail are paramount. Here are some valuable tips to enhance your cutting process and ensure a seamless installation:
-
Sharp Blades: Always use a sharp utility knife to cut vinyl flooring. Dull blades can result in jagged edges and imprecise cuts. Replace the blade as needed to maintain clean and accurate cutting throughout the project.
-
Measure Twice, Cut Once: Adhering to the age-old adage of "measure twice, cut once" is crucial when working with vinyl flooring. Double-check your measurements before making any cuts to minimize errors and material wastage.
-
Use Templates for Complex Cuts: When dealing with intricate shapes or angles, creating templates from paper or cardboard can be immensely helpful. These templates allow you to transfer precise outlines onto the vinyl flooring, ensuring a tailored fit around obstacles and irregularities.
-
Cut in a Well-Ventilated Area: Vinyl flooring can produce fine particles and dust during the cutting process. To minimize inhalation of these particles, work in a well-ventilated area or consider using a dust mask for added protection.
-
Protect the Subfloor: Place a protective barrier, such as cardboard or a drop cloth, over the subfloor when cutting the vinyl flooring. This precaution prevents debris and scratches on the subfloor, maintaining its integrity throughout the installation.
-
Work in Sections: If you're covering a large area with vinyl flooring, consider working in manageable sections. This approach allows for greater precision and control, especially when dealing with complex layouts or patterns.
-
Smooth Edges with Sandpaper: After making cuts, use fine-grit sandpaper to smooth any rough edges or imperfections. This step ensures a seamless transition between the cut pieces and contributes to a professional finish.
-
Test Cuts on Scrap Material: Before making cuts on the actual vinyl flooring, practice on a scrap piece to familiarize yourself with the cutting technique and ensure the desired results.
-
Maintain a Clean Work Area: Regularly clear away debris and scraps from the work area to maintain a tidy and organized space. This practice minimizes the risk of tripping hazards and facilitates a more efficient cutting process.
-
Seek Professional Advice if Needed: If you encounter complex or challenging cutting scenarios, don't hesitate to seek advice from professionals or refer to manufacturer guidelines. Proper guidance can prevent costly mistakes and ensure a successful outcome.
By incorporating these tips into your vinyl flooring cutting process, you can elevate the precision and quality of your installation, resulting in a visually stunning and durable flooring transformation.
Conclusion
Mastering the art of cutting vinyl flooring is a valuable skill that empowers homeowners and DIY enthusiasts to transform their living spaces with precision and finesse. Throughout this comprehensive guide, we've delved into the intricacies of cutting vinyl flooring, providing step-by-step instructions, essential tips, and valuable insights to equip you with the knowledge and confidence needed to tackle this task effectively.
By meticulously preparing the work area, gathering the necessary tools and materials, and embracing a methodical approach to measuring and cutting the vinyl flooring, you can achieve a seamless and professional-looking installation. The careful positioning and installation of the cut pieces further contribute to the durability, functionality, and aesthetic appeal of the flooring within your space.
As you embark on your vinyl flooring project, remember the importance of precision, attention to detail, and the utilization of sharp tools to ensure clean and accurate cuts. Embracing the tips provided, such as using templates for complex cuts, working in well-ventilated areas, and maintaining a clean work environment, will enhance the overall cutting process and contribute to a successful outcome.
Ultimately, the ability to cut vinyl flooring with precision and finesse enables you to customize the material to fit any room's dimensions, corners, or obstacles, resulting in a visually stunning and professionally executed installation. Whether you're updating a kitchen, bathroom, or any other area, the knowledge and skills acquired from this guide will empower you to elevate the aesthetic appeal and functionality of your living space.
By incorporating the insights and techniques outlined in this guide, you are well-equipped to embark on your vinyl flooring project with confidence, knowing that you have the expertise to achieve a polished and visually appealing result. Embrace the process, exercise patience, and revel in the transformative power of cutting vinyl flooring to create a space that exudes charm, durability, and personalized style.