Home>Home and Garden>How To Make A T-shirt Quilt

Home and Garden
How To Make A T-shirt Quilt
Published: March 5, 2024
Learn how to turn your old t-shirts into a cozy quilt with our step-by-step guide. Perfect for adding a personal touch to your home decor. Discover the best techniques for creating a beautiful t-shirt quilt.
(Many of the links in this article redirect to a specific reviewed product. Your purchase of these products through affiliate links helps to generate commission for Noodls.com, at no extra cost. Learn more)
Table of Contents
Introduction
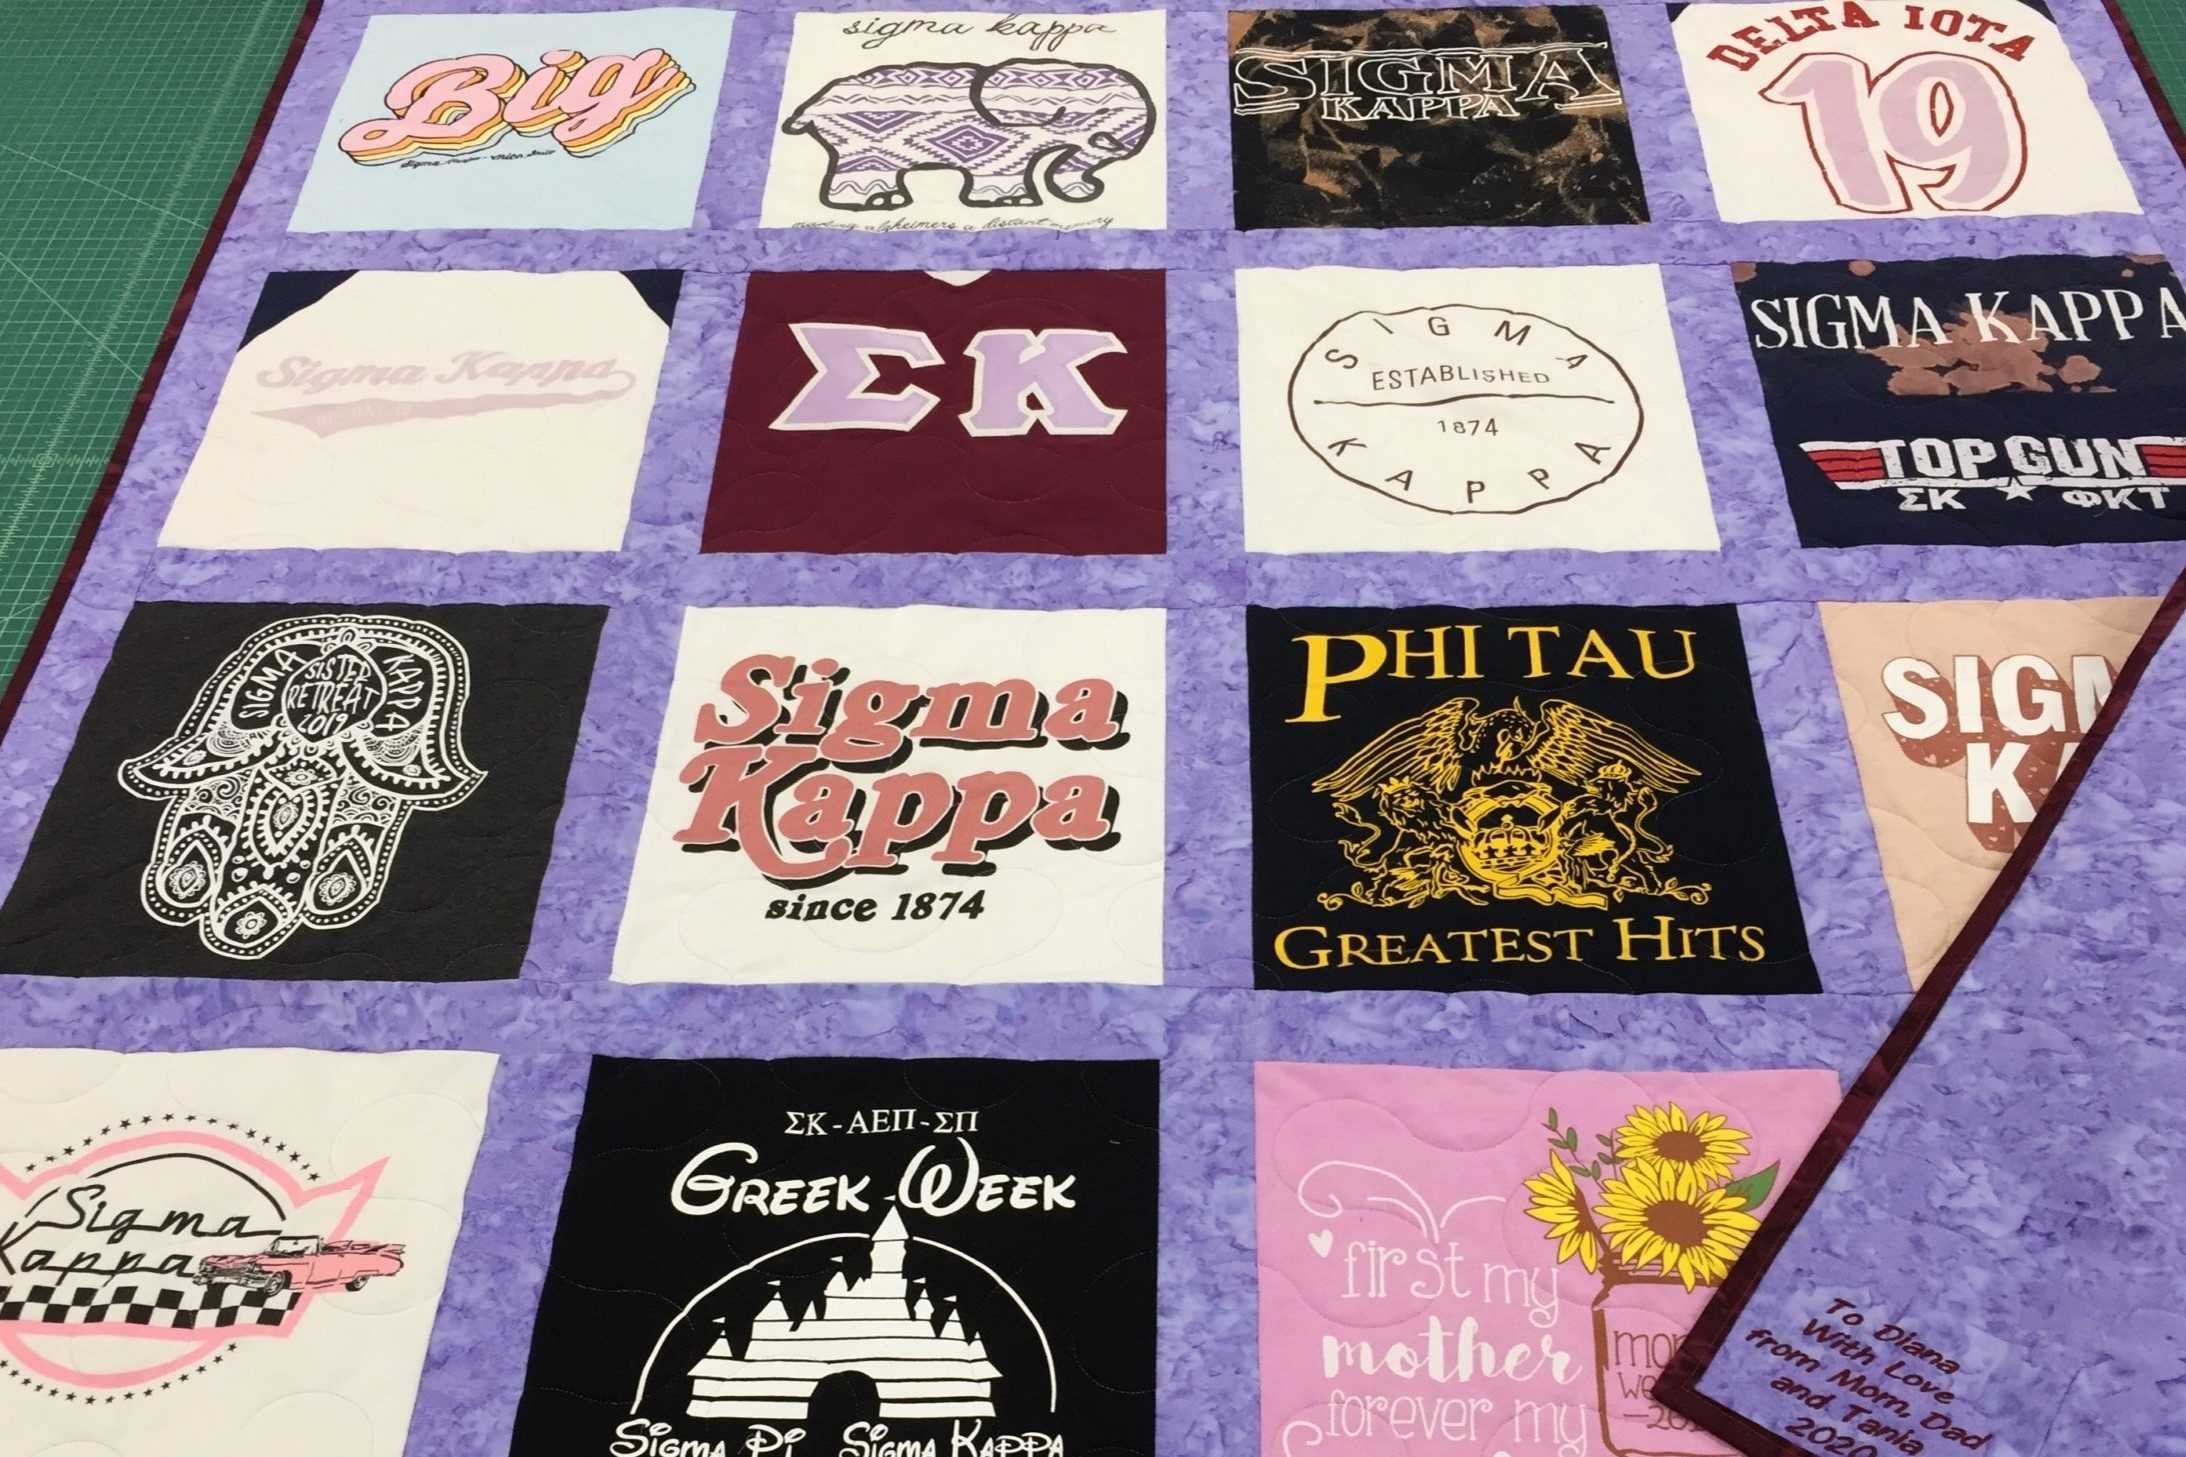
Creating a t-shirt quilt is a wonderful way to preserve cherished memories and repurpose beloved t-shirts that hold sentimental value. Whether it's a collection of concert tees, sports jerseys, or vacation souvenirs, each shirt carries a story that can be woven into a cozy and meaningful quilt. This step-by-step guide will walk you through the process of transforming your collection of t-shirts into a beautiful and functional quilt that will be treasured for years to come.
A t-shirt quilt is not just a practical item; it's a tangible representation of the experiences and milestones captured in the fabric. Each shirt holds a memory, a moment frozen in time, and by repurposing them into a quilt, you can create a unique and personal keepsake. Whether you're a seasoned quilter or a novice, this project offers a creative and rewarding way to showcase your t-shirt collection while adding a touch of warmth and comfort to your home.
As you embark on this journey of transforming t-shirts into a quilt, you'll discover the joy of combining creativity with functionality. This project allows you to breathe new life into old t-shirts, giving them a renewed purpose and ensuring that the memories they hold remain alive and vibrant. From selecting the perfect t-shirts to stitching the final seam, each step of the process is an opportunity to infuse your quilt with love and personal significance.
So, gather your t-shirts, dust off your sewing machine, and get ready to embark on a journey of creativity and nostalgia. Whether you're making a quilt for yourself, a loved one, or as a special gift, this project is a heartfelt endeavor that celebrates the stories woven into the fabric of our lives. Let's dive into the process of creating a t-shirt quilt, where every stitch is a testament to the memories and moments that make life truly extraordinary.
Read more: How To Tie A Button Up Shirt
Step 1: Gather Materials
To embark on the journey of creating a t-shirt quilt, you'll need to gather a few essential materials and tools. Here's a comprehensive list to ensure you're well-prepared for this rewarding project:
Materials:
- T-shirts: Collect a selection of t-shirts that hold sentimental value or represent significant moments in your life. These can include shirts from concerts, sports events, travel destinations, or any other cherished memories. Ensure the shirts are clean and free of stains or damages.
- Fabric for Sashing: Choose a fabric for the sashing, which is the strips of fabric that will separate the t-shirt squares. Consider selecting a color or pattern that complements the t-shirts and enhances the overall aesthetic of the quilt.
- Backing Fabric: Select a durable and visually appealing fabric for the back of the quilt. This will provide a finishing touch to the project while ensuring the quilt is sturdy and long-lasting.
- Batting: Acquire batting, which is the soft layer of insulation that will be sandwiched between the quilt top and backing. Opt for a batting that provides warmth and comfort without adding excessive bulk to the quilt.
- Thread: Choose a high-quality thread in a color that complements the t-shirts and other fabrics. The thread will be used for sewing the t-shirt squares together and quilting the layers.
- Sewing Supplies: Ensure you have a reliable sewing machine, as well as scissors, pins, a rotary cutter, a cutting mat, and a ruler. These tools will be essential for cutting the t-shirts into squares and assembling the quilt.
Optional Materials:
- Stabilizer: If the t-shirts are particularly stretchy or thin, consider using stabilizer to reinforce the fabric before cutting and sewing.
- Quilting Ruler and Marking Pen: These tools can aid in accurately measuring and cutting the t-shirt squares, ensuring precision and uniformity in the quilt assembly.
By gathering these materials, you'll set the stage for a successful t-shirt quilt project. Each item plays a crucial role in bringing your vision to life and preserving the memories woven into the fabric of your t-shirts. With the materials in hand, you're ready to move on to the next step in this creative and sentimental endeavor.
Step 2: Prepare T-shirts
Before transforming your beloved t-shirts into a quilt, it's essential to prepare them for the cutting and sewing process. This step involves assessing each shirt, determining the usable fabric area, and stabilizing the material to ensure clean and precise cuts. Here's a detailed guide on how to prepare your t-shirts for the next phase of the quilt-making journey.
Assessing the T-shirts
Begin by carefully examining each t-shirt to identify the usable fabric area. Some shirts may feature graphics or designs that extend beyond the front or back, while others might have logos positioned in specific areas. Assessing the layout of each shirt will help you determine the most suitable sections to include in the quilt. Consider the significance of the graphics or designs, and envision how they will contribute to the overall aesthetic of the finished quilt.
Stabilizing the Fabric
To prevent stretching or distortion during the cutting and sewing process, it's advisable to stabilize the t-shirt fabric. This is particularly important for shirts made of stretchy or lightweight material. Stabilizer, available in various forms such as fusible interfacing or sew-in stabilizer, can be applied to the back of the t-shirt fabric to reinforce it. By stabilizing the fabric, you'll ensure that the t-shirt squares maintain their shape and structure, resulting in a more professional-looking quilt.
Cutting the T-shirts
Once the fabric is stabilized, it's time to carefully cut out the usable sections of each t-shirt. Using a sharp pair of fabric scissors or a rotary cutter, trim around the graphics or designs, leaving a border of extra fabric to allow for adjustments during the quilting process. Take your time to achieve clean and precise cuts, as the accuracy of the t-shirt squares will significantly impact the overall appearance of the quilt.
Organizing the T-shirt Squares
As you complete the cutting process, organize the t-shirt squares and take note of any specific orientation or arrangement that you'd like to maintain. Consider the color balance, graphic placement, and overall visual appeal of each square. This step will help you visualize how the quilt will come together and allow for adjustments before the sewing phase begins.
By meticulously preparing the t-shirts for the quilt-making process, you'll set the stage for a seamless and enjoyable journey toward creating a meaningful and visually stunning t-shirt quilt. With the t-shirts ready for the next steps, you're one step closer to bringing your cherished memories to life in the form of a beautiful and functional quilt.
Read more: How To Roll Up Dress Shirt Sleeves
Step 3: Cut T-shirts into Squares
After preparing the t-shirts and stabilizing the fabric, the next crucial step in creating a t-shirt quilt is cutting the t-shirts into squares. This process requires precision and attention to detail to ensure that each square is uniform and visually appealing. Here's a detailed guide on how to expertly cut the t-shirts into squares for your quilt.
Measuring and Marking
Begin by measuring and marking the t-shirt fabric to determine the size of the squares. Commonly, t-shirt quilt squares are cut to a standard size, such as 12 inches by 12 inches, although you can adjust the dimensions based on your preference and the design of the shirts. Using a quilting ruler and a fabric marking pen, carefully measure and mark the fabric before cutting. This step is crucial in ensuring that each square is consistent in size, allowing for seamless assembly later in the process.
Cutting with Precision
Once the fabric is marked, it's time to cut out the squares. Utilize a sharp rotary cutter and a self-healing cutting mat to achieve clean and precise cuts. Take your time and exercise caution to maintain accuracy throughout the cutting process. Pay close attention to the graphics or designs on the t-shirts, ensuring that they are centered within each square and aligned uniformly. Consistent and precise cutting is essential for creating a visually appealing quilt that showcases the unique elements of each t-shirt.
Organizing the Squares
As you complete the cutting process, organize the t-shirt squares based on your desired layout for the quilt. Consider the color combinations, graphic placements, and overall visual balance of the squares. This step allows you to experiment with different arrangements and ensures that the quilt reflects your personal style and the significance of the t-shirts. By organizing the squares beforehand, you'll have a clear vision of how the quilt will come together, setting the stage for the next phase of the project.
Read more: How To Make Yellow
Embracing the Memories
Throughout the cutting process, take a moment to appreciate the memories and stories represented by each t-shirt. As you transform them into squares, you're preserving the essence of these cherished moments in a tangible and enduring form. Each cut is a testament to the experiences and milestones captured in the fabric, infusing the quilt with a profound sense of nostalgia and personal significance.
By expertly cutting the t-shirts into squares, you're not only preparing the essential components of the quilt but also honoring the memories and emotions woven into the fabric. With the squares ready for the next stage of assembly, you're one step closer to creating a captivating t-shirt quilt that encapsulates the essence of your unique journey.
Step 4: Arrange Squares
With the t-shirt squares meticulously cut and prepared, the next pivotal phase in crafting a captivating t-shirt quilt is the arrangement of the squares. This step offers an opportunity to unleash your creativity and design sensibilities, as you curate a visually compelling layout that pays homage to the significance of each t-shirt. Here's a detailed exploration of the process of arranging the t-shirt squares for your quilt.
Exploring Layout Options
Before diving into the arrangement, take a moment to explore various layout options. Consider the visual impact of different arrangements, such as a grid pattern, a staggered layout, or a carefully curated mix of colors and graphics. Each t-shirt square holds a unique story, and the arrangement should reflect a harmonious balance that honors the individuality of the shirts while creating a cohesive overall design.
Balancing Colors and Graphics
As you begin arranging the squares, pay attention to the interplay of colors and graphics. Aim to distribute contrasting and complementary colors evenly throughout the quilt, creating a dynamic and visually engaging composition. Additionally, consider the placement of graphics and designs, ensuring that no two adjacent squares clash or compete for attention. By balancing colors and graphics, you'll achieve a harmonious and aesthetically pleasing arrangement that celebrates the diversity of the t-shirts.
Read more: How To Make Teal
Embracing Personal Significance
Throughout the arrangement process, infuse the layout with personal significance and intentionality. Reflect on the stories and memories associated with each t-shirt, and consider how their placement within the quilt can convey a narrative or evoke specific emotions. Whether it's arranging shirts from a memorable vacation in a cluster or strategically positioning shirts from significant life events, the arrangement becomes a visual storytelling device that amplifies the sentimental value of the quilt.
Iterating and Refining
As you experiment with different arrangements, allow yourself the freedom to iterate and refine the layout. Move the squares around, swap positions, and explore alternative combinations until you achieve a composition that resonates with your vision. This iterative process enables you to fine-tune the arrangement, ensuring that every square contributes meaningfully to the overall narrative of the quilt.
Infusing Creativity and Meaning
Ultimately, the arrangement of the t-shirt squares is a canvas for infusing creativity and meaning into the quilt. It's an opportunity to transform a collection of shirts into a cohesive and visually striking piece of textile art. By thoughtfully arranging the squares, you're not only creating a quilt but also weaving together a tapestry of memories, emotions, and personal significance.
As you immerse yourself in the arrangement process, embrace the creative journey and allow the stories within the fabric to guide your choices. With the squares arranged in a manner that resonates with your heart, you're poised to transition to the next phase of bringing your t-shirt quilt to life.
Step 5: Sew Squares Together
With the t-shirt squares thoughtfully arranged, the next pivotal step in the t-shirt quilt-making process is sewing the squares together to form the quilt top. This phase requires precision, patience, and a keen eye for detail to ensure that the squares are seamlessly joined, resulting in a cohesive and visually captivating quilt. Here's a comprehensive exploration of the process of sewing the t-shirt squares together, transforming individual fabric pieces into a unified textile masterpiece.
Preparing for Sewing
Before commencing the sewing process, it's essential to prepare the t-shirt squares and establish a clear plan for their assembly. Lay out the arranged squares in the desired order, ensuring that the layout reflects your vision for the quilt. Take a moment to review the placement of each square, confirming that the colors, graphics, and overall composition align with your creative intent. This preparatory step sets the stage for a smooth and focused sewing experience, allowing you to seamlessly transition from one square to the next as you stitch the quilt top together.
Stitching the Squares
Using a reliable sewing machine and high-quality thread, begin stitching the t-shirt squares together according to the predetermined layout. Employ a consistent seam allowance to maintain uniformity and ensure that the squares align seamlessly. As you guide the fabric through the machine, pay attention to the intersections where multiple squares meet, ensuring that the seams converge neatly to create a cohesive and visually appealing quilt top. Exercise patience and precision, allowing the rhythmic hum of the sewing machine to transform the individual squares into a unified textile canvas.
Pressing and Finishing
After sewing the squares together, press the seams to set them and create a flat, polished surface for the quilt top. Utilize an iron set to the appropriate temperature for the fabric to ensure that the seams lie smoothly and the quilt top achieves a professional finish. Take care to press the seams in the direction that facilitates smooth assembly and minimizes bulk, enhancing the overall appearance of the quilt top. This meticulous attention to detail during the pressing process contributes to the refinement and visual coherence of the quilt top, elevating it from a collection of squares to a cohesive and visually striking textile composition.
Embracing the Journey
As you sew the t-shirt squares together, embrace the journey of transforming fabric into a tangible representation of cherished memories and personal significance. Each stitch serves as a thread that binds the stories and emotions woven into the fabric, culminating in a quilt top that transcends its individual components. With each seam, you're not only assembling a quilt but also weaving together the threads of your unique journey, infusing the textile with a profound sense of nostalgia and personal narrative.
Read more: How To Make Magenta
Moving Forward
With the t-shirt squares expertly sewn together, the quilt top begins to take shape, reflecting the culmination of your creativity and the cherished memories encapsulated in the fabric. As you transition to the subsequent phases of the quilt-making process, the quilt top stands as a testament to the transformative power of stitching together individual elements to create a unified and visually captivating whole.
Step 6: Add Backing and Batting
With the quilt top assembled, the next crucial step in the t-shirt quilt-making process is adding the backing fabric and batting to create a layered foundation that enhances the quilt's durability, warmth, and overall aesthetic appeal.
Adding the Backing Fabric
Begin by selecting a durable and visually appealing fabric for the backing of the quilt. Lay the chosen fabric on a flat surface, ensuring it is free of wrinkles or creases. Place the quilt top over the backing fabric, aligning the edges to ensure a precise fit. Carefully trim the backing fabric to match the size of the quilt top, leaving a slight overhang to accommodate any potential shifting during the quilting process. This overhang will be trimmed later to create a clean and uniform edge for the finished quilt.
Layering the Batting
Once the backing fabric is prepared, it's time to add the batting, which provides insulation and loft to the quilt. Lay the batting over the backing fabric, smoothing out any wrinkles or folds to create a flat and even surface. Ensure that the batting extends slightly beyond the edges of the quilt top, allowing for a consistent layer of insulation throughout the quilt. The combination of the quilt top, batting, and backing fabric forms a layered foundation that will contribute to the quilt's overall structure and comfort.
Read more: How To Make A Bun
Securing the Layers
With the quilt top, batting, and backing fabric layered together, secure the layers using safety pins or basting spray. This step prevents shifting and bunching during the quilting process, ensuring that the layers remain aligned and stable. Take care to distribute the pins or spray evenly across the quilt, maintaining a smooth and taut surface that is conducive to the quilting phase.
Preparing for Quilting
As the layers are secured, the quilt is poised for the final phase of quilting, where the intricate stitching patterns will bind the layers together and add visual and textural interest to the fabric. The addition of the backing fabric and batting not only enhances the quilt's functionality and warmth but also provides a stable and supportive canvas for the quilting process.
A Foundation of Craftsmanship
By adding the backing fabric and batting, you're establishing a foundation of craftsmanship that elevates the t-shirt quilt from a collection of fabric squares to a cohesive and enduring textile creation. The layers of fabric, meticulously aligned and secured, set the stage for the transformative artistry of quilting, where each stitch will contribute to the quilt's visual appeal and structural integrity.
As the quilt awaits the intricate quilting process, the addition of backing and batting represents a pivotal juncture in the quilt-making journey, signaling the transition from individual fabric components to a unified and multi-layered textile masterpiece.
Step 7: Quilt the Layers Together
Quilting the layers together represents a transformative phase in the t-shirt quilt-making process, where the individual fabric components coalesce into a unified and enduring textile masterpiece. This step involves the intricate art of stitching, where the quilt top, batting, and backing fabric are meticulously bound together, creating a visually captivating and structurally resilient quilt.
The quilting process offers an opportunity to infuse the quilt with artistry and texture, as each stitch contributes to the visual and tactile appeal of the fabric. Whether employing traditional quilting patterns, free-motion quilting, or innovative stitching techniques, the act of quilting adds depth and dimension to the quilt, elevating it from a functional textile to a work of art.
As the layers are carefully guided through the sewing machine or expertly hand-stitched, the rhythmic interplay of needle and thread transforms the quilt into a canvas of creativity and craftsmanship. The stitching patterns not only secure the layers together but also create visual interest, enhancing the overall aesthetic of the quilt and adding a layer of storytelling to the fabric.
Throughout the quilting process, attention to detail is paramount, ensuring that the stitches are even, the patterns are consistent, and the fabric remains smooth and taut. Each stitch serves as a testament to the dedication and artistry infused into the quilt, reflecting the culmination of the maker's vision and the stories encapsulated within the fabric.
As the quilt emerges from the quilting process, it embodies the fusion of creativity and functionality, where the layers are seamlessly integrated, and the fabric becomes a tapestry of memories and artistry. The quilt stands as a testament to the transformative power of stitching, where individual elements are woven together to create a cohesive and visually captivating whole.
With the layers quilted together, the t-shirt quilt transcends its utilitarian purpose, becoming a tangible representation of cherished memories, personal significance, and the enduring artistry of quilting. As the quilt awaits the final phase of finishing the edges, it stands as a testament to the transformative journey of transforming fabric into a timeless and cherished textile creation.
Read more: How To Make Purple
Step 8: Finish the Edges
The final phase of creating a t-shirt quilt involves finishing the edges, a crucial step that adds a polished and professional touch to the textile masterpiece. This process not only enhances the quilt's durability but also provides a visually appealing frame that encapsulates the artistry and craftsmanship woven into the fabric.
To begin, carefully trim the excess backing and batting to align with the edges of the quilt top, ensuring a uniform and tidy foundation for the finishing process. This step sets the stage for creating a clean and seamless border that complements the overall aesthetic of the quilt.
Next, select a binding fabric that harmonizes with the colors and design elements of the quilt. The binding fabric serves as a decorative border that encases the raw edges of the quilt, providing a durable and visually appealing finish. Cut the binding fabric into strips, ensuring they are of sufficient length to encompass the entire perimeter of the quilt.
As you attach the binding to the quilt, employ meticulous attention to detail, ensuring that the corners are neatly mitered and the binding lies flat and smooth against the edges. Whether machine-sewn or hand-finished, the binding process represents the culmination of the quilt-making journey, where the individual components are unified into a cohesive and visually captivating whole.
The act of finishing the edges not only enhances the quilt's structural integrity but also represents a testament to the dedication and artistry infused into the fabric. Each stitch and fold of the binding encapsulates the maker's commitment to transforming t-shirts into a timeless and cherished textile creation.
As the final stitches are secured and the binding is meticulously aligned, the quilt emerges as a testament to the transformative power of craftsmanship and creativity. The finished edges not only provide a sense of closure to the quilt-making process but also serve as a visual and tactile frame that encapsulates the stories and memories woven into the fabric.
With the edges expertly finished, the t-shirt quilt stands as a tangible representation of cherished memories, personal significance, and the enduring artistry of quilting. It is a testament to the transformative journey of transforming fabric into a timeless and cherished textile creation.
Conclusion
As the final stitch is secured and the binding neatly aligned, the culmination of the t-shirt quilt-making journey unfolds into a tangible representation of cherished memories, personal significance, and enduring artistry. Each step of this creative endeavor, from gathering the t-shirts to meticulously finishing the edges, has been a testament to the transformative power of craftsmanship and creativity.
The t-shirt quilt, now a cohesive and visually captivating textile masterpiece, stands as a living tapestry of stories and emotions woven into the fabric. It is more than a functional textile; it is a testament to the transformative journey of transforming fabric into a timeless and cherished creation.
Every stitch, every seam, and every fold of the binding encapsulates the dedication and artistry infused into the fabric. The quilt is a testament to the maker's commitment to preserving cherished memories and repurposing beloved t-shirts into a beautiful and functional quilt that will be treasured for years to come.
As the quilt finds its place in the home, it becomes a living testament to the experiences and milestones captured in the fabric. Each shirt holds a memory, a moment frozen in time, and by repurposing them into a quilt, the stories they carry remain alive and vibrant.
The t-shirt quilt is not just a practical item; it's a tangible representation of the experiences and milestones captured in the fabric. Each shirt holds a memory, a moment frozen in time, and by repurposing them into a quilt, a unique and personal keepsake is created.
Whether it's a collection of concert tees, sports jerseys, or vacation souvenirs, each shirt carries a story that has been woven into the quilt. The quilt is a heartfelt endeavor that celebrates the stories woven into the fabric of our lives.
In conclusion, the t-shirt quilt represents the fusion of creativity and functionality, where the layers are seamlessly integrated, and the fabric becomes a tapestry of memories and artistry. It stands as a testament to the transformative power of stitching, where individual elements are woven together to create a cohesive and visually captivating whole. The quilt is a tangible representation of cherished memories, personal significance, and the enduring artistry of quilting.
