Home>Home and Garden>How To Drill A Hole In Ceramic Pot
Home and Garden
How To Drill A Hole In Ceramic Pot
Published: March 2, 2024
Learn how to drill a hole in a ceramic pot with our easy step-by-step guide. Perfect for your home and garden projects.
(Many of the links in this article redirect to a specific reviewed product. Your purchase of these products through affiliate links helps to generate commission for Noodls.com, at no extra cost. Learn more)
Table of Contents
Introduction
Drilling a hole in a ceramic pot may seem like a daunting task, but with the right tools and techniques, it can be a straightforward and rewarding DIY project. Whether you want to create drainage holes for your plants or add a touch of creativity to your garden, mastering the art of drilling into ceramic pots is a valuable skill for any home and garden enthusiast.
Ceramic pots are a popular choice for plant containers due to their durability and aesthetic appeal. However, many ceramic pots do not come with pre-drilled drainage holes, which can lead to water pooling at the bottom and potentially harming the plants. By learning how to drill a hole in a ceramic pot, you can ensure proper drainage and create an ideal environment for your plants to thrive.
In this comprehensive guide, we will walk you through the step-by-step process of drilling a hole in a ceramic pot, covering everything from the essential tools and materials to the precise techniques required for a successful outcome. Whether you are a seasoned DIY enthusiast or a novice looking to expand your skills, this guide will equip you with the knowledge and confidence to tackle this project with ease.
So, roll up your sleeves, gather your tools, and get ready to embark on a fulfilling journey of transforming ordinary ceramic pots into functional and visually appealing planters. With a little patience and the right approach, you'll soon be adding your personal touch to your indoor or outdoor space while promoting the health and vitality of your beloved plants. Let's dive in and discover the art of drilling a hole in a ceramic pot!
Read more: How To Sew A Hole
Tools and materials needed
Drilling a hole in a ceramic pot requires a specific set of tools and materials to ensure a successful and safe outcome. Before embarking on this project, it's essential to gather the following items:
Tools:
- Cordless Drill: A high-quality cordless drill with variable speed settings is essential for this task. Opt for a model with a clutch to prevent over-tightening and potential damage to the ceramic pot.
- Diamond-Tipped Drill Bit: Select a diamond-tipped or carbide drill bit specifically designed for drilling into ceramic, porcelain, or glass. These specialized drill bits are capable of cutting through the hard, brittle surface of ceramic pots without causing cracks or chips.
- Masking Tape: This will be used to create a guide for the drill bit, preventing it from slipping and ensuring precise placement of the hole.
- Safety Glasses: Protect your eyes from any debris or ceramic shards that may be generated during the drilling process.
- Marker or Pencil: Use a marker or pencil to mark the exact spot where you want to drill the hole, ensuring accuracy and precision.
Materials:
- Ceramic Pot: Select the ceramic pot in which you intend to drill the hole. Ensure that the pot is clean and free from any dirt or debris that could interfere with the drilling process.
- Water: Having a small container of water nearby will help to lubricate the drill bit and keep it cool during the drilling process, reducing the risk of overheating and damage to the ceramic surface.
- Protective Gloves: While not essential, wearing protective gloves can provide an added layer of safety, especially if you are working with multiple ceramic pots or handling sharp edges.
By assembling these tools and materials, you will be well-prepared to tackle the task of drilling a hole in a ceramic pot. Each item plays a crucial role in ensuring precision, safety, and efficiency throughout the process. With the right tools at your disposal, you can approach this project with confidence, knowing that you have everything you need to achieve a professional and polished result.
Preparing the ceramic pot
Before diving into the drilling process, it's crucial to prepare the ceramic pot to ensure a smooth and successful outcome. Follow these steps to properly prepare the pot for drilling:
-
Clean the Pot: Start by thoroughly cleaning the ceramic pot, removing any dirt, dust, or residue from both the interior and exterior surfaces. Use a mild soap and water solution to wash the pot, and allow it to dry completely before proceeding. A clean surface will facilitate better adhesion of the masking tape and ensure that the drill bit can make precise contact with the ceramic material.
-
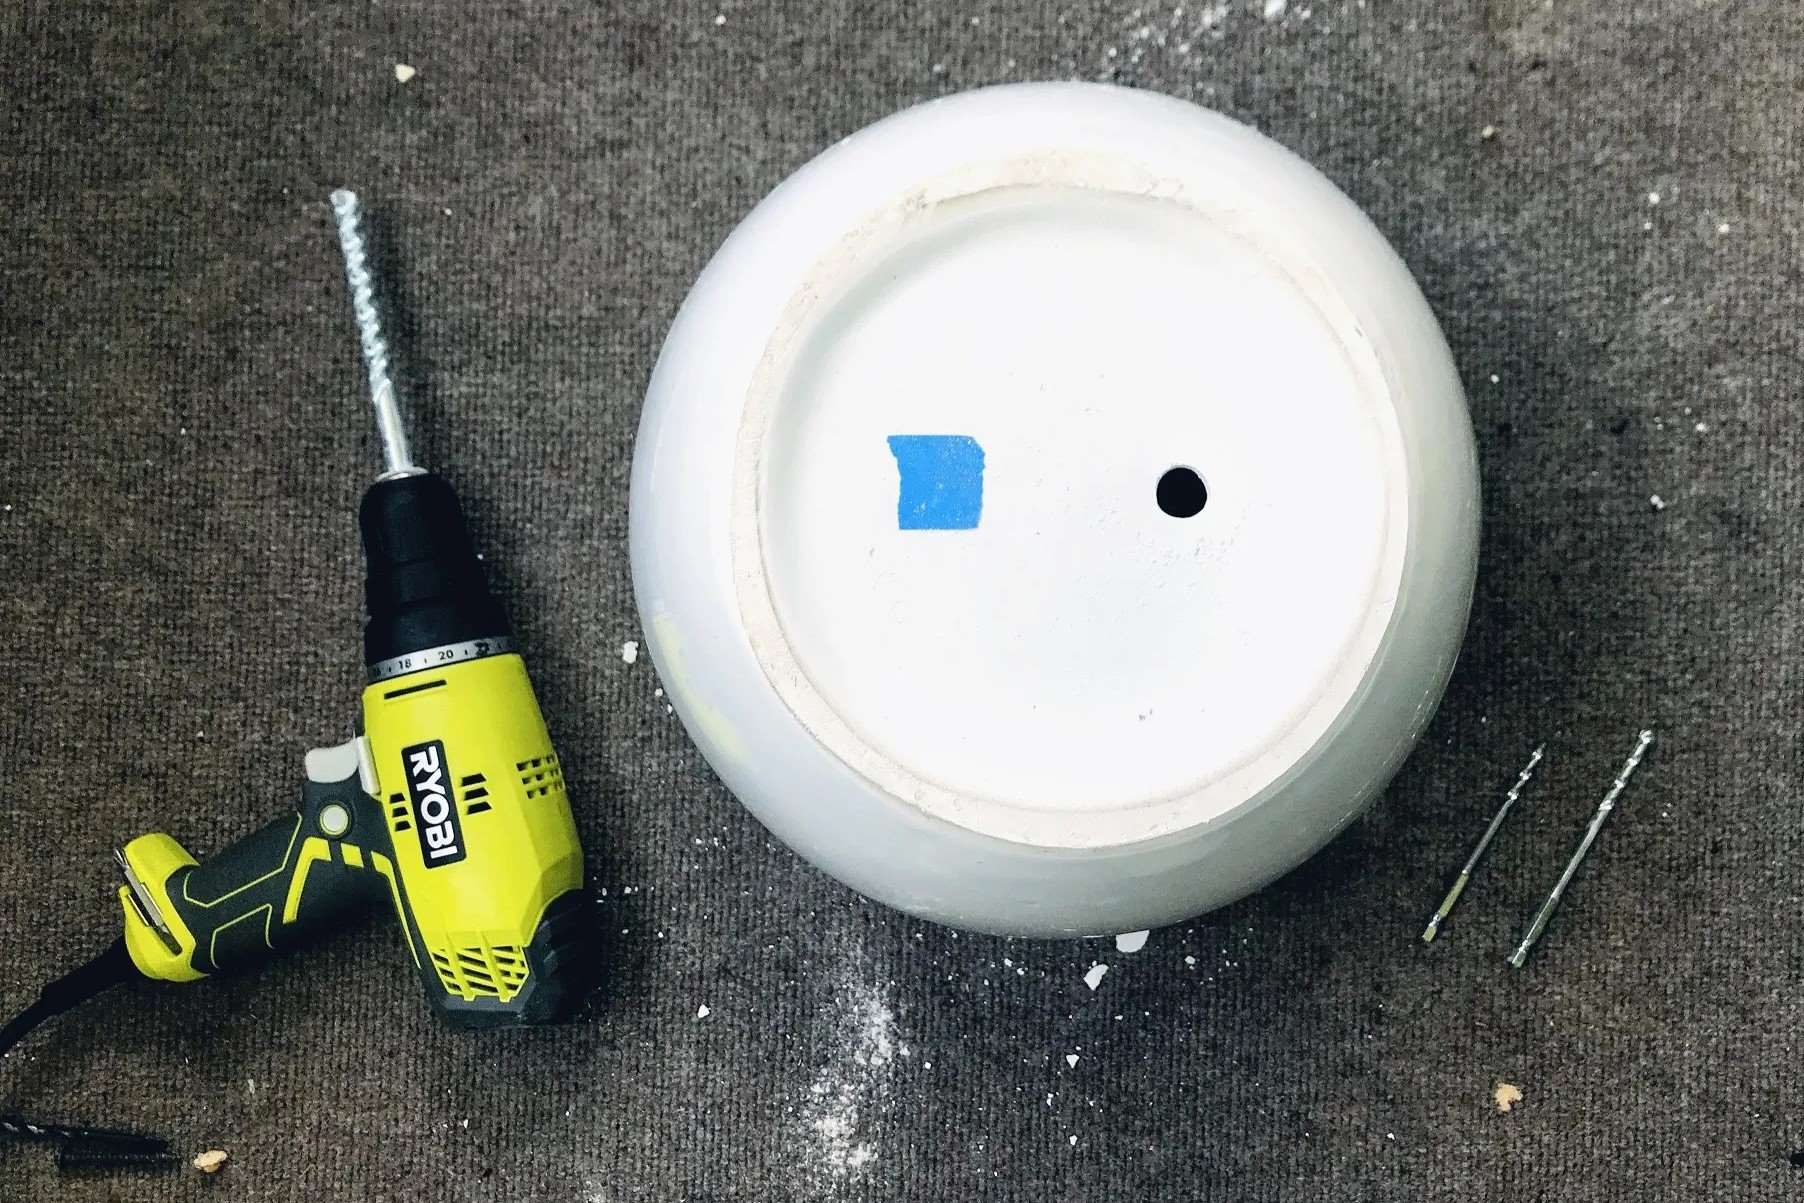
Mark the Drilling Spot: Use a marker or pencil to clearly mark the exact spot where you want to drill the hole. If you're drilling multiple holes, take measurements to ensure uniformity and symmetry. The marking will serve as a guide for the drill bit, allowing you to maintain accuracy and precision during the drilling process.
-
Apply Masking Tape: Once the drilling spot is marked, apply a piece of masking tape over the area. The masking tape serves multiple purposes: it helps prevent the drill bit from slipping on the smooth surface of the ceramic pot, reduces the risk of chipping or cracking, and provides a visual guide for the drilling process. Make sure the tape is securely adhered to the pot, with no wrinkles or air bubbles that could affect the stability of the drill bit.
By meticulously preparing the ceramic pot in this manner, you set the stage for a controlled and effective drilling process. Taking the time to clean the pot, mark the drilling spot, and apply masking tape demonstrates a commitment to precision and attention to detail, which are essential for achieving professional results. With the pot properly prepared, you are now ready to move on to the next crucial step: choosing the right drill bit for the job.
Read more: How To Unlock A Door With A Hole
Choosing the right drill bit
Selecting the appropriate drill bit is a critical step in the process of drilling a hole in a ceramic pot. The choice of drill bit can significantly impact the outcome, affecting the precision of the hole and the overall integrity of the ceramic material. When it comes to drilling into hard, brittle surfaces such as ceramic, porcelain, or glass, not all drill bits are created equal. Here's what you need to consider when choosing the right drill bit for this task:
Diamond-Tipped Drill Bit:
For drilling into ceramic pots, a diamond-tipped or carbide drill bit is the preferred option. These specialized drill bits are specifically designed to cut through hard materials with precision and minimal risk of causing cracks or chips. The diamond-tipped design ensures that the drill bit maintains its sharpness and durability, allowing it to effectively penetrate the dense surface of the ceramic pot without compromising its structural integrity.
Size and Diameter:
The size and diameter of the drill bit are crucial considerations, especially if you have specific requirements for the hole size. Ensure that the drill bit diameter matches the size of the hole you intend to create in the ceramic pot. Whether you need a small drainage hole for a potted plant or a larger hole for a decorative purpose, selecting the right size drill bit will determine the final outcome.
Compatibility with Cordless Drill:
When choosing a drill bit, it's essential to ensure that it is compatible with your cordless drill. Check the shank size of the drill bit to confirm that it fits securely into the chuck of your drill. Using a drill bit that is compatible with your drill will promote stability and precision during the drilling process, minimizing the risk of wobbling or slippage.
Read more: How To Fix Stripped Screw Hole
Quality and Durability:
Opt for a high-quality drill bit that is known for its durability and longevity. Investing in a reliable drill bit may result in cleaner cuts, reduced friction, and extended usability, making it a worthwhile addition to your DIY toolkit. While quality drill bits may come at a slightly higher price point, their performance and longevity often outweigh the initial investment.
By carefully considering these factors and selecting a diamond-tipped or carbide drill bit that aligns with the specific requirements of your project, you can set the stage for a successful drilling experience. The right drill bit will not only facilitate the creation of precise and clean holes in ceramic pots but also contribute to the overall safety and efficiency of the drilling process. With the appropriate drill bit in hand, you are now prepared to move on to the next phase: drilling the hole in the ceramic pot.
Drilling the hole
With the ceramic pot properly prepared and the appropriate drill bit selected, it's time to proceed with the crucial step of drilling the hole. Follow these detailed steps to ensure a precise and successful drilling process:
-
Secure the Pot: Place the ceramic pot on a stable surface, such as a workbench or table, ensuring that it is positioned securely to prevent any wobbling or movement during drilling. If necessary, use clamps or a non-slip mat to hold the pot in place, providing stability and reducing the risk of accidents.
-
Put on Safety Gear: Prioritize safety by wearing protective gloves and safety glasses before commencing the drilling process. These essential safety measures will shield your hands and eyes from any potential debris or ceramic shards that may be generated during drilling.
-
Lubricate the Drill Bit: Dip the tip of the diamond-tipped or carbide drill bit into water to lubricate it. This step helps to dissipate heat and reduce friction during drilling, preventing the drill bit from overheating and prolonging its effectiveness. The water also serves as a coolant, keeping the ceramic surface from becoming too hot and potentially cracking.
-
Set the Drill Speed: Adjust the cordless drill to a low speed setting, as high speeds can generate excessive heat and increase the risk of damaging the ceramic pot. A slower speed allows for better control and precision throughout the drilling process.
-
Position the Drill Bit: Align the tip of the drill bit with the marked spot on the masking tape, ensuring that it is perpendicular to the surface of the ceramic pot. Hold the drill steady and maintain a firm grip to prevent any unnecessary movement or slippage.
-
Begin Drilling: Gently apply pressure to the drill and start drilling into the ceramic pot. Maintain a steady and even pressure, allowing the drill bit to gradually penetrate the surface. Avoid exerting excessive force, as this can lead to cracking or chipping of the ceramic material.
-
Monitor Progress: As you drill, periodically pause to check the depth of the hole and clear away any debris that may accumulate. This step allows you to assess the progress and make any necessary adjustments to ensure that the hole is being drilled to the desired depth.
-
Complete the Drilling: Continue drilling until the drill bit has penetrated through the ceramic pot, creating a clean and precise hole. Once the hole is successfully drilled, carefully withdraw the drill bit from the pot, taking care to avoid any sudden movements that could cause damage.
By following these detailed steps and exercising patience and precision, you can successfully drill a hole in a ceramic pot without compromising its structural integrity. The careful execution of each step ensures that the drilling process is controlled, safe, and effective, resulting in a professionally finished hole that meets your specific requirements.
Now that the hole has been drilled, you can proceed to the final phase of the process: applying the finishing touches to the newly created opening in the ceramic pot.
Finishing touches
After successfully drilling a hole in the ceramic pot, it's essential to attend to the finishing touches to ensure that the newly created opening is refined and ready for use. The following steps will guide you through the process of completing the finishing touches with precision and care:
-
Remove Masking Tape: Once the hole is drilled, carefully peel off the masking tape from the surface of the ceramic pot. Take your time to avoid any sudden movements that could potentially damage the edges of the hole.
-
Smooth the Edges: Inspect the edges of the hole to ensure that they are smooth and free from any rough or jagged areas. If necessary, use a fine-grit sandpaper to gently smooth out any uneven edges, creating a clean and polished finish.
-
Clean the Pot: Wipe down the ceramic pot to remove any residual dust or debris that may have accumulated during the drilling process. A clean, dust-free surface will enhance the overall appearance of the pot and prepare it for its intended use.
-
Inspect the Hole: Carefully examine the drilled hole to confirm that it meets your specific requirements in terms of size, depth, and overall quality. Address any minor imperfections or irregularities to ensure that the hole is precisely tailored to your needs.
-
Test the Drainage: If the hole was drilled to facilitate drainage for potted plants, conduct a quick test by pouring a small amount of water into the pot. Observe the flow of water through the hole to verify that it provides adequate drainage without any obstructions.
-
Personalize the Pot (Optional): If desired, consider adding a personal touch to the ceramic pot to enhance its visual appeal. This could involve painting the pot, adding decorative elements, or incorporating personalized designs to complement your home or garden aesthetic.
By attending to these finishing touches, you can elevate the overall quality and functionality of the ceramic pot, ensuring that the drilled hole serves its intended purpose with precision and finesse. With the completion of the finishing touches, your ceramic pot is now ready to be incorporated into your indoor or outdoor space, providing a functional and visually appealing container for your beloved plants.
This meticulous attention to detail and commitment to refining the drilled hole demonstrates a dedication to achieving professional results and ensuring that the ceramic pot is primed for its intended use. With the finishing touches complete, you can take pride in your accomplishment and enjoy the enhanced versatility and functionality of your newly modified ceramic pot.
Conclusion
In conclusion, mastering the art of drilling a hole in a ceramic pot opens up a world of possibilities for home and garden enthusiasts. By following the step-by-step process outlined in this guide and utilizing the essential tools and techniques, you can transform ordinary ceramic pots into functional and visually appealing planters. The ability to create drainage holes for potted plants or add personalized touches to ceramic pots empowers you to enhance the health and vitality of your plants while infusing your living spaces with creativity and individuality.
Throughout this guide, we have emphasized the importance of meticulous preparation, the selection of the right drill bit, and the execution of the drilling process with precision and care. By adhering to these principles, you can achieve professional results while safeguarding the structural integrity of the ceramic pot. The finishing touches, including smoothing the edges and conducting drainage tests, ensure that the drilled hole meets your specific requirements and is ready for its intended purpose.
Drilling a hole in a ceramic pot is not just a practical endeavor; it is a testament to your commitment to nurturing a thriving and vibrant environment for your plants. Whether you are a seasoned DIY enthusiast or a novice looking to expand your skills, this guide equips you with the knowledge and confidence to undertake this project with ease. The satisfaction of creating a functional and aesthetically pleasing ceramic pot is a testament to your dedication to enhancing your home and garden spaces.
As you embark on your journey of drilling holes in ceramic pots, remember that patience, precision, and attention to detail are the keys to success. With each carefully drilled hole, you are not only enhancing the functionality of your ceramic pots but also adding a personal touch that reflects your unique style and preferences. Embrace the creative possibilities that come with this skill, and let your imagination flourish as you explore the endless ways to elevate the beauty and functionality of your plant containers.
In the end, drilling a hole in a ceramic pot is more than just a DIY project; it is a transformative experience that allows you to merge practicality with creativity, resulting in a harmonious blend of functionality and aesthetics. So, roll up your sleeves, gather your tools, and embark on this fulfilling journey of enhancing your ceramic pots, one hole at a time. With the knowledge and skills acquired from this guide, you are well-equipped to embark on this rewarding endeavor and elevate the beauty and functionality of your home and garden spaces.