Home>Home and Garden>How To Clean Battery Corrosion
Home and Garden
How To Clean Battery Corrosion
Published: March 2, 2024
Learn how to clean battery corrosion at home with simple and effective methods. Keep your home and garden safe with these easy cleaning tips.
(Many of the links in this article redirect to a specific reviewed product. Your purchase of these products through affiliate links helps to generate commission for Noodls.com, at no extra cost. Learn more)
Table of Contents
Introduction
Battery corrosion is a common issue that can affect the performance and lifespan of your electronic devices. Whether it's a remote control, a flashlight, or a car battery, corrosion can impede the flow of electricity and lead to malfunction or complete failure. Understanding how to clean battery corrosion is essential for maintaining the functionality of your devices and ensuring their longevity.
In this comprehensive guide, we will delve into the intricacies of battery corrosion, providing you with the knowledge and tools necessary to effectively address this problem. From safety precautions to step-by-step cleaning techniques and preventive measures, we will equip you with the expertise to tackle battery corrosion with confidence.
By the end of this guide, you will have the skills to identify, address, and prevent battery corrosion, empowering you to extend the life of your electronic devices and minimize the risk of unexpected malfunctions. Let's embark on this enlightening journey to conquer battery corrosion and safeguard the performance of your cherished gadgets.
Understanding Battery Corrosion
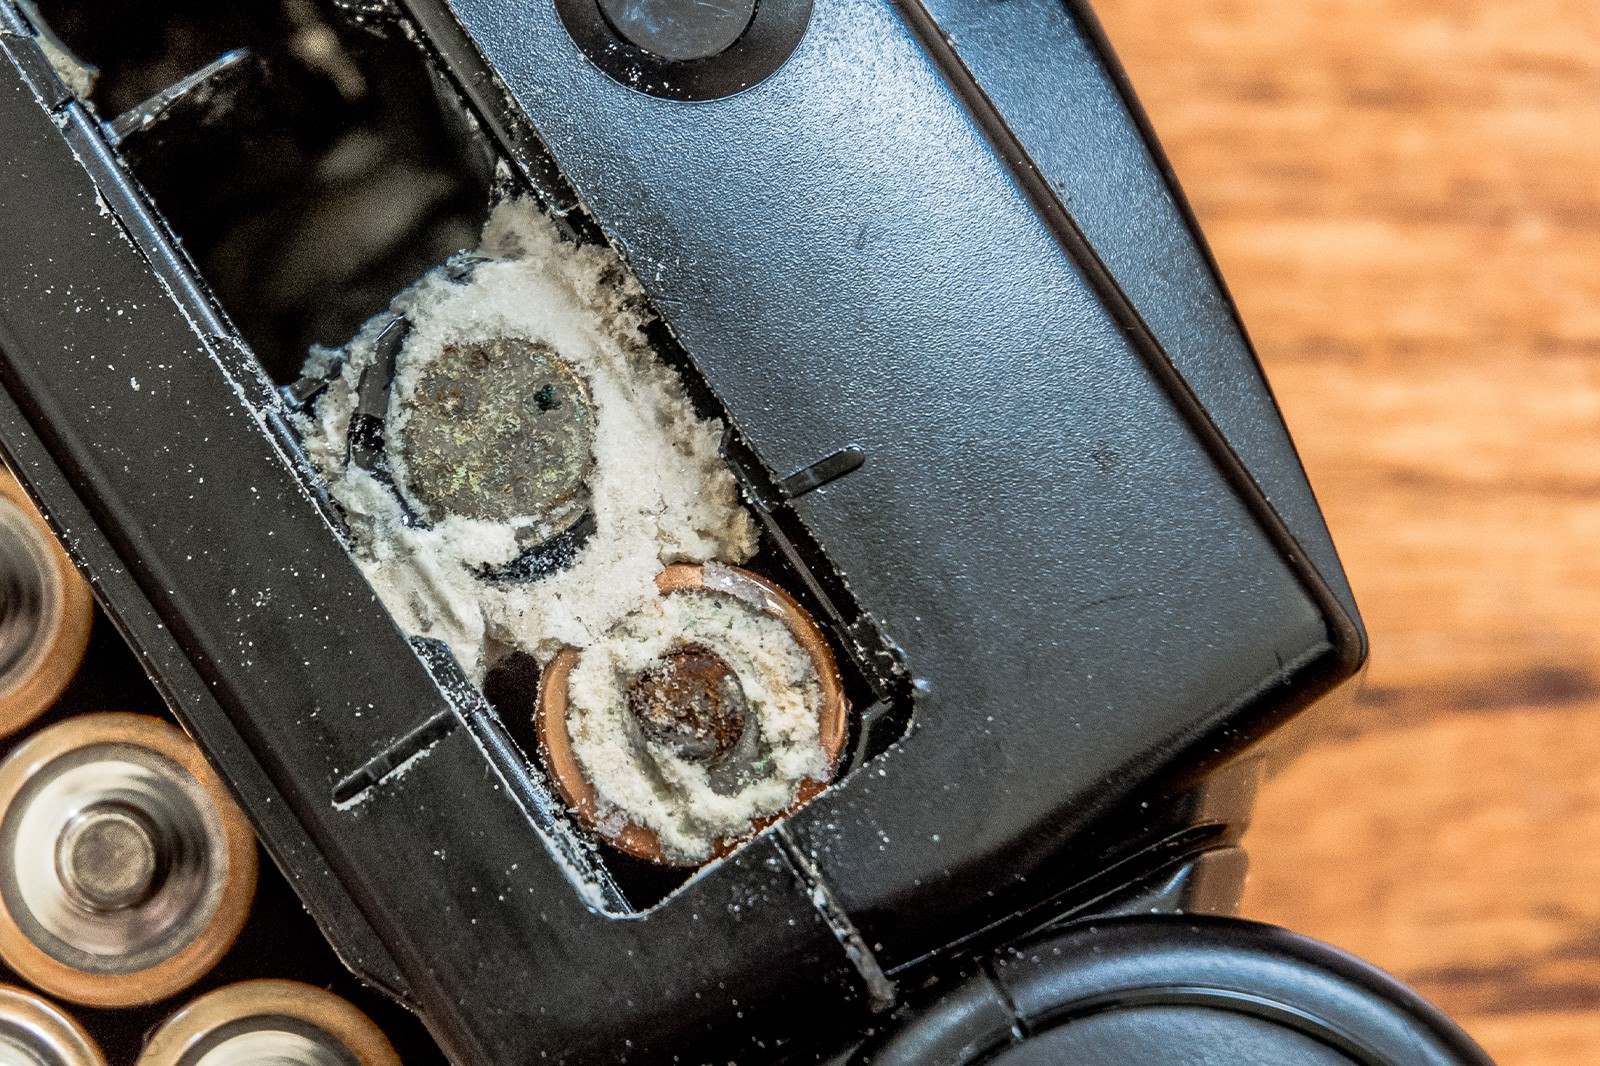
Battery corrosion occurs when the acidic electrolytes within a battery leak and react with the metal terminals, resulting in the formation of a powdery, bluish-white substance. This corrosive buildup, typically a compound of potassium hydroxide and copper sulfate, can obstruct the flow of electricity and compromise the functionality of the battery-powered device.
The primary cause of battery corrosion is attributed to aging batteries or those left unused for extended periods. When batteries remain in devices without regular use, they are more susceptible to leakage, leading to corrosion. Additionally, exposure to high temperatures can accelerate the chemical reactions within the battery, exacerbating the corrosion process.
The visible signs of battery corrosion include a powdery or crystalline substance around the battery terminals, often accompanied by a decline in device performance. In severe cases, the corrosion may spread to the battery compartment, potentially causing irreversible damage to the device.
Understanding the detrimental effects of battery corrosion is crucial for proactive maintenance and timely intervention. By recognizing the symptoms and underlying causes of corrosion, individuals can take preemptive measures to mitigate its impact and preserve the integrity of their electronic devices.
In the subsequent sections, we will explore the essential tools and materials required for cleaning battery corrosion, along with a detailed step-by-step guide to effectively address this issue. By gaining a comprehensive understanding of battery corrosion, you will be better equipped to safeguard your devices and prolong their operational lifespan.
Tools and Materials Needed
To effectively clean battery corrosion and ensure the optimal performance of your electronic devices, you will require a set of essential tools and materials. By assembling the following items, you will be equipped to address battery corrosion with precision and efficiency.
1. Safety Gloves and Eye Protection
Prioritize safety by wearing protective gloves and eye gear to shield yourself from potential exposure to corrosive substances. Battery corrosion can contain harmful chemicals, and protective gear is essential to prevent skin irritation or eye damage during the cleaning process.
2. Baking Soda
Baking soda, a versatile household staple, serves as a potent cleaning agent for battery corrosion. Its alkaline properties facilitate the neutralization of acidic residues, effectively dissolving the corrosion without causing damage to the battery terminals.
Read more: How To Replace Battery In Key Fob
3. Distilled Water
Distilled water is crucial for diluting the baking soda solution and rinsing the battery terminals. Its purity ensures that no additional contaminants or impurities are introduced during the cleaning process, minimizing the risk of further corrosion.
4. Soft-bristled Brush or Toothbrush
A soft-bristled brush or an old toothbrush is ideal for gently scrubbing the battery terminals and removing the corrosion buildup. The delicate bristles help dislodge the powdery residue without causing damage to the metal surfaces.
5. Paper Towels or Clean Cloth
Absorbent paper towels or a clean cloth are essential for drying the battery terminals after cleaning. They aid in removing excess moisture and residual cleaning solutions, preparing the terminals for reinstallation.
6. Battery Terminal Cleaner or Vinegar (Optional)
For stubborn corrosion, a specialized battery terminal cleaner or vinegar can be used to dissolve and remove persistent buildup. These alternatives provide additional cleaning power when dealing with extensive or stubborn corrosion.
7. Disposable Container
A disposable container, such as a plastic cup or bowl, is useful for preparing the baking soda solution and containing the cleaning process. It ensures convenient and safe disposal of any leftover cleaning solutions and minimizes the risk of spillage.
By gathering these essential tools and materials, you will be well-prepared to embark on the process of cleaning battery corrosion with confidence and precision. These items form the foundation of an effective and thorough cleaning regimen, enabling you to restore the functionality of your devices and prevent future corrosion.
Step 1: Safety Precautions
Prior to initiating the battery corrosion cleaning process, it is imperative to prioritize safety measures to safeguard yourself from potential hazards associated with corrosive substances and electrical components. By adhering to the following safety precautions, you can mitigate risks and ensure a secure environment for addressing battery corrosion.
1. Wear Protective Gear
Begin by equipping yourself with safety gloves and eye protection to shield against direct contact with corrosive materials. Nitrile or latex gloves provide a protective barrier, preventing skin exposure to potentially harmful substances. Additionally, safety goggles or glasses serve as a crucial defense against accidental splashes or airborne particles, safeguarding your eyes from irritation or injury.
2. Work in a Well-Ventilated Area
Select a well-ventilated workspace to conduct the cleaning process, ensuring adequate airflow to dissipate any fumes or vapors that may arise during the procedure. Proper ventilation minimizes the inhalation of chemical odors and promotes a healthier environment for handling the battery and cleaning solutions.
Read more: How To Change Nissan Key Fob Battery
3. Disconnect Power Sources
Before removing the battery from the device, ensure that the power source, such as the electrical outlet or power switch, is disconnected to prevent accidental electrical discharge. This precautionary step eliminates the risk of electrical shocks or short circuits while handling the battery and mitigates potential safety hazards.
4. Exercise Caution with Corrosive Materials
Exercise caution when handling baking soda, distilled water, and any cleaning solutions, as they may contain alkaline or acidic properties. Avoid direct skin contact with these substances and handle them with care to prevent accidental spills or splashes. Adhering to proper handling procedures minimizes the risk of skin irritation or chemical burns.
5. Keep Children and Pets Away
Maintain a safe distance from children and pets during the battery cleaning process to prevent accidental exposure to cleaning materials or corrosive residues. Store the tools and materials in a secure location inaccessible to young children or animals, ensuring a hazard-free environment for the cleaning procedure.
By adhering to these safety precautions, you can create a secure and controlled environment for addressing battery corrosion, minimizing potential risks and ensuring a safe cleaning process. These measures prioritize personal safety and promote a responsible approach to handling corrosive substances and electrical components, setting the stage for a successful and secure cleaning endeavor.
Step 2: Removing the Battery
Removing the battery is a crucial step in the process of addressing battery corrosion, as it provides access to the terminals for thorough cleaning and maintenance. Whether it's a small electronic device or a car battery, the proper removal procedure ensures safe and unhindered access to the affected components. Follow these detailed steps to effectively remove the battery and prepare it for the cleaning process.
1. Power Down the Device
Before handling the battery, power down the device in which it is installed. For electronic devices, such as remote controls or flashlights, ensure that they are turned off to prevent electrical hazards during the battery removal process. In the case of a car battery, switch off the vehicle's engine and disconnect any auxiliary power sources to deactivate the electrical system.
2. Locate the Battery Compartment
Identify the location of the battery compartment within the device or vehicle. In electronic devices, the battery compartment is often secured with a cover or casing that can be easily opened using a screwdriver or by following the manufacturer's instructions. For car batteries, the location may vary depending on the vehicle model, with most being situated in the engine bay or trunk area.
3. Unfasten the Battery Holder or Clamps
If the battery is secured with a holder or clamps, use the appropriate tools, such as a screwdriver or wrench, to loosen and remove the fasteners. Carefully detach the battery holder or clamps to release the battery from its housing. Exercise caution to prevent any accidental damage to the surrounding components or wiring.
4. Disconnect the Battery Cables
Identify the positive (+) and negative (-) terminals on the battery. Using a suitable wrench or pliers, loosen the nuts or bolts securing the battery cables to the terminals. Start with the negative cable, followed by the positive cable. Gently wiggle the cables to ensure they are fully detached from the terminals. Take note of the cable positions and terminal polarities for reconnection later.
5. Remove the Battery
Once the cables are disconnected, carefully lift the battery out of the compartment or housing. Exercise caution, as batteries can be heavy, especially in the case of car batteries. Hold the battery securely with both hands and ensure a stable grip to prevent any accidental drops or mishandling.
By following these meticulous steps, you can safely and effectively remove the battery from the device or vehicle, setting the stage for the subsequent cleaning and maintenance procedures. Proper battery removal is essential for accessing the terminals and addressing the corrosion with precision and care.
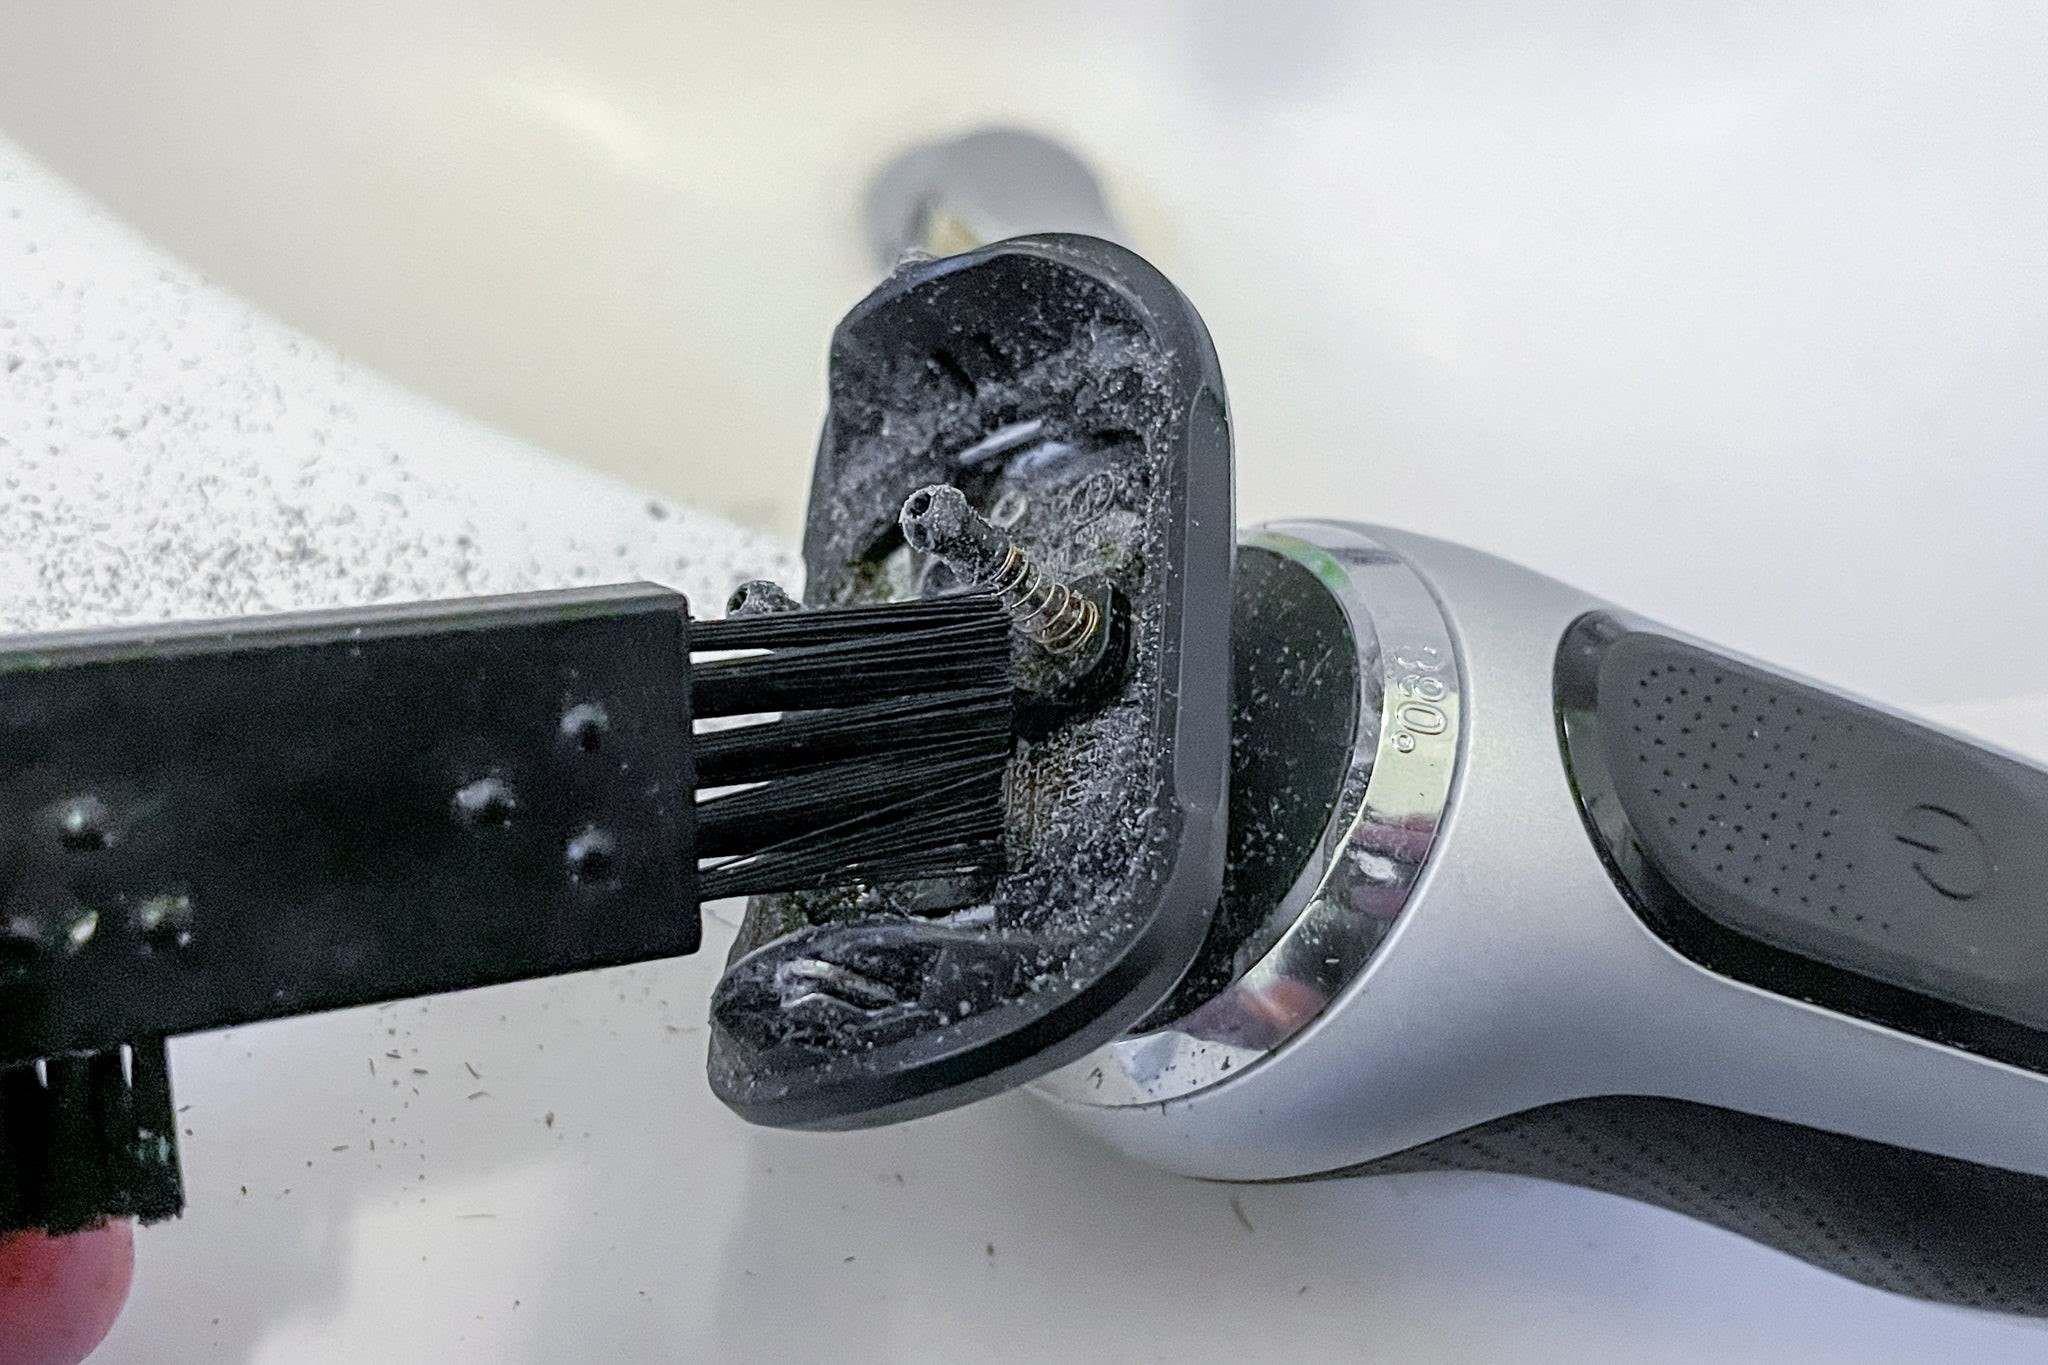
Step 3: Cleaning the Corrosion
With the battery safely removed, it's time to focus on cleaning the corrosion from the terminals. This crucial step requires attention to detail and the use of appropriate cleaning materials to effectively eliminate the corrosive buildup. Follow these comprehensive steps to ensure thorough and meticulous cleaning of the battery terminals:
-
Prepare the Baking Soda Solution: In a disposable container, mix a solution of baking soda and distilled water. The recommended ratio is 3 tablespoons of baking soda to 1 tablespoon of water. Stir the mixture until the baking soda is fully dissolved, creating a mildly alkaline cleaning solution.
-
Apply the Baking Soda Solution: Using a soft-bristled brush or an old toothbrush, carefully apply the baking soda solution to the corroded battery terminals. Ensure that the terminals are generously coated with the solution, allowing it to penetrate the corrosion and initiate the cleaning process.
-
Gently Scrub the Terminals: With the baking soda solution applied, gently scrub the battery terminals using the brush. Employ circular motions and gentle pressure to dislodge the corrosive buildup. Take care not to apply excessive force, as the goal is to remove the corrosion without causing damage to the metal terminals.
-
Rinse with Distilled Water: After thorough scrubbing, use a clean cloth or paper towel dampened with distilled water to rinse the battery terminals. Wipe away the residual baking soda solution and corrosion, ensuring that the terminals are clean and free from any remaining powdery residue.
-
Inspect for Residual Corrosion: Upon rinsing, visually inspect the battery terminals for any residual corrosion. If stubborn deposits persist, consider using a specialized battery terminal cleaner or a mild vinegar solution to further dissolve and remove the remaining buildup.
-
Dry the Terminals: Once the corrosion is effectively removed, use a dry paper towel or clean cloth to dry the battery terminals thoroughly. Ensure that no moisture remains on the terminals, as residual dampness can contribute to future corrosion.
By meticulously following these steps, you can effectively clean the battery corrosion and restore the terminals to their optimal condition. The use of baking soda and distilled water provides a gentle yet potent cleaning solution, while the meticulous scrubbing and rinsing ensure a thorough removal of the corrosive buildup. With the terminals cleaned, you are now ready to proceed to the next step of reinstalling the battery and implementing preventive measures to minimize future corrosion.
Step 4: Reinstalling the Battery
After successfully cleaning the battery terminals, the next crucial step is to reinstall the battery into the device or vehicle. Proper reinstallation ensures the secure and reliable connection of the battery, setting the stage for the optimal functionality of the electronic device. Follow these meticulous steps to ensure the seamless reinstallation of the battery:
-
Position the Battery: Carefully place the cleaned battery back into the designated compartment or housing, ensuring that it is positioned securely and aligned with the terminal connections. Exercise caution to prevent any accidental tilting or displacement of the battery during the reinstallation process.
-
Reconnect the Battery Cables: Begin by reconnecting the battery cables to the terminals in the reverse order of disconnection. Start with the positive (+) cable followed by the negative (-) cable. Use a suitable wrench or pliers to tighten the nuts or bolts, ensuring a secure and snug connection without over-tightening.
-
Secure the Battery Holder or Clamps: If the battery is secured with a holder or clamps, reattach and fasten them to secure the battery in place. Ensure that the holder or clamps are tightened sufficiently to prevent any movement or instability of the battery within the compartment.
-
Inspect the Connections: After reconnecting the battery cables and securing the battery in place, visually inspect the connections to verify that they are firmly attached and free from any signs of looseness or instability. Confirm that the positive and negative terminals are correctly aligned with their respective cables.
-
Power Up the Device: Once the battery is securely reinstalled and all connections are verified, power up the device to ensure that it functions as intended. For electronic devices, test the functionality by turning them on and confirming that the battery powers the device effectively. In the case of a vehicle battery, start the engine to verify proper electrical system operation.
By meticulously following these steps, you can ensure the seamless and secure reinstallation of the battery, setting the stage for the optimal functionality of the device or vehicle. Proper reinstallation not only facilitates the electrical connection but also minimizes the risk of future corrosion by maintaining a stable and secure battery setup. With the battery successfully reinstalled, you are now prepared to implement preventive measures to safeguard against future corrosion and preserve the integrity of the battery and device.
Step 5: Preventing Future Corrosion
Preventing future battery corrosion is essential for maintaining the longevity and performance of electronic devices. By implementing proactive measures, individuals can mitigate the risk of corrosion recurrence and safeguard the integrity of their batteries. The following strategies and preventive techniques serve as effective means to minimize the likelihood of future corrosion and preserve the functionality of battery-powered devices.
1. Regular Inspection and Maintenance
Frequent inspection of battery terminals is crucial for early detection of corrosion. By routinely examining the terminals for any signs of buildup or discoloration, individuals can identify and address potential corrosion at its onset. Additionally, periodic maintenance, such as cleaning the terminals with a baking soda solution, can prevent the accumulation of corrosive residues and prolong the battery's lifespan.
2. Application of Terminal Protection
Applying a thin layer of petroleum jelly or terminal protectant to the battery terminals creates a protective barrier against moisture and corrosive elements. This preventive measure effectively seals the terminals, inhibiting the penetration of external contaminants and reducing the likelihood of corrosion. Regular reapplication of the protective coating further enhances its effectiveness in preventing corrosion.
3. Proper Battery Storage
When storing devices or spare batteries, it is essential to remove the batteries from the devices to prevent potential leakage and corrosion. Store batteries in a cool, dry environment away from direct sunlight and extreme temperatures. Proper storage conditions minimize the risk of electrolyte leakage and chemical reactions that contribute to corrosion.
4. Utilization of Alkaline Batteries
Opting for alkaline batteries, known for their leak-resistant design and longer shelf life, can significantly reduce the risk of corrosion. Alkaline batteries are engineered to minimize electrolyte leakage, making them a reliable choice for devices that require extended periods of inactivity. By choosing alkaline batteries, individuals can proactively mitigate the potential for corrosion-related issues.
5. Timely Battery Replacement
For devices that utilize disposable batteries, timely replacement of old or expired batteries is crucial for preventing corrosion. Aging batteries are more prone to leakage and corrosion, posing a risk to the devices they power. By replacing batteries according to the manufacturer's recommendations and expiration dates, individuals can maintain a consistent and reliable power source while minimizing the likelihood of corrosion.
By incorporating these preventive measures into their maintenance routines, individuals can effectively mitigate the risk of future battery corrosion and preserve the operational integrity of their electronic devices. Proactive maintenance, proper storage practices, and the utilization of corrosion-resistant products collectively contribute to a comprehensive approach to preventing future corrosion and ensuring the sustained functionality of battery-powered devices.
Conclusion
In conclusion, mastering the art of cleaning battery corrosion empowers individuals to safeguard the functionality and longevity of their electronic devices. By understanding the causes and effects of battery corrosion, as well as implementing meticulous cleaning and preventive measures, individuals can effectively combat this pervasive issue.
The comprehensive process of addressing battery corrosion begins with prioritizing safety precautions, ensuring the secure removal of the battery, and meticulously cleaning the terminals with a baking soda solution. The subsequent steps of reinstallation and preventive measures, including regular inspection, terminal protection, proper storage, and timely battery replacement, collectively contribute to a holistic approach in preventing future corrosion.
By embracing these practices, individuals can proactively mitigate the risk of corrosion, preserve the integrity of their batteries, and extend the operational lifespan of their cherished devices. The utilization of alkaline batteries, in particular, serves as a strategic choice for minimizing the likelihood of corrosion-related issues, further enhancing the reliability of battery-powered devices.
In essence, the knowledge and skills acquired through this comprehensive guide empower individuals to take proactive control of battery maintenance, ensuring the sustained performance and durability of their electronic devices. By integrating these practices into their maintenance routines, individuals can enjoy the peace of mind that comes with a reliable and corrosion-free power source for their devices.
Ultimately, the journey to conquer battery corrosion is a testament to the proactive and responsible approach to device maintenance, underscoring the significance of preventive measures and meticulous care in preserving the functionality of battery-powered devices. With the insights and techniques gleaned from this guide, individuals are equipped to navigate the realm of battery maintenance with confidence and precision, ensuring the seamless operation and prolonged lifespan of their electronic companions.