Home>Home and Garden>How To Clean Waterpik

Home and Garden
How To Clean Waterpik
Published: February 28, 2024
Learn how to effectively clean your Waterpik at home with our expert tips and tricks. Keep your oral hygiene in top shape with our easy-to-follow guide.
(Many of the links in this article redirect to a specific reviewed product. Your purchase of these products through affiliate links helps to generate commission for Noodls.com, at no extra cost. Learn more)
Table of Contents
Introduction
Cleaning your Waterpik is an essential part of maintaining good oral hygiene and ensuring the longevity of your device. Over time, mineral deposits, bacteria, and other impurities can accumulate in the water reservoir, tip, handle, and exterior of the Waterpik, potentially compromising its performance and hygiene. By regularly cleaning your Waterpik, you can prevent these issues and continue to enjoy the benefits of this effective oral care tool.
In this comprehensive guide, we will walk you through the step-by-step process of cleaning your Waterpik, providing you with valuable insights and practical tips to ensure that your device remains in optimal condition. Whether you are a seasoned Waterpik user or a newcomer to this innovative oral care technology, this guide will equip you with the knowledge and skills to maintain a clean and hygienic Waterpik.
By following the cleaning instructions outlined in this guide, you can effectively remove any buildup of mineral deposits, bacteria, and other impurities, thereby enhancing the performance and hygiene of your Waterpik. Additionally, regular cleaning can help prevent clogs and ensure that the device continues to deliver a powerful and refreshing oral irrigation experience.
Now, let's delve into the step-by-step process of cleaning your Waterpik, empowering you to take proactive measures in preserving the cleanliness and functionality of this indispensable oral care device.
Read more: How To Wash Squishmallows
Step 1: Disassemble the Waterpik
To initiate the cleaning process, the first step is to disassemble the various components of your Waterpik. This allows for thorough access to all parts, ensuring a comprehensive cleaning experience.
-
Unplug the Waterpik: Before disassembling the device, ensure that it is unplugged from the power source to prevent any electrical mishaps during the cleaning process.
-
Remove the Water Reservoir: Start by detaching the water reservoir from the main unit. Depending on the model of your Waterpik, this may involve simply lifting the reservoir off or unscrewing it from the base. Once removed, empty any remaining water and set the reservoir aside for cleaning.
-
Detach the Tip: If your Waterpik is equipped with a removable tip, carefully detach it from the handle. This allows for individual cleaning of the tip and handle, ensuring that no residue or impurities are left behind.
-
Separate Other Components (if applicable): Some Waterpik models may have additional components that can be detached for thorough cleaning. These may include the lid of the water reservoir, specialized tips, or other removable parts. Refer to the user manual for your specific model to identify and detach any additional components.
By disassembling the Waterpik, you create the foundation for a meticulous cleaning process, enabling you to address each component individually. This approach ensures that no area is overlooked, and all parts are effectively cleaned to maintain optimal hygiene and performance.
With the Waterpik disassembled, you are now ready to proceed to the next step, which involves cleaning the water reservoir to eliminate any accumulated impurities and maintain a pristine oral irrigation experience.
Step 2: Clean the Water Reservoir
Cleaning the water reservoir of your Waterpik is a crucial step in maintaining its hygiene and ensuring the purity of the water used for oral irrigation. Over time, mineral deposits, bacteria, and other impurities can accumulate in the reservoir, potentially compromising the effectiveness of the device. By following the steps outlined below, you can effectively clean the water reservoir and preserve the integrity of your Waterpik.
Materials Needed:
- Mild dish soap
- Warm water
- Soft-bristled brush or cloth
- White vinegar (optional)
Cleaning Process:
-
Empty the Reservoir: Start by emptying any remaining water from the reservoir. This ensures that you are working with a clean and empty container for the cleaning process.
-
Prepare a Cleaning Solution: In a sink or basin, mix a small amount of mild dish soap with warm water. This solution will serve as the cleaning agent for the reservoir.
-
Clean the Interior: Using a soft-bristled brush or cloth, gently scrub the interior of the reservoir with the prepared cleaning solution. Pay close attention to any areas where mineral deposits or residue may have accumulated. For stubborn deposits, a mixture of white vinegar and water can be used as a natural cleaning alternative. Allow the cleaning solution to sit in the reservoir for a few minutes to help loosen any buildup.
-
Rinse Thoroughly: Once the interior of the reservoir has been cleaned, thoroughly rinse it with clean water to remove any soap or vinegar residue. Ensure that all cleaning solution is completely removed to prevent any lingering taste or odor.
-
Dry Completely: After rinsing, allow the reservoir to air dry completely before reassembling the Waterpik. This step is essential to prevent the growth of mold or mildew and to ensure that the device is ready for use.
By following these steps, you can effectively clean the water reservoir of your Waterpik, removing any accumulated impurities and maintaining a hygienic oral irrigation experience. Regular cleaning of the reservoir is essential to prevent the buildup of mineral deposits and bacteria, ensuring that your Waterpik continues to deliver optimal performance and hygiene.
With the water reservoir cleaned, you are now ready to proceed to the next step, which involves cleaning the tip and handle of the Waterpik to ensure a thorough and comprehensive cleaning process.
Read more: How To Clean A Toaster
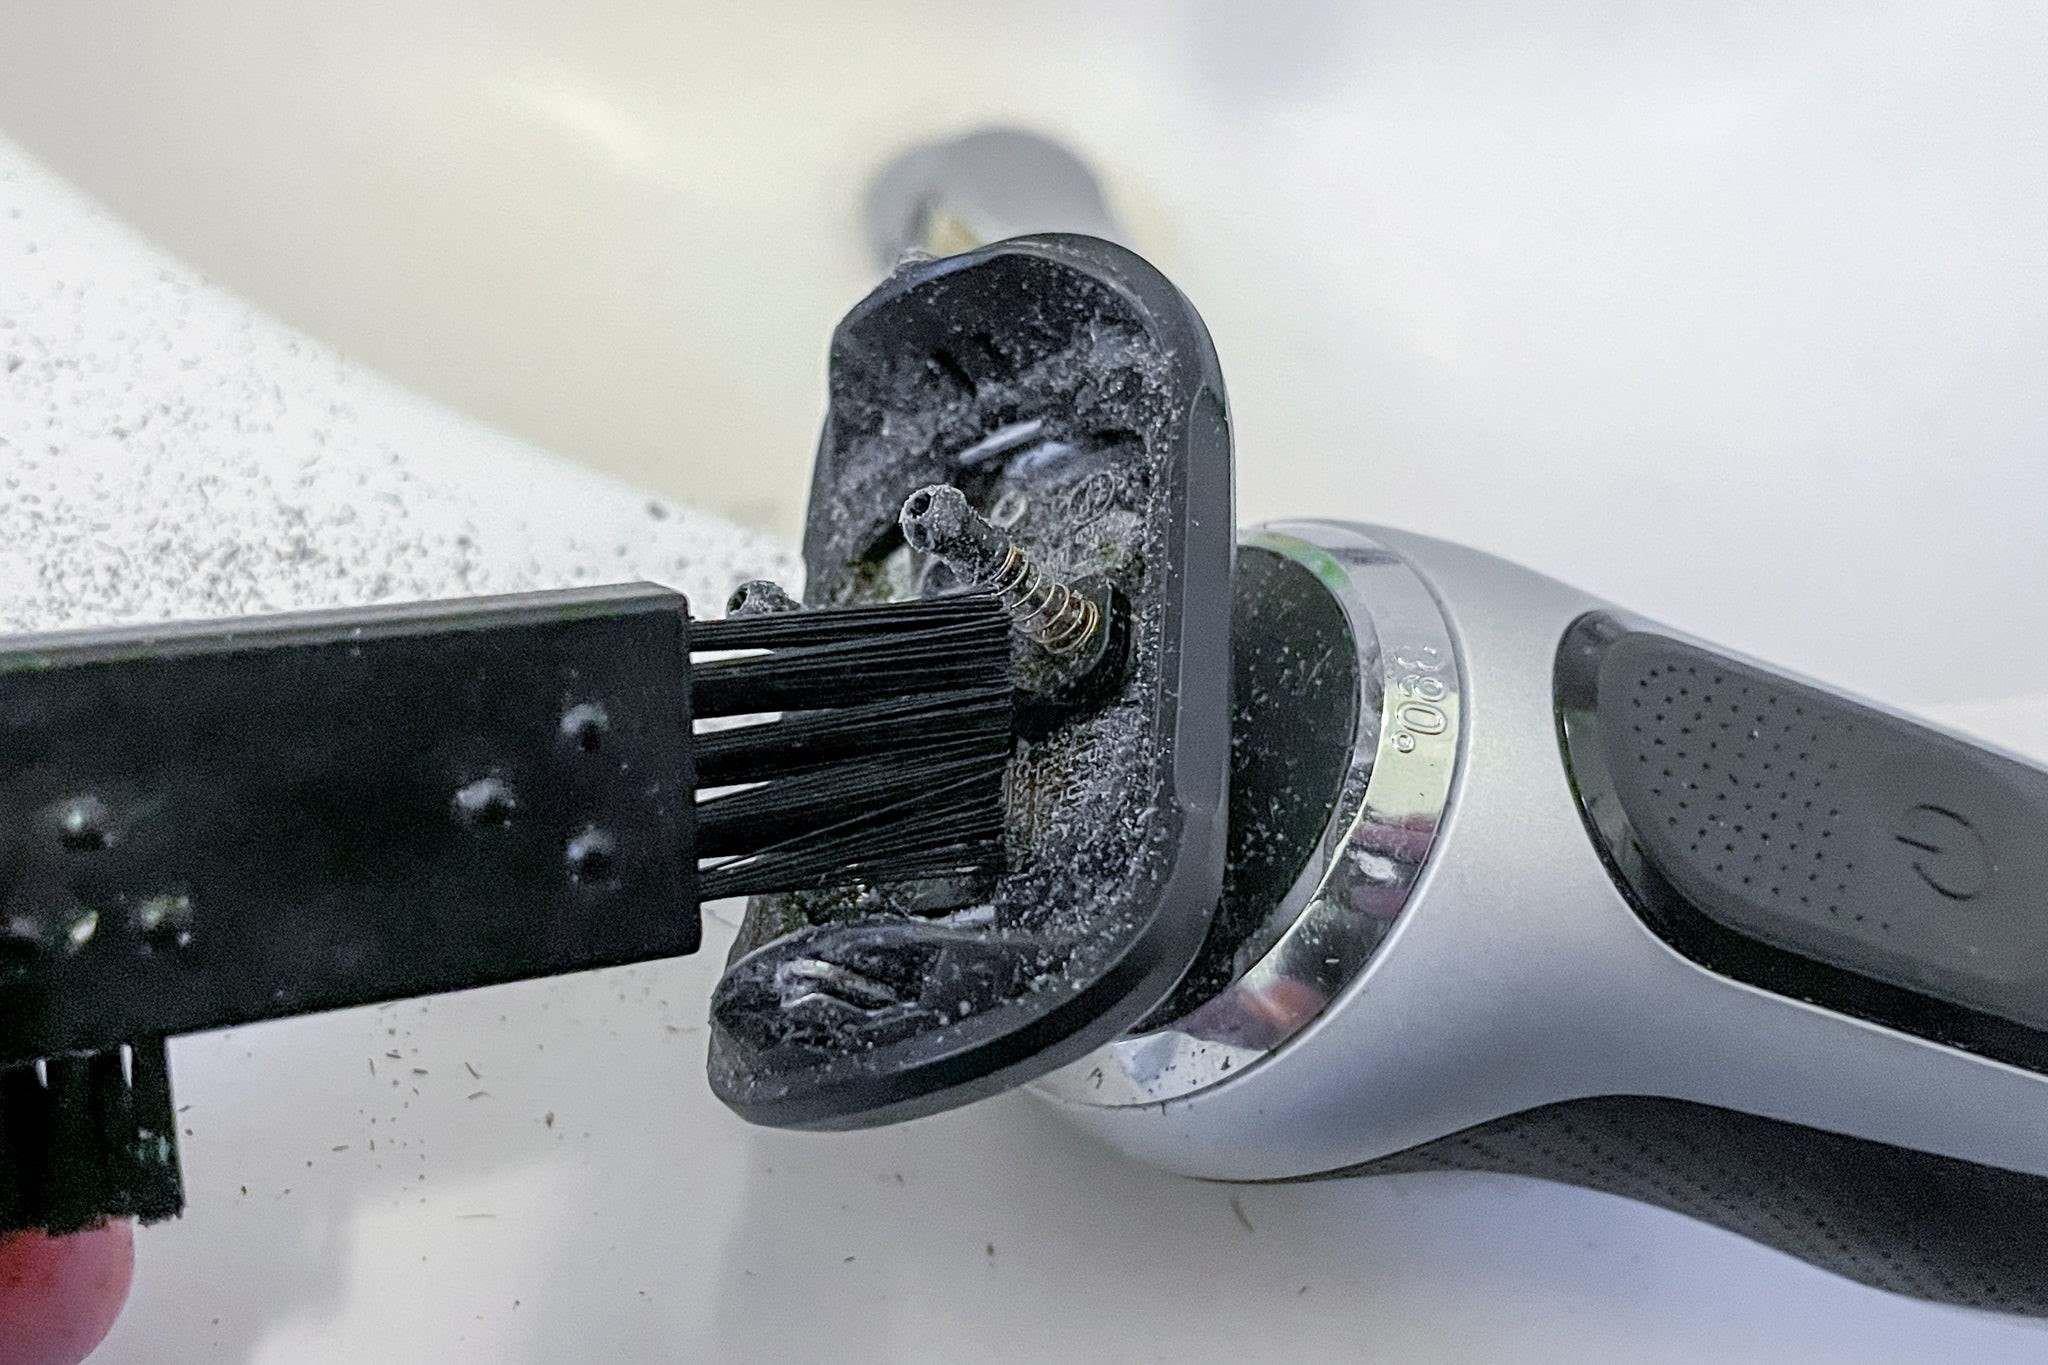
Step 3: Clean the Tip and Handle
Cleaning the tip and handle of your Waterpik is essential for maintaining optimal oral hygiene and ensuring the effectiveness of the device. Over time, residue, bacteria, and impurities can accumulate in these components, potentially compromising the cleanliness and performance of your Waterpik. By following the steps outlined below, you can effectively clean the tip and handle, promoting a hygienic and refreshing oral irrigation experience.
Materials Needed:
- Mild dish soap
- Warm water
- Soft-bristled brush or cloth
- White vinegar (optional)
Cleaning Process:
-
Detach the Tip: Start by detaching the tip from the handle of your Waterpik. Depending on the model, this may involve simply pulling the tip off or unscrewing it from the handle. By separating the tip from the handle, you can ensure a thorough cleaning of both components.
-
Prepare a Cleaning Solution: In a sink or basin, create a mixture of mild dish soap and warm water. This solution will serve as the cleaning agent for the tip and handle. For those preferring a natural cleaning alternative, a mixture of white vinegar and water can be used.
-
Clean the Tip: Using a soft-bristled brush or cloth, gently scrub the tip with the prepared cleaning solution. Pay close attention to the areas where debris or residue may have accumulated. Ensure that the bristles of the brush are gentle to avoid damaging the tip. For hard-to-reach areas, consider using a pipe cleaner or cotton swab to thoroughly clean the tip.
-
Clean the Handle: Similarly, use the cleaning solution and a soft-bristled brush or cloth to clean the handle of the Waterpik. Pay attention to any grooves or crevices where bacteria or buildup may be present. Ensure that the handle is thoroughly cleaned to maintain its hygiene and functionality.
-
Rinse and Dry: Once the tip and handle have been cleaned, rinse them thoroughly with clean water to remove any residual cleaning solution. Ensure that all soap or vinegar residue is completely removed. After rinsing, allow the components to air dry completely before reassembling the Waterpik.
By following these steps, you can effectively clean the tip and handle of your Waterpik, ensuring that these components remain free from residue and bacteria. Regular cleaning of the tip and handle is essential to maintain the hygiene and performance of your Waterpik, allowing you to continue enjoying the benefits of this innovative oral care device.
With the tip and handle cleaned, you are now ready to proceed to the next step, which involves cleaning the exterior of the Waterpik to complete the comprehensive cleaning process.
Step 4: Clean the Exterior of the Waterpik
Cleaning the exterior of your Waterpik is an important step in maintaining its overall cleanliness and ensuring a hygienic oral care routine. The exterior surfaces, including the main unit and any control buttons or switches, can accumulate dust, moisture, or residue over time. By following the steps outlined below, you can effectively clean the exterior of your Waterpik, promoting a pristine and well-maintained appearance while enhancing its longevity.
Materials Needed:
- Mild dish soap
- Warm water
- Soft cloth or sponge
- Cotton swabs (optional)
- Rubbing alcohol (optional)
Cleaning Process:
-
Unplug the Waterpik: Before cleaning the exterior, ensure that the device is unplugged from the power source to prevent any electrical hazards.
-
Prepare a Cleaning Solution: In a small bowl, mix a small amount of mild dish soap with warm water to create a gentle cleaning solution. This solution will serve as the primary agent for cleaning the exterior surfaces of the Waterpik.
-
Dampen the Cloth or Sponge: Dip a soft cloth or sponge into the prepared cleaning solution, ensuring that it is damp but not dripping with excess water.
-
Clean the Main Unit: Gently wipe the exterior surfaces of the main unit with the damp cloth or sponge. Pay close attention to any areas where dust or residue may have accumulated. For stubborn spots or dried-on residue, consider using a cotton swab dampened with rubbing alcohol to spot-clean specific areas.
-
Clean Control Buttons or Switches: If your Waterpik has control buttons or switches, use the damp cloth or sponge to clean these components as well. Take care to avoid excessive moisture around these areas to prevent any potential damage to the electrical components.
-
Dry Thoroughly: After cleaning, use a dry cloth to wipe the exterior surfaces of the Waterpik, ensuring that all moisture is removed. Pay attention to any crevices or seams where water may have accumulated during the cleaning process.
By following these steps, you can effectively clean the exterior of your Waterpik, maintaining its overall cleanliness and visual appeal. Regular cleaning of the exterior surfaces ensures that your Waterpik remains in optimal condition, reflecting your commitment to oral hygiene and device maintenance.
With the exterior of the Waterpik now cleaned, you have completed the comprehensive cleaning process, ensuring that all components of your device are thoroughly maintained and ready for use.
Step 5: Reassemble the Waterpik
After completing the meticulous cleaning process, reassembling your Waterpik is the final step to ensure that all components are properly put back together for optimal functionality. This step involves carefully reattaching the disassembled parts, such as the water reservoir, tip, handle, and any additional components, to restore the device to its fully operational state.
-
Reattach the Water Reservoir: Begin by placing the cleaned water reservoir back onto the main unit of the Waterpik. Depending on the model, this may involve aligning the reservoir with the designated slot and securely attaching it to the base. Ensure that the reservoir is firmly in place to prevent any leaks during operation.
-
Attach the Tip to the Handle: If you detached the tip from the handle during the cleaning process, carefully reattach it to the handle. Ensure that the tip is securely fastened to the handle to prevent any movement or dislodging during use.
-
Secure Additional Components (if applicable): For Waterpik models with additional components, such as specialized tips or lid attachments, carefully secure these parts according to the manufacturer's instructions. Pay attention to any locking mechanisms or alignment indicators to ensure proper attachment.
-
Perform a Functionality Check: Once the Waterpik is reassembled, perform a quick functionality check to ensure that all components are securely in place and that there are no visible issues. Plug the device back into the power source and briefly run it to confirm that the water flow and pressure are consistent.
By reassembling the Waterpik after the cleaning process, you ensure that all components are properly aligned and secured, allowing for uninterrupted and effective oral irrigation. This step marks the completion of the comprehensive cleaning and maintenance process, empowering you to continue enjoying the benefits of a clean and hygienic Waterpik for your oral care routine.
Conclusion
In conclusion, maintaining a clean Waterpik is essential for preserving optimal oral hygiene and ensuring the longevity of this innovative oral care device. By following the step-by-step cleaning process outlined in this guide, you can effectively remove mineral deposits, bacteria, and impurities from the water reservoir, tip, handle, and exterior of the Waterpik, thereby enhancing its performance and hygiene.
Regular cleaning of the water reservoir is crucial for preventing the buildup of mineral deposits and bacteria, ensuring that the water used for oral irrigation remains pure and free from impurities. By using mild dish soap and warm water, coupled with occasional white vinegar for stubborn deposits, you can thoroughly clean the reservoir and maintain a pristine oral irrigation experience.
Cleaning the tip and handle of the Waterpik is equally important, as residue and bacteria can accumulate in these components over time. By using a gentle cleaning solution and a soft-bristled brush or cloth, you can effectively remove impurities and ensure that the tip and handle remain hygienic and free from residue, promoting a refreshing oral care routine.
Additionally, cleaning the exterior of the Waterpik is essential for maintaining its overall cleanliness and visual appeal. By using mild dish soap and a soft cloth or sponge, you can effectively remove dust, moisture, and residue from the main unit and control buttons, ensuring that your Waterpik reflects your commitment to oral hygiene and device maintenance.
Finally, reassembling the Waterpik after the cleaning process ensures that all components are properly aligned and secured, allowing for uninterrupted and effective oral irrigation. By following these comprehensive cleaning steps, you can maintain a clean and hygienic Waterpik, promoting optimal oral health and a refreshing oral care experience.
Incorporating regular cleaning into your oral care routine not only ensures the effectiveness of the Waterpik but also contributes to your overall oral hygiene. By dedicating time to maintain the cleanliness of your Waterpik, you can continue to enjoy the benefits of this advanced oral care technology while promoting a healthy and hygienic oral environment.
By incorporating these cleaning practices into your oral care routine, you can ensure that your Waterpik remains a reliable and effective tool for maintaining optimal oral hygiene, promoting a refreshing and hygienic oral care experience.