Home>Home and Garden>How To Clean Clippers
Home and Garden
How To Clean Clippers
Published: March 3, 2024
Learn how to clean clippers effectively at home with our expert tips and tricks. Keep your clippers in top condition for a well-groomed look. Perfect for home and garden enthusiasts.
(Many of the links in this article redirect to a specific reviewed product. Your purchase of these products through affiliate links helps to generate commission for Noodls.com, at no extra cost. Learn more)
Table of Contents
Introduction
Keeping your clippers clean is essential for maintaining their performance and longevity. Over time, hair clippings, oils, and debris can accumulate within the blades, leading to a decline in cutting efficiency and potentially causing skin irritation. By regularly cleaning and maintaining your clippers, you can ensure a smooth and precise cutting experience while promoting hygiene and sanitation.
In this comprehensive guide, we will walk you through the step-by-step process of cleaning your clippers effectively. Whether you are a professional barber or an individual maintaining your personal grooming tools, these cleaning techniques will help you achieve optimal results. From disassembling the clippers to meticulously cleaning and lubricating the blades, each step is crucial for preserving the functionality and hygiene of your clippers.
By following these cleaning procedures, you can extend the lifespan of your clippers and minimize the risk of skin irritation or infections. Additionally, a well-maintained set of clippers will deliver consistent and precise cuts, ensuring that you always look and feel your best.
Now, let's delve into the detailed steps for cleaning your clippers, empowering you to maintain a high standard of hygiene and grooming excellence.
Read more: How To Sharpen Hair Clippers
Step 1: Disassemble the Clippers
Disassembling your clippers is the first crucial step in the cleaning process. Before you begin, ensure that the clippers are unplugged to prevent any accidents. Most clippers are designed to be easily disassembled, typically consisting of a few main components: the blade, blade guard, and housing. Here's a detailed guide on how to disassemble your clippers effectively:
-
Unplug the Clippers: Always start by disconnecting the clippers from the power source to eliminate the risk of electric shock. This is a fundamental safety measure that should never be overlooked.
-
Remove the Blade Guard: Depending on the model of your clippers, the blade guard may be detachable. Gently release the blade guard by following the manufacturer's instructions. In some cases, it may require a simple sliding or snapping motion to detach it from the housing.
-
Detach the Blade: Once the blade guard is removed, carefully detach the blade from the clippers. This step may involve pressing a release button or unscrewing the blade, depending on the specific design of your clippers. Take your time to ensure that the blade is disconnected without causing any damage.
-
Separate the Housing: After removing the blade, you can proceed to separate the housing of the clippers. This step allows you to access the internal components and thoroughly clean any accumulated debris or hair clippings.
By disassembling the clippers with precision and care, you create a clear pathway for thorough cleaning and maintenance. Each component plays a vital role in the functionality of the clippers, and by disassembling them correctly, you set the stage for a comprehensive cleaning process that will optimize the performance and longevity of your grooming tools.
Once the clippers are disassembled, you can move on to the next step of the cleaning process, which involves removing hair and debris from the components. This meticulous approach to cleaning ensures that your clippers remain in top condition, delivering exceptional results with every use.
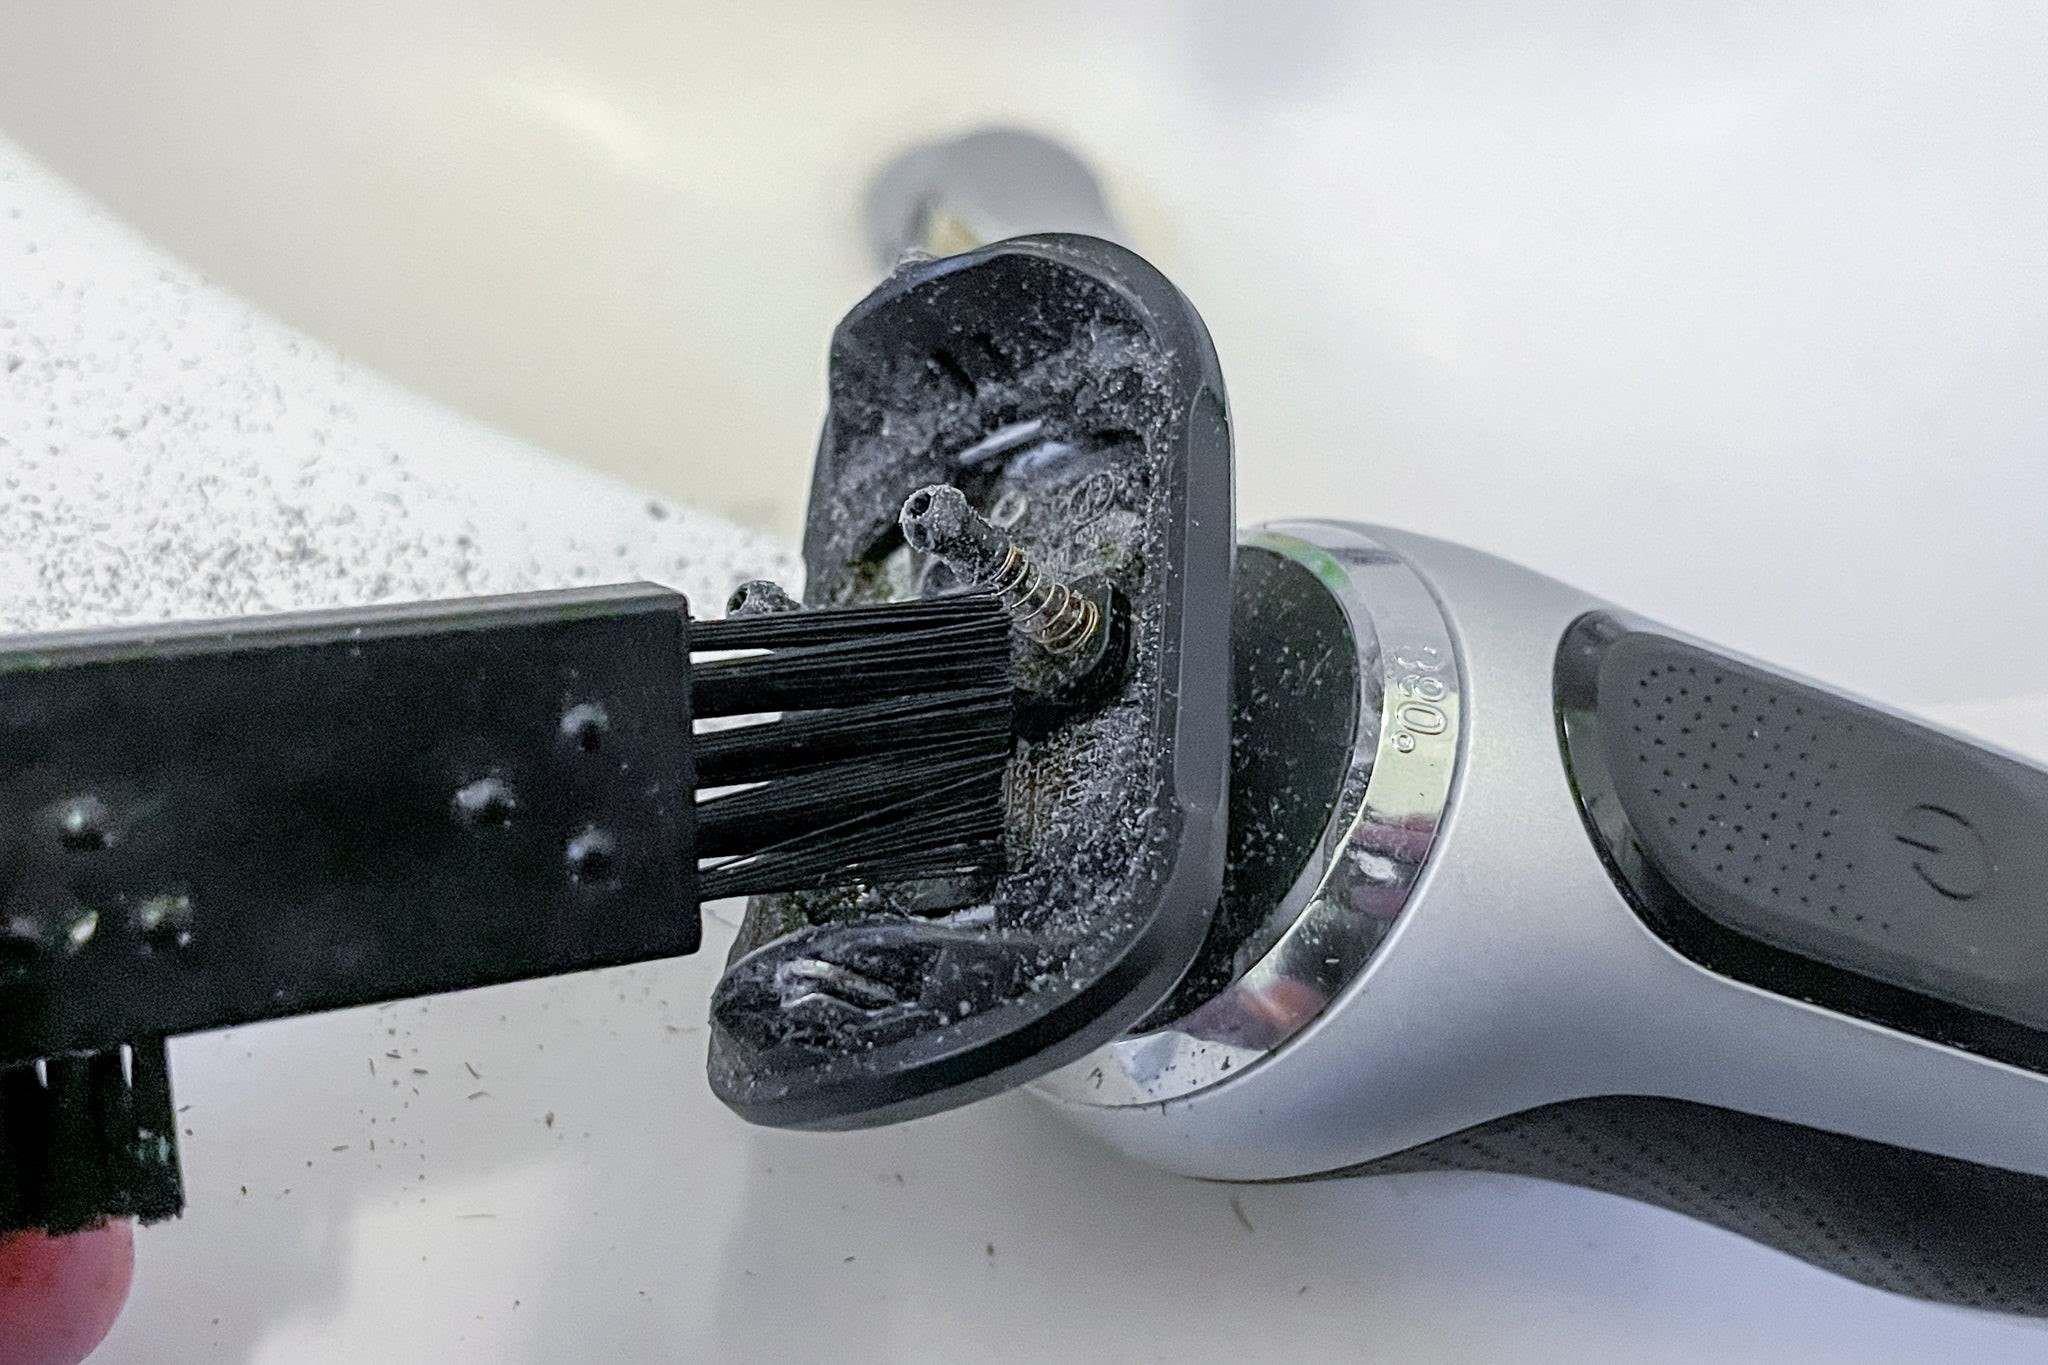
Step 2: Remove Hair and Debris
After disassembling the clippers, the next critical step is to thoroughly remove any accumulated hair and debris from the components. Over time, hair clippings, dust, and other particles can build up within the blades and housing, potentially compromising the cutting performance and hygiene of the clippers. By meticulously clearing out these obstructions, you can restore the clippers to their optimal condition and ensure a hygienic grooming experience.
Here's a detailed guide on how to effectively remove hair and debris from your clippers:
-
Brushing and Compressed Air: Begin by using a small cleaning brush to dislodge and remove visible hair and debris from the blade and housing. A soft-bristled brush is ideal for this task, as it can reach into crevices and corners to dislodge stubborn particles. Additionally, compressed air can be used to blow away loose hair and dust, further clearing the components of the clippers.
-
Cleaning Solution: For more stubborn residue and buildup, a specialized clipper cleaning solution can be applied to the blade and housing. This solution helps to dissolve and loosen hardened debris, making it easier to remove. Ensure that the cleaning solution is specifically formulated for clippers to avoid damaging the components.
-
Toothbrush or Q-Tip: In intricate areas where the brush may not reach, a toothbrush or Q-tip can be used to delicately scrub and remove any remaining hair or residue. Pay close attention to the nooks and crannies of the blade and housing, as these areas are prone to accumulating debris.
-
Visual Inspection: After the initial cleaning process, visually inspect the components to ensure that all hair and debris have been effectively removed. This step is crucial for identifying any overlooked particles that may hinder the performance of the clippers.
By meticulously removing hair and debris from the clippers, you pave the way for the subsequent cleaning and maintenance steps, ultimately optimizing the functionality and hygiene of your grooming tools. Once the components are thoroughly cleared of obstructions, you can proceed to the next step of the cleaning process, which involves cleaning the blades to ensure precision and longevity.
Step 3: Clean the Blades
Cleaning the blades of your clippers is a pivotal step in maintaining their cutting precision and overall performance. Over time, the accumulation of hair, oils, and debris can diminish the sharpness of the blades and impede their ability to deliver precise cuts. By implementing thorough cleaning techniques, you can effectively restore the sharpness and functionality of the blades, ensuring optimal grooming results.
Here's a detailed guide on how to clean the blades of your clippers effectively:
-
Blade Cleaning Solution: Begin by applying a specialized blade cleaning solution to the surface of the blades. This solution is designed to break down and dissolve any residual hair clippings, oils, and grime that may have adhered to the blades. Ensure that the cleaning solution is specifically formulated for clipper blades to avoid causing any damage.
-
Brushing and Wiping: Use a small cleaning brush to gently scrub the blades, dislodging any remaining debris or buildup. Pay close attention to the grooves and edges of the blades, as these areas are prone to accumulating residue. After brushing, use a clean, dry cloth to wipe away the loosened debris and cleaning solution from the blades.
-
Blade Soaking: For more stubborn residue, consider soaking the blades in a blade cleaning solution for a few minutes. This soaking process helps to further dissolve hardened debris, making it easier to remove. Ensure that you follow the manufacturer's guidelines for soaking duration to prevent any potential damage to the blades.
-
Rinsing and Drying: Once the blades have been thoroughly cleaned and any residue has been removed, rinse them with lukewarm water to ensure that all cleaning solution and debris are completely washed away. After rinsing, carefully dry the blades with a clean, lint-free cloth to prevent any moisture-related issues.
-
Blade Inspection: After cleaning and drying the blades, conduct a visual inspection to ensure that they are free from any remaining debris or buildup. This inspection is crucial for verifying that the blades are in optimal condition and ready for the next step of the maintenance process.
By meticulously cleaning the blades of your clippers, you can effectively restore their sharpness and cutting precision, ultimately enhancing the overall grooming experience. Once the blades are thoroughly cleaned, the next step involves lubricating them to ensure smooth operation and prolonged durability.
Step 4: Lubricate the Blades
Lubricating the blades of your clippers is a critical maintenance task that significantly impacts their performance and longevity. Proper lubrication ensures smooth operation, reduces friction, and helps prevent premature wear and tear. By applying the appropriate lubricant to the blades, you can prolong their lifespan and maintain consistent cutting efficiency, ultimately enhancing the overall grooming experience.
Here's a detailed guide on how to lubricate the blades of your clippers effectively:
-
Selecting the Right Lubricant: Choose a high-quality clipper blade oil or lubricant that is specifically formulated for grooming tools. Avoid using general-purpose oils, as they may not provide the necessary protection and performance for clipper blades. Quality lubricants are designed to penetrate the blade surfaces, reduce heat generation, and prevent corrosion, ensuring optimal functionality.
-
Applying the Lubricant: With the blades clean and dry, apply a few drops of the selected lubricant along the teeth and surfaces of the blades. Ensure that the lubricant reaches the critical contact points and moving parts within the blade assembly. Gently move the blades to distribute the oil evenly and allow it to penetrate the internal mechanisms.
-
Running the Clippers: After applying the lubricant, briefly run the clippers to allow the oil to spread across the blade surfaces and internal components. This action helps to ensure thorough lubrication and promotes smooth movement within the blade assembly. Running the clippers for a short duration distributes the oil evenly, optimizing its protective and lubricating effects.
-
Wiping Excess Lubricant: Use a clean, dry cloth to wipe away any excess lubricant from the blade surfaces and housing. While the lubricant is essential for maintaining the blades, an excess amount can attract dirt and debris, potentially compromising the cutting performance. Wiping away the excess oil ensures that the blades remain clean and free from buildup.
-
Blade Movement Check: Test the movement of the blades to verify that they operate smoothly and without any resistance. Proper lubrication should result in effortless blade movement, indicating that the lubricant has effectively reduced friction and enhanced the overall functionality of the clippers.
By following these lubrication steps, you can ensure that your clipper blades remain in optimal condition, delivering precise and consistent cutting performance. Proper lubrication not only extends the lifespan of the blades but also contributes to a seamless grooming experience, allowing you to achieve professional-quality results with every use.
Read more: Magic Johnson Wants Lakers Not Clippers
Step 5: Reassemble the Clippers
After completing the meticulous cleaning, hair removal, blade maintenance, and lubrication processes, the final step involves reassembling the clippers to restore them to their fully operational state. Proper reassembly is crucial for ensuring that all components are securely in place, allowing the clippers to function optimally and deliver precise, consistent cuts. Here's a detailed guide on how to reassemble your clippers effectively:
-
Blade Attachment: Begin by carefully reattaching the cleaned and lubricated blade to the clippers. Align the blade with the corresponding mounting points, ensuring a secure and snug fit. Depending on the clippers' design, this step may involve sliding the blade into position or securing it with screws or fasteners. Take care to follow the manufacturer's instructions to ensure proper attachment.
-
Housing Alignment: Once the blade is in place, align the housing components to encase the blade securely. Ensure that the housing pieces fit together seamlessly, with no gaps or misalignments. Proper housing alignment is essential for maintaining the integrity of the blade assembly and safeguarding the internal mechanisms of the clippers.
-
Blade Guard Installation: If your clippers feature a detachable blade guard, reattach it to the housing to provide additional protection for the blade and ensure safe operation. The blade guard serves as a crucial safety feature, preventing accidental contact with the sharp blade edges and preserving the longevity of the cutting surfaces.
-
Secure Fastening: Double-check that all components are securely fastened and properly aligned. Tighten any screws or fasteners according to the manufacturer's specifications, ensuring that the blade, housing, and blade guard are firmly held in place. A secure assembly minimizes the risk of component misalignment during operation, promoting safety and performance.
-
Functional Test: Once the clippers are reassembled, conduct a brief functional test to verify that all components are working as intended. Plug in the clippers and turn them on to ensure that the blade operates smoothly and without any unusual noises or vibrations. This test confirms that the reassembly process has been executed accurately, and the clippers are ready for use.
By meticulously reassembling the clippers, you complete the comprehensive cleaning and maintenance process, ensuring that your grooming tools are primed for optimal performance. A well-assembled set of clippers not only delivers precise and consistent cuts but also promotes safety and longevity, allowing you to maintain a high standard of grooming excellence.
Conclusion
In conclusion, maintaining clean and well-functioning clippers is essential for achieving professional-quality grooming results and promoting hygiene. By following the step-by-step cleaning and maintenance procedures outlined in this guide, you can ensure that your clippers remain in optimal condition, delivering precise and consistent cuts while minimizing the risk of skin irritation or infections.
Regularly disassembling the clippers to remove hair and debris, cleaning the blades with specialized solutions, and applying the appropriate lubricant are fundamental practices that contribute to the longevity and performance of your grooming tools. Each step in the cleaning process plays a crucial role in preserving the sharpness, functionality, and hygiene of the clippers, ultimately enhancing the overall grooming experience.
Furthermore, the meticulous reassembly of the clippers ensures that all components are securely in place, promoting safety and operational integrity. A well-maintained set of clippers not only reflects a commitment to grooming excellence but also minimizes the need for frequent replacements, saving both time and resources in the long run.
By incorporating these cleaning techniques into your grooming routine, whether for personal use or professional barbering, you can elevate the quality of your grooming services and maintain a high standard of hygiene. Clean clippers not only contribute to a polished and professional appearance but also instill confidence in clients, showcasing your dedication to cleanliness and precision.
In essence, the investment of time and care in cleaning and maintaining your clippers yields significant returns in terms of performance, durability, and client satisfaction. By prioritizing the cleanliness and functionality of your grooming tools, you can uphold a reputation for excellence and ensure that every grooming session is a seamless and satisfying experience for both you and your clients.
Incorporating these cleaning practices into your grooming regimen empowers you to consistently deliver exceptional results, setting a benchmark for grooming standards and reinforcing the importance of hygiene in the grooming industry. With clean and well-maintained clippers at your disposal, you can confidently pursue your passion for grooming, knowing that your tools are primed for excellence.