Home>Home and Garden>How To Install Cabinet Handles
Home and Garden
How To Install Cabinet Handles
Published: March 4, 2024
Learn how to install cabinet handles with our step-by-step guide. Upgrade your home and garden with this simple DIY project.
(Many of the links in this article redirect to a specific reviewed product. Your purchase of these products through affiliate links helps to generate commission for Noodls.com, at no extra cost. Learn more)
Table of Contents
Introduction
Installing new cabinet handles is a simple yet impactful way to refresh the look of your kitchen or bathroom. Whether you're upgrading your existing handles or adding them to brand-new cabinets, this DIY project can instantly elevate the aesthetics of the space. By following a few straightforward steps and using the right tools, you can achieve a professional-looking result without the need for extensive experience or expertise.
The process of installing cabinet handles involves measuring, marking, drilling, and attaching the hardware to the cabinet doors and drawers. It's a project that allows for personalization and customization, as you can choose from a wide array of handle styles, finishes, and sizes to complement your decor and express your unique taste. From sleek and modern stainless steel handles to classic and ornate designs, the options are virtually limitless, enabling you to tailor the look of your cabinets to suit your preferences.
Not only does installing new cabinet handles enhance the visual appeal of your cabinetry, but it also provides functional benefits. The addition of handles makes it easier to open and close cabinet doors and drawers, improving the overall usability of the space. Furthermore, the installation process itself is relatively quick and straightforward, making it an accessible project for DIY enthusiasts of all skill levels.
In this comprehensive guide, we will walk you through each step of the installation process, from gathering the necessary tools and materials to adding the finishing touches. By following these instructions and tips, you can confidently tackle the project and achieve professional-looking results. So, roll up your sleeves, gather your supplies, and let's get started on transforming your cabinets with stylish new handles!
Read more: How To Replace A Toilet Handle
Step 1: Gather Necessary Tools and Materials
Before embarking on the cabinet handle installation process, it's essential to gather the required tools and materials to ensure a smooth and efficient workflow. By having everything at your disposal, you can minimize interruptions and complete the project with ease. Here's a comprehensive list of the items you'll need:
Tools:
- Measuring Tape: Accurate measurements are crucial for determining the placement of the handles, so a reliable measuring tape is essential.
- Pencil: Use a pencil to mark the precise locations where the handles will be installed.
- Power Drill: A power drill equipped with the appropriate drill bits will be used to create holes for the handle screws.
- Screwdriver: Depending on the type of screws included with the handles, you may need a Phillips or flathead screwdriver for attachment.
- Level: To ensure that the handles are installed straight and aligned, a level will be indispensable.
- Safety Glasses: When drilling holes, it's important to prioritize safety by wearing protective eyewear.
- Masking Tape: This can be used to create a guide for drilling and prevent splintering on the cabinet surface.
Materials:
- Cabinet Handles: Select the desired handles that complement the style and finish of your cabinets. Ensure that you have the appropriate quantity for all doors and drawers.
- Screws: Check the packaging of the handles to confirm the availability of screws for attachment.
- Wood Putty: If you are replacing existing handles and the new ones have a different hole configuration, wood putty can be used to fill the old holes before drilling new ones.
- Painter's Tape: This can be used to protect the cabinet surface from scratches or marks during the installation process.
- Cleaning Cloth: Before installing the new handles, it's beneficial to clean the cabinet surfaces to ensure a pristine foundation for the hardware.
By assembling these tools and materials, you'll be well-prepared to proceed with the subsequent steps of the installation process. Having everything within reach will streamline the project and contribute to a successful outcome, allowing you to transform the appearance and functionality of your cabinets with confidence.
Step 2: Measure and Mark Placement for Handles
Accurate measurement and precise marking are crucial steps in the process of installing cabinet handles. By carefully determining the placement of the handles, you can ensure a visually appealing and functional result. Here's a detailed guide on how to measure and mark the placement for handles:
1. Assessing Placement Options:
Before marking the cabinets, consider the most ergonomic and visually pleasing placement for the handles. For cabinet doors, it's common to position the handles vertically along the stile (the vertical frame piece of the cabinet door) or horizontally across the rail (the horizontal frame piece). Similarly, for drawers, handles are typically centered horizontally and vertically. Visualize the placement options and consider how the handles will align with the overall design of the cabinets.
2. Taking Measurements:
Using a measuring tape, determine the precise locations for the handle placement. For consistency, it's advisable to measure and mark the placement of the first handle and then replicate the same measurements for the remaining doors and drawers. When measuring for handle placement, consider the following factors:
- For cabinet doors: Measure the distance from the top and bottom of the door to the center of the handle placement. Ensure that the measurements are symmetrical for a balanced appearance.
- For drawers: Measure the distance from the top and bottom of the drawer front to the center of the handle placement. Again, symmetry is key for a cohesive look.
3. Marking the Placement:
Once the measurements are determined, use a pencil to mark the precise locations for the handle placement on the cabinet doors and drawers. To maintain accuracy, use a level to ensure that the markings are straight and aligned. Additionally, consider using masking tape to create a guide for drilling, as this can help prevent splintering on the cabinet surface and provide a visual reference for the handle placement.
4. Double-Checking Measurements:
Before proceeding to the drilling stage, double-check the measurements and markings to confirm their accuracy. Take a moment to step back and visually assess the marked placements to ensure that they align with your aesthetic preferences and functional requirements. Making any necessary adjustments at this stage can prevent potential issues during the drilling and installation process.
By meticulously measuring and marking the placement for handles, you can lay the groundwork for a successful installation process. These initial steps set the stage for the subsequent drilling and attachment of the handles, ensuring that the end result is visually harmonious and enhances the functionality of your cabinets.
Read more: How To Handle A Cat In Heat
Step 3: Drill Holes for Handles
With the precise measurements and markings in place, the next crucial step in the cabinet handle installation process is drilling holes to accommodate the hardware. This step requires careful attention to detail to ensure that the holes are accurately positioned and aligned, allowing for seamless attachment of the handles. Here's a comprehensive guide on how to drill holes for handles:
-
Selecting the Appropriate Drill Bit: Begin by selecting a drill bit that matches the diameter of the handle screws. It's essential to choose a bit that creates a hole slightly smaller than the screw diameter to ensure a snug fit. For most cabinet handles, a 3/16-inch drill bit is suitable, but it's advisable to verify the specific requirements of the handles being installed.
-
Securing the Cabinet Surface: To prevent splintering and ensure clean hole drilling, it's recommended to place a piece of masking tape over the marked locations on the cabinet doors and drawers. This not only serves as a visual guide but also helps protect the cabinet surface during the drilling process.
-
Drilling the Holes: Using the selected drill bit, carefully drill into the marked locations on the cabinet doors and drawers. It's important to maintain a steady hand and apply gentle, consistent pressure to create clean and precise holes. If you're drilling into hardwood or dense materials, it may be beneficial to use a slower drill speed to avoid splintering.
-
Checking Hole Depth: When drilling the holes, pay attention to the depth to ensure that it accommodates the entire length of the handle screws. To gauge the appropriate depth, measure the length of the screws and mark the corresponding depth on the drill bit using a piece of masking tape. This serves as a visual indicator to prevent drilling too deep or too shallow.
-
Clearing Debris: After drilling the holes, use a cleaning cloth or a gentle blast of compressed air to remove any wood shavings or debris from the interior of the holes. This ensures a clean and unobstructed pathway for the handle screws during the attachment process.
By following these detailed steps and exercising precision during the hole drilling process, you can lay the foundation for secure and visually appealing handle attachment. The careful execution of this step sets the stage for the final phase of the installation, allowing you to seamlessly integrate the handles into your cabinets with professional-looking results.
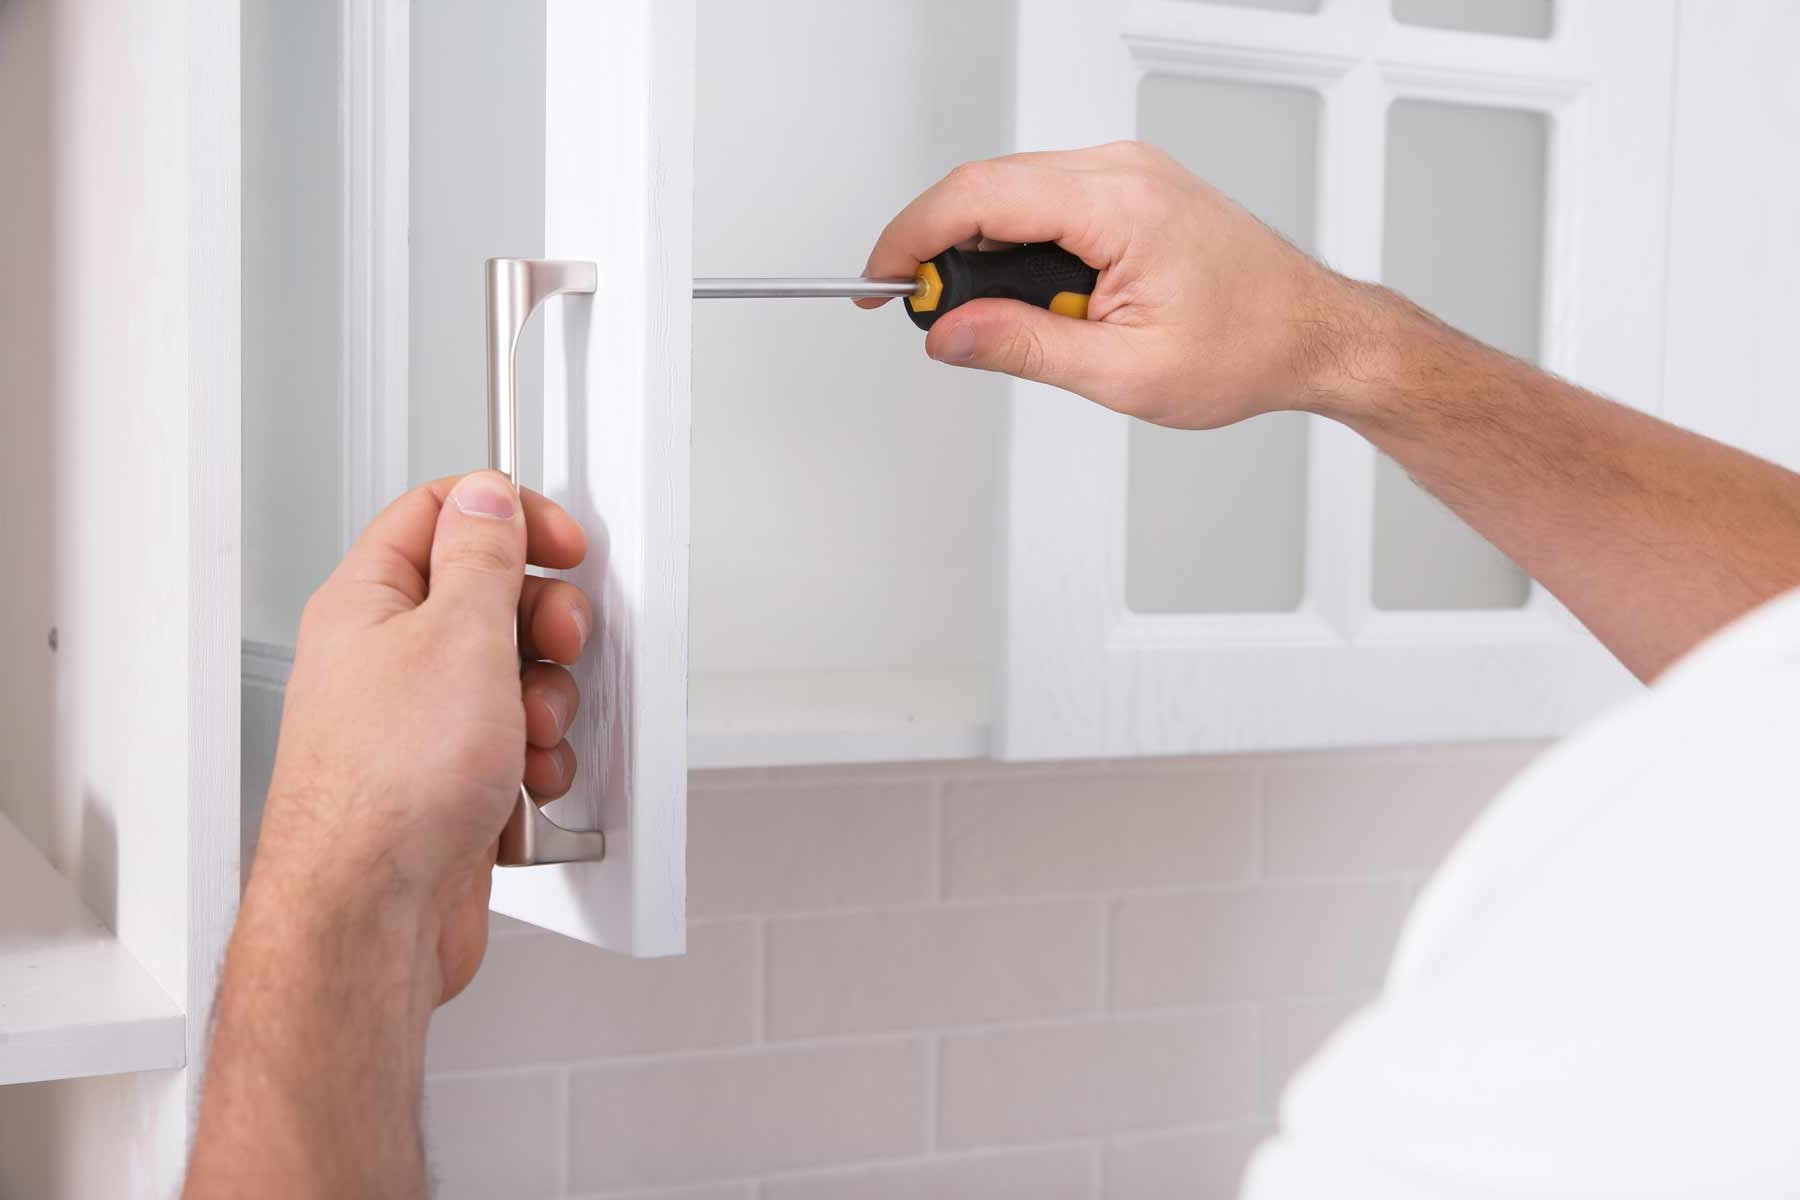
Step 4: Attach Handles to Cabinets
With the holes drilled and the preparation complete, the next pivotal step in the cabinet handle installation process is attaching the handles to the cabinets. This phase involves securing the hardware in place, ensuring that the handles are aligned, and fastening them securely to the cabinet doors and drawers. Here's a detailed guide on how to effectively attach handles to cabinets:
-
Positioning the Handles: Begin by aligning the handles with the drilled holes on the cabinet doors and drawers. Carefully thread the handle screws through the back of the hardware and position them at the designated locations. It's essential to ensure that the handles are centered and straight before proceeding with the attachment.
-
Securing the Screws: Using a screwdriver, gently tighten the screws into the pre-drilled holes. Exercise caution to avoid over-tightening, as this can potentially strip the screws or cause damage to the cabinet surface. The goal is to fasten the screws snugly to secure the handles in place without compromising the integrity of the hardware or the cabinets.
-
Verifying Alignment: As you attach each handle, periodically step back and visually assess the alignment and consistency of the installed hardware. Ensuring that the handles are uniformly positioned and aligned across all cabinet doors and drawers contributes to a cohesive and professional appearance.
-
Testing Functionality: Once all handles are attached, test the functionality by gently opening and closing the cabinet doors and drawers. Verify that the handles provide a comfortable grip and that they facilitate smooth operation. Making any necessary adjustments at this stage can ensure optimal functionality and user experience.
-
Final Checks: After attaching all the handles, conduct a final inspection to confirm that they are securely fastened and aligned to your satisfaction. Use a level to verify that the handles are straight, and make any minor adjustments if needed to achieve a polished and consistent look.
By following these detailed steps and exercising precision during the handle attachment process, you can seamlessly integrate the hardware into your cabinets with professional-looking results. The careful execution of this phase ensures that the handles not only enhance the visual appeal of your cabinetry but also contribute to the overall functionality and usability of the space.
Step 5: Finishing Touches and Clean Up
After attaching the handles to your cabinets, the final step involves adding finishing touches and conducting a thorough clean-up to ensure that the installation process is completed with precision and attention to detail. This phase not only contributes to the overall aesthetics of the cabinets but also ensures that the surrounding area is left pristine. Here's a detailed guide on how to carry out the finishing touches and clean-up:
1. Inspecting and Adjusting
Begin by conducting a comprehensive inspection of the installed handles. Verify that each handle is securely fastened and aligned to your satisfaction. If any adjustments are necessary to achieve uniformity or optimal alignment, make the required modifications at this stage. Ensuring that the handles are visually consistent and functionally sound is essential for a polished end result.
2. Applying Wood Putty (If Needed)
If you are replacing existing handles and the new ones have a different hole configuration, you may need to fill the old holes with wood putty before drilling new ones. Apply the wood putty to the previous holes and allow it to dry according to the manufacturer's instructions. Once dry, sand the area to create a smooth surface for drilling new holes, ensuring a seamless transition between the old and new handle placements.
3. Cleaning the Cabinet Surfaces
Using a cleaning cloth and a mild cleaning solution, thoroughly clean the cabinet surfaces to remove any dust, debris, or fingerprints accumulated during the installation process. Pay attention to the areas surrounding the handles, ensuring that they are free from any residual markings or adhesive from the packaging. A clean and polished cabinet surface sets the stage for a visually appealing and well-maintained appearance.
4. Removing Masking Tape and Protective Coverings
Carefully remove any masking tape or protective coverings that were applied to the cabinet surfaces during the installation process. Take care to peel off the tape gently to avoid any damage to the cabinet finish. This step not only reveals the pristine appearance of the cabinets but also signifies the completion of the installation process.
5. Final Evaluation
Once the finishing touches and clean-up are complete, take a moment to step back and evaluate the overall outcome. Ensure that the handles are aligned, the cabinet surfaces are clean and free from blemishes, and the surrounding area reflects the meticulous attention to detail applied throughout the installation process. This final evaluation allows you to appreciate the transformation of your cabinets and the impact of the newly installed handles on the overall aesthetic of the space.
By meticulously carrying out the finishing touches and clean-up, you can elevate the visual appeal of your cabinets and create a polished and professional result. This phase marks the culmination of the installation process, leaving you with beautifully enhanced cabinets that reflect your attention to detail and commitment to quality.
Conclusion
In conclusion, the process of installing cabinet handles presents a rewarding opportunity to revitalize the appearance and functionality of your kitchen or bathroom cabinets. By following the comprehensive steps outlined in this guide, you can confidently undertake this DIY project and achieve professional-looking results without the need for extensive experience or specialized skills.
The journey begins with gathering the necessary tools and materials, ensuring that you have everything at your disposal to streamline the installation process. From measuring and marking the precise placement for the handles to drilling holes with precision, each step contributes to the foundation for a successful installation. The meticulous attention to detail during the attachment of the handles ensures that they are not only visually appealing but also functionally reliable, enhancing the usability of the cabinets.
As the installation process nears completion, the application of finishing touches and a thorough clean-up adds the final polish to the project, leaving you with beautifully enhanced cabinets that reflect your commitment to quality and attention to detail.
Beyond the tangible outcomes, the installation of new cabinet handles offers a sense of personalization and customization, allowing you to tailor the look of your cabinets to align with your unique style and preferences. Whether you opt for sleek and modern stainless steel handles or classic and ornate designs, the choices are virtually limitless, enabling you to make a statement and infuse your personal touch into the space.
Furthermore, the functional benefits of installing cabinet handles should not be overlooked. The addition of handles makes it easier to open and close cabinet doors and drawers, contributing to the overall usability and convenience of the space. This simple yet impactful upgrade can transform the aesthetic appeal and practicality of your cabinets, enhancing the overall ambiance of the room.
In essence, the installation of cabinet handles transcends mere hardware attachment; it represents a creative endeavor that allows you to breathe new life into your living space. By embracing this DIY project and following the steps outlined in this guide, you can embark on a journey of transformation, infusing your personal style and enhancing the functionality of your cabinets with confidence and ease.