Home>Home and Garden>How To Install And Use The Honeywell Home Thermostat
Home and Garden
How To Install And Use The Honeywell Home Thermostat
Published: March 4, 2024
Learn how to install and use the Honeywell Home Thermostat to efficiently manage your home's temperature. Upgrade your home and garden with this smart device today!
(Many of the links in this article redirect to a specific reviewed product. Your purchase of these products through affiliate links helps to generate commission for Noodls.com, at no extra cost. Learn more)
Table of Contents
Introduction
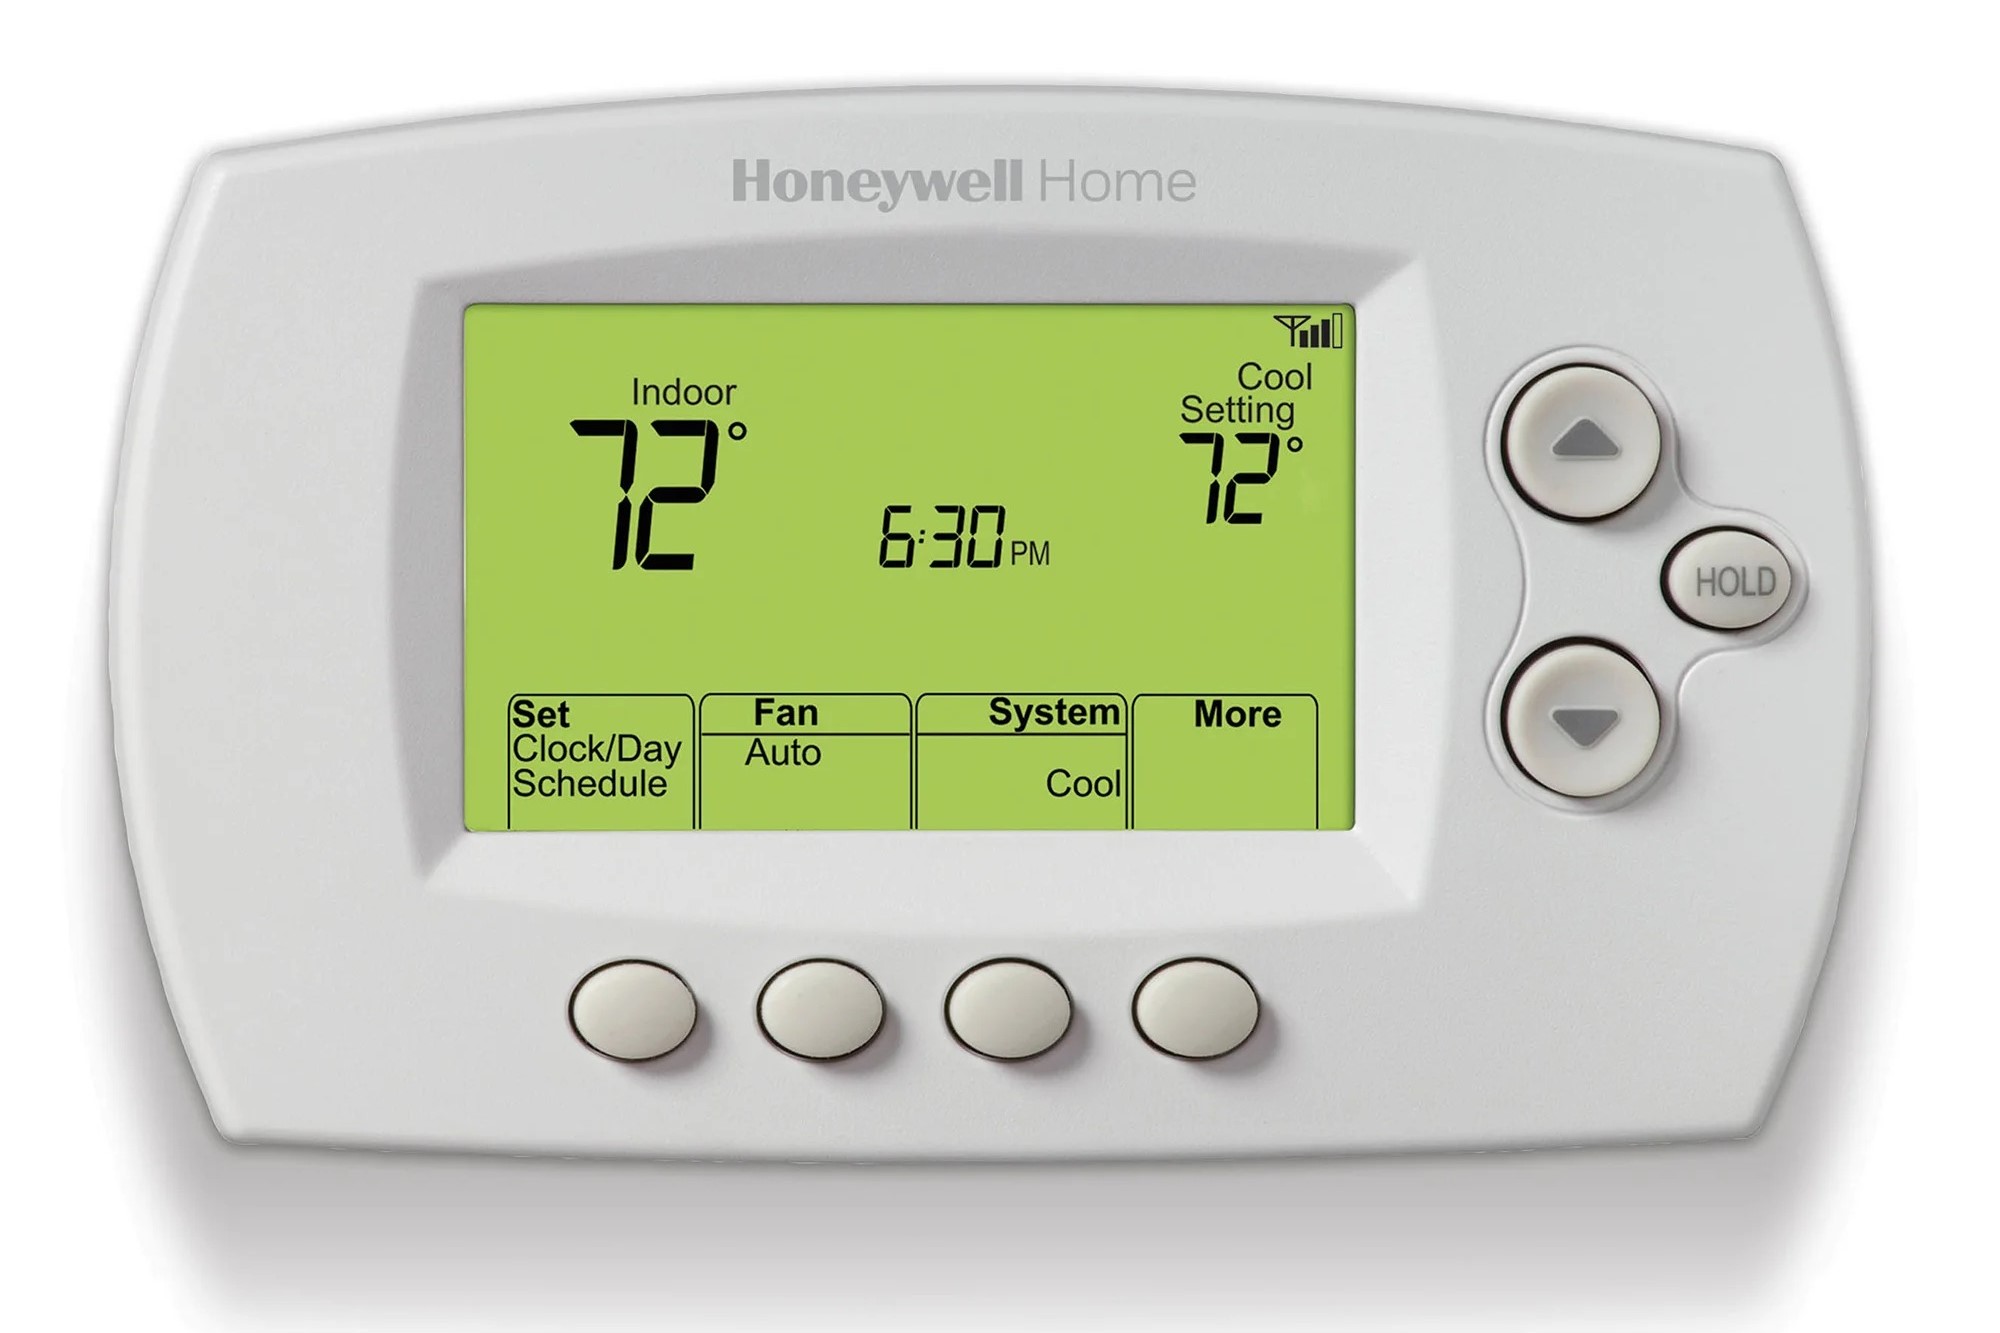
The Honeywell Home Thermostat is a cutting-edge device designed to provide optimal comfort and energy efficiency in your home. With its sleek design and advanced features, this thermostat offers a seamless way to control the temperature and settings of your heating and cooling systems. Whether you're a tech-savvy homeowner or someone who simply wants to simplify their daily routine, the Honeywell Home Thermostat is a valuable addition to any modern household.
This comprehensive guide will walk you through the process of installing and using the Honeywell Home Thermostat, ensuring that you can make the most of its capabilities. From unboxing the device to connecting it to your Wi-Fi network and utilizing the Honeywell Home app, each step is outlined in detail to provide a smooth and hassle-free experience.
By following the instructions in this guide, you'll gain a deeper understanding of how the Honeywell Home Thermostat functions and how it can be customized to suit your specific needs. Whether you're looking to reduce energy consumption, create a comfortable living environment, or simply enjoy the convenience of remote temperature control, this guide will empower you to harness the full potential of your Honeywell Home Thermostat.
Now, let's embark on this journey together and unlock the possibilities that the Honeywell Home Thermostat has to offer. Whether you're a seasoned DIY enthusiast or a first-time user, this guide is tailored to ensure that you can seamlessly integrate this innovative device into your home and lifestyle. Let's dive in and discover the transformative benefits of the Honeywell Home Thermostat!
Step 1: Unboxing and Checking Contents
Upon receiving your Honeywell Home Thermostat, the first step is to carefully unbox the device and ensure that all the necessary components are included. The unboxing experience sets the stage for the installation process and allows you to familiarize yourself with the contents of the package. Here's a detailed overview of what to expect when unboxing your Honeywell Home Thermostat:
-
Thermostat Unit: The central component of the package is the thermostat unit itself. This sleek and modern device serves as the control center for managing your home's temperature and settings.
-
Baseplate and Mounting Hardware: You'll find the baseplate, which serves as the foundation for mounting the thermostat on your wall. Additionally, the package includes the necessary mounting hardware, such as screws and anchors, to securely install the thermostat.
-
Screws and Wire Labels: To facilitate the wiring process, the package contains screws for securing the wires and labels to help identify the corresponding terminals on the thermostat.
-
Quick Start Guide and User Manual: Included in the package are the quick start guide and user manual, providing essential instructions and detailed information on setting up and using the thermostat.
-
Power Adapter (if applicable): Depending on the model of the Honeywell Home Thermostat, a power adapter may be included to ensure seamless power supply during installation.
Before proceeding with the installation, it's crucial to inspect each item and verify that nothing is missing or damaged. This meticulous approach ensures a smooth installation process and minimizes any potential setbacks. By taking the time to unbox and check the contents thoroughly, you set the stage for a successful installation and seamless integration of the Honeywell Home Thermostat into your home environment.
As you unbox the thermostat and familiarize yourself with its contents, you'll gain a sense of confidence and preparedness for the subsequent steps in the installation process. With the components laid out before you, you're ready to move on to the next phase: mounting the thermostat.
The unboxing experience is not only practical but also serves as an exciting introduction to the innovative features and capabilities of the Honeywell Home Thermostat. It marks the beginning of your journey toward enhanced comfort, convenience, and energy efficiency within your home.
Step 2: Mounting the Thermostat
Mounting the Honeywell Home Thermostat is a crucial step in the installation process, as it determines the device's placement and accessibility within your home. Before proceeding with the mounting, it's essential to select an optimal location that meets specific criteria for efficient operation. Here's a detailed guide on how to mount the thermostat:
-
Location Selection: Choose a location on a flat, interior wall that is easily accessible and away from direct sunlight, drafts, doorways, and windows. This ensures that the thermostat can accurately sense and regulate the indoor temperature without being influenced by external factors.
-
Power Consideration: If the thermostat requires a power source, ensure that the chosen location is in proximity to an electrical outlet. This facilitates the connection of the power adapter, if applicable, and eliminates the need for extensive wiring modifications.
-
Mounting Height: The ideal mounting height for the thermostat is approximately 5 feet above the floor. This height allows for convenient viewing and access while ensuring that the device remains out of reach of young children and pets.
-
Baseplate Installation: Using the provided mounting hardware, such as screws and anchors, securely attach the baseplate to the chosen location on the wall. Ensure that the baseplate is level and firmly affixed to provide a stable foundation for the thermostat.
-
Wiring Accessibility: Position the baseplate in a manner that allows easy access to the wiring terminals. This accessibility simplifies the subsequent wiring process and facilitates a seamless connection between the thermostat and your home's heating and cooling system.
-
Aesthetic Considerations: While functionality is paramount, consider the aesthetic appeal of the thermostat's placement. Opt for a location that complements the overall interior design of the space, blending seamlessly with the surrounding decor.
By following these steps, you can effectively mount the Honeywell Home Thermostat in a strategic and practical location within your home. The careful consideration of placement, accessibility, and aesthetic integration ensures that the thermostat becomes a seamless and visually appealing addition to your living environment. With the thermostat securely mounted, you're ready to proceed to the next phase: wiring the thermostat to your heating and cooling system.
Step 3: Wiring the Thermostat
Wiring the Honeywell Home Thermostat is a pivotal step that establishes the connection between the device and your home's heating and cooling system. This process requires precision and attention to detail to ensure that the thermostat functions seamlessly and accurately regulates the indoor climate. Here's a comprehensive guide on how to wire the thermostat:
-
Power Off: Before initiating the wiring process, it's imperative to turn off the power supply to your heating and cooling system at the circuit breaker. This precautionary measure ensures safety during the wiring procedure and prevents any electrical mishaps.
-
Labeling: If not already labeled, carefully label each wire connected to the existing thermostat. The labeling process involves identifying and marking the wires based on their corresponding terminals, such as R, W, Y, G, and C. This step streamlines the transition to the new thermostat and minimizes confusion during the wiring process.
-
Wire Identification: Identify the wires coming from your heating and cooling system and match them to the corresponding terminals on the baseplate of the Honeywell Home Thermostat. Common wire colors include red (R), white (W), yellow (Y), green (G), and blue (C), though variations may exist based on the specific system configuration.
-
Terminal Connection: Carefully connect each labeled wire to its designated terminal on the baseplate of the thermostat. Ensure a secure and snug fit for each wire to guarantee proper conductivity and reliable functionality.
-
C-Wire Consideration: If your system requires a C-wire (common wire) for continuous power supply to the thermostat, ensure that it is properly connected to the C terminal on the baseplate. The C-wire is essential for maintaining consistent power to the thermostat and enabling advanced features such as Wi-Fi connectivity.
-
Compatibility Verification: Confirm that the wiring configuration aligns with the compatibility requirements of the Honeywell Home Thermostat. Certain models may have specific wiring specifications, and it's crucial to ensure that the wiring setup meets the device's compatibility criteria for optimal performance.
-
Double-Check: Once the wiring is complete, double-check each connection to verify that the wires are securely fastened to the respective terminals. This meticulous review minimizes the risk of loose connections or wiring errors that could impede the thermostat's functionality.
By meticulously following these steps, you can effectively wire the Honeywell Home Thermostat to your home's heating and cooling system, laying the foundation for precise temperature control and energy-efficient operation. With the wiring process successfully completed, the next phase involves connecting the thermostat to your Wi-Fi network, unlocking a realm of remote control and smart functionality.
Step 4: Connecting to Wi-Fi
Connecting your Honeywell Home Thermostat to your Wi-Fi network opens up a world of convenience and control, allowing you to manage your home's temperature settings remotely and take advantage of smart features. The process of connecting to Wi-Fi is straightforward and can be accomplished with the following steps:
-
Access Wi-Fi Settings: Begin by powering on your Honeywell Home Thermostat and accessing the device's menu or settings. Navigate to the Wi-Fi setup option to initiate the connection process.
-
Network Selection: Upon entering the Wi-Fi setup, the thermostat will scan for available networks. Select your home Wi-Fi network from the list of detected options.
-
Enter Credentials: If your Wi-Fi network is password-protected, you will be prompted to enter the network's security key or password. Carefully input the credentials to establish a secure connection between the thermostat and your home network.
-
Connection Confirmation: Once the Wi-Fi credentials are entered, the thermostat will attempt to connect to the selected network. Upon successful connection, a confirmation message or indicator will display, signaling that the thermostat is now linked to your Wi-Fi.
-
Remote Access Setup: After the Wi-Fi connection is established, follow any additional on-screen prompts to set up remote access and enable the thermostat's smart features. This may involve creating an account on the Honeywell Home app or linking the thermostat to an existing smart home ecosystem.
-
Verification and Testing: To ensure that the Wi-Fi connection is stable and functional, perform a test by accessing the thermostat's controls and settings through the associated app or web interface. Verify that you can adjust temperature settings and monitor the thermostat remotely.
By successfully connecting your Honeywell Home Thermostat to your Wi-Fi network, you gain the ability to manage your home's climate control from anywhere, whether you're at home, at work, or on the go. The seamless integration with Wi-Fi empowers you to optimize energy usage, schedule temperature adjustments, and enjoy the convenience of a connected home environment.
With the thermostat now connected to Wi-Fi, you're ready to explore the next phase: setting up the thermostat to align with your specific comfort preferences and scheduling needs.
Step 5: Setting Up the Thermostat
Setting up the Honeywell Home Thermostat involves customizing its functionality to align with your specific comfort preferences and scheduling needs. This pivotal step allows you to tailor the thermostat's operation to suit your lifestyle while maximizing energy efficiency. Here's a detailed guide on how to set up the thermostat:
-
Initial Configuration: Upon completing the Wi-Fi connection, navigate through the thermostat's menu to access the initial configuration settings. This may involve specifying the type of heating and cooling system in your home, such as furnace, heat pump, or central air conditioning, to ensure accurate operation.
-
Temperature Settings: Adjust the default temperature settings to reflect your preferred comfort levels. Whether you prefer a cozy warmth during the winter or a refreshing coolness in the summer, fine-tuning the temperature settings allows the thermostat to maintain an environment that suits your preferences.
-
Scheduling: Leverage the thermostat's scheduling capabilities to create personalized temperature schedules that align with your daily routine. By programming specific temperature settings for different times of the day, you can optimize energy usage and ensure comfort without the need for manual adjustments.
-
Smart Features Activation: If your Honeywell Home Thermostat offers smart features such as geofencing, adaptive learning, or integration with smart home platforms, take the time to activate and configure these functionalities. Smart features enhance the thermostat's capabilities, allowing for automated adjustments based on your presence, weather conditions, and overall home environment.
-
Energy-Saving Options: Explore and enable energy-saving options provided by the thermostat, such as eco mode or energy-saving schedules. These features promote energy efficiency by automatically adjusting temperature settings when you're away or during periods of reduced activity, helping you conserve energy without sacrificing comfort.
-
Remote Access Setup: Ensure that remote access via the Honeywell Home app or web interface is fully configured. This step allows you to monitor and adjust the thermostat's settings from anywhere, providing unparalleled convenience and control over your home's climate.
By meticulously setting up the Honeywell Home Thermostat to align with your preferences and lifestyle, you unlock its full potential as a versatile and intuitive climate control solution. The personalized configuration empowers you to enjoy a comfortable living environment while optimizing energy usage, ultimately enhancing the overall efficiency and convenience of your home.
With the thermostat now fully set up and tailored to your needs, you're poised to experience the seamless integration of advanced temperature control within your home. This personalized setup ensures that the thermostat operates in harmony with your lifestyle, delivering comfort and energy efficiency in equal measure.
Step 6: Using the Honeywell Home App
The Honeywell Home App serves as the gateway to a seamless and intuitive experience, allowing you to remotely monitor and control your Honeywell Home Thermostat from your smartphone or tablet. This powerful app empowers you to manage your home's climate with unprecedented convenience and flexibility, enhancing your overall comfort and energy efficiency. Here's a detailed exploration of how to effectively utilize the Honeywell Home App:
Remote Temperature Control
Upon launching the Honeywell Home App, you're greeted with a user-friendly interface that provides instant access to your thermostat's settings and status. From the app's dashboard, you can effortlessly adjust the temperature, set heating and cooling schedules, and fine-tune comfort settings based on your preferences. Whether you're at home, at work, or traveling, the app ensures that you remain in control of your home's climate with just a few taps on your mobile device.
Smart Alerts and Notifications
The Honeywell Home App keeps you informed and empowered through its smart alerts and notifications feature. You'll receive timely updates on temperature changes, system status, and potential issues, allowing you to address any concerns promptly. Whether it's a reminder to change the air filter or a notification about unusual temperature fluctuations, the app ensures that you stay informed and proactive in maintaining your home's comfort system.
Geofencing and Adaptive Learning
Harnessing the power of geofencing and adaptive learning, the Honeywell Home App intelligently adapts to your lifestyle and presence. By leveraging geofencing technology, the app can automatically adjust temperature settings based on your proximity to home, ensuring that you arrive to a comfortable environment without unnecessary energy consumption. Additionally, the app's adaptive learning capabilities analyze your temperature preferences and habits, fine-tuning the thermostat's operation to align with your unique lifestyle over time.
Energy Usage Insights
Gain valuable insights into your home's energy usage and efficiency through the Honeywell Home App's energy monitoring features. The app provides detailed reports and analytics, allowing you to track energy consumption patterns, identify opportunities for optimization, and make informed decisions to enhance efficiency. By understanding your energy usage trends, you can take proactive steps to minimize waste and maximize savings without compromising comfort.
Seamless Integration with Smart Home Ecosystems
For those with a broader smart home ecosystem, the Honeywell Home App seamlessly integrates with popular platforms such as Amazon Alexa, Google Assistant, and Apple HomeKit. This integration enables voice control and interoperability with other smart devices, creating a cohesive and interconnected home environment. Whether you prefer voice commands, automation routines, or cross-device synchronization, the app's compatibility ensures a harmonious smart home experience.
By leveraging the full capabilities of the Honeywell Home App, you elevate your control over your home's climate, enabling personalized comfort, energy efficiency, and proactive management. The app's intuitive features and seamless connectivity redefine the way you interact with your Honeywell Home Thermostat, empowering you to create an ideal living environment tailored to your preferences and lifestyle.
Conclusion
In conclusion, the installation and utilization of the Honeywell Home Thermostat represent a transformative journey toward enhanced comfort, energy efficiency, and seamless climate control within your home. By following the comprehensive steps outlined in this guide, you've gained valuable insights into the process of unboxing, mounting, wiring, connecting to Wi-Fi, setting up, and leveraging the advanced features of the thermostat. As you embark on this journey, you've not only integrated a cutting-edge device into your home but also empowered yourself to optimize your living environment with precision and convenience.
The unboxing experience served as an exciting introduction to the innovative features and capabilities of the Honeywell Home Thermostat, setting the stage for a successful installation. By meticulously checking the contents and familiarizing yourself with the components, you established a solid foundation for the subsequent steps, ensuring a smooth and seamless integration of the thermostat into your home.
The process of mounting the thermostat involved strategic decision-making regarding its placement, accessibility, and aesthetic integration. By selecting an optimal location and securely affixing the baseplate, you've positioned the thermostat as a visually appealing and functional addition to your living space, ready to regulate your home's climate with precision.
Wiring the thermostat was a pivotal step that established the crucial connection between the device and your home's heating and cooling system. By carefully identifying, labeling, and connecting the wires, you've laid the groundwork for precise temperature control and reliable operation, setting the stage for a comfortable and energy-efficient living environment.
Connecting the thermostat to your Wi-Fi network unlocked a realm of convenience and control, enabling you to manage your home's temperature settings remotely and take advantage of smart features. This seamless integration with Wi-Fi empowers you to optimize energy usage, schedule temperature adjustments, and enjoy the convenience of a connected home environment.
Setting up the thermostat involved tailoring its functionality to align with your specific comfort preferences and scheduling needs. By customizing temperature settings, creating personalized schedules, and activating smart features, you've ensured that the thermostat operates in harmony with your lifestyle, delivering comfort and energy efficiency in equal measure.
Finally, the utilization of the Honeywell Home App has redefined the way you interact with your thermostat, offering remote temperature control, smart alerts, energy usage insights, and seamless integration with smart home ecosystems. This powerful app empowers you to manage your home's climate with unprecedented convenience and flexibility, enhancing your overall comfort and energy efficiency.
In essence, the installation and utilization of the Honeywell Home Thermostat represent a significant step toward creating a modern, efficient, and comfortable living environment. By embracing the capabilities of this innovative device and leveraging its advanced features, you've positioned yourself at the forefront of smart home climate control, ensuring that your home remains a haven of comfort and efficiency.