Home>Home and Garden>How To String A Weed Eater
Home and Garden
How To String A Weed Eater
Published: March 5, 2024
Learn how to string a weed eater in a few simple steps with our comprehensive guide. Keep your home and garden looking pristine with our expert tips and tricks.
(Many of the links in this article redirect to a specific reviewed product. Your purchase of these products through affiliate links helps to generate commission for Noodls.com, at no extra cost. Learn more)
Table of Contents
Introduction
String trimmers, commonly known as weed eaters, are indispensable tools for maintaining a tidy and well-kept lawn. These versatile devices are designed to effortlessly trim grass, weeds, and unruly vegetation in areas that are hard to reach with a lawnmower. However, to ensure that your weed eater operates at its best, it's crucial to regularly replace the string. Over time, the string wears down from constant use, requiring replacement to maintain optimal cutting performance.
In this comprehensive guide, we will walk you through the process of stringing a weed eater, providing step-by-step instructions and valuable tips to make the task seamless and efficient. Whether you're a seasoned gardener or a novice DIY enthusiast, mastering the art of stringing a weed eater will empower you to keep your outdoor spaces looking pristine and well-manicured.
By following the steps outlined in this guide, you'll be equipped with the knowledge and skills needed to tackle this essential maintenance task with confidence. From gathering the necessary tools and materials to testing the weed eater after string installation, each step is carefully explained to ensure a successful outcome. So, let's dive in and learn how to string a weed eater like a pro!
Read more: How To Put String In A Weed Eater
Step 1: Gather Necessary Tools and Materials
Before embarking on the task of stringing a weed eater, it's essential to gather all the required tools and materials. Having everything at hand will streamline the process and prevent unnecessary interruptions. Here's a comprehensive list of items you'll need:
Tools:
- Safety Gear: Prioritize safety by wearing protective gear, including safety glasses to shield your eyes from debris and gloves to safeguard your hands.
- Screwdriver: Depending on the weed eater model, a screwdriver may be necessary for accessing the string spool.
- Scissors or Wire Cutters: These tools will be used to trim the new string to the appropriate length.
- Work Gloves: Sturdy work gloves will provide a secure grip and protect your hands during the stringing process.
Materials:
- Replacement String: Select the appropriate type and thickness of string for your weed eater. The user manual or manufacturer's guidelines can help you determine the correct string specifications.
- Owner's Manual: Keep the weed eater's owner's manual on hand for reference, especially if you're new to stringing a weed eater or using a specific model for the first time.
- Clean Cloth: Having a clean cloth or rag nearby will be useful for wiping any dirt or debris from the weed eater during the string replacement process.
- Workbench or Stable Surface: Prepare a stable work surface, such as a workbench or table, where you can comfortably work on the weed eater.
By ensuring that you have all the necessary tools and materials ready, you'll be well-prepared to proceed with the subsequent steps of preparing, removing, and installing the new string. This proactive approach minimizes the likelihood of interruptions and allows you to focus on the task at hand, ultimately leading to a successful string replacement for your weed eater.
Step 2: Prepare the Weed Eater
Before delving into the process of string replacement, it's crucial to prepare the weed eater adequately. This step sets the foundation for a smooth and efficient stringing process, ensuring that the weed eater is in optimal condition for the task at hand. Here's a detailed breakdown of the essential preparatory measures:
-
Inspect the Weed Eater: Begin by conducting a thorough visual inspection of the weed eater. Check for any signs of damage, wear, or loose components that may affect its performance or safety. Ensure that the power switch is in the "off" position to prevent accidental activation during the preparation phase.
-
Clean the Weed Eater: Use a clean cloth or rag to wipe away any dirt, grass clippings, or debris that may have accumulated on the weed eater. Pay close attention to the cutting head, string spool, and air vents to remove any obstructions that could impede the string replacement process.
-
Secure the Weed Eater: Place the weed eater on a stable workbench or surface, ensuring that it is firmly secured to prevent movement during the stringing process. This stability is essential for maintaining control and precision when handling the weed eater and accessing its components.
-
Refer to the Owner's Manual: Take a moment to review the weed eater's owner's manual for specific instructions related to string replacement and maintenance. Familiarizing yourself with the manufacturer's guidelines and recommendations will provide valuable insights into the weed eater's design and operation, enhancing your overall preparedness.
-
Prepare the Replacement String: If the replacement string is not pre-cut to the required length, use scissors or wire cutters to trim it to the appropriate size as specified in the owner's manual. Ensuring that the string is properly sized and prepared beforehand will streamline the installation process.
By meticulously preparing the weed eater and adhering to these preparatory steps, you'll establish a solid foundation for the subsequent stages of string removal and installation. This proactive approach sets the stage for a seamless and successful string replacement, allowing you to maintain the weed eater's cutting prowess and operational efficiency.
Read more: How To Propagate String Of Pearls
Step 3: Remove the Old String
Removing the old string from your weed eater is a crucial step in the string replacement process. By carefully following the steps outlined below, you can effectively remove the worn-out string and prepare the weed eater for the installation of fresh cutting line.
-
Turn Off the Weed Eater: Prior to any maintenance task, it's essential to ensure the weed eater is powered off and the spark plug is disconnected to prevent accidental starts. This safety measure protects you from potential injuries during the string removal process.
-
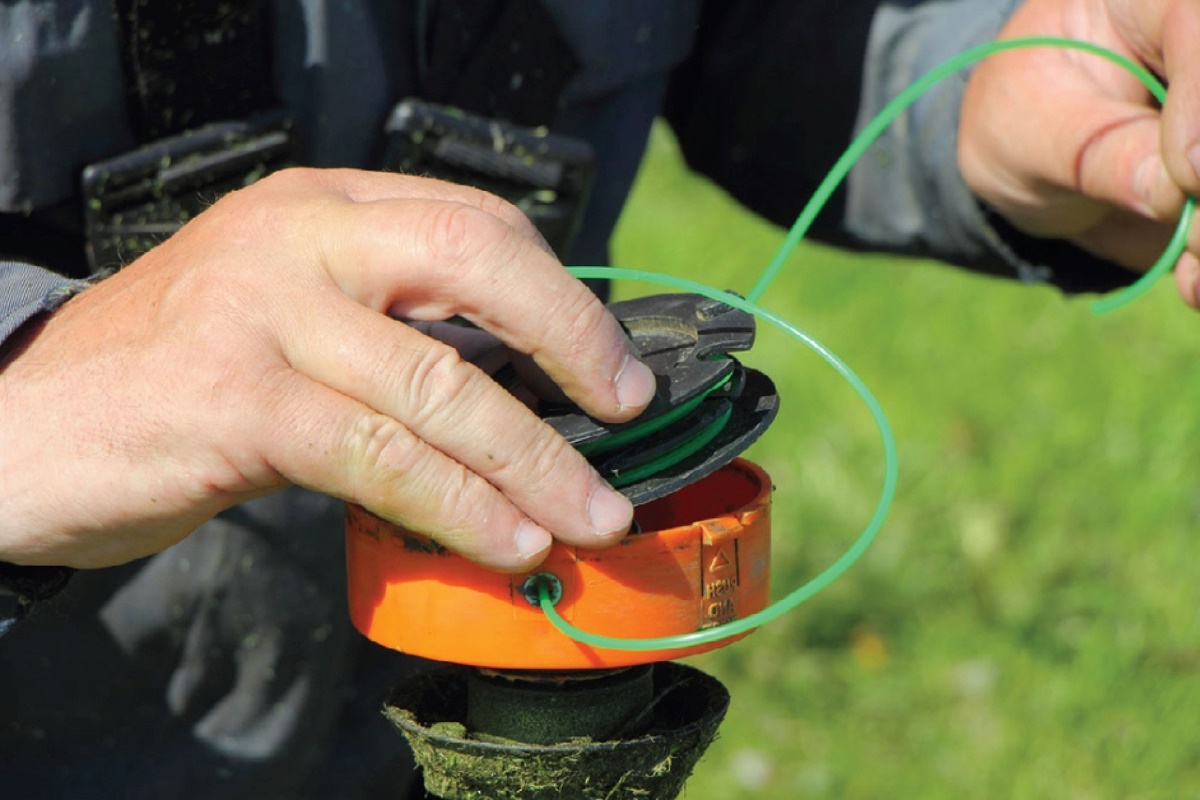
Locate the String Spool: Depending on the weed eater model, the string spool can typically be found at the bottom of the cutting head. It may be secured in place with a retaining cap or knob, which requires careful removal to access the spool.
-
Inspect the String Spool: Once the spool is accessible, examine how the old string is wound around it. Take note of the string's orientation and the method used to secure it in place. This observation will guide you when installing the new string later on.
-
Unwind the Old String: Carefully unwind the old string from the spool, taking note of any specific winding patterns or notches used to secure the string. Exercise caution to prevent the string from inadvertently springing out and causing injury.
-
Dispose of the Old String: Once the old string has been completely unwound, safely dispose of it according to local waste disposal guidelines. Properly discarding the worn-out string contributes to a clean and organized work environment.
-
Inspect the Cutting Head: While the string spool is exposed, take the opportunity to inspect the cutting head for any accumulated debris or grass clippings. Clearing any obstructions ensures optimal performance when the new string is installed.
By meticulously following these steps, you can effectively remove the old string from your weed eater, setting the stage for the subsequent installation of fresh cutting line. This thorough approach ensures that the weed eater is primed for the next phase of the string replacement process, ultimately contributing to its continued reliability and cutting efficiency.
Step 4: Install the New String
With the old string successfully removed and the weed eater prepared for the next phase, it's time to proceed with installing the new string. This pivotal step in the string replacement process requires precision and attention to detail to ensure that the new cutting line is securely in place and ready for action. Follow these comprehensive steps to seamlessly install the new string on your weed eater:
-
Select the Correct Replacement String: Refer to the weed eater's owner's manual or guidelines to determine the appropriate type and thickness of replacement string. Using the correct string ensures optimal performance and prevents potential damage to the weed eater.
-
Thread the New String: Begin by threading one end of the new string through the designated eyelet or hole on the string spool. Follow any specific winding patterns or directional arrows indicated on the spool to ensure proper string alignment.
-
Wind the String Onto the Spool: Carefully wind the new string onto the spool in the direction indicated by the arrows or based on the manufacturer's guidelines. Maintain even tension and alignment as you wind the string to prevent tangling and ensure smooth feeding during operation.
-
Secure the String: Once the desired length of string is wound onto the spool, secure the loose end in the designated retaining notch or slot. This prevents the string from unraveling and maintains its position during use.
-
Feed the String Through the Cutting Head: With the string securely wound onto the spool, feed the free end through the eyelet or guide on the weed eater's cutting head. Ensure that the string is correctly positioned to facilitate smooth and efficient cutting.
-
Assemble the String Spool: If the weed eater's design requires it, carefully reassemble the string spool, ensuring that it is securely fastened and aligned with the cutting head. Follow any specific instructions provided in the owner's manual for proper reassembly.
By meticulously following these steps, you can effectively install the new string on your weed eater, setting the stage for enhanced cutting performance and operational efficiency. This meticulous approach ensures that the weed eater is equipped with a fresh cutting line, ready to tackle overgrown grass and weeds with precision and ease.
Step 5: Test the Weed Eater
After successfully installing the new string, it's essential to conduct a thorough test of the weed eater to ensure that the string is properly aligned, the cutting head functions smoothly, and the overall performance meets expectations. This critical step allows you to verify the effectiveness of the string replacement and address any potential issues before resuming regular use of the weed eater.
To conduct a comprehensive test of the weed eater, follow these essential guidelines:
-
Power On the Weed Eater: With the new string securely installed, power on the weed eater according to the manufacturer's instructions. Ensure that the spark plug is connected and that all safety precautions are in place.
-
Inspect String Alignment: Observe the string's alignment and feeding as the weed eater operates. Verify that the string extends to the appropriate length from the cutting head, allowing for efficient trimming without excessive strain on the motor.
-
Monitor Cutting Performance: Test the weed eater on a small patch of grass or weeds to evaluate its cutting performance. Pay attention to the smoothness of the cutting action and the effectiveness of the new string in trimming vegetation.
-
Listen for Unusual Noises: While the weed eater is in operation, listen for any unusual noises or vibrations that may indicate issues with the string, cutting head, or motor. Unusual sounds should be investigated and addressed promptly to prevent potential damage to the weed eater.
-
Check for String Feeding Issues: Observe the string feeding mechanism to ensure that it functions smoothly and consistently. Any irregularities in string feeding should be addressed to prevent tangling or interruptions during use.
-
Inspect for String Wear: After testing the weed eater, inspect the new string for signs of wear or fraying. While some wear is expected during initial use, excessive wear may indicate issues with the string installation or the weed eater's operation.
By meticulously testing the weed eater after string replacement, you can identify and address any potential issues, ensuring that the tool is ready for regular use. This proactive approach enhances safety, operational efficiency, and cutting performance, ultimately contributing to a well-maintained and visually appealing outdoor space.
Conclusion
In conclusion, mastering the art of stringing a weed eater is a valuable skill that empowers individuals to maintain well-manicured outdoor spaces with ease and precision. By following the comprehensive steps outlined in this guide, you have gained the knowledge and confidence to effectively replace the string on your weed eater, ensuring that it remains a reliable tool for trimming grass, weeds, and unruly vegetation.
The process begins with gathering the necessary tools and materials, emphasizing the importance of safety gear, a screwdriver, scissors or wire cutters, work gloves, replacement string, the owner's manual, and a clean cloth. This proactive approach sets the stage for a seamless string replacement experience, minimizing interruptions and optimizing efficiency.
Preparation is key, and the guide emphasizes the significance of inspecting, cleaning, and securing the weed eater, as well as familiarizing oneself with the owner's manual. These preparatory measures lay the groundwork for a successful string replacement process, ensuring that the weed eater is in optimal condition for the task at hand.
The subsequent steps of removing the old string and installing the new one are detailed with precision, highlighting the importance of safety, attention to detail, and adherence to manufacturer's guidelines. By carefully unwinding the old string, disposing of it responsibly, and meticulously installing the new string, you can maintain the weed eater's cutting prowess and operational efficiency.
After the new string is in place, conducting a thorough test of the weed eater is essential to verify the effectiveness of the string replacement and address any potential issues. This step allows you to ensure proper string alignment, smooth cutting performance, and consistent string feeding, ultimately enhancing the tool's reliability and operational safety.
By mastering the process of stringing a weed eater, you are equipped to uphold the pristine appearance of your outdoor spaces, effortlessly tackling overgrown vegetation and maintaining a well-kept lawn. The knowledge and skills acquired through this guide empower you to approach string replacement with confidence, contributing to a visually appealing and inviting outdoor environment.
In essence, the ability to string a weed eater effectively is a testament to your commitment to maintaining a beautiful and well-groomed outdoor space, reflecting your dedication to enhancing the aesthetics and functionality of your property. With this newfound expertise, you are poised to tackle string replacement with proficiency and ease, ensuring that your weed eater remains a reliable ally in your lawn maintenance endeavors.