Home>Home and Garden>The Ultimate Guide To Removing A Dishwasher From Under A Counter
Home and Garden
The Ultimate Guide To Removing A Dishwasher From Under A Counter
Published: January 20, 2024
Learn how to remove a dishwasher from under a counter with our comprehensive guide. Perfect for home and garden enthusiasts looking to tackle this project with confidence.
(Many of the links in this article redirect to a specific reviewed product. Your purchase of these products through affiliate links helps to generate commission for Noodls.com, at no extra cost. Learn more)
Table of Contents
Introduction
Removing a dishwasher from under a counter may seem like a daunting task, but with the right guidance, it can be a straightforward process. Whether you're upgrading to a new dishwasher, making way for additional storage, or simply need to access the space underneath, understanding the step-by-step procedure is essential. By following this comprehensive guide, you'll gain the knowledge and confidence to tackle this project with ease.
A dishwasher is a vital appliance in any modern kitchen, streamlining the post-meal cleanup process and saving valuable time and effort. However, when it comes to replacing or removing a dishwasher, it's crucial to approach the task methodically to ensure a smooth and safe transition. From disconnecting the power and water supply to carefully sliding the unit out from its position, each step plays a crucial role in the overall process.
This guide will walk you through each stage of removing a dishwasher from under a counter, providing clear instructions and useful tips to simplify the task. By familiarizing yourself with the necessary precautions and techniques, you'll be well-equipped to handle the removal process effectively and without unnecessary complications. Whether you're a seasoned DIY enthusiast or a first-time homeowner, this guide is designed to empower you with the knowledge needed to complete the task confidently.
So, if you're ready to embark on this home improvement endeavor and gain a deeper understanding of your kitchen's inner workings, let's dive into the step-by-step process of removing a dishwasher from under a counter. With a bit of patience and attention to detail, you'll soon have the dishwasher ready to be replaced, relocated, or the space beneath it transformed for a new purpose.
Read more: How To Remove A Dishwasher
Step 1: Turn off the Power and Water Supply
Before initiating the process of removing a dishwasher from under a counter, the first crucial step is to ensure the power and water supply are completely shut off. This is essential for safety and to prevent any potential damage during the removal process.
Disconnecting the Power Supply
Start by locating the circuit breaker or fuse box that controls the power supply to the dishwasher. Once located, switch off the corresponding circuit breaker or remove the fuse to cut off the power. It's important to verify that the power is indeed turned off by testing the dishwasher's controls to ensure they are non-operational.
Shutting off the Water Supply
Next, locate the water shut-off valve connected to the dishwasher. This valve is typically located under the kitchen sink. Turn the valve clockwise to shut off the water supply to the dishwasher. After doing so, it's advisable to run the kitchen sink faucet to release any residual water pressure in the lines.
By following these initial steps to turn off the power and water supply, you are taking the necessary precautions to ensure a safe and efficient removal process. This proactive approach not only minimizes the risk of electrical hazards and water leaks but also sets the stage for the subsequent steps involved in removing the dishwasher from under the counter.
With the power and water supply successfully turned off, you're now ready to proceed to the next step in the process, setting the stage for the smooth and secure removal of the dishwasher.
Remember, safety is paramount at every stage of the removal process, and by taking the time to properly turn off the power and water supply, you're laying the groundwork for a successful and stress-free project.
Step 2: Remove the Toe Kick
The toe kick, also known as the kick plate, is the panel located at the base of the dishwasher, serving as a decorative and protective barrier. Removing the toe kick is an essential step in the process of taking out a dishwasher from under a counter.
To begin, carefully examine the toe kick to identify the method of attachment. In most cases, the toe kick is secured in place with screws or clips. Using a suitable screwdriver or a drill with a screwdriver bit, proceed to remove the screws that secure the toe kick to the dishwasher frame. If the toe kick is held in place by clips, gently push or pry the panel to release it from the clips.
Once the screws or clips have been removed, gently pull the toe kick away from the dishwasher. It's important to exercise caution during this step to avoid damaging the surrounding cabinetry or the toe kick itself. If the toe kick seems to be stuck, carefully inspect for any additional fasteners or adhesive that may be holding it in place.
After successfully detaching the toe kick, set it aside in a safe location. This step not only allows for easier access to the components underneath the dishwasher but also paves the way for the subsequent stages of the removal process.
Removing the toe kick is a relatively simple yet crucial step in the overall process of taking out a dishwasher from under a counter. By carefully following this step, you're effectively preparing the appliance for further disconnection and removal. With the toe kick out of the way, you're now ready to proceed to the next steps, continuing the systematic process of freeing the dishwasher from its current location.
Remember, attention to detail and a methodical approach are key to successfully removing the toe kick without causing any damage. By taking the time to complete this step with care and precision, you're setting the stage for a smooth and efficient removal process.
Step 3: Disconnect the Water Supply Line
Disconnecting the water supply line is a critical step in the process of removing a dishwasher from under a counter. This task involves safely detaching the water inlet hose that connects the dishwasher to the kitchen's water supply. By following the steps outlined below, you can effectively disconnect the water supply line with precision and care.
-
Locate the Water Inlet Valve: Begin by identifying the water inlet valve, which is typically located at the bottom of the dishwasher, near the front. This valve serves as the point of connection for the water supply line. Once located, ensure that the valve is in the closed position to prevent any water leakage during the disconnection process.
-
Turn off the Water Supply: Before proceeding with the disconnection, it's essential to shut off the main water supply to the dishwasher. This can be achieved by turning the shut-off valve, usually located under the kitchen sink, in a clockwise direction. By doing so, you minimize the risk of water spillage and create a safer working environment.
-
Release the Hose Clamp: With the water supply turned off, carefully inspect the water inlet hose for any securing mechanism, such as a hose clamp. If a hose clamp is present, use pliers to loosen and remove it, allowing the hose to be detached from the water inlet valve.
-
Disconnect the Water Inlet Hose: Once the hose clamp has been released, gently pull the water inlet hose away from the water inlet valve. It's important to exercise caution and ensure a steady grip to prevent any unnecessary strain on the hose or the valve.
-
Prepare for Residual Water: As the water inlet hose is disconnected, be prepared for the possibility of residual water within the hose or the valve. Have a towel or a container ready to catch any remaining water that may drain out during the disconnection process.
By meticulously following these steps, you can effectively disconnect the water supply line from the dishwasher, setting the stage for the subsequent stages of the removal process. This careful approach not only minimizes the risk of water damage but also ensures a smooth and efficient disconnection, preparing the dishwasher for its eventual removal from under the counter.
With the water supply line successfully disconnected, you're now ready to proceed to the next steps, continuing the systematic process of freeing the dishwasher from its current location. Remember, attention to detail and a methodical approach are crucial for a successful disconnection, ensuring that the removal process progresses seamlessly.
Step 4: Disconnect the Drain Hose
Disconnecting the drain hose is a pivotal step in the process of removing a dishwasher from under a counter. This task involves safely detaching the hose that facilitates the drainage of wastewater from the dishwasher. By following the steps outlined below, you can effectively disconnect the drain hose with precision and care.
-
Locate the Drain Hose: Begin by identifying the drain hose, which is typically connected to the sink's plumbing or garbage disposal unit. The point of connection is crucial for allowing the wastewater from the dishwasher to be effectively drained out. Once located, carefully inspect the area to ensure clear access to the hose and the connection point.
-
Prepare for Residual Water: Before proceeding with the disconnection, it's important to anticipate the presence of residual water within the drain hose. Place a towel or a shallow container beneath the connection point to catch any water that may spill out during the disconnection process. This proactive measure helps minimize the risk of water spillage and ensures a tidier workspace.
-
Release the Hose Clamp or Connector: Depending on the dishwasher model and installation, the drain hose may be secured in place with a hose clamp or connector. Use pliers to loosen and remove the clamp or connector, allowing the drain hose to be detached from the sink's plumbing or garbage disposal. It's essential to exercise caution and ensure a steady grip to prevent any unnecessary strain on the hose or the connection point.
-
Disconnect the Drain Hose: Once the clamp or connector has been released, gently pull the drain hose away from the connection point. Take care to angle the hose in a manner that allows any residual water to drain into the prepared towel or container. By doing so, you minimize the risk of water spillage and maintain a clean working environment.
-
Inspect for Debris: With the drain hose disconnected, take a moment to inspect the interior of the hose and the connection point for any debris or blockages. Clearing any obstructions ensures that the drainage system remains free-flowing and prevents potential issues when reinstalling the dishwasher or connecting a new unit in the future.
By meticulously following these steps, you can effectively disconnect the drain hose from the dishwasher, preparing the appliance for its eventual removal from under the counter. This careful approach not only minimizes the risk of water spillage but also ensures a smooth and efficient disconnection, setting the stage for the successful removal of the dishwasher.
With the drain hose successfully disconnected, you're now ready to proceed to the next steps, continuing the systematic process of freeing the dishwasher from its current location. Remember, attention to detail and a methodical approach are crucial for a successful disconnection, ensuring that the removal process progresses seamlessly.
Step 5: Disconnect the Electrical Connection
Disconnecting the electrical connection is a crucial step in the process of removing a dishwasher from under a counter. This task involves safely detaching the power supply that enables the dishwasher to operate. By following the steps outlined below, you can effectively disconnect the electrical connection with precision and care.
-
Locate the Power Source: Begin by identifying the power source for the dishwasher. This may involve locating the electrical outlet behind the dishwasher or directly accessing the junction box where the dishwasher's electrical wiring is connected. It's essential to exercise caution and ensure clear access to the power source before proceeding with the disconnection.
-
Turn Off the Circuit Breaker: Before initiating the disconnection, it's crucial to turn off the circuit breaker that supplies power to the dishwasher. This proactive measure ensures that the electrical connection is safely deactivated, minimizing the risk of electrical hazards during the disconnection process.
-
Verify the Power Supply: Once the circuit breaker is switched off, use a non-contact voltage tester to verify that the power supply to the dishwasher is indeed turned off. This important step provides an added layer of safety, ensuring that there is no electrical current flowing to the appliance before proceeding with the disconnection.
-
Remove the Junction Box Cover: If the dishwasher is hardwired to the electrical supply, carefully remove the cover of the junction box to access the wiring connections. Use a screwdriver to loosen the terminal screws and detach the electrical wires from the corresponding terminals. It's imperative to handle the wires with care and avoid damaging the insulation during this process.
-
Disconnect the Power Cord: If the dishwasher is connected to an electrical outlet, unplug the power cord from the outlet. Gently guide the cord out from its location, ensuring that it is free from any obstructions or entanglements. Exercise caution to prevent any strain on the cord or the outlet during this disconnection.
By meticulously following these steps, you can effectively disconnect the electrical connection from the dishwasher, preparing the appliance for its eventual removal from under the counter. This careful approach not only minimizes the risk of electrical hazards but also ensures a smooth and efficient disconnection, setting the stage for the successful removal of the dishwasher.
With the electrical connection successfully disconnected, you're now ready to proceed to the next steps, continuing the systematic process of freeing the dishwasher from its current location. Remember, attention to detail and a methodical approach are crucial for a successful disconnection, ensuring that the removal process progresses seamlessly.
Step 6: Unscrew the Dishwasher from the Countertop
With the power, water supply, and essential connections safely disconnected, the next pivotal step in the process of removing a dishwasher from under a counter is unscrewing the appliance from the countertop. This step involves carefully releasing the fasteners that secure the dishwasher in place, allowing for its subsequent removal with precision and care.
To begin, locate the screws or mounting brackets that secure the dishwasher to the underside of the countertop. These fasteners are typically positioned along the top front edge of the dishwasher, where it meets the underside of the countertop. Using a suitable screwdriver or a drill with a screwdriver bit, proceed to remove the screws or loosen the mounting brackets to release the dishwasher from its fixed position.
It's important to approach this step with caution and precision, ensuring that the dishwasher is adequately supported as the fasteners are being removed. Enlist the assistance of a helper if necessary to stabilize the dishwasher and prevent it from shifting or tilting during the unscrewing process.
As the screws or mounting brackets are released, carefully guide the dishwasher to prevent any sudden movements that may cause damage to the surrounding area. Take note of any shims or additional support structures that may be in place to ensure that they are accounted for during the removal process.
Once all the fasteners are removed, gently pull the dishwasher forward, creating ample space to access the rear of the appliance. Take care to avoid placing excessive strain on the water and electrical connections that have been previously disconnected. If the dishwasher is situated snugly in its position, gently rock it back and forth to loosen it from the countertop.
With the dishwasher now freed from the countertop, take a moment to inspect the underside of the appliance and the countertop for any residual debris or signs of wear. This step sets the stage for a smooth transition as the dishwasher is prepared for its final removal from under the counter.
By meticulously following these steps, you can effectively unscrew the dishwasher from the countertop, marking a significant milestone in the overall process of removing the appliance. This careful approach not only ensures the safe release of the dishwasher but also sets the stage for the subsequent steps involved in its complete removal.
With the dishwasher successfully unscrewed from the countertop, you're now ready to proceed to the next steps, continuing the systematic process of freeing the appliance from its current location. Remember, attention to detail and a methodical approach are crucial for a successful unscrewing process, ensuring that the removal progresses seamlessly.
Read more: How To Remove Mold In Your Dishwasher
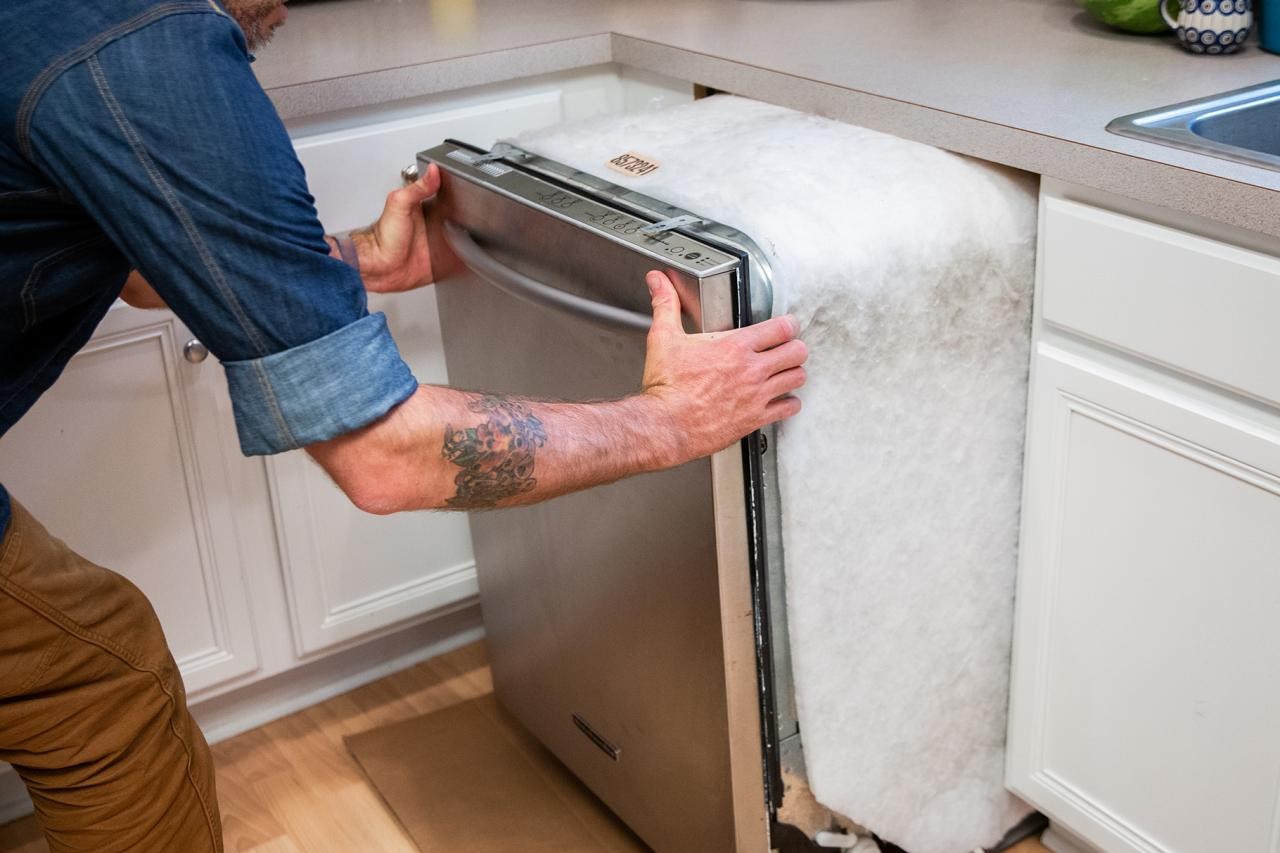
Step 7: Slide the Dishwasher Out
With the dishwasher successfully unscrewed from the countertop, the final step in the process of removing a dishwasher from under a counter involves carefully sliding the appliance out from its position. This pivotal step requires precision and attention to detail to ensure a smooth and seamless transition as the dishwasher is prepared for its complete removal.
To begin, gently pull the dishwasher forward, taking care to maintain a steady and controlled movement. It's important to be mindful of any remaining connections, such as the water supply line, the drain hose, and the electrical cord, to prevent any strain or damage during the sliding process. If necessary, enlist the assistance of a helper to provide additional support and guidance as the dishwasher is maneuvered out from under the counter.
As the dishwasher is gradually slid forward, pay close attention to any resistance or obstacles that may impede its movement. Take note of the flooring surface and ensure that the dishwasher's base glides smoothly without causing any damage. If the appliance encounters any resistance, carefully inspect the surrounding area to identify the source of the obstruction and address it accordingly.
Once the dishwasher is partially out from under the counter, take a moment to assess the space and ensure that there is adequate clearance for its complete removal. If the dishwasher is situated within a tight or confined space, maneuver it with gentle and deliberate movements to prevent any unnecessary strain on the appliance or the surrounding area.
As the dishwasher nears its full removal from under the counter, maintain a firm grip on the appliance to guide it smoothly and steadily. Be mindful of any protruding components, such as the dishwasher's door handle or control panel, to prevent accidental damage or interference with the surrounding cabinetry.
With careful coordination and attention to detail, the dishwasher can be successfully slid out from under the counter, marking the completion of this crucial step in the removal process. This careful approach not only ensures the safe extraction of the appliance but also sets the stage for its subsequent relocation or replacement.
By meticulously following these steps, you can effectively slide the dishwasher out from under the counter, completing the systematic process of freeing the appliance from its previous location. This methodical approach ensures that the removal process progresses seamlessly, providing a sense of accomplishment as the dishwasher is prepared for its next phase.
Remember, attention to detail and a methodical approach are essential for a successful sliding process, ensuring that the dishwasher is safely and efficiently maneuvered out from under the counter.
Conclusion
Successfully removing a dishwasher from under a counter is a significant accomplishment, requiring meticulous attention to detail, careful coordination, and a methodical approach. Throughout this comprehensive guide, we've navigated through each step of the removal process, from turning off the power and water supply to sliding the dishwasher out from its position. By following these systematic steps, you've gained the knowledge and confidence to tackle this project with ease and precision.
As you conclude the removal process, it's important to reflect on the accomplishment of safely and effectively freeing the dishwasher from its previous location. This marks a significant milestone in your home improvement journey, whether you're making way for a new appliance, creating additional storage space, or embarking on a kitchen renovation project. By following the steps outlined in this guide, you've not only gained valuable insights into the inner workings of a dishwasher but also honed your skills in executing a complex task with finesse.
As you survey the now empty space under the counter, take a moment to appreciate the effort and attention to detail that went into completing this project. The systematic approach you've employed has not only ensured a successful removal but also set the stage for the next phase, whether it involves installing a new dishwasher, repurposing the space, or making other enhancements to your kitchen environment.
Remember, the knowledge and experience gained from this endeavor extend beyond the immediate task at hand. The skills and confidence you've developed can be applied to future home improvement projects, empowering you to take on new challenges with a sense of assurance and capability.
As you move forward, whether it's installing a new dishwasher, renovating your kitchen, or embarking on other home improvement endeavors, carry the lessons learned from this process with you. The attention to detail, methodical approach, and commitment to safety and precision will serve as valuable assets in your ongoing journey to create a home environment that reflects your vision and aspirations.
With the dishwasher successfully removed from under the counter, you've demonstrated your ability to navigate complex tasks with confidence and expertise. As you embark on future projects, carry this accomplishment with you as a testament to your dedication to creating a home that is both functional and tailored to your unique preferences and needs.