Home>Home and Garden>The Ultimate Hack For Connecting A Dryer To A Floor Vent
Home and Garden
The Ultimate Hack For Connecting A Dryer To A Floor Vent
Published: January 20, 2024
Discover the ultimate hack for connecting your dryer to a floor vent in this comprehensive guide. Perfect for home and garden enthusiasts looking for a seamless solution.
(Many of the links in this article redirect to a specific reviewed product. Your purchase of these products through affiliate links helps to generate commission for Noodls.com, at no extra cost. Learn more)
Table of Contents
Introduction
Connecting a dryer to a floor vent is a crucial step in ensuring efficient and safe operation. Whether you're setting up a new dryer or relocating an existing one, understanding how to properly connect it to the floor vent is essential. This process involves more than just hooking up a few components; it requires a comprehensive understanding of the floor vent system and the right tools and materials to ensure a secure and effective connection.
Properly connecting a dryer to a floor vent not only ensures the smooth flow of air and moisture but also prevents potential hazards such as lint buildup and restricted airflow. By following the correct steps and using the appropriate tools and materials, you can optimize the performance of your dryer while safeguarding your home against potential risks.
In this guide, we will delve into the intricacies of connecting a dryer to a floor vent, providing you with a comprehensive overview of the process. From understanding the floor vent system to the step-by-step procedure for connecting the dryer, this guide will equip you with the knowledge and confidence to tackle this essential task. So, roll up your sleeves and get ready to master the ultimate hack for connecting a dryer to a floor vent!
Understanding the Floor Vent System
The floor vent system plays a pivotal role in facilitating the safe and efficient operation of a dryer. It serves as the pathway through which hot air and moisture are expelled from the dryer to the outdoors. A thorough understanding of the floor vent system is essential for ensuring that the dryer functions optimally while minimizing the risk of potential hazards.
The floor vent system typically consists of several key components, including the vent hood, ductwork, and exterior vent cap. The vent hood is located on the exterior wall of the building and serves as the entry point for the dryer exhaust. It is essential for the vent hood to be equipped with a flap or louvered cover to prevent the entry of pests and outdoor elements while the dryer is not in use.
The ductwork, which extends from the back of the dryer to the vent hood, is a critical component of the floor vent system. It is commonly constructed from aluminum or rigid metal to ensure durability and fire resistance. Proper installation of the ductwork is crucial for maintaining a smooth airflow and preventing the accumulation of lint, which can pose a fire hazard.
The exterior vent cap, located on the outer wall of the building, acts as the outlet for the dryer exhaust. This component is designed to expel hot air and moisture while preventing the entry of debris and pests. It is essential for the vent cap to be equipped with a backdraft damper to ensure that outdoor elements do not infiltrate the ductwork when the dryer is not in operation.
Understanding the floor vent system involves recognizing the importance of proper airflow and ventilation. A well-designed and properly installed floor vent system enables the efficient expulsion of hot air and moisture, thereby preventing potential issues such as condensation, mold growth, and overheating of the dryer.
In addition, knowledge of the floor vent system includes an awareness of potential obstructions and blockages that can impede airflow. Regular inspection and maintenance of the floor vent system are essential for identifying and addressing any obstructions, such as debris accumulation or pest infestation, which can compromise the functionality of the system.
By comprehending the intricacies of the floor vent system, including its components, functionality, and potential challenges, you can effectively ensure the smooth operation of your dryer while mitigating the risk of hazards associated with inadequate ventilation and airflow.
Understanding the floor vent system is foundational to the successful connection of a dryer, as it provides the necessary insights to navigate the subsequent steps with confidence and precision. With this knowledge in hand, you are well-equipped to proceed to the next phase of connecting the dryer to the floor vent.
Tools and Materials Needed
Before embarking on the task of connecting a dryer to a floor vent, it is essential to gather the necessary tools and materials to ensure a seamless and secure connection. Equipping yourself with the right items will not only streamline the process but also contribute to the long-term effectiveness and safety of the dryer system. Here's a comprehensive list of the tools and materials you'll need:
Tools:
- Screwdriver: A versatile tool for removing or securing screws, the screwdriver is indispensable for disassembling and reassembling components during the connection process.
- Adjustable Wrench: This tool is crucial for tightening and securing hose clamps and fasteners, ensuring a snug and leak-free connection.
- Utility Knife: Used for precise cutting of ductwork and insulation, the utility knife facilitates the customization of components to fit the specific requirements of the floor vent system.
- Tape Measure: Accurate measurements are essential for ensuring a precise and tailored fit of the ductwork and other components, making a tape measure an indispensable tool for this task.
- Duct Tape: While not a permanent solution, duct tape can be handy for temporarily securing connections and sealing minor gaps or leaks.
Materials:
- Aluminum Ductwork: High-quality aluminum ductwork is essential for facilitating the smooth flow of air and moisture from the dryer to the floor vent. Ensure that the ductwork is of the appropriate diameter and length to suit the specific requirements of your floor vent system.
- Vent Hose: A flexible vent hose is necessary for connecting the dryer to the floor vent. Opt for a durable and heat-resistant hose to ensure optimal performance and safety.
- Vent Hood: If the existing vent hood is damaged or inadequate, it may be necessary to replace it with a new one equipped with a flap or louvered cover to prevent the entry of pests and outdoor elements.
- Hose Clamps: Secure and adjustable hose clamps are essential for creating a tight and leak-free connection between the vent hose and the dryer's exhaust outlet as well as the floor vent.
- Vent Cap: If the exterior vent cap is worn or damaged, it is advisable to replace it with a new one featuring a backdraft damper to prevent the infiltration of outdoor elements when the dryer is not in use.
By ensuring that you have the requisite tools and materials at your disposal, you can approach the task of connecting the dryer to the floor vent with confidence and efficiency. This comprehensive list of tools and materials serves as a roadmap for a successful and secure connection, setting the stage for the subsequent steps in the process.
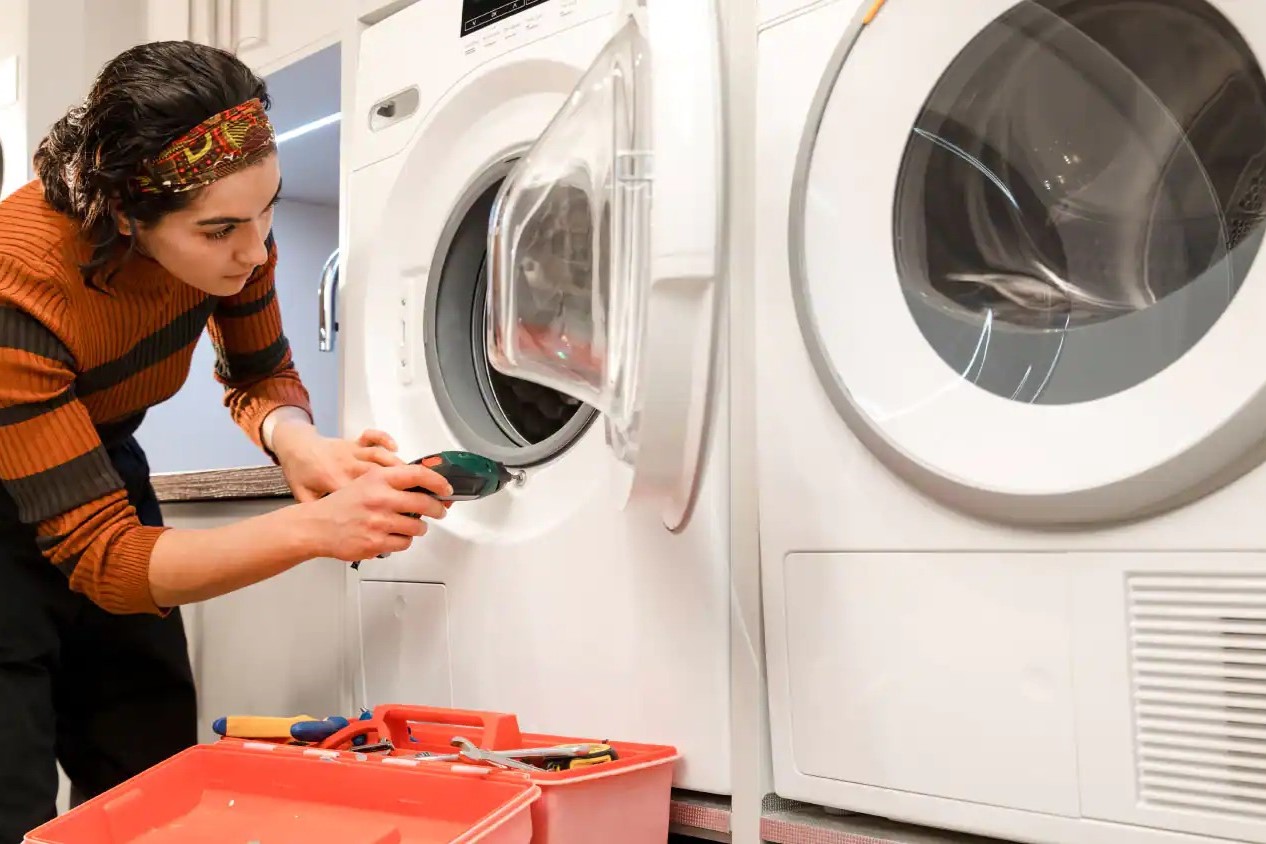
Steps for Connecting the Dryer to the Floor Vent
-
Measure and Prepare: Begin by measuring the distance from the dryer's exhaust outlet to the floor vent to determine the required length of the vent hose and ductwork. Use a tape measure to ensure precise measurements, accounting for any bends or turns in the pathway. Once the measurements are obtained, cut the vent hose and aluminum ductwork to the appropriate lengths using a utility knife, ensuring a tailored fit for the specific layout of your floor vent system.
-
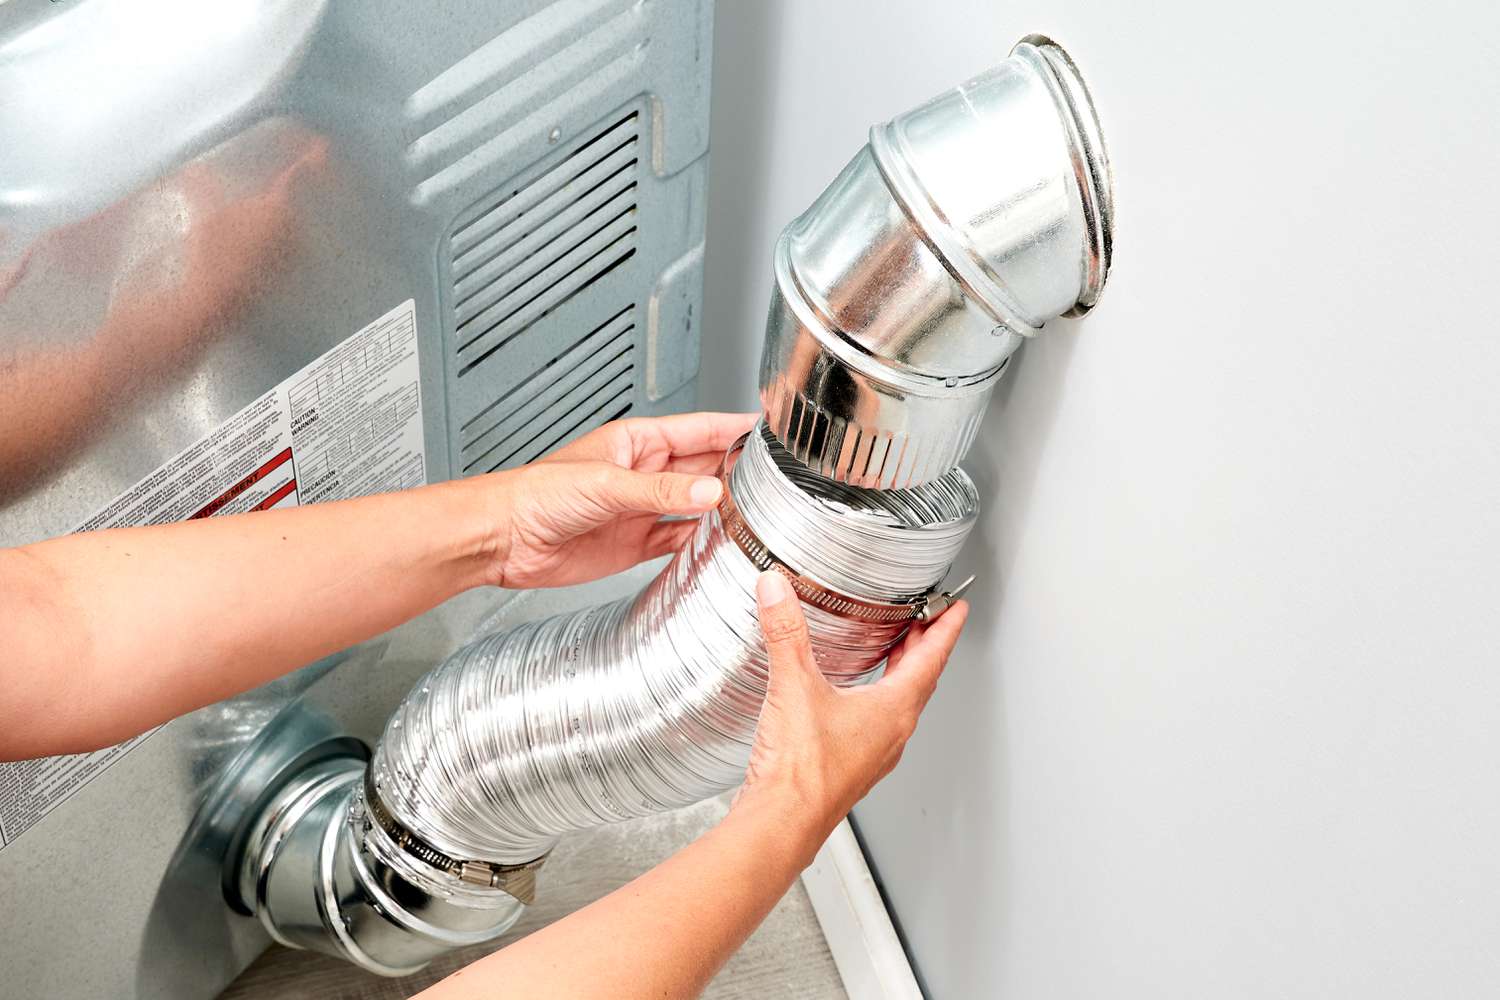
Secure the Vent Hose: Attach one end of the vent hose to the dryer's exhaust outlet using a secure hose clamp. Slide the hose clamp over the end of the vent hose and position it over the dryer's exhaust outlet, then tighten it using a screwdriver or adjustable wrench to create a snug and leak-free connection.
-
Connect the Ductwork: With the vent hose in place, proceed to connect the aluminum ductwork to the other end of the vent hose. Secure the connection using a hose clamp, ensuring that the ductwork is aligned with the vent hose and the dryer's exhaust outlet. Tighten the hose clamp to create a secure and airtight connection, preventing any leaks or dislodgement during the operation of the dryer.
-
Position the Vent Hood: If necessary, install or replace the vent hood on the exterior wall of the building. Position the vent hood so that it aligns with the end of the ductwork, allowing for a direct pathway for the expelled air and moisture to exit the building. Secure the vent hood in place, ensuring that it is level and firmly attached to the exterior wall.
-
Secure the Vent Cap: Install or replace the vent cap on the exterior end of the ductwork, ensuring that it is equipped with a backdraft damper to prevent the entry of outdoor elements. The vent cap should be securely fastened to the exterior wall, providing a protective barrier against debris and pests while allowing for the unobstructed expulsion of hot air and moisture.
-
Inspect and Test: Once the connections are in place, carefully inspect the entire assembly to ensure that all components are securely fastened and aligned. Check for any gaps, leaks, or loose connections, and make any necessary adjustments to achieve a tight and seamless configuration. After the inspection, turn on the dryer and observe the airflow to verify that the expelled air and moisture are flowing smoothly through the floor vent system.
By following these meticulous steps, you can effectively connect your dryer to the floor vent, ensuring optimal performance and safety. This systematic approach not only facilitates a secure and efficient connection but also contributes to the long-term functionality and reliability of your dryer system.
Testing the Connection
After completing the intricate process of connecting the dryer to the floor vent, it is crucial to conduct a comprehensive test to ensure that the entire system functions seamlessly. Testing the connection serves as the final validation of the meticulous work put into the assembly, providing the assurance of optimal performance and safety. Here's a detailed overview of the essential steps involved in testing the connection:
-
Power On the Dryer: Begin by powering on the dryer and allowing it to run for a complete cycle. This enables the expelled air and moisture to flow through the newly connected system, allowing you to observe its functionality in real-time.
-
Inspect Airflow: While the dryer is in operation, carefully observe the airflow at the vent hood on the exterior wall. The expelled air should flow steadily and consistently, indicating that the system is effectively expelling hot air and moisture from the dryer to the outdoors.
-
Check for Leaks and Dislodgement: During the testing phase, closely monitor the connections, including the vent hose, ductwork, vent hood, and vent cap, for any signs of leaks or dislodgement. Any irregularities such as air leaks or loose connections should be promptly addressed to ensure the system's integrity.
-
Assess Vent Hood Operation: Verify that the vent hood operates as intended, with the flap or louvered cover opening when the dryer is in use and closing securely when the dryer is not in operation. This mechanism prevents the entry of pests and outdoor elements while the dryer is idle, contributing to the overall functionality of the floor vent system.
-
Observe Moisture Expulsion: As the dryer operates, pay close attention to the expulsion of moisture through the vent hood. The system should effectively expel moisture without any signs of condensation or backflow, ensuring that the floor vent system adequately manages the moisture generated during the drying process.
-
Evaluate Noise and Vibration: While the dryer is running, assess the noise and vibration levels to ensure that the connections are secure and stable. Excessive noise or vibration may indicate loose components or misaligned connections, warranting further inspection and adjustments.
-
Perform a Second Inspection: Once the dryer cycle is complete, conduct a second inspection of the entire system, focusing on the connections, vent hood, and vent cap. This thorough examination allows you to identify any issues that may have arisen during the testing phase and address them promptly.
By meticulously testing the connection, you can validate the effectiveness and safety of the newly connected system, ensuring that the dryer operates optimally while safeguarding your home against potential hazards. This comprehensive testing phase serves as the final quality assurance checkpoint, providing the peace of mind that comes with a secure and reliable dryer-to-floor vent connection.
Conclusion
In conclusion, mastering the art of connecting a dryer to a floor vent is a vital skill that combines practical knowledge, precision, and a commitment to safety. By understanding the intricacies of the floor vent system, gathering the necessary tools and materials, and following a systematic approach to the connection process, homeowners can ensure the efficient and secure operation of their dryers while mitigating potential hazards.
The floor vent system, comprising the vent hood, ductwork, and exterior vent cap, serves as the essential pathway for expelling hot air and moisture from the dryer to the outdoors. Understanding the functionality and components of this system is fundamental to achieving a successful connection, as it provides the insights necessary to navigate the process with confidence and precision.
Equipping oneself with the right tools and materials is a crucial preparatory step, setting the stage for a seamless and secure connection. From screwdrivers and adjustable wrenches to aluminum ductwork and vent caps, each item plays a pivotal role in ensuring the effectiveness and longevity of the dryer-to-floor vent assembly.
The step-by-step process of connecting the dryer to the floor vent involves meticulous measurements, secure attachments, and thorough inspections. By carefully measuring and preparing the vent hose and ductwork, securing connections, and positioning the vent hood and cap, homeowners can create a robust and airtight system that facilitates the smooth expulsion of air and moisture.
The final phase of testing the connection serves as the ultimate validation of the meticulous work invested in the assembly. By observing airflow, checking for leaks and dislodgement, and evaluating the operation of the vent hood, homeowners can verify the functionality and safety of the newly connected system, providing the assurance of optimal performance.
In essence, mastering the ultimate hack for connecting a dryer to a floor vent empowers homeowners to optimize the efficiency and safety of their dryer systems. By combining knowledge, precision, and a commitment to thoroughness, individuals can ensure the seamless operation of their dryers while safeguarding their homes against potential risks. With this comprehensive guide as a resource, homeowners can approach the task of connecting a dryer to a floor vent with confidence, knowing that they possess the necessary insights and skills to achieve a secure and effective connection.