Sports
How To Tape For Shin Splints
Published: February 25, 2024
Learn the best taping techniques for shin splints to support your sports activities and prevent injuries. Find out how to tape for shin splints effectively.
(Many of the links in this article redirect to a specific reviewed product. Your purchase of these products through affiliate links helps to generate commission for Noodls.com, at no extra cost. Learn more)
Table of Contents
Introduction
Shin splints are a common ailment among athletes, particularly those engaged in high-impact sports such as running, basketball, or soccer. This condition, known medically as medial tibial stress syndrome, manifests as pain along the inner edge of the shinbone. It is often caused by overuse, improper training techniques, or wearing inadequate footwear. The discomfort associated with shin splints can be debilitating, hindering an individual's performance and overall well-being.
In response to this issue, athletes and fitness enthusiasts have turned to taping as a preventive and therapeutic measure. Taping for shin splints involves applying adhesive tape to the lower leg to alleviate pain, provide support, and promote proper muscle alignment. When executed correctly, taping can significantly reduce discomfort and enable individuals to engage in physical activities with greater ease and confidence.
In this comprehensive guide, we will delve into the intricacies of taping for shin splints, offering valuable insights into the selection of appropriate taping materials, preparation techniques, and effective taping methods. By understanding the principles and nuances of taping, individuals can proactively address shin splints and minimize their impact on athletic performance and daily activities.
Whether you are a seasoned athlete striving to overcome persistent shin splint discomfort or a fitness enthusiast seeking preventive measures, this guide will equip you with the knowledge and techniques necessary to leverage taping as a valuable tool in managing and mitigating the effects of shin splints. Let's embark on this enlightening journey to unlock the potential of taping in promoting lower leg health and enhancing overall athletic prowess.
Read more: How To Wear Shin Guards
Understanding Shin Splints
Shin splints, medically referred to as medial tibial stress syndrome, encompass a spectrum of lower leg discomfort characterized by pain along the inner edge of the shinbone. This condition commonly affects athletes engaged in high-impact activities, such as running, basketball, and soccer, as well as individuals who engage in repetitive, weight-bearing exercises. The primary cause of shin splints is often attributed to overuse, inadequate training techniques, or wearing unsupportive footwear.
The onset of shin splints is typically associated with the excessive stress placed on the shinbone and the connective tissues that attach muscles to the bone. This stress can result in inflammation of the periosteum, the connective tissue surrounding the shinbone, leading to discomfort and tenderness. Additionally, muscle imbalances, biomechanical irregularities, and sudden increases in physical activity can contribute to the development of shin splints.
The symptoms of shin splints may vary in intensity, ranging from a dull, aching pain to sharp discomfort along the inner aspect of the lower leg. Individuals with shin splints often experience tenderness and swelling in the affected area, particularly during or after physical activity. The pain associated with shin splints can significantly impede an individual's ability to engage in athletic pursuits and may even affect daily activities.
Understanding the underlying factors contributing to shin splints is crucial for effective management and prevention. By addressing the root causes, such as overuse, improper biomechanics, or inadequate footwear, individuals can take proactive measures to mitigate the impact of shin splints on their athletic performance and overall well-being.
In the subsequent sections, we will explore the intricacies of taping for shin splints, offering valuable insights into the selection of appropriate taping materials, preparation techniques, and effective taping methods. By gaining a comprehensive understanding of shin splints and their implications, individuals can harness the power of taping as a proactive and therapeutic approach to alleviate discomfort and promote lower leg health.
Let's delve deeper into the nuances of taping for shin splints, empowering individuals to embrace this valuable technique as a means of enhancing athletic performance and fostering overall well-being.
Choosing the Right Tape
Selecting the appropriate tape for taping shin splints is a critical aspect of the taping process. The right tape not only provides effective support and compression but also ensures comfort and flexibility during physical activities. When choosing tape for shin splints, individuals should consider several key factors to optimize its therapeutic benefits.
Factors to Consider
-
Elasticity and Support: Opt for a tape with sufficient elasticity to facilitate natural movement while providing adequate support to the lower leg muscles. The tape should offer compression to reduce strain on the shinbone and surrounding tissues, thereby alleviating discomfort associated with shin splints.
-
Adhesive Strength: The tape's adhesive properties play a crucial role in ensuring its longevity and effectiveness. Look for a tape with strong adhesive capabilities that can withstand perspiration and prolonged physical activity without losing its grip or causing skin irritation.
-
Breathability: Choose a tape that promotes airflow and ventilation to prevent moisture buildup and skin irritation. Breathable tapes facilitate comfort and allow individuals to engage in activities without feeling constrained or overheated.
-
Skin-Friendly Materials: Opt for tapes made from hypoallergenic and skin-friendly materials to minimize the risk of allergic reactions or irritation. Individuals with sensitive skin should prioritize tapes designed to be gentle on the skin while providing robust support.
-
Water Resistance: Consider tapes that offer water-resistant properties, particularly for athletes engaged in water-based activities or those prone to excessive sweating. Water-resistant tapes maintain their integrity and adhesive strength even when exposed to moisture, ensuring consistent support and stability.
-
Flexibility and Range of Motion: The selected tape should allow for a full range of motion, enabling individuals to move comfortably without restriction. A flexible tape adapts to the natural contours of the lower leg, promoting unrestricted movement during physical activities.
Popular Tape Options
Several types of tapes are commonly used for taping shin splints, each offering unique benefits and characteristics. These include:
-
Kinesiology Tape: Known for its elasticity and ability to mimic the flexibility of human skin, kinesiology tape provides dynamic support and promotes natural movement. It is widely favored for its versatility and adaptability to various taping techniques.
-
Rigid Strapping Tape: This tape offers robust support and stability, making it suitable for individuals requiring enhanced compression and immobilization of the lower leg. Rigid strapping tape is often utilized in cases where additional reinforcement is necessary to address severe shin splint discomfort.
-
Elastic Adhesive Bandage: With its stretchable and adhesive properties, elastic adhesive bandage tape provides reliable support while allowing for comfortable movement. It is a popular choice for individuals seeking a balance between support and flexibility during physical activities.
By carefully considering these factors and exploring the diverse tape options available, individuals can make informed decisions when selecting the most suitable tape for taping shin splints. The right tape not only enhances the effectiveness of taping techniques but also contributes to the overall comfort and well-being of individuals managing shin splint discomfort.
In the subsequent sections, we will delve into the essential preparatory steps and taping techniques, empowering individuals to execute taping for shin splints with precision and confidence. Let's embark on this enlightening journey to unlock the potential of taping in promoting lower leg health and enhancing overall athletic prowess.
Read more: How To Remove Tape Residue
Preparing for Taping
Before embarking on the taping process for shin splints, it is essential to prepare the lower leg area to optimize the effectiveness and longevity of the tape application. Proper preparation not only ensures the adhesion and stability of the tape but also promotes comfort and minimizes the risk of skin irritation. By adhering to the following preparatory steps, individuals can lay the groundwork for successful taping and maximize the therapeutic benefits for managing shin splints.
Cleansing the Skin
Begin by thoroughly cleansing the skin on the lower leg to remove any dirt, oils, or lotions that may hinder the tape's adhesion. Use a mild soap and water to gently cleanse the area, ensuring that the skin is free from any residues that could compromise the tape's grip.
Drying the Skin
Once the skin is cleansed, it is crucial to ensure that it is completely dry before applying the tape. Use a clean towel to gently pat the skin dry, taking care to remove any excess moisture. Dry skin promotes optimal adhesion and prevents the tape from peeling or slipping during physical activities.
Shaving if Necessary
For individuals with excessive hair on the lower leg, consider shaving the area where the tape will be applied. While this step is optional, it can enhance the tape's adherence and prevent discomfort when removing the tape. Shaving the area also facilitates a smoother application process, ensuring that the tape adheres securely to the skin.
Read more: How To Apply KT Tape To Your Ankle
Skin Protection
To safeguard the skin and enhance comfort, consider applying a thin layer of hypoallergenic underwrap or pre-wrap before taping. This protective layer serves as a barrier between the skin and the adhesive tape, reducing the risk of skin irritation and discomfort, particularly during prolonged wear.
Assessing Skin Sensitivity
Individuals with sensitive skin should conduct a patch test with the selected tape material to assess any potential allergic reactions or skin sensitivities. Apply a small piece of the tape to a discreet area of the skin and monitor for any adverse reactions before proceeding with the taping process.
By meticulously preparing the lower leg through proper cleansing, drying, and, if necessary, shaving, individuals can create an optimal foundation for the taping process. Additionally, the use of skin protection and sensitivity assessments contributes to a comfortable and irritation-free taping experience. With the lower leg primed and ready, individuals can proceed to execute the taping techniques with confidence, leveraging the therapeutic benefits of taping to address shin splint discomfort effectively.
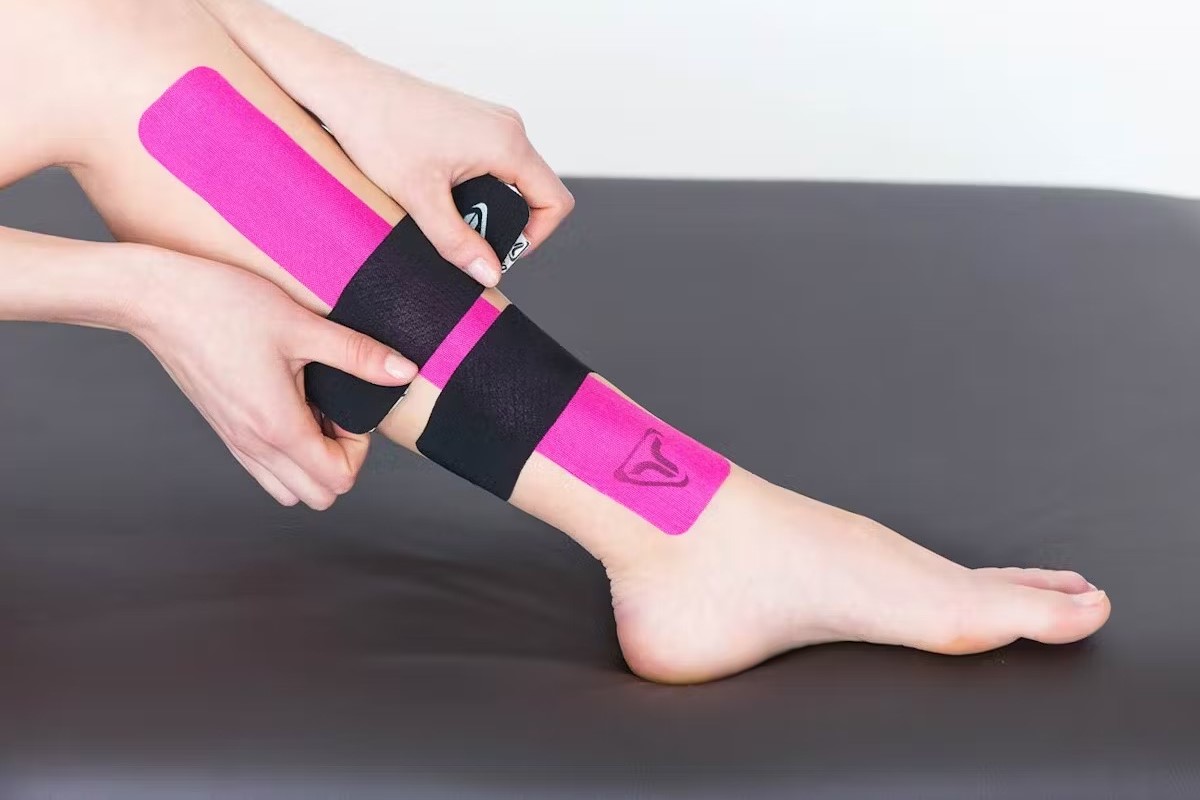
Taping Techniques
Taping for shin splints encompasses a variety of techniques aimed at providing support, alleviating discomfort, and promoting proper muscle alignment in the lower leg. By mastering the intricacies of taping techniques, individuals can effectively address shin splint discomfort and enhance their ability to engage in physical activities with confidence and ease. Let's explore the fundamental taping techniques that can be employed to manage shin splints and optimize lower leg health.
Basic Taping Method
The basic taping method involves applying adhesive tape along the inner edge of the shinbone to provide support and reduce strain on the affected area. Begin by anchoring the tape just above the ankle, ensuring a firm yet comfortable grip. Gradually wrap the tape around the lower leg, maintaining consistent tension to promote compression and stability. As the tape ascends along the shinbone, it should cover the tender area while allowing for unrestricted movement. Secure the tape just below the knee, ensuring that it adheres firmly without constricting blood flow or causing discomfort.
X-Taping Technique
The X-taping technique involves creating a crisscross pattern with the adhesive tape to target specific areas of discomfort and provide enhanced support. Begin by anchoring the tape diagonally across the front of the lower leg, starting from the inner side and crossing over to the outer side. Repeat this process with a second strip of tape, creating an X-shaped pattern that encompasses the tender area. This technique effectively distributes pressure and support, reducing strain on the shinbone and surrounding tissues while promoting natural movement.
Figure-8 Taping Method
The figure-8 taping method is designed to provide comprehensive support and stability to the lower leg, particularly in cases where individuals experience discomfort along the entire length of the shinbone. Commence by anchoring the tape just above the ankle, then guide it around the back of the heel before ascending along the inner and outer sides of the lower leg in a figure-8 pattern. This technique offers uniform compression and support, addressing widespread discomfort associated with shin splints while facilitating comfortable movement during physical activities.
Fan Taping Technique
The fan taping technique involves applying adhesive tape in a fan-like pattern to disperse pressure and provide targeted support to the affected area. Begin by anchoring the tape just above the ankle, then fan out multiple strips of tape from the anchor point, extending them along the inner edge of the shinbone. This technique effectively distributes support across the lower leg, reducing strain on specific areas while promoting muscle alignment and comfort during movement.
By mastering these taping techniques and tailoring them to individual needs, individuals can effectively manage shin splint discomfort and enhance their lower leg health. The proper execution of taping techniques, combined with the selection of suitable taping materials and meticulous preparation, empowers individuals to proactively address shin splints and optimize their athletic performance. With a comprehensive understanding of taping techniques, individuals can leverage this valuable tool to promote lower leg health and foster overall well-being.
Tips for Effective Taping
Effective taping for shin splints goes beyond the application of adhesive tape; it encompasses a holistic approach that optimizes the therapeutic benefits and longevity of the taping. By incorporating the following tips into the taping process, individuals can elevate the effectiveness of taping for shin splints, promoting comfort, support, and overall lower leg health.
Read more: How To Apply KT Tape To Your Wrist
1. Precision and Consistency
Maintain precision and consistency throughout the taping process to ensure uniform support and compression. Consistent tension and alignment of the tape facilitate optimal muscle stabilization and comfort, minimizing the risk of uneven pressure distribution and discomfort.
2. Avoid Overlapping
When applying multiple strips of tape, avoid excessive overlapping, as it may impede natural movement and compromise the tape's adhesive properties. Carefully position each strip to create a seamless and supportive taping pattern, promoting unrestricted mobility and comfort.
3. Monitor Sensations
Pay attention to any sensations or discomfort during and after taping. Individuals should communicate any excessive tightness, numbness, or tingling, as these may indicate improper taping or excessive pressure. Adjust the tension and positioning of the tape as needed to ensure comfort and effectiveness.
4. Regular Reassessment
Periodically reassess the tape's integrity and the lower leg's sensation during physical activities. Over time, the tape may loosen or shift, necessitating readjustment to maintain consistent support and stability. Regular reassessment ensures that the taping remains effective and supportive throughout athletic pursuits.
5. Customization to Individual Needs
Tailor the taping technique to individual needs and comfort preferences. Consider the unique biomechanics and discomfort patterns experienced by each individual, adjusting the taping method and tension to optimize support and alleviate discomfort effectively.
6. Gradual Adaptation
For individuals new to taping, allow for a gradual adaptation period to become accustomed to the sensation and support provided by the tape. Gradual adaptation promotes comfort and confidence during physical activities, allowing individuals to reap the full benefits of taping for shin splints.
7. Removal and Skin Care
Exercise caution when removing the tape to prevent skin irritation or discomfort. Gently peel off the tape, following the natural direction of hair growth to minimize discomfort. After removal, cleanse the skin to remove any adhesive residue and moisturize the area to promote skin health and comfort.
By integrating these tips into the taping process, individuals can enhance the effectiveness and comfort of taping for shin splints, promoting optimal support, stability, and lower leg health. These insights empower individuals to leverage taping as a proactive and therapeutic approach to managing shin splints and enhancing their athletic performance with confidence and ease.
Conclusion
In conclusion, taping for shin splints serves as a valuable and versatile tool for athletes and fitness enthusiasts seeking to address discomfort, promote lower leg health, and optimize their athletic performance. By understanding the underlying principles of taping, selecting appropriate materials, and mastering effective taping techniques, individuals can proactively manage shin splints and minimize their impact on daily activities.
The comprehensive guide has shed light on the intricacies of taping for shin splints, offering valuable insights into the selection of suitable taping materials, preparatory steps, taping techniques, and tips for optimizing the taping process. By embracing the holistic approach to taping outlined in this guide, individuals can harness the therapeutic benefits of taping, alleviate discomfort, and foster overall lower leg health.
Furthermore, the meticulous selection of tape based on factors such as elasticity, adhesive strength, breathability, and skin-friendly materials empowers individuals to make informed decisions, ensuring optimal support and comfort during physical activities. The diverse tape options, including kinesiology tape, rigid strapping tape, and elastic adhesive bandage, cater to varying support needs, allowing individuals to tailor their taping approach to their specific requirements.
The preparatory steps highlighted in this guide emphasize the importance of skin cleansing, drying, and protection, laying the foundation for successful taping while minimizing the risk of skin irritation. By adhering to these preparatory measures, individuals can create an optimal environment for the application of adhesive tape, maximizing its adhesion and therapeutic benefits.
The exploration of fundamental taping techniques, including the basic taping method, X-taping technique, figure-8 taping method, and fan taping technique, equips individuals with a diverse toolkit to address shin splint discomfort effectively. Mastering these techniques enables individuals to provide targeted support, alleviate strain, and promote proper muscle alignment, fostering comfort and confidence during physical activities.
Moreover, the incorporation of tips for effective taping underscores the importance of precision, consistency, and customization to individual needs, elevating the therapeutic efficacy of taping for shin splints. By integrating these tips into the taping process, individuals can optimize support, minimize discomfort, and promote lower leg health with confidence and ease.
In essence, taping for shin splints transcends the application of adhesive tape; it embodies a proactive and holistic approach to managing discomfort, promoting muscle stability, and enhancing athletic performance. By embracing the insights and techniques presented in this guide, individuals can unlock the potential of taping as a valuable ally in their journey toward optimal lower leg health and athletic prowess.