Home>Arts and Culture>How To Draw A Bat
Arts and Culture
How To Draw A Bat
Published: February 28, 2024
Learn how to draw a bat with easy step-by-step instructions. Perfect for arts and culture enthusiasts looking to improve their drawing skills.
(Many of the links in this article redirect to a specific reviewed product. Your purchase of these products through affiliate links helps to generate commission for Noodls.com, at no extra cost. Learn more)
Table of Contents
Introduction
Drawing is a wonderful way to express creativity and bring imagination to life. Whether you are an aspiring artist or simply looking for a fun activity, learning how to draw a bat can be an exciting and rewarding experience. Bats are fascinating creatures that have captured the human imagination for centuries, often associated with mystery, darkness, and the supernatural. By mastering the art of drawing a bat, you can unlock the ability to depict these enigmatic creatures with your own unique flair.
In this step-by-step guide, we will explore the process of drawing a bat in a simple and approachable manner. You don't need to be a professional artist to follow along – just grab some basic drawing materials and let your creativity take flight. With a few easy-to-follow instructions and a touch of patience, you'll soon find yourself creating a captivating bat illustration that is sure to impress.
So, gather your pencils, paper, and eraser, and get ready to embark on a creative journey. Whether you're a novice or a seasoned artist, this tutorial will provide you with the essential techniques to bring a bat to life on the page. Let's spread our artistic wings and delve into the captivating world of bat drawing!
Read more: Unveiling The Mysterious Sounds Of Bats
Materials Needed
To begin your bat-drawing adventure, you'll need a few essential materials to set the stage for your artistic endeavor. Here's a list of items that will help you bring your bat illustration to life:
-
Drawing Paper: A smooth, sturdy paper will provide a reliable surface for your artwork. Opt for a medium-weight paper that can withstand pencil strokes and erasures without tearing or smudging.
-
Pencils: A set of graphite pencils with varying lead hardness (ranging from 2H to 6B) will allow you to achieve different shades and textures in your drawing. The harder pencils (2H to H) are ideal for light outlines and fine details, while the softer ones (2B to 6B) can be used for shading and adding depth.
-
Eraser: A soft, kneaded eraser or a vinyl eraser will come in handy for correcting mistakes and refining your drawing. These erasers are gentle on the paper and can be molded into different shapes for precise erasing.
-
Sharpener: Keep a reliable pencil sharpener nearby to ensure that your pencils are consistently sharp, allowing for precise lines and details in your artwork.
-
Reference Images: While not a physical material, having reference images of bats on hand can be incredibly helpful. You can use these images as a guide to understand the bat's anatomy, posture, and wing structure, aiding you in creating a realistic and accurate depiction.
-
Optional: Colored Pencils or Markers: If you wish to add a pop of color to your bat drawing, consider having colored pencils or markers at your disposal. These can be used to enhance your artwork and add a vibrant touch to the final illustration.
By gathering these materials, you'll be well-equipped to embark on your bat-drawing journey. With the right tools at your disposal, you can unleash your creativity and bring a captivating bat illustration to life on the page. Now that you have your materials ready, it's time to dive into the step-by-step process of drawing a remarkable bat!
Step 1: Draw the Body
Drawing the body of the bat serves as the foundational step in creating a captivating bat illustration. To begin, lightly sketch the basic outline of the bat's body using a well-sharpened pencil. Start by drawing a large oval shape to represent the bat's torso. This oval will serve as the core structure from which the rest of the body will take shape. Keep your lines light and fluid, allowing for adjustments as you progress.
Next, extend two slightly curved lines downward from the bottom of the oval to form the bat's abdomen. These lines should taper as they reach the bottom, creating a gentle, pointed curve. This will establish the lower body of the bat, providing a sense of volume and dimension to your drawing.
Once the basic body shape is in place, it's time to add the defining feature of the bat – its wings. Position your pencil at the upper sides of the oval and extend two elongated, slightly tapered shapes outward to represent the bat's wings. These shapes should curve gracefully and extend beyond the body, capturing the characteristic silhouette of a bat in flight. Take your time to ensure that the wings are symmetrical and proportionate to the body, as they will play a pivotal role in defining the bat's appearance.
As you refine the body outline, pay attention to the subtle details that contribute to the bat's anatomy. Consider adding a gentle curve at the top of the oval to represent the bat's back, leading to the connection points for the wings. Additionally, incorporate a small, rounded bump at the top center of the oval to indicate the bat's head position. These nuanced touches will bring depth and realism to your bat illustration, setting the stage for the next steps in the drawing process.
By focusing on the body structure with precision and care, you can lay a solid foundation for your bat drawing, ensuring that the subsequent steps flow seamlessly. With the body sketched out, you're ready to move on to the next phase of bringing your bat illustration to life.
Step 2: Add the Wings
Adding the wings to your bat illustration is a pivotal step that infuses character and majesty into your artwork. The wings are a defining feature of bats, enabling them to navigate the night sky with grace and agility. As you embark on this phase of the drawing process, you'll have the opportunity to capture the intricate structure and ethereal beauty of bat wings.
Begin by focusing on the details of the wings, paying close attention to their shape and texture. Bats possess elongated fingers that support the structure of their wings, creating a webbed membrane that allows for powered flight. To depict this unique feature, start by drawing a series of elongated, curved lines that extend from the bat's body to represent the fingers of the wing. These lines should radiate from the upper part of the bat's body, gradually tapering as they reach the outer edges of the wings. This foundational framework will lay the groundwork for the intricate webbing that defines the bat's wings.
Once the finger-like structures are in place, carefully connect them with a delicate, translucent membrane. This membrane should follow the curvature of the fingers, creating a seamless and graceful expanse that characterizes the bat's wings. Pay attention to the subtle webbing patterns within the membrane, incorporating gentle curves and intersecting lines to convey the intricate texture of the wing surface. This attention to detail will add a sense of realism and depth to your bat illustration, capturing the essence of these remarkable creatures.
As you refine the wing structure, consider adding subtle variations in shading to convey the play of light and shadow on the wings. Use your pencils to create soft gradients, enhancing the three-dimensional quality of the wings and imbuing them with a lifelike appearance. By skillfully blending light and shadow, you can evoke a sense of movement and dimension within your bat illustration, elevating it to a captivating work of art.
With the wings taking shape, step back and admire the graceful form that has emerged on your paper. The addition of the wings brings a sense of dynamism and elegance to your bat drawing, capturing the essence of these nocturnal creatures in flight. As you proceed to the next stages of the drawing process, the presence of the wings will serve as a striking focal point, guiding the evolution of your bat illustration with grace and allure.
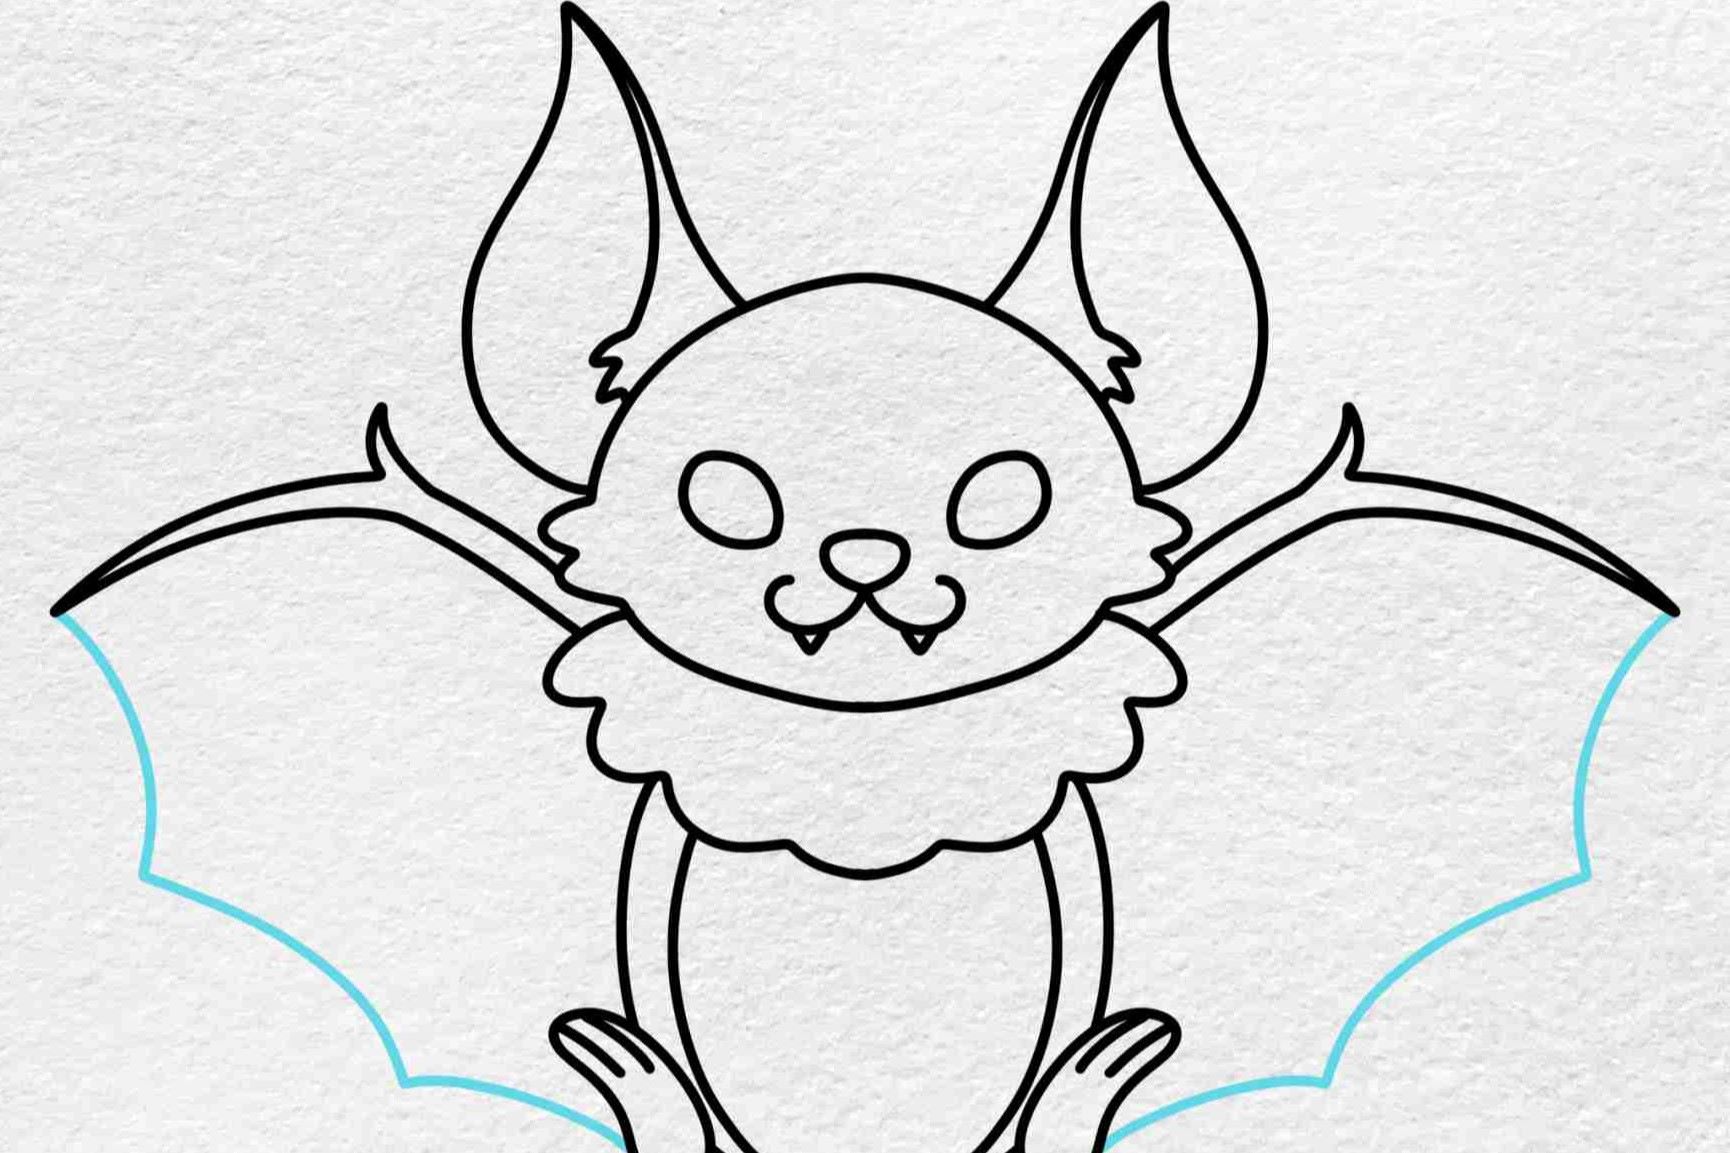
Step 3: Draw the Face
Drawing the face of the bat is a pivotal stage in infusing personality and character into your illustration. The face is where the unique features of the bat come to life, capturing its enigmatic allure and captivating essence. As you delve into this phase of the drawing process, you'll have the opportunity to convey the mystique and charm of these fascinating creatures through intricate details and expressive nuances.
Begin by focusing on the placement of the bat's eyes, which are a defining feature of its facial structure. Position your pencil delicately to sketch two small, circular shapes near the top center of the bat's head. These eyes should exude a sense of depth and curiosity, reflecting the keen perception and nocturnal nature of bats. Take care to ensure that the eyes are symmetrical and proportionate, as they will serve as the focal point of the bat's face, infusing it with a sense of vitality and allure.
Next, turn your attention to the bat's nose, which is characterized by a distinctive, elongated shape. Beneath the eyes, sketch a slender, tapered structure that represents the bat's nose. This feature adds a touch of elegance and intrigue to the face, capturing the unique profile of these remarkable creatures. Pay attention to the subtle curvature and proportions of the nose, ensuring that it harmonizes with the overall facial composition, contributing to the bat's captivating visage.
As you refine the facial details, consider incorporating the bat's expressive mouth and ears, which further define its charismatic appearance. Sketch a small, curved line beneath the nose to represent the bat's mouth, evoking a sense of subtle expression and grace. Additionally, depict the bat's ears as delicate, pointed shapes on either side of the head, adding a touch of whimsy and charm to the overall composition. These nuanced features contribute to the bat's enigmatic allure, infusing the face with a sense of mystery and elegance.
With the facial elements in place, take a moment to admire the captivating presence that has emerged on your paper. The intricate details of the face imbue your bat illustration with depth and personality, capturing the essence of these remarkable creatures with finesse and artistry. As you proceed to the subsequent stages of the drawing process, the face of the bat will stand as a testament to your skill and creativity, captivating viewers with its enigmatic charm and allure.
Read more: How To Draw A Shoe
Step 4: Add Details
As you venture into the realm of adding details to your bat illustration, you have the opportunity to infuse depth, texture, and character into your artwork. This phase is where the intricacies of the bat's anatomy and the subtle nuances of its form come to life, elevating your drawing to a captivating and immersive portrayal of these enigmatic creatures.
Begin by focusing on the texture and structure of the bat's fur, which contributes to its distinctive appearance. Using light, controlled strokes, layer the pencil lines to create a soft, velvety texture that mimics the fur of the bat. Pay attention to the direction of the fur growth, allowing your pencil strokes to follow the natural flow and contours of the bat's body. By skillfully rendering the fur with delicate precision, you can evoke a sense of tactile richness and realism, imbuing your illustration with a captivating tactile quality.
Next, consider incorporating subtle shading and highlights to accentuate the three-dimensional form of the bat. Use varying degrees of pressure with your pencils to create gentle gradients, enhancing the volume and depth of the bat's body, wings, and facial features. By skillfully blending light and shadow, you can evoke a sense of dimension and presence, infusing your bat illustration with a lifelike vitality that captivates the viewer's gaze.
As you refine the details, pay special attention to the intricate webbing of the bat's wings, capturing the delicate membrane that enables these creatures to take flight. Use fine, intersecting lines to convey the intricate structure of the wing membrane, infusing it with a sense of ethereal beauty and grace. By meticulously rendering the wing details, you can evoke a sense of movement and dynamism, imbuing your bat illustration with a mesmerizing sense of motion and elegance.
Additionally, consider adding atmospheric elements to enhance the mood and ambiance of your bat illustration. Whether it's the suggestion of a moonlit night sky, the subtle silhouette of tree branches, or the gentle flutter of leaves, these atmospheric touches can enrich the narrative of your artwork, transporting the viewer into the captivating world of bats.
By infusing your bat illustration with meticulous details, you can create a compelling and immersive portrayal of these remarkable creatures, inviting viewers to marvel at the intricacies of their form and the enchanting allure of the nocturnal realm. With each carefully rendered detail, your bat illustration becomes a testament to your artistic skill and creative vision, capturing the essence of these enigmatic creatures with finesse and artistry.
Step 5: Final Touches
As you approach the final touches of your bat illustration, you stand at the threshold of transforming your artwork into a captivating and immersive portrayal of these enigmatic creatures. This phase is where you have the opportunity to refine, enhance, and elevate your drawing, infusing it with a sense of depth, atmosphere, and artistic finesse.
Begin by revisiting the overall composition of your bat illustration, taking a moment to assess the balance, proportions, and visual impact of the artwork. Consider subtle adjustments that can enhance the cohesiveness and dynamism of the illustration, ensuring that the elements harmonize to create a compelling and visually engaging portrayal of the bat.
Next, focus on refining the shading and tonal values within your artwork. Pay close attention to the interplay of light and shadow, using your pencils to create nuanced gradients and subtle contrasts that accentuate the form and texture of the bat. By skillfully manipulating the tonal values, you can evoke a sense of depth and dimension, infusing your illustration with a captivating sense of realism and presence.
Consider incorporating atmospheric elements that enrich the narrative and ambiance of your bat illustration. Whether it's the suggestion of a moonlit night sky, the subtle silhouette of tree branches, or the gentle flutter of leaves, these atmospheric touches can transport the viewer into the captivating world of bats, adding a layer of storytelling and intrigue to your artwork.
As you approach the final stages of your bat drawing, take a step back to admire the captivating presence that has emerged on your paper. Embrace the opportunity to infuse your illustration with a touch of your unique artistic flair, adding subtle details and nuances that reflect your creative vision and passion for the subject.
With each deliberate stroke and thoughtful addition, your bat illustration becomes a testament to your artistic skill and imaginative spirit, capturing the essence of these remarkable creatures with finesse and artistry. As you apply the final touches, allow your creativity to soar, infusing your bat illustration with a sense of wonder, mystery, and timeless allure.
In the culmination of your artistic journey, revel in the transformative power of your creativity, as you bring a captivating bat illustration to life, ready to captivate and inspire all who behold its mesmerizing presence.
Conclusion
In the culmination of your artistic journey, you have embarked on a captivating exploration of creativity and imagination, bringing a remarkable bat illustration to life on the page. Through each carefully crafted step, you have delved into the intricacies of bat anatomy, capturing the essence of these enigmatic creatures with finesse and artistry. As you reflect on the culmination of your artistic endeavor, you stand on the threshold of a captivating portrayal that embodies the allure, mystery, and timeless fascination associated with bats.
Your bat illustration is a testament to the power of artistic expression, serving as a visual narrative that invites viewers into the captivating world of these nocturnal creatures. From the graceful sweep of the wings to the enigmatic charm of the bat's face, your artwork captures the essence of these remarkable creatures, evoking a sense of wonder and intrigue that transcends the boundaries of the page.
As you add the final touches to your bat illustration, you infuse it with a touch of your unique artistic flair, adding subtle details and nuances that reflect your creative vision and passion for the subject. The interplay of light and shadow, the delicate texture of fur, and the atmospheric elements woven into the composition transport the viewer into a realm where the mystique of bats comes to life with captivating allure.
In the intricate details and expressive nuances of your bat illustration, you have created a work of art that resonates with depth, character, and timeless fascination. Whether it's the suggestion of a moonlit night sky, the subtle silhouette of tree branches, or the gentle flutter of leaves, these atmospheric touches enrich the narrative and ambiance of your artwork, inviting viewers to marvel at the intricacies of bat anatomy and the enchanting allure of the nocturnal realm.
As you stand back and behold the captivating presence that has emerged on your paper, embrace the transformative power of your creativity. Your bat illustration is a testament to your artistic skill and imaginative spirit, capturing the essence of these remarkable creatures with finesse and artistry. It stands as a visual ode to the enigmatic charm and timeless allure of bats, ready to captivate and inspire all who behold its mesmerizing presence.