Home>Arts and Culture>How To Draw A Pig
Arts and Culture
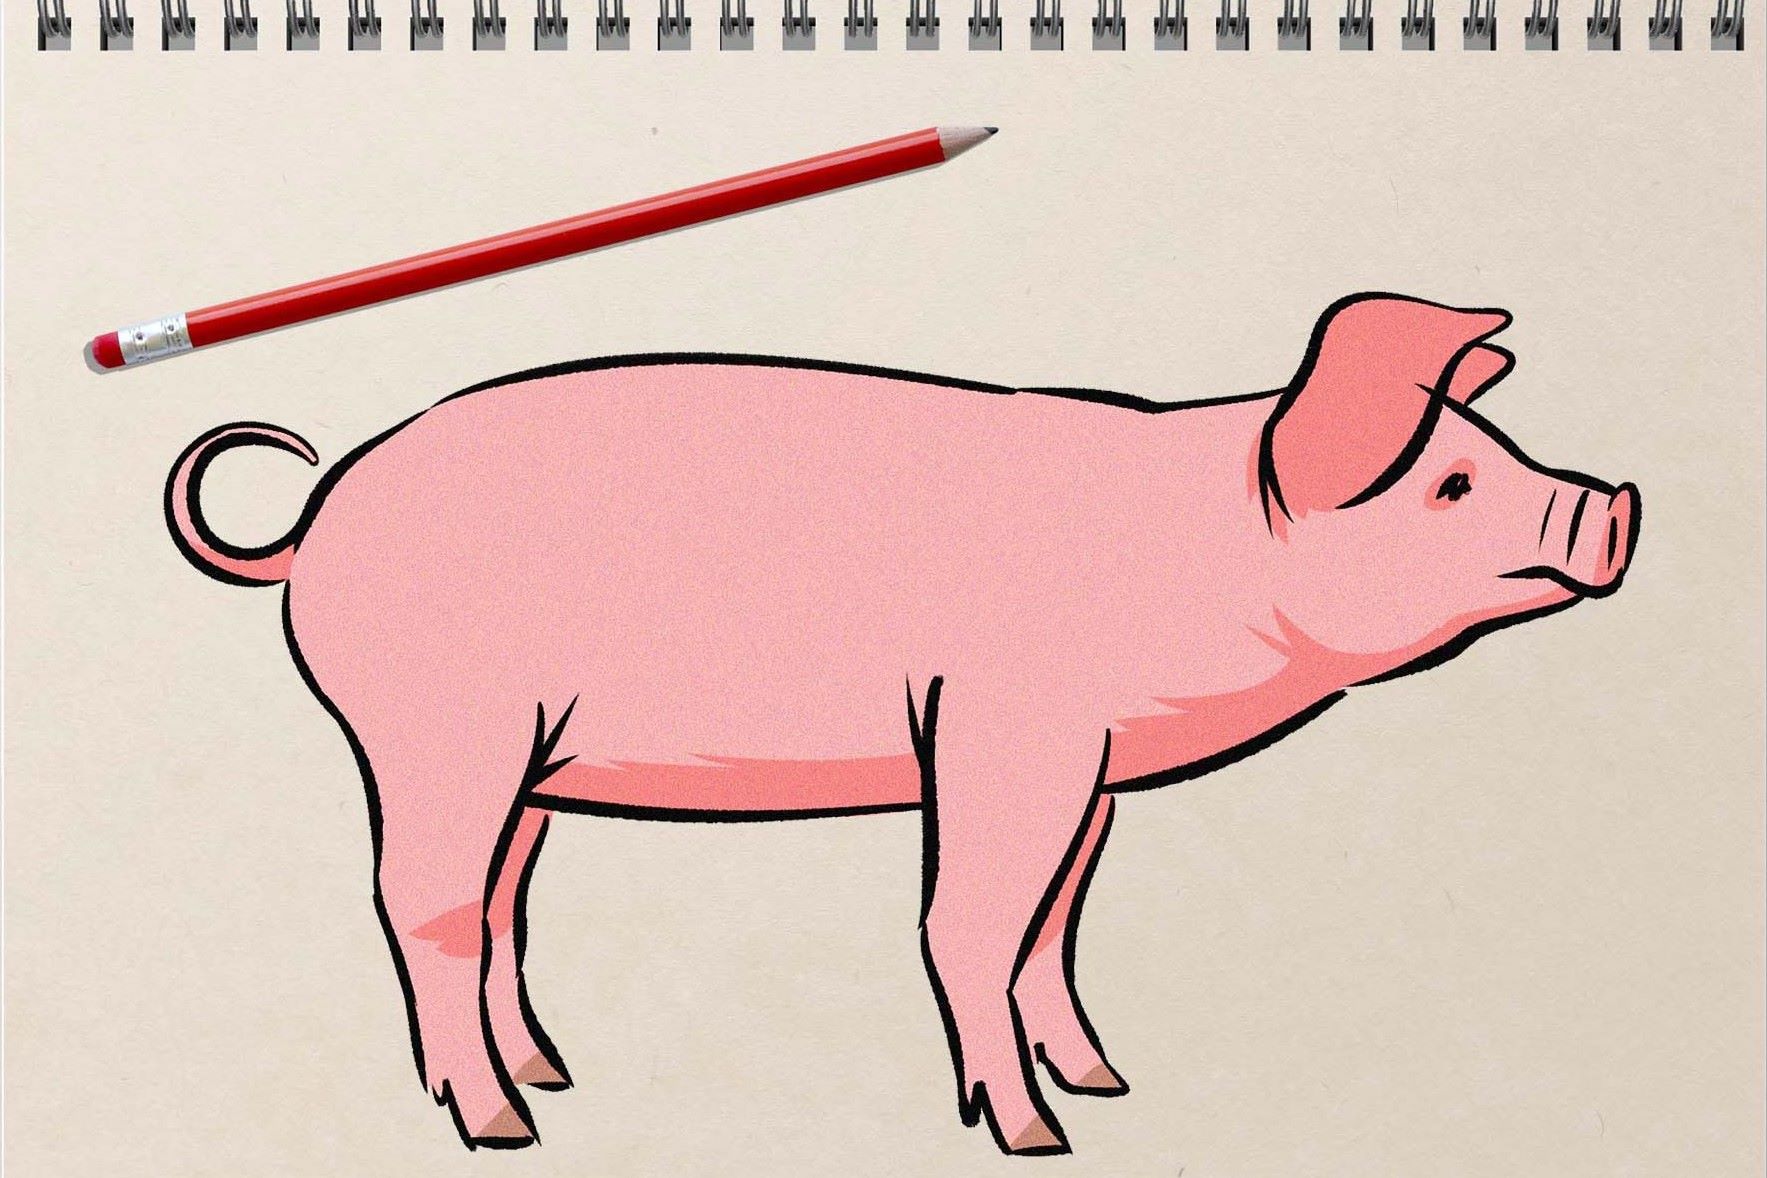
How To Draw A Pig
Modified: February 29, 2024
Learn how to draw a pig with easy step-by-step instructions. Explore your creativity and improve your artistic skills with this fun arts and culture tutorial.
(Many of the links in this article redirect to a specific reviewed product. Your purchase of these products through affiliate links helps to generate commission for Noodls.com, at no extra cost. Learn more)
Table of Contents
Introduction
Drawing is a wonderful form of expression that allows us to bring our imagination to life on a blank canvas. Whether you're an experienced artist or just starting out, learning to draw a pig can be a fun and rewarding experience. Pigs are fascinating creatures, known for their adorable snouts, curly tails, and playful nature. In this step-by-step guide, we will explore the art of drawing a pig in a simple and approachable manner. By following these easy instructions, you'll be able to create your own charming pig illustration in no time.
Drawing not only allows us to unleash our creativity but also helps us develop patience, attention to detail, and hand-eye coordination. It's a relaxing and meditative activity that can be enjoyed by people of all ages. Whether you're looking to add a personal touch to a greeting card, create a whimsical illustration for a storybook, or simply want to hone your drawing skills, mastering the art of drawing a pig is a delightful endeavor.
Throughout this tutorial, we will explore the fundamental steps required to draw a pig from scratch. From sketching the body and adding the characteristic features to bringing the pig to life with intricate details, each step will be broken down into simple and easy-to-follow instructions. So, grab your drawing materials, unleash your creativity, and let's embark on this artistic journey to create an adorable pig illustration together.
Read more: How To Draw A Shoe
Materials Needed
To begin your pig drawing adventure, you'll need a few essential materials to bring your artistic vision to life. Here's a list of items that will help you create a charming pig illustration:
-
Drawing Paper: A smooth, sturdy drawing paper provides the ideal surface for sketching and adding intricate details to your pig drawing. The paper should be thick enough to withstand erasing and shading without tearing.
-
Pencils: A set of high-quality pencils, including a range of lead hardness (such as 2H, HB, 2B, 4B, and 6B), will allow you to create varying line weights and shading effects. The different lead grades enable you to achieve both light, delicate lines and bold, expressive strokes.
-
Eraser: A soft, kneaded eraser or a precision eraser pen is essential for correcting mistakes and refining details in your pig illustration. It's important to have an eraser that can lift graphite without smudging or damaging the drawing paper.
-
Sharpener: A reliable pencil sharpener ensures that your pencils are consistently sharp, allowing for precise lines and fine details in your pig drawing.
-
Reference Image: While not a physical material, having a reference image of a pig can be incredibly helpful. Whether it's a photograph, a drawing, or a digital image, a reference will guide you in capturing the unique characteristics and proportions of a pig in your illustration.
-
Coloring Materials (Optional): If you wish to add color to your pig drawing, consider using colored pencils, markers, or watercolor paints. These materials can bring vibrancy and personality to your pig illustration, allowing you to explore different artistic styles and techniques.
Gathering these materials will set the stage for an enjoyable and rewarding drawing experience. With these tools at your disposal, you'll be well-equipped to embark on the creative journey of drawing an endearing pig from start to finish.
Step 1: Draw the Body
To begin drawing a pig, we'll start by sketching the basic shape of its body. Using a light pencil, such as an HB or 2H, lightly outline the body of the pig. Begin by drawing a large oval shape to represent the pig's torso. This oval will serve as the foundation for the pig's body, providing a framework for the rest of the illustration.
Next, extend a slightly curved line downward from the lower part of the oval to create the pig's belly. Pigs are known for their round and plump bodies, so be sure to capture this characteristic in your drawing. The curved line should gently slope outward, emphasizing the pig's adorable roundness.
Once the torso and belly are sketched, add a smaller oval shape at the lower front of the body to represent the pig's snout. This oval should slightly overlap with the larger torso oval, creating a seamless transition from the body to the snout. The snout is a defining feature of a pig, so take your time to ensure that the proportions and placement are visually appealing.
After outlining the snout, draw a short, curved line at the bottom of the smaller oval to form the pig's chin. This line should curve upward slightly, connecting to the lower part of the snout and adding depth to the pig's facial structure.
As you progress with drawing the body, pay attention to the proportions and overall shape of the pig. While maintaining a light touch with your pencil, refine the outlines to capture the gentle curves and contours of the pig's body. Take a moment to step back and assess the overall form, making any necessary adjustments to ensure that the body conveys the endearing essence of a pig.
By following these steps and focusing on the foundational elements of the pig's body, you'll establish a solid starting point for your pig illustration. With the body sketched, you're ready to move on to the next step and continue adding detail and character to your delightful pig drawing.
Step 2: Add the Head
With the body of the pig sketched, it's time to focus on adding the distinctive features that will bring the pig to life, starting with the head. The head is a defining aspect of a pig's appearance, encompassing its expressive eyes, adorable snout, and characteristic ears. By carefully capturing these details, you'll infuse your pig illustration with charm and personality.
Begin by drawing a large oval shape above the snout to outline the basic structure of the pig's head. This oval should slightly overlap with the upper part of the snout, creating a seamless transition from the body to the head. Pigs are known for their rounded heads, so ensure that the oval shape reflects this endearing characteristic.
Next, within the oval shape, sketch two small circles to represent the pig's eyes. Position the eyes towards the upper part of the head, allowing ample space for the forehead and snout. Pigs have expressive and curious eyes, so take the time to position the circles in a way that conveys a sense of warmth and playfulness.
Following the eyes, draw a smaller oval shape at the lower front of the head to define the pig's snout. The snout should extend outward from the head, featuring a rounded tip and a slightly curved underside. This prominent feature is a hallmark of a pig's appearance, so pay attention to the proportions and contours as you sketch the snout.
Once the snout is outlined, add two small ovals within it to represent the pig's nostrils. These ovals should be positioned near the tip of the snout, conveying the pig's keen sense of smell. By incorporating these subtle details, you'll further enhance the lifelike quality of your pig illustration.
After defining the snout and nostrils, draw a gentle curve above the snout to represent the pig's smile. Pigs are often associated with cheerful and friendly expressions, and capturing a subtle smile will infuse your illustration with a sense of warmth and amiability.
As you progress with adding the head, take a moment to refine the outlines and proportions, ensuring that the features harmoniously complement the body of the pig. Pay attention to the overall balance and expression, making any necessary adjustments to capture the endearing essence of a pig's head.
By following these steps and focusing on the intricate details of the pig's head, you'll elevate your illustration to new heights, infusing it with charm and character. With the head sketched, you're ready to continue the artistic journey and bring your delightful pig drawing to fruition.
Step 3: Draw the Ears
Drawing the ears is a pivotal step in capturing the distinctive charm of a pig. The ears are a prominent feature that adds character and personality to the pig's appearance. By carefully crafting the ears, you'll infuse your pig illustration with an endearing quality that captures the essence of these delightful creatures.
To begin, position your pencil at the upper part of the pig's head, slightly above the eyes. Lightly sketch a curved line that gently slopes outward, creating the basic outline of the pig's ear. Pigs are known for their floppy and expressive ears, so ensure that the curve conveys a sense of softness and gentle curvature.
Next, extend the curved line downward, gradually increasing the width as you move towards the lower part of the ear. Pigs have relatively large ears in proportion to their heads, so take this into account as you refine the shape. The lower part of the ear should feature a rounded edge, adding to the endearing and playful nature of the pig's appearance.
Once the basic outline of the ear is established, add internal details to enhance its lifelike quality. Within the ear, sketch a series of curved lines to represent the folds and contours of the pig's ear. These lines should follow the natural curvature of the ear, creating a sense of depth and dimension.
As you add the internal details, pay attention to the placement of the ear in relation to the head. Ensure that the ear is positioned at a natural angle, complementing the overall expression and posture of the pig. Take the time to refine the outlines and internal details, capturing the unique characteristics of a pig's ear with precision and care.
By focusing on the intricacies of the pig's ears, you'll elevate your illustration, infusing it with a sense of liveliness and charm. The ears play a significant role in defining the visual appeal of a pig, and by capturing their endearing qualities, you'll bring your pig drawing to life in a captivating and delightful manner.
Read more: How To Draw A Squirrel
Step 4: Add the Eyes and Nose
Adding the eyes and nose to your pig illustration is a pivotal step that infuses the character with personality and charm. These features are central to capturing the endearing essence of a pig and bringing your drawing to life with expressive details.
Begin by focusing on the eyes, which serve as windows to the pig's playful and inquisitive nature. Position your pencil above the snout, and carefully sketch two small, circular shapes to represent the pig's eyes. Pigs are known for their warm and expressive gaze, so take the time to position the eyes in a way that conveys a sense of curiosity and friendliness. Ensure that the eyes are proportionate to the head and aligned symmetrically, contributing to the overall balance and appeal of the pig's expression.
Following the eyes, shift your attention to the nose, a defining feature of a pig's appearance. Within the snout, sketch two small ovals to represent the pig's nostrils. These ovals should be positioned near the tip of the snout, capturing the pig's keen sense of smell and adding a touch of realism to your illustration. Pay attention to the placement and size of the nostrils, ensuring that they harmonize with the overall structure of the snout and contribute to the pig's endearing facial features.
As you refine the eyes and nose, consider the subtle details that will enhance the lifelike quality of your pig illustration. Add a gentle curve above the snout to represent the pig's smile, infusing the expression with warmth and charm. Take the time to assess the placement and proportions of the eyes and nose, making any necessary adjustments to ensure that they complement the head and convey the delightful essence of a pig's features.
By meticulously adding the eyes and nose, you'll elevate your pig illustration, infusing it with a sense of liveliness and character. These features play a significant role in defining the visual appeal of a pig, and by capturing their endearing qualities with precision and care, you'll bring your pig drawing to life in a captivating and delightful manner.
Step 5: Draw the Legs and Hooves
Drawing the legs and hooves of the pig is a crucial step in bringing the entire illustration together. The legs provide the foundation for the pig's stance, while the hooves add a touch of realism and character to the overall portrayal. By carefully crafting these elements, you'll enhance the lifelike quality of your pig drawing and capture the endearing essence of these delightful creatures.
To begin, position your pencil near the lower part of the pig's body, and lightly sketch two straight lines extending downward to represent the front legs. Pigs have sturdy and robust legs, so ensure that the lines convey a sense of strength and stability. As you sketch the legs, pay attention to the proportions and alignment, ensuring that they harmonize with the overall posture of the pig.
Next, at the bottom of each leg, draw a small rectangular shape to outline the hooves. Pigs have distinctively shaped hooves, characterized by their rounded edges and solid appearance. The hooves should be positioned firmly on the ground, conveying a sense of groundedness and presence. Take the time to refine the shape and size of the hooves, ensuring that they complement the legs and contribute to the pig's overall stance.
After defining the front legs and hooves, shift your focus to the hind legs. Extend two slightly curved lines downward from the lower part of the pig's body to represent the hind legs. Pigs have powerful hindquarters, so capture the muscular and robust nature of the legs as you sketch the lines. Pay attention to the curvature and proportions, ensuring that the hind legs align harmoniously with the front legs and contribute to the pig's balanced posture.
Once the hind legs are sketched, add rectangular shapes at the bottom of each leg to define the hind hooves. Similar to the front hooves, these shapes should convey a sense of solidity and stability, anchoring the pig's stance with authenticity and charm. Refine the contours and proportions of the hooves, ensuring that they complement the overall structure of the legs and contribute to the visual appeal of the pig's portrayal.
By meticulously drawing the legs and hooves, you'll enrich your pig illustration with a sense of presence and vitality. These elements play a significant role in defining the posture and character of the pig, and by capturing their distinctive qualities with precision and care, you'll bring your pig drawing to life in a captivating and delightful manner.
Step 6: Add the Tail
Adding the tail to your pig illustration is a pivotal step that infuses the character with personality and charm. The tail is a distinctive feature that contributes to the overall portrayal of a pig, capturing its playful and endearing nature. By carefully crafting the tail, you'll enhance the lifelike quality of your pig drawing and bring it to life with expressive details.
To begin, position your pencil at the rear of the pig's body, slightly above the hind legs. Lightly sketch a curved line that gently arcs outward, creating the basic outline of the pig's tail. Pigs are known for their curly and expressive tails, so ensure that the curve conveys a sense of liveliness and playful energy. The tail should flow naturally from the rear of the body, adding a dynamic element to the pig's overall posture.
Next, extend the curved line with a series of smaller, interconnected curves to form the distinctive spiral shape of the pig's tail. Pigs have unique and captivating tails that curl with elegance and grace, so take the time to capture the fluidity and curvature of the tail. The spiraling motion adds a sense of movement and vitality to the pig's portrayal, infusing the illustration with a touch of whimsy and character.
As you refine the tail, consider the subtle details that will enhance the lifelike quality of your pig illustration. Pay attention to the proportions and curvature of the tail, ensuring that it harmonizes with the overall posture and expression of the pig. Take the time to assess the placement and flow of the tail, making any necessary adjustments to ensure that it complements the body and conveys the delightful essence of a pig's tail.
By meticulously adding the tail, you'll elevate your pig illustration, infusing it with a sense of liveliness and charm. The tail plays a significant role in defining the visual appeal of a pig, and by capturing its endearing qualities with precision and care, you'll bring your pig drawing to life in a captivating and delightful manner.
Step 7: Add Details
As we approach the final step of our pig drawing journey, it's time to focus on adding intricate details that will elevate the overall charm and character of our illustration. This step allows us to infuse the pig with a sense of liveliness and authenticity, capturing the endearing essence of these delightful creatures through carefully crafted nuances.
To begin, consider adding subtle shading and texture to the pig's body, head, and features. Use varying pencil pressures to create gentle gradients that convey the softness of the pig's fur and the roundness of its form. Pay attention to light and shadow, enhancing the three-dimensional quality of the illustration and adding depth to the pig's portrayal. By delicately blending and layering graphite, you can evoke a tactile quality that invites the viewer to connect with the illustration on a sensory level.
Next, focus on refining the facial features, such as the eyes, snout, and ears, with precision and attention to detail. Add small highlights to the eyes to capture a sense of light and vitality, infusing the gaze with warmth and expression. Pay close attention to the contours of the snout, using subtle lines to convey its texture and form. Refine the internal details of the ears, capturing the intricate folds and curves that contribute to the pig's endearing appearance.
As you add details, consider incorporating elements that reflect the pig's environment and personality. For example, you may choose to include a hint of natural scenery, such as a patch of grass or a gentle breeze, to contextualize the pig within its surroundings. Additionally, consider adding a touch of whimsy by incorporating playful elements, such as a subtle smile or a hint of curiosity in the pig's expression, further enhancing its charm and appeal.
Finally, take a moment to step back and assess the overall composition of the illustration. Consider the balance of details, the harmony of the elements, and the cohesive narrative that the pig embodies. Make any final adjustments to ensure that the illustration captures the heartwarming essence of a pig, inviting viewers to connect with its endearing presence.
By meticulously adding details with care and precision, you'll bring your pig drawing to life in a captivating and delightful manner, infusing it with a sense of warmth, character, and authenticity.
Read more: How To Draw A Pumpkin
Conclusion
In conclusion, the art of drawing a pig is a delightful and rewarding endeavor that allows us to capture the endearing essence of these charming creatures through the strokes of a pencil. Throughout this step-by-step guide, we have embarked on an artistic journey, exploring the fundamental steps required to create a captivating pig illustration from start to finish.
Drawing a pig not only offers a creative outlet but also provides an opportunity to develop patience, attention to detail, and observational skills. By carefully crafting each feature, from the body and head to the ears, eyes, and tail, we have infused our illustration with a sense of liveliness and charm, capturing the playful and endearing nature of pigs.
As we added intricate details, such as shading, texture, and nuanced expressions, we brought our pig drawing to life, evoking a tactile and emotive connection with the viewer. The careful consideration of proportions, posture, and character has allowed us to create an illustration that resonates with warmth and authenticity, inviting others to appreciate the unique qualities of these beloved animals.
Drawing a pig is not merely a technical exercise but a journey of storytelling and expression. Each stroke of the pencil has contributed to a narrative that celebrates the whimsy, curiosity, and gentle spirit of pigs, inviting us to connect with these remarkable creatures on a deeper level.
As we conclude our artistic exploration, it's important to recognize that the process of drawing a pig extends beyond the final illustration. It encompasses the joy of discovery, the satisfaction of honing our craft, and the ability to convey emotion and personality through art. Whether our pig illustration serves as a standalone piece or as part of a larger creative endeavor, it embodies the spirit of creativity and imagination that enriches our lives.
In the end, drawing a pig is a testament to the power of art to capture the essence of the world around us, inviting us to pause, observe, and celebrate the beauty and charm found in the simplest of subjects. It's a reminder that within the strokes of a pencil, we can encapsulate the wonder and delight of the natural world, inviting others to share in the joy of artistic expression.