Home>Home and Garden>Build A Stunning Privacy Wall For Your Deck
Home and Garden
Build A Stunning Privacy Wall For Your Deck
Published: January 20, 2024
Create a beautiful and functional privacy wall for your deck with our expert tips and ideas. Enhance your home and garden with this stylish and practical addition.
(Many of the links in this article redirect to a specific reviewed product. Your purchase of these products through affiliate links helps to generate commission for Noodls.com, at no extra cost. Learn more)
Table of Contents
Introduction
Creating a serene and secluded oasis in your outdoor space is a wonderful way to enhance your enjoyment and relaxation. A well-designed privacy wall not only provides a sense of seclusion but also adds a touch of elegance to your deck. Whether you're seeking a cozy retreat for intimate gatherings or a peaceful sanctuary for quiet reflection, a privacy wall can transform your deck into a private haven.
In this comprehensive guide, we'll walk you through the step-by-step process of building a stunning privacy wall for your deck. With a few essential tools, quality materials, and a touch of creativity, you can craft a stylish and functional barrier that complements your outdoor living area.
By following these instructions, you'll be able to customize the privacy wall to suit your unique style and preferences. Whether you opt for a sleek modern design, a rustic and charming aesthetic, or a timeless classic look, this project offers ample room for personalization.
As you embark on this endeavor, envision the possibilities that lie ahead. Picture the lush greenery of your surroundings, the gentle sway of the breeze, and the warm glow of sunlight filtering through the panels. Imagine the sense of tranquility and comfort that your newly constructed privacy wall will bring to your outdoor space.
With each step, you'll gain valuable insights into the construction process while acquiring the skills to bring your vision to life. Embrace the opportunity to unleash your creativity and craftsmanship, and revel in the satisfaction of completing a project that enhances both the beauty and functionality of your deck.
So, without further ado, let's dive into the rewarding journey of building a privacy wall that will elevate the ambiance of your outdoor retreat. Get ready to embark on a fulfilling and transformative experience that will leave you with a sense of accomplishment and a breathtaking addition to your deck.
Step 1: Gather Materials and Tools
Before diving into the construction of your privacy wall, it's essential to gather all the necessary materials and tools. By ensuring that you have everything on hand, you can streamline the building process and minimize interruptions. Here's a comprehensive list of materials and tools you'll need:
Materials:
- Lumber: Select high-quality, weather-resistant lumber for the frame and panels. Cedar or pressure-treated pine are excellent choices due to their durability and natural resistance to decay.
- Privacy Panels: Choose from a variety of materials such as lattice, bamboo, or composite panels, depending on your desired aesthetic and level of privacy.
- Deck Screws: Opt for corrosion-resistant deck screws to secure the frame and panels firmly in place.
- Post Caps: These decorative elements add a polished finish to the top of the posts and help protect them from the elements.
- Stain or Paint: Enhance the visual appeal and longevity of the privacy wall by applying a protective stain or paint in your preferred color.
Tools:
- Measuring Tape: Accurate measurements are crucial for ensuring a precise and secure fit of the privacy wall on your deck.
- Circular Saw: A reliable circular saw will be indispensable for cutting the lumber to the required dimensions.
- Drill with Screwdriver Bits: Choose a drill with sufficient power to drive the deck screws effortlessly into the lumber.
- Level: This tool is essential for maintaining straight and even lines during the construction process.
- Safety Gear: Prioritize safety by wearing protective eyewear, gloves, and a dust mask when handling lumber and power tools.
- Paintbrushes or Stain Applicators: If you opt to stain or paint the privacy wall, ensure you have the necessary tools for a smooth and even application.
By gathering these materials and tools, you'll be well-prepared to commence the construction of your privacy wall with confidence and efficiency. With everything at your fingertips, you can proceed seamlessly to the next step, eager to bring your vision to fruition.
Step 2: Measure and Mark
Accurate measurements and precise marking are foundational to the successful construction of a privacy wall for your deck. Before cutting any lumber or assembling the frame, it's crucial to meticulously measure the dimensions of your deck and determine the placement of the privacy wall. Here's a detailed guide on how to execute this pivotal step:
-
Measure the Deck: Begin by measuring the length and height of the area where the privacy wall will be installed. Use a measuring tape to record the exact dimensions, ensuring that your measurements are precise and consistent. Take into account any obstructions such as railings, posts, or stairs that may impact the placement of the privacy wall.
-
Mark the Placement: Once you've determined the dimensions, use chalk or a pencil to mark the locations where the posts will be positioned. Ensure that the marks are clearly visible and aligned with the intended placement of the privacy wall.
-
Establish Post Spacing: Depending on the size of your privacy panels and the desired level of stability, determine the spacing between the posts. Typically, a spacing of 4 to 8 feet is suitable for ensuring the structural integrity of the privacy wall. Mark the locations for each post along the edge of the deck, maintaining consistent spacing between them.
-
Check for Level and Plumb: Using a level, verify that the marks for the posts are aligned horizontally and vertically. This step is crucial for ensuring that the privacy wall will stand straight and true once it's installed. Make any necessary adjustments to the markings to achieve precise alignment.
-
Double-Check Measurements: Before proceeding to the next step, double-check all measurements and markings to confirm their accuracy. It's essential to catch any discrepancies at this stage to avoid errors during the subsequent phases of construction.
By meticulously measuring and marking the placement of the privacy wall, you establish a solid foundation for the construction process. This attention to detail ensures that the subsequent steps, including cutting and assembling the frame, proceed smoothly and result in a privacy wall that fits seamlessly into your deck space. With this crucial step completed, you're ready to move forward with confidence, knowing that the groundwork has been laid for a successful and visually stunning privacy wall.
Step 3: Cut and Assemble Frame
With the precise measurements and markings in place, it's time to embark on the crucial phase of cutting and assembling the frame for your privacy wall. This step forms the structural backbone of the wall, providing stability and support for the panels while contributing to its visual appeal. Here's a detailed guide on how to execute this pivotal phase:
-
Cut the Lumber: Using a reliable circular saw, carefully cut the lumber according to the measured dimensions. Ensure clean and precise cuts to guarantee a seamless fit during assembly. Take into account any angles or special cuts required to accommodate the layout of your deck and the design of the privacy wall.
-
Assemble the Frame: Begin by constructing the vertical posts of the frame, securing them in the marked positions on the deck. Use deck screws to firmly attach the posts, ensuring that they are plumb and aligned with the markings. Next, connect the horizontal rails between the posts, creating a sturdy framework for the privacy panels. Pay close attention to the spacing and alignment of the rails to maintain a uniform and visually appealing structure.
-
Reinforce the Corners: To enhance the strength and durability of the frame, consider reinforcing the corners with additional lumber or metal brackets. This extra reinforcement provides added stability and prevents the frame from becoming vulnerable to shifting or warping over time.
-
Add Decorative Elements: If desired, incorporate decorative elements such as post caps or trim to enhance the aesthetic appeal of the frame. These finishing touches can elevate the visual impact of the privacy wall, adding a touch of sophistication and charm to the overall design.
-
Double-Check Alignment and Stability: Once the frame is assembled, use a level to verify that it is perfectly aligned and stable. Address any discrepancies or instability by making necessary adjustments, ensuring that the frame serves as a solid and reliable foundation for the privacy panels.
By meticulously cutting and assembling the frame, you lay the groundwork for a visually striking and structurally sound privacy wall. This phase sets the stage for the installation of the privacy panels, bringing you one step closer to the realization of your envisioned outdoor sanctuary. With the frame securely in place, you're ready to proceed to the next phase of the construction process, eager to witness the transformation of your deck into a private and inviting retreat.
Step 4: Attach Frame to Deck
With the frame meticulously assembled, the next critical step is to securely attach it to the deck, ensuring stability and structural integrity for the privacy wall. This phase not only anchors the frame firmly in place but also sets the stage for the seamless installation of the privacy panels. Here's a detailed guide on how to execute this pivotal phase:
-
Positioning the Frame: Begin by carefully positioning the assembled frame in alignment with the previously marked locations on the deck. Ensure that the frame is centered and evenly spaced, maintaining the precise measurements and markings established in the earlier steps.
-
Securing the Frame: Utilize corrosion-resistant deck screws to firmly secure the vertical posts of the frame to the deck. Drive the screws through the base of each post, anchoring them securely to the deck surface. Pay close attention to the alignment and stability of the frame, ensuring that it stands straight and secure against the deck.
-
Adding Additional Support: Depending on the size and design of the privacy wall, consider adding additional support by attaching the frame to existing structural elements of the deck, such as the railing posts or joists. This extra reinforcement enhances the overall stability and ensures that the privacy wall remains steadfast in various weather conditions.
-
Verifying Alignment and Level: Once the frame is attached, use a level to verify that it is perfectly aligned and level. Make any necessary adjustments to ensure that the frame stands true and upright. This meticulous attention to detail guarantees that the privacy wall maintains a visually appealing and structurally sound presence on your deck.
-
Inspecting for Stability: Conduct a thorough inspection of the attached frame, checking for any signs of wobbling or instability. Address any areas of concern by reinforcing the attachment points or making adjustments as needed. The goal is to achieve a solid and secure connection between the frame and the deck, laying the groundwork for the flawless installation of the privacy panels.
By meticulously attaching the frame to the deck, you establish a solid foundation for the privacy wall, ensuring that it stands firm and resolute in its position. This phase sets the stage for the seamless integration of the privacy panels, bringing you one step closer to the realization of your envisioned outdoor sanctuary. With the frame securely anchored to the deck, you're ready to proceed to the next phase of the construction process, eager to witness the transformation of your deck into a private and inviting retreat.
Step 5: Install Privacy Panels
With the frame securely in place, it's time to embark on the transformative phase of installing the privacy panels, which will elevate the functionality and aesthetic appeal of your privacy wall. Whether you opt for classic lattice panels, natural bamboo screening, or modern composite materials, the installation process remains consistent, offering an opportunity to customize the visual impact of your outdoor sanctuary. Here's a detailed guide on how to execute this pivotal phase:
-
Selecting the Privacy Panels: Begin by carefully selecting the privacy panels that best align with your desired aesthetic and level of seclusion. Consider the material, design, and dimensions of the panels, ensuring that they complement the overall style of your deck and the existing architectural elements. Whether you prioritize natural textures, sleek modern lines, or intricate patterns, the chosen panels should harmonize with the surrounding environment while fulfilling the intended purpose of privacy.
-
Positioning the Panels: Carefully position the selected privacy panels within the frame, ensuring a snug and uniform fit. Align the panels with the vertical posts and horizontal rails, maintaining consistent spacing and ensuring that they are centered within each section of the frame. Take into account any design elements or patterns on the panels, positioning them to achieve a visually appealing and balanced composition.
-
Securing the Panels: Utilize corrosion-resistant screws or fasteners to securely attach the panels to the frame, ensuring that they are firmly anchored in place. Pay close attention to the stability and alignment of each panel, driving the fasteners through the edges or designated attachment points without compromising the integrity of the material. This meticulous approach guarantees that the panels are securely affixed to the frame, ready to withstand the elements and provide enduring privacy.
-
Customizing the Installation: Depending on the design of the privacy panels and your creative vision, consider customizing the installation to enhance the visual impact. Incorporate decorative elements, such as trim or molding, to frame the panels and add a touch of elegance. Additionally, explore the option of integrating lighting fixtures or climbing plants to further enhance the ambiance and allure of the privacy wall.
-
Verifying Alignment and Cohesion: Once the panels are installed, step back and assess the overall alignment and cohesion of the privacy wall. Ensure that the panels are uniformly positioned, with consistent spacing and a visually pleasing arrangement. Make any necessary adjustments to guarantee that the installation reflects your envisioned design and upholds the functionality of the privacy wall.
By meticulously installing the privacy panels, you bring your vision to life, creating a captivating and functional barrier that enriches your outdoor living space. This phase marks the culmination of your efforts, transforming the deck into a private and inviting retreat where you can unwind and savor moments of tranquility. With the privacy panels seamlessly integrated into the frame, your outdoor sanctuary is now complete, ready to envelop you in a sense of seclusion and serenity.
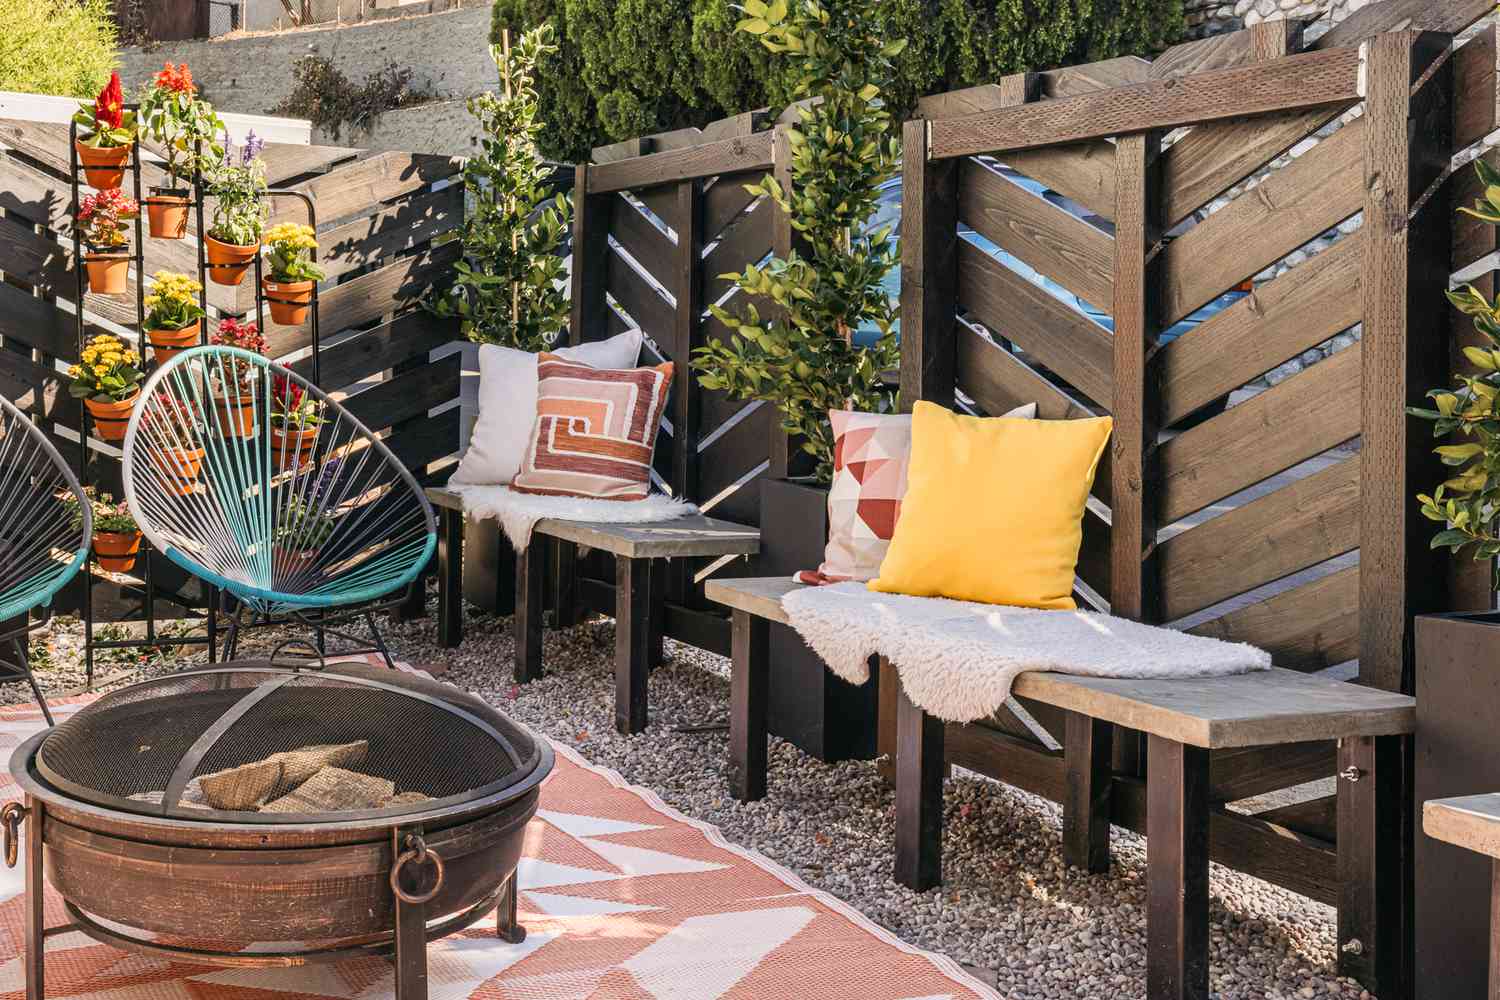
Step 6: Add Finishing Touches
As the construction of the privacy wall nears completion, the addition of finishing touches serves as the crowning glory, elevating the visual appeal and functionality of the structure. This phase presents an opportunity to infuse character, charm, and personalization, culminating in a privacy wall that seamlessly integrates with your outdoor living space.
Stain or Paint Application
Consider applying a protective stain or paint to the privacy wall, enhancing its resilience against the elements while infusing it with your preferred color palette. Whether you opt for a rich, earthy stain that accentuates the natural beauty of the wood or a vibrant paint that adds a pop of personality, the application of the finishing coat transforms the privacy wall into a striking focal point.
Decorative Elements
Incorporate decorative elements such as ornamental post caps, trim, or lattice to embellish the privacy wall. These embellishments not only add a touch of sophistication but also create a cohesive visual impact, tying the structure into the overall design of the deck. Additionally, consider integrating planter boxes or trellises to introduce greenery and vertical interest, further enhancing the allure of the privacy wall.
Lighting Integration
Explore the option of integrating lighting fixtures into the privacy wall, extending the functionality of the space into the evening hours. Whether through discreetly placed LED strip lights, elegant sconces, or solar-powered lanterns, the strategic placement of lighting creates a warm and inviting ambiance, casting a gentle glow across the deck and accentuating the beauty of the privacy wall.
Personalized Accents
Infuse the privacy wall with personalized accents that reflect your unique style and preferences. Consider incorporating decorative outdoor art, weather-resistant textiles such as outdoor curtains or decorative screens, or even a custom-designed monogram or motif that adds a touch of individuality. These personalized accents impart a sense of warmth and personality to the privacy wall, making it an extension of your outdoor sanctuary.
By adding these finishing touches, the privacy wall transcends its functional purpose, becoming a captivating and harmonious element of your outdoor retreat. The meticulous attention to detail and thoughtful integration of personalized elements culminate in a privacy wall that not only provides seclusion but also enriches the ambiance of your deck, creating a space where you can unwind, entertain, and immerse yourself in the beauty of your outdoor surroundings.
Conclusion
As you reach the culmination of this transformative journey, the creation of a stunning privacy wall for your deck stands as a testament to your craftsmanship, creativity, and dedication to enhancing your outdoor living space. The process of envisioning, planning, and constructing this essential element has not only resulted in a visually captivating addition but has also bestowed upon you a sanctuary where tranquility and comfort converge.
The completion of the privacy wall signifies the fulfillment of your vision, as the once-open expanse of your deck has been artfully transformed into a secluded haven. Each step of the construction process, from gathering materials and meticulously measuring to cutting, assembling, and installing, has contributed to the realization of a structure that seamlessly integrates with the natural beauty of your outdoor environment.
With the privacy wall in place, you now possess a space where you can savor moments of solitude, host intimate gatherings, and bask in the serenity of your surroundings. The privacy panels, securely anchored within the meticulously crafted frame, provide not only seclusion but also a visually stunning backdrop against which cherished memories will unfold.
The addition of finishing touches, whether through the application of protective stain, the integration of decorative elements, or the incorporation of personalized accents, has elevated the privacy wall into a captivating focal point. It now stands as a testament to your discerning taste and unwavering commitment to creating a space that reflects your individuality and enhances your lifestyle.
As you step back to admire the completed privacy wall, envision the countless moments that await within its embrace. Whether it's the gentle rustle of leaves in the breeze, the soft glow of evening light casting a warm ambiance, or the laughter of loved ones enjoying the seclusion it provides, the privacy wall has become an integral part of your outdoor sanctuary.
In conclusion, the journey of building a stunning privacy wall for your deck has not only yielded a tangible structure but has also enriched your connection to your outdoor space. It has provided an opportunity to infuse your personal touch into your surroundings, creating a space that resonates with your desires and reflects the beauty of nature. Embrace the sense of accomplishment that accompanies the completion of this project, and relish the tranquility and comfort that your newly constructed privacy wall brings to your outdoor retreat.