Home>Home and Garden>How To Clean A Glass Pipe

Home and Garden
How To Clean A Glass Pipe
Published: February 27, 2024
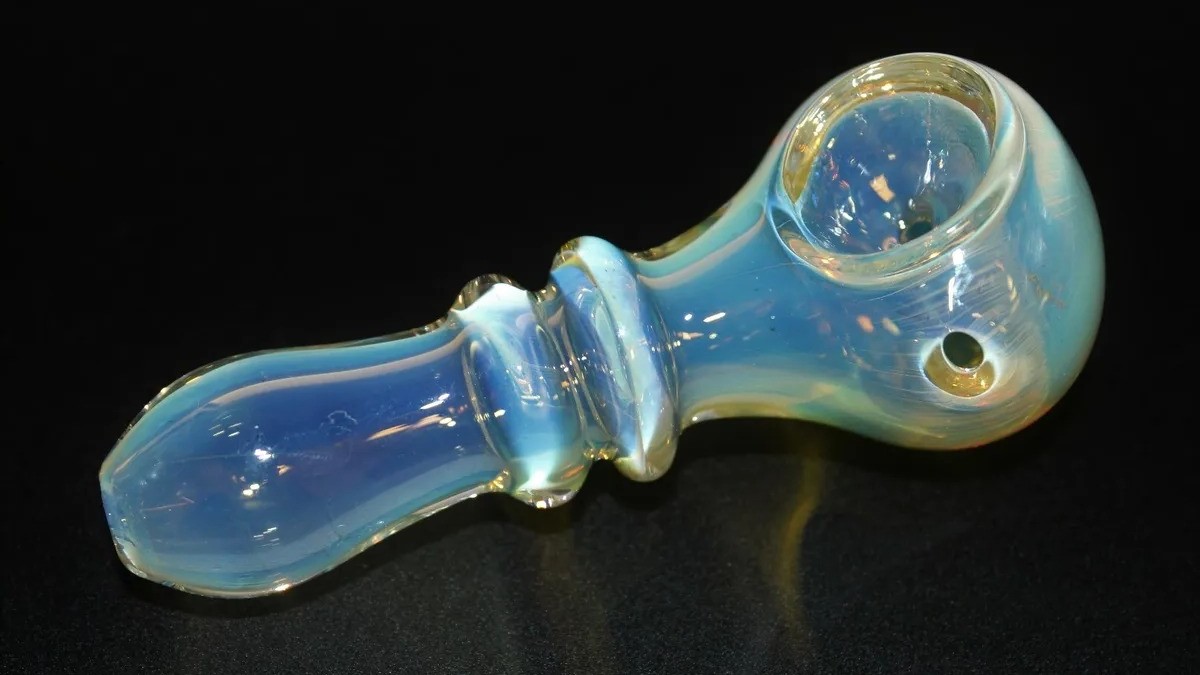
Learn how to effectively clean a glass pipe at home with our expert tips and tricks. Keep your home and garden accessories in top condition with our easy-to-follow guide.
(Many of the links in this article redirect to a specific reviewed product. Your purchase of these products through affiliate links helps to generate commission for Noodls.com, at no extra cost. Learn more)
Table of Contents
Introduction
Cleaning a glass pipe is an essential part of maintaining its functionality and preserving its aesthetic appeal. Over time, resin and residue can accumulate within the pipe, affecting the taste and purity of the smoking experience. By regularly cleaning your glass pipe, you can ensure a smoother, more enjoyable smoking session while prolonging the lifespan of your beloved piece.
Whether you're a seasoned smoker or new to the world of glass pipes, learning the proper cleaning techniques is crucial. Not only does it contribute to a better smoking experience, but it also helps in preventing the buildup of harmful bacteria and other contaminants. Additionally, a clean glass pipe reflects your commitment to hygiene and responsible smoking practices.
In this comprehensive guide, we will walk you through the step-by-step process of cleaning a glass pipe effectively. From gathering the necessary materials to disassembling the pipe, soaking it in a cleaning solution, scrubbing away residue, and ensuring thorough rinsing and drying, we've got you covered. By following these simple yet crucial steps, you can maintain your glass pipe in top condition, ensuring that every smoking session is as enjoyable and satisfying as the first.
So, whether you're preparing for a deep cleaning session or just looking for quick maintenance tips, this guide will equip you with the knowledge and techniques needed to keep your glass pipe sparkling clean. Let's dive into the materials needed and the step-by-step cleaning process to ensure that your glass pipe remains a reliable companion for many smoking sessions to come.
Read more: How To Clean A Pipe
Materials Needed
When it comes to cleaning a glass pipe, having the right materials at your disposal is essential for achieving optimal results. Here's a comprehensive list of the items you'll need to ensure a thorough and effective cleaning process:
-
Rubbing Alcohol (Isopropyl Alcohol): This is a key component in breaking down the resin and residue that accumulates inside the glass pipe. Opt for a higher concentration, such as 90% or above, for more efficient cleaning.
-
Coarse Salt: Coarse salt serves as an abrasive agent that aids in dislodging stubborn residue from the inner surfaces of the pipe. Its granular texture enhances the scrubbing action, facilitating the removal of built-up gunk.
-
Resealable Plastic Bags or Containers: These are used for soaking the disassembled pipe in the cleaning solution. Ensure that the bags or containers are large enough to accommodate the pipe and cleaning solution while allowing for easy shaking and swirling.
-
Pipe Cleaners or Cotton Swabs: These are instrumental in reaching and cleaning the smaller, intricate parts of the pipe, such as the mouthpiece and the bowl's crevices. They provide precision cleaning and help remove residual buildup in hard-to-reach areas.
-
Boiling Water: Boiling water is effective for rinsing the pipe after the initial cleaning process, ensuring that any remaining residue and cleaning solution are thoroughly flushed out.
-
Rubber Gloves: Since the cleaning process involves handling rubbing alcohol and other cleaning agents, wearing rubber gloves is advisable to protect your skin and prevent direct contact with the cleaning solutions.
-
Paper Towels or Clean Cloth: These are used for drying the pipe after the cleaning process. Ensure that the towels or cloth are clean and lint-free to avoid leaving behind any particles that could affect the pipe's cleanliness.
-
Plastic or Wooden Picks: These tools are useful for gently scraping off any stubborn residue that may be lodged in hard-to-reach areas of the pipe, such as the bowl or the mouthpiece.
By ensuring that you have these materials on hand, you can proceed with confidence, knowing that you are well-equipped to tackle the cleaning process effectively. With the right tools at your disposal, you'll be ready to disassemble your glass pipe and embark on the journey to restore its pristine condition, ensuring a delightful smoking experience with every use.
Step 1: Disassembling the Pipe
Disassembling the glass pipe is the initial and crucial step in the cleaning process. Before diving into the cleaning procedure, it's essential to disassemble the pipe to access all its components and ensure a thorough cleaning. Here's a detailed guide on how to disassemble your glass pipe effectively:
-
Prepare a Clean Workspace: Find a well-lit and spacious area to work on disassembling your glass pipe. A clean and clutter-free surface will provide ample space for organizing the disassembled parts and prevent any components from getting misplaced during the cleaning process.
-
Remove the Bowl: The first step in disassembling the pipe is to remove the bowl, which is the part where the smoking material is placed. Gently twist and pull the bowl away from the pipe, taking care not to apply excessive force that could potentially damage the pipe or the bowl itself.
-
Detach the Mouthpiece: Next, carefully detach the mouthpiece from the pipe. Depending on the design of your glass pipe, the mouthpiece may be attached firmly or simply slide out. Exercise caution to avoid any sudden movements that could cause the mouthpiece to break or chip.
-
Inspect and Organize the Components: As you disassemble the pipe, take a moment to inspect each component for any signs of damage or wear. Additionally, organize the disassembled parts in a systematic manner, ensuring that they are easily identifiable and accessible for the subsequent cleaning steps.
-
Handle with Care: Throughout the disassembly process, handle the components with care to prevent any accidental breakage or damage. Glass, although durable, can be fragile, so it's important to exercise caution and gentleness when handling the disassembled parts.
By following these steps, you can effectively disassemble your glass pipe, setting the stage for the subsequent cleaning process. Properly disassembling the pipe allows for thorough access to all its nooks and crannies, ensuring that every part is cleaned meticulously. With the pipe disassembled and the components organized, you are now ready to proceed to the next step of soaking the parts in the cleaning solution, setting the foundation for a comprehensive and effective cleaning process.
Step 2: Soaking in Cleaning Solution
Once the glass pipe is disassembled, the next crucial step in the cleaning process involves soaking the components in a potent cleaning solution. This soaking phase is instrumental in breaking down the stubborn resin and residue that has accumulated within the pipe, preparing it for thorough scrubbing and cleansing. Here's a detailed guide on how to effectively soak your glass pipe components in a cleaning solution:
Choosing the Cleaning Solution
Selecting the right cleaning solution is paramount to the success of this step. Isopropyl alcohol, commonly known as rubbing alcohol, is a highly effective cleaning agent for glass pipes. Opt for a high concentration, ideally 90% or above, as it provides superior solvent properties for dissolving resin and residue. The higher concentration ensures a more potent cleaning solution, facilitating the breakdown of stubborn buildup within the pipe.
Read more: How To Get Super Glue Off Glasses Lens
Preparing the Soaking Container
Choose a resealable plastic bag or container that is large enough to accommodate the disassembled pipe components. This container will serve as the vessel for the soaking process. Pour a sufficient amount of the cleaning solution into the container, ensuring that it fully submerges the disassembled parts. The resealable nature of the bag or container allows for easy shaking and swirling, ensuring that the cleaning solution reaches all areas of the pipe components.
Submerging the Components
Carefully place the disassembled pipe components into the cleaning solution, ensuring that each part is fully submerged. Gently agitate the container to allow the cleaning solution to penetrate the nooks and crevices of the components. This soaking action initiates the breakdown of the accumulated resin and residue, softening it for easier removal during the subsequent cleaning steps.
Allowing Sufficient Soaking Time
Patience is key during this phase, as allowing the components to soak for an adequate duration is crucial for effective cleaning. Depending on the extent of residue buildup, a soaking period of 30 minutes to several hours may be necessary. The longer soaking time ensures that the cleaning solution thoroughly penetrates and loosens the stubborn residue, facilitating its removal in the subsequent cleaning steps.
Ensuring Adequate Ventilation
While the components are soaking, ensure that the area is well-ventilated to disperse any fumes from the cleaning solution. Proper ventilation is essential for maintaining a safe and comfortable environment during the cleaning process. Additionally, avoid exposure to open flames or sources of ignition, as isopropyl alcohol is flammable.
By following these detailed steps for soaking the glass pipe components in a potent cleaning solution, you are laying the foundation for a thorough and effective cleaning process. The soaking phase serves as a crucial preparatory step, softening the accumulated residue and setting the stage for the subsequent scrubbing and rinsing, ensuring that your glass pipe is restored to its pristine condition.
Step 3: Scrubbing the Pipe
After the glass pipe components have undergone the soaking process and the stubborn residue has been softened, the next critical step is to embark on the scrubbing phase. This step is pivotal in dislodging and removing the loosened residue, ensuring that the inner and outer surfaces of the pipe are thoroughly cleansed. Here's a detailed guide on how to effectively scrub your glass pipe components to restore their pristine condition:
Utilizing Abrasive Agents
To facilitate the scrubbing process, coarse salt serves as an excellent abrasive agent that aids in dislodging the softened residue from the inner surfaces of the pipe. The granular texture of the salt enhances the scrubbing action, effectively removing the built-up gunk. Additionally, the salt's abrasive nature ensures that even the most stubborn residue is loosened and lifted from the inner walls of the pipe, preparing it for a thorough cleansing.
Applying Mechanical Action
With the softened residue and coarse salt in place, it's time to apply mechanical action to the pipe components. Seal the openings of the pipe, such as the mouthpiece and the bowl, using your fingers or appropriate plugs to prevent the cleaning solution from spilling out. Once sealed, gently shake and swirl the components, ensuring that the coarse salt and cleaning solution reach all areas of the pipe's interior. This mechanical action aids in dislodging the residue, allowing the abrasive salt to scrub away the buildup effectively.
Precision Cleaning with Pipe Cleaners
For intricate and hard-to-reach areas of the pipe, such as the mouthpiece and the bowl's crevices, pipe cleaners or cotton swabs are instrumental in providing precision cleaning. Dip the pipe cleaners in the cleaning solution and carefully maneuver them through the smaller openings and intricate parts of the pipe. This targeted approach ensures that residual buildup in hard-to-reach areas is effectively removed, leaving no trace of residue behind.
Read more: How To Cut PVC Pipe
Gentle Scraping for Stubborn Residue
In cases where stubborn residue persists in hard-to-reach areas, such as the bowl or the mouthpiece, plastic or wooden picks can be used for gentle scraping. Exercise caution and gentleness when employing this method to avoid damaging the delicate glass surface. The picks aid in dislodging any residual buildup that may be lodged in crevices, ensuring a comprehensive cleaning of the pipe components.
Repeating the Scrubbing Process
Depending on the extent of residue buildup, it may be necessary to repeat the scrubbing process to ensure thorough cleansing. Assess the cleanliness of the pipe components and, if needed, repeat the scrubbing steps until the surfaces are free from any residual buildup. Patience and diligence in this phase are crucial for achieving a meticulously cleaned glass pipe.
By following these detailed steps for scrubbing the glass pipe components, you are actively working towards restoring the pipe to its original, pristine condition. The scrubbing phase, when executed meticulously, ensures that every nook and cranny of the pipe is thoroughly cleansed, setting the stage for the final steps of rinsing and drying. With the scrubbing process completed, the pipe components are now ready for the subsequent steps, ensuring that your glass pipe remains a reliable and hygienic companion for your smoking sessions.
Step 4: Rinsing and Drying
After the thorough scrubbing of the glass pipe components, the final step in the cleaning process involves rinsing and drying the parts to ensure the removal of any remaining residue and cleaning solution. This critical phase is essential for restoring the glass pipe to its pristine condition, ready to deliver a delightful smoking experience. Here's a detailed guide on how to effectively rinse and dry your glass pipe components:
Rinsing with Boiling Water
Boiling water serves as an effective agent for rinsing the pipe components, ensuring that any residual residue and cleaning solution are thoroughly flushed out. Carefully pour boiling water through the mouthpiece and the bowl, allowing it to flow through the interior of the pipe. The hot water effectively dislodges and flushes out any remaining residue, leaving the components clean and free from any lingering cleaning solution.
Read more: How To Remove Stickers From Glass
Ensuring Thorough Flushing
During the rinsing process, it's crucial to ensure thorough flushing of the pipe components. Gently shake and swirl the components while rinsing to facilitate the removal of any loosened residue. Repeat the rinsing process as needed until the water runs clear, indicating the complete removal of all residual buildup and cleaning solution.
Drying the Components
Once the rinsing process is complete, it's time to dry the pipe components thoroughly. Use paper towels or a clean, lint-free cloth to carefully dry the exterior and interior of each part. Ensure that all moisture is removed, leaving the components completely dry and free from any water or cleaning solution residue.
Allowing Sufficient Air Drying Time
After the initial drying with towels or cloth, allow the components to air dry completely. Place them on a clean, dry surface in a well-ventilated area, ensuring that each part is positioned to allow air circulation. Patience is key during this phase, as allowing the components to air dry completely ensures that no moisture or residue is left behind, guaranteeing a pristine and hygienic glass pipe.
Assembling the Pipe
Once the components are thoroughly dried, carefully reassemble the glass pipe, ensuring that each part fits snugly and securely. Take a moment to inspect the reassembled pipe, ensuring that it is clean, dry, and free from any residual residue. With the pipe fully assembled, it is now ready to deliver a delightful smoking experience, reflecting the care and attention invested in its thorough cleaning.
By following these detailed steps for rinsing and drying the glass pipe components, you are concluding the comprehensive cleaning process, ensuring that your glass pipe is restored to its original, pristine condition. The meticulous rinsing and drying phase, when executed diligently, guarantees that your glass pipe remains a reliable and hygienic companion for your smoking sessions, ready to deliver a smooth and enjoyable smoking experience every time.
Conclusion
In conclusion, the process of cleaning a glass pipe is not only essential for maintaining its functionality and aesthetic appeal but also plays a crucial role in ensuring a hygienic and enjoyable smoking experience. By following the step-by-step guide outlined in this comprehensive cleaning tutorial, you have equipped yourself with the knowledge and techniques needed to keep your glass pipe in top condition, ready to deliver a delightful smoking session every time.
Regular cleaning of your glass pipe is a testament to your commitment to responsible smoking practices and hygiene. By investing the time and effort into thorough cleaning, you are not only preserving the integrity of your pipe but also contributing to a healthier and more enjoyable smoking experience. The removal of accumulated residue and buildup not only enhances the purity and flavor of the smoking material but also prevents the growth of harmful bacteria and contaminants within the pipe.
Furthermore, the meticulous cleaning process outlined in this guide ensures that every nook and cranny of the glass pipe is thoroughly cleansed, leaving no trace of residual buildup or cleaning solution. This attention to detail not only enhances the longevity of your pipe but also reflects your dedication to maintaining a clean and hygienic smoking accessory.
As you reassemble your glass pipe, take a moment to appreciate the effort invested in its thorough cleaning. The restored pristine condition of your pipe is a testament to your commitment to quality and hygiene, ensuring that every smoking session is as enjoyable and satisfying as the first.
By disassembling the pipe, soaking it in a potent cleaning solution, meticulously scrubbing away residue, and ensuring thorough rinsing and drying, you have completed a comprehensive cleaning journey. Your glass pipe is now ready to accompany you on many more delightful smoking sessions, reflecting the care and attention invested in its maintenance.
In essence, the cleaning process outlined in this guide not only restores the functionality and aesthetic appeal of your glass pipe but also contributes to a safer and more enjoyable smoking experience. With the knowledge and techniques acquired from this guide, you are well-equipped to maintain your glass pipe in top condition, ensuring that it remains a reliable and hygienic companion for your smoking sessions.
Remember, a clean glass pipe not only enhances the smoking experience but also reflects your dedication to responsible and hygienic smoking practices. So, as you embark on your next smoking session with your freshly cleaned glass pipe, take pride in knowing that you've invested in the care and maintenance of a cherished smoking accessory.
