Home>Home and Garden>How To Make A Bow For A Wreath
Home and Garden
How To Make A Bow For A Wreath
Published: March 3, 2024
Learn how to make a beautiful bow for your wreath with our easy step-by-step guide. Elevate your home and garden decor today!
(Many of the links in this article redirect to a specific reviewed product. Your purchase of these products through affiliate links helps to generate commission for Noodls.com, at no extra cost. Learn more)
Table of Contents
Introduction
Creating a beautiful bow for a wreath is a delightful way to add a personalized touch to your home decor. Whether you're preparing for a special occasion or simply aiming to elevate your living space, a well-crafted bow can instantly enhance the visual appeal of any wreath. The process of making a bow may seem daunting at first, but with the right materials and a bit of guidance, you'll soon find it to be an enjoyable and rewarding endeavor.
A carefully crafted bow can serve as the focal point of your wreath, drawing attention and admiration from visitors and passersby. The art of bow-making allows you to infuse your personal style and creativity into your home decor, making each wreath a unique reflection of your taste and personality. Whether you prefer a classic, elegant bow or a more whimsical and playful design, the possibilities are endless when it comes to creating the perfect bow for your wreath.
In this comprehensive guide, we will walk you through the step-by-step process of making a stunning bow for your wreath. From selecting the right ribbon to mastering the art of shaping and securing the bow, you'll gain the skills and confidence needed to elevate your wreath-making endeavors. With a few simple materials and a touch of creativity, you'll soon be on your way to crafting beautiful, eye-catching bows that will impress and inspire.
So, gather your materials and prepare to embark on a delightful journey of creativity and craftsmanship. Whether you're a seasoned DIY enthusiast or a newcomer to the world of wreath-making, this guide will equip you with the knowledge and techniques needed to create stunning bows that will elevate your home decor to new heights. Let's dive in and discover the art of making a bow for a wreath!
Read more: Create A Stunning Easter Wreath On A Budget!
Materials Needed
To embark on the delightful journey of creating a beautiful bow for your wreath, you will need a few essential materials to ensure a seamless and enjoyable crafting experience. Here's a comprehensive list of the items you'll need to gather before diving into the art of bow-making:
-
Ribbon: Select a high-quality ribbon in the color and texture of your choice. Whether you opt for a classic satin ribbon, a rustic burlap ribbon, or a festive patterned ribbon, ensure that it complements the theme and style of your wreath. The width of the ribbon will determine the size and fullness of your bow, so consider the desired proportions as you make your selection.
-
Scissors: A sharp pair of scissors is essential for cleanly cutting the ribbon to the desired length. Precision is key when crafting a bow, so ensure that your scissors are in optimal condition for smooth and accurate cuts.
-
Wire: Floral wire or pipe cleaners will be used to secure the center of the bow and attach it to the wreath. Opt for a sturdy wire that can effectively hold the shape of the bow and withstand any movement or environmental factors.
-
Measuring Tape: To achieve symmetry and precision in your bow-making process, a measuring tape will be indispensable for accurately determining the length of the ribbon and creating uniform loops.
-
Optional Embellishments: Depending on your creative vision, you may choose to incorporate additional embellishments such as decorative picks, faux flowers, or glittering ornaments to adorn your bow and infuse it with a touch of personalized charm.
By ensuring that you have these materials at your disposal, you'll be well-equipped to embark on the artful process of crafting a stunning bow for your wreath. With these essentials in hand, you're ready to move on to the next step and bring your vision to life.
Step 1: Choose Your Ribbon
The first step in creating a beautiful bow for your wreath is selecting the perfect ribbon. The ribbon you choose will set the tone for the entire bow, dictating its color, texture, and overall aesthetic. When browsing through an array of ribbons, consider the theme and style of your wreath, as well as the environment in which it will be displayed.
If you're aiming for a classic and elegant look, a satin ribbon in a rich, jewel-toned color can exude sophistication and timeless charm. For a more rustic or natural vibe, a burlap or jute ribbon can add a touch of warmth and organic appeal to your bow. If you're preparing for a festive occasion or holiday, consider incorporating a patterned or metallic ribbon to infuse your bow with a celebratory spirit.
The width of the ribbon is another crucial factor to consider. A wider ribbon will result in a more substantial and dramatic bow, while a narrower ribbon can create a dainty and delicate aesthetic. Keep in mind the size of your wreath and the visual impact you wish to achieve when making your selection.
Additionally, pay attention to the texture of the ribbon. A smooth, glossy ribbon can convey a sense of refinement and elegance, while a textured or patterned ribbon can add depth and visual interest to your bow. By carefully considering these elements, you can ensure that the ribbon you choose harmonizes seamlessly with the overall design of your wreath, resulting in a cohesive and visually striking composition.
Once you've chosen the perfect ribbon that aligns with your creative vision and complements the theme of your wreath, you're ready to proceed to the next step in the bow-making process. With the foundation of your bow established, you're one step closer to crafting a stunning and personalized adornment for your wreath.
Step 2: Measure and Cut the Ribbon
With the perfect ribbon in hand, the next crucial step in creating a beautiful bow for your wreath is to measure and cut the ribbon to the desired length. This step sets the foundation for the size and fullness of your bow, ensuring that each loop is uniform and symmetrical. Precision is key in this process, as accurate measurements and clean cuts will contribute to the overall polished and professional appearance of your bow.
Begin by unrolling the ribbon to the desired length, taking into account the size of your wreath and the proportions you wish to achieve. Using a measuring tape, carefully measure and mark the length of the ribbon, ensuring that each end is even and neatly trimmed. This initial measurement will determine the size of the loops and tails of your bow, so take your time to achieve the desired dimensions.
Once the ribbon is marked, use a sharp pair of scissors to make clean and precise cuts along the marked lines. It's essential to maintain straight edges and avoid fraying to ensure a neat and polished look for your bow. If you're working with a delicate or slippery fabric, consider using fabric shears or applying a small amount of fray check along the cut edges to prevent unraveling.
As you cut the ribbon, maintain a steady hand and follow the marked lines with accuracy. Smooth, straight cuts will contribute to the overall professional appearance of your bow, allowing for a seamless and visually appealing finished product. Whether you're crafting a single bow or multiple bows for a series of wreaths, consistency in the cutting process will result in a cohesive and harmonious display of decorative accents.
With the ribbon accurately measured and cleanly cut, you've successfully completed the crucial second step in the bow-making process. This meticulous attention to detail sets the stage for the subsequent steps, allowing you to proceed with confidence and precision as you shape and assemble the components of your bow. As you move forward in the creative journey of bow-making, the foundation laid in this step will serve as the cornerstone of your beautifully crafted wreath adornment.
Step 3: Create the Loops
After preparing the ribbon by measuring and cutting it to the desired length, the next step in crafting a stunning bow for your wreath is to create the loops that will form the body of the bow. This step is where your creativity and attention to detail truly come into play, as the size and arrangement of the loops will determine the fullness and visual impact of the finished bow.
To begin, take the cut length of ribbon and hold it firmly between your thumb and forefinger. With a gentle and fluid motion, bring the end of the ribbon toward you to form the first loop. The size of this initial loop will depend on the desired proportions of your bow, so take your time to gauge the length and maintain a consistent width throughout the loop.
Once the first loop is formed, secure it between your fingers to maintain its shape. Then, without twisting the ribbon, bring the loose end behind the first loop to create a second loop of equal size. The key to achieving a balanced and symmetrical bow lies in maintaining uniformity in the size and shape of each loop, so pay close attention to the dimensions as you form subsequent loops.
Continue this process, alternating between bringing the ribbon toward you to form loops and securing them in place, until you have created the desired number of loops for your bow. Whether you opt for a classic bow with two loops on each side or a more elaborate design with multiple loops, the technique remains consistent, requiring precision and a keen eye for symmetry.
As you create the loops, periodically fluff and adjust them to ensure that they are uniform in size and shape. This step allows you to refine the appearance of the bow, adjusting the loops to achieve a balanced and visually appealing arrangement. By taking the time to finesse the loops, you can elevate the overall presentation of the bow, resulting in a polished and professional aesthetic.
With the loops meticulously formed and arranged, you've successfully completed the pivotal step of creating the foundational structure of your bow. This process sets the stage for the subsequent steps, guiding you toward the final stages of shaping and securing the bow. As you proceed with the bow-making journey, the care and precision invested in this step will shine through in the exquisite craftsmanship of your finished wreath adornment.
Read more: How To Make Teal
Step 4: Secure the Center
With the loops of the bow meticulously formed and arranged, the next critical step in the bow-making process is to secure the center of the bow. This pivotal stage not only ensures the structural integrity of the bow but also provides a foundation for attaching it to the wreath, allowing for a seamless and secure adornment.
To begin, carefully pinch the center of the looped ribbon between your fingers, holding it firmly to maintain the shape of the loops. Then, using a length of floral wire or a pipe cleaner, wrap it around the pinched center of the loops, securing it in place with a few tight twists. Ensure that the wire is snugly fastened around the center, holding the loops together without distorting their shape.
As you secure the center of the bow, take a moment to assess the symmetry and fullness of the loops, making any necessary adjustments to ensure uniformity. Fluff and finesse the loops as needed, refining their arrangement to achieve a balanced and visually appealing presentation.
Once the center of the bow is securely fastened, trim any excess wire, leaving a small tail to facilitate the attachment of the bow to the wreath. If desired, you can also leave an extended length of wire to serve as a versatile attachment mechanism, allowing you to affix the bow to various surfaces with ease.
The process of securing the center is a crucial step that lays the groundwork for the final embellishments and adjustments. By meticulously fastening the center of the bow, you establish a stable and well-defined focal point, setting the stage for the subsequent steps of fluffing and adjusting the bow to perfection.
With the center of the bow expertly secured, you've reached a pivotal milestone in the bow-making journey, bringing you one step closer to the completion of a stunning and personalized adornment for your wreath. As you proceed to the next steps, the meticulous attention to detail invested in securing the center will shine through in the impeccable craftsmanship of your finished bow.
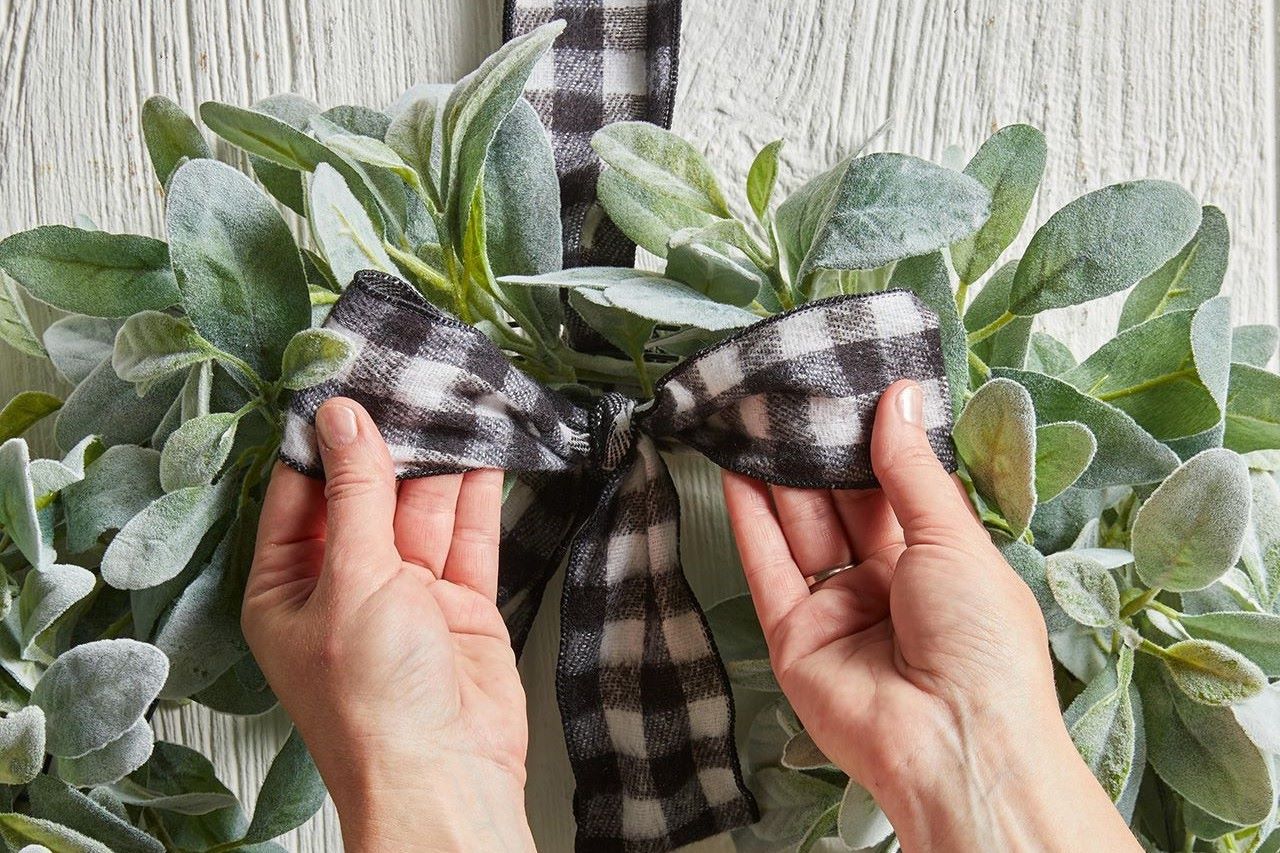
Step 5: Fluff and Adjust the Bow
With the center of the bow securely fastened, the next crucial step in the bow-making process is to fluff and adjust the loops to achieve a balanced and visually appealing presentation. This step allows you to refine the appearance of the bow, ensuring that each loop is uniform in size and shape, and that the overall composition exudes a sense of fullness and symmetry.
Begin by gently separating and fluffing each loop of the bow, starting from the innermost loops and working outward. Use your fingers to carefully spread out the layers of the ribbon, creating volume and dimension within the bow. This process not only enhances the visual impact of the bow but also allows you to conceal any wire or attachments, resulting in a seamless and polished appearance.
As you fluff the loops, take a moment to step back and assess the overall shape and fullness of the bow. Make any necessary adjustments to ensure that the loops are evenly distributed and that the bow maintains a balanced and harmonious silhouette. Pay close attention to the positioning of the loops, refining their arrangement to create a cohesive and visually striking composition.
If you're working with a wired ribbon, take advantage of the inherent flexibility of the wire to sculpt and shape the loops to your desired aesthetic. Manipulate the ribbon gently, bending and curving the loops to add depth and character to the bow. This creative process allows you to infuse the bow with a sense of movement and dynamism, elevating its visual appeal and creating a captivating focal point for your wreath.
Throughout the fluffing and adjusting process, maintain a keen eye for detail and symmetry, ensuring that each loop contributes to the overall elegance and charm of the bow. By taking the time to finesse the loops and refine their arrangement, you can elevate the presentation of the bow, resulting in a polished and professional aesthetic that will captivate and delight.
With the loops meticulously fluffed and adjusted, you've reached a pivotal stage in the bow-making journey, bringing you one step closer to the completion of a stunning and personalized adornment for your wreath. As you proceed to the final steps, the care and precision invested in fluffing and adjusting the bow will shine through in the exquisite craftsmanship of your finished creation.
Step 6: Attach the Bow to the Wreath
With the meticulously crafted bow in hand, the final step in the bow-making process is to attach the bow to the wreath, bringing your vision to life and completing the stunning ensemble. This pivotal stage requires precision and care to ensure that the bow is securely affixed to the wreath, allowing it to serve as a captivating focal point that elevates the overall aesthetic of the decorative arrangement.
Begin by positioning the bow at the desired location on the wreath, taking into account the composition and visual balance of the entire display. Whether you opt for a traditional placement at the top center of the wreath or a more whimsical off-center positioning, ensure that the bow complements the existing elements and enhances the overall appeal of the wreath.
Once you've determined the ideal placement, use the extended wire or tail from the center of the bow to secure it to the wreath. If the wreath is made of natural materials such as grapevine or branches, you can easily tuck the wire into the structure of the wreath, concealing it within the foliage for a seamless and polished appearance. If the wreath has a more solid base, such as a foam or wire frame, use floral wire or a hot glue gun to affix the bow securely in place.
As you attach the bow to the wreath, periodically step back to assess the positioning and ensure that it harmonizes with the overall composition. Make any necessary adjustments to the angle and placement of the bow, refining its position to create a cohesive and visually appealing display. Pay close attention to symmetry and balance, aiming to achieve a harmonious integration of the bow within the wreath's design.
Once the bow is securely attached and perfectly positioned, take a moment to admire the culmination of your efforts. The beautifully crafted bow serves as a captivating focal point, infusing the wreath with a touch of elegance and charm. Whether you're preparing for a special occasion or simply aiming to elevate your home decor, the addition of a stunning bow brings a sense of artistry and personalization to your wreath, leaving a lasting impression on all who encounter it.
With the bow expertly attached to the wreath, you've completed the final step in the bow-making journey, culminating in a visually striking and personalized adornment that enhances the beauty of your living space. As you admire the finished ensemble, take pride in the artful craftsmanship and creativity that have transformed a simple wreath into a captivating work of art.
Conclusion
In conclusion, the art of making a bow for a wreath is a delightful and rewarding endeavor that allows you to infuse your personal style and creativity into your home decor. From selecting the perfect ribbon to meticulously shaping and securing the bow, each step in the process contributes to the creation of a stunning and personalized adornment that elevates the visual appeal of any wreath.
As you embark on the journey of bow-making, the careful selection of ribbon sets the tone for the entire bow, dictating its color, texture, and overall aesthetic. Whether you opt for a classic satin ribbon, a rustic burlap ribbon, or a festive patterned ribbon, the choice reflects your unique taste and complements the theme of your wreath. The width and texture of the ribbon further contribute to the visual impact of the bow, allowing you to tailor its appearance to suit your creative vision.
The meticulous steps of measuring, cutting, and shaping the ribbon culminate in the creation of uniform loops that form the body of the bow. The process of fluffing and adjusting the loops allows you to refine the appearance of the bow, ensuring that each element is symmetrical and visually appealing. The final step of securing the center and attaching the bow to the wreath brings your vision to life, completing the stunning ensemble and infusing the wreath with a touch of elegance and charm.
Through the artful craftsmanship and attention to detail invested in each step, you have transformed a simple wreath into a captivating work of art. Whether displayed on your front door, above the mantelpiece, or as a centerpiece for a special occasion, the addition of a beautifully crafted bow serves as a captivating focal point that leaves a lasting impression on all who encounter it.
As you admire the finished creation, take pride in the artistry and creativity that have elevated your home decor to new heights. The personalized touch of a handcrafted bow adds a sense of warmth and sophistication to your living space, creating an inviting and visually striking ambiance that reflects your unique style.
In the art of making a bow for a wreath, each step is a testament to your creativity and dedication, resulting in a stunning and personalized adornment that brings joy and inspiration to all who behold it.