Home>Home and Garden>How To Put Hinges On A Door
Home and Garden
How To Put Hinges On A Door
Published: February 29, 2024
Learn how to put hinges on a door with our step-by-step guide. Get expert tips and advice for your home and garden projects.
(Many of the links in this article redirect to a specific reviewed product. Your purchase of these products through affiliate links helps to generate commission for Noodls.com, at no extra cost. Learn more)
Table of Contents
Introduction
Installing hinges on a door is a fundamental skill that can empower you to make significant improvements to your home. Whether you're replacing old hinges or installing new ones on a newly constructed door, understanding the process is essential for achieving a seamless and functional result. By mastering this skill, you can enhance the functionality and aesthetic appeal of your doors, contributing to the overall ambiance of your living space.
Properly installed hinges ensure that your doors open and close smoothly, providing privacy, security, and convenience. Additionally, a well-hung door can contribute to the overall energy efficiency of your home by maintaining proper insulation and reducing drafts. This simple yet impactful task can elevate the functionality and visual appeal of your living space, making it a valuable addition to your home improvement repertoire.
In this comprehensive guide, we will walk you through the step-by-step process of putting hinges on a door. From gathering the necessary tools and materials to marking and measuring for precise hinge placement, we will cover each crucial aspect of the installation process. By following these instructions, you will gain the confidence and expertise needed to successfully install hinges on any door, whether it's a bedroom door, a closet door, or an entry door.
So, roll up your sleeves, gather your tools, and let's dive into the rewarding journey of learning how to put hinges on a door. With a bit of patience and attention to detail, you'll soon be enjoying the satisfaction of seamlessly operating doors that enhance the functionality and charm of your home.
Read more: How To Use Hinge
Tools and materials needed
Before embarking on the process of putting hinges on a door, it's essential to gather the necessary tools and materials to ensure a smooth and efficient installation. Here's a comprehensive list of items you'll need:
Tools:
- Screwdriver: A screwdriver is a fundamental tool for installing hinges. Ensure you have both a Phillips head and a flat head screwdriver to accommodate different types of screws commonly used in hinge installation.
- Hammer: A hammer will come in handy for gently tapping the hinges into place and ensuring a snug fit.
- Chisel: A sharp chisel is essential for creating clean and precise recesses for the hinges to sit flush with the door and frame.
- Tape Measure: Accurate measurements are crucial for proper hinge placement. A reliable tape measure will help you achieve precise positioning for the hinges.
- Pencil: A pencil is essential for marking the locations for hinge installation on the door and frame.
- Utility Knife: A utility knife will be useful for scoring the outline of the hinges on the door, allowing for clean and accurate chiseling.
- Drill and Bits: If you're working with a door that requires pilot holes for the screws, a drill and appropriate drill bits will be necessary for this task.
- Safety Glasses: It's important to prioritize safety during any DIY project. Safety glasses will protect your eyes from any wood chips or debris that may result from chiseling and drilling.
Materials:
- Hinges: Depending on the type of door and its weight, you'll need to select the appropriate hinges. Common options include butt hinges, barrel hinges, and continuous hinges, each suitable for different door types and applications.
- Screws: Ensure you have the correct screws for attaching the hinges to the door and frame. The length of the screws should be appropriate for the thickness of the door and the frame material.
- Wood Filler: In case of any minor mistakes or adjustments, having wood filler on hand will allow you to fill in small gaps or holes for a seamless finish.
- Sandpaper: Sandpaper will be useful for smoothing any rough edges or surfaces after chiseling and drilling, ensuring a professional and polished result.
- Paint or Stain (Optional): If you're working with a wooden door, having paint or stain available will allow you to touch up any areas that may be affected during the hinge installation process.
By ensuring you have these tools and materials at your disposal, you'll be well-prepared to proceed with the process of putting hinges on a door, setting the stage for a successful and satisfying home improvement project.
Preparing the door for hinges
Before diving into the installation of hinges, it's crucial to prepare the door to ensure a seamless and durable outcome. Proper preparation sets the foundation for precise hinge placement and ensures the door operates smoothly for years to come.
Step 1: Assess the Door
Begin by examining the door to identify any imperfections or irregularities that may affect the installation of hinges. Check for dents, warping, or rough areas that could hinder the proper alignment of the hinges. If the door exhibits significant damage or warping, consider addressing these issues before proceeding with the hinge installation.
Step 2: Determine Hinge Placement
Based on the type of door and its intended use, determine the number of hinges required for optimal support. Standard interior doors typically require two hinges, while heavier or taller doors may benefit from three hinges for added stability. Additionally, consider the ideal placement of the hinges to ensure balanced support and smooth operation.
Step 3: Mark Hinge Locations
Using a pencil and a tape measure, mark the precise locations for the hinges on the door. For two hinges, the top hinge is typically positioned 5 inches from the top of the door, while the bottom hinge is placed 10 inches from the bottom. If using three hinges, evenly space them along the height of the door for uniform support.
Step 4: Score the Hinge Outlines
Once the hinge locations are marked, use a utility knife to score the outlines of the hinges on the door. This step creates clean and defined boundaries for chiseling, ensuring that the recesses for the hinges are accurately aligned with the door's edge.
Read more: How To Remove Door Knob
Step 5: Chisel Recesses for Hinges
With the outlines scored, carefully use a chisel to create recesses for the hinges to sit flush with the door. Take your time to chisel along the scored lines, ensuring that the depth of the recess matches the thickness of the hinges. This meticulous process results in a precise fit for the hinges, promoting stability and smooth door movement.
Step 6: Test Fit the Hinges
After chiseling the recesses, perform a test fit of the hinges to verify that they sit flush with the door surface. This step allows you to make any necessary adjustments to the recesses before proceeding with the final installation.
By meticulously preparing the door for hinges, you establish a solid groundwork for the subsequent steps of hinge installation. This attention to detail ensures that the hinges are seamlessly integrated with the door, contributing to its functionality and aesthetic appeal.
Marking and measuring for hinge placement
Accurate marking and precise measurements are crucial for ensuring the proper alignment and functionality of hinges on a door. This step is essential for achieving seamless door movement and long-term durability. By meticulously marking and measuring for hinge placement, you set the stage for a successful installation that enhances the functionality and aesthetic appeal of the door.
Step 1: Determine Hinge Quantity and Placement
The first consideration when marking and measuring for hinge placement is determining the appropriate number of hinges for the door. Standard interior doors typically require two hinges, while heavier or taller doors may benefit from three hinges to distribute the weight evenly. Once the hinge quantity is established, the next step is to determine the ideal placement for optimal support and smooth operation.
Read more: How To Open A Locked Door
Step 2: Marking Hinge Locations
Using a pencil and a reliable tape measure, mark the precise locations for the hinges on the door. For doors requiring two hinges, the top hinge is typically positioned 5 inches from the top of the door, while the bottom hinge is placed 10 inches from the bottom. This positioning ensures balanced support and smooth door movement. If the door necessitates three hinges, evenly space them along the height of the door to distribute the weight and stress uniformly.
Step 3: Verify Alignment and Levelness
After marking the hinge locations, it's essential to verify the alignment and levelness of the markings. Using a spirit level, ensure that the marked locations for the hinges are perfectly aligned vertically. This step is crucial for preventing any misalignment that could lead to uneven door movement or stress on the hinges over time.
Step 4: Double-Check Measurements
Before proceeding with the installation, double-check the measurements and markings to confirm their accuracy. Ensure that the hinge locations are consistent with the door's dimensions and that the markings align with the intended placement for optimal support and functionality.
By meticulously following these steps for marking and measuring hinge placement, you establish a solid foundation for the subsequent installation process. This attention to detail ensures that the hinges are positioned accurately, contributing to the smooth operation and longevity of the door.
Installing the hinges
With the door meticulously prepared and the hinge locations marked and measured, it's time to proceed with the crucial step of installing the hinges. This phase of the process is where precision and attention to detail are paramount, as it directly impacts the functionality and longevity of the door. Follow these steps to ensure a seamless and durable installation of the hinges.
Read more: How To Unlock Bathroom Door
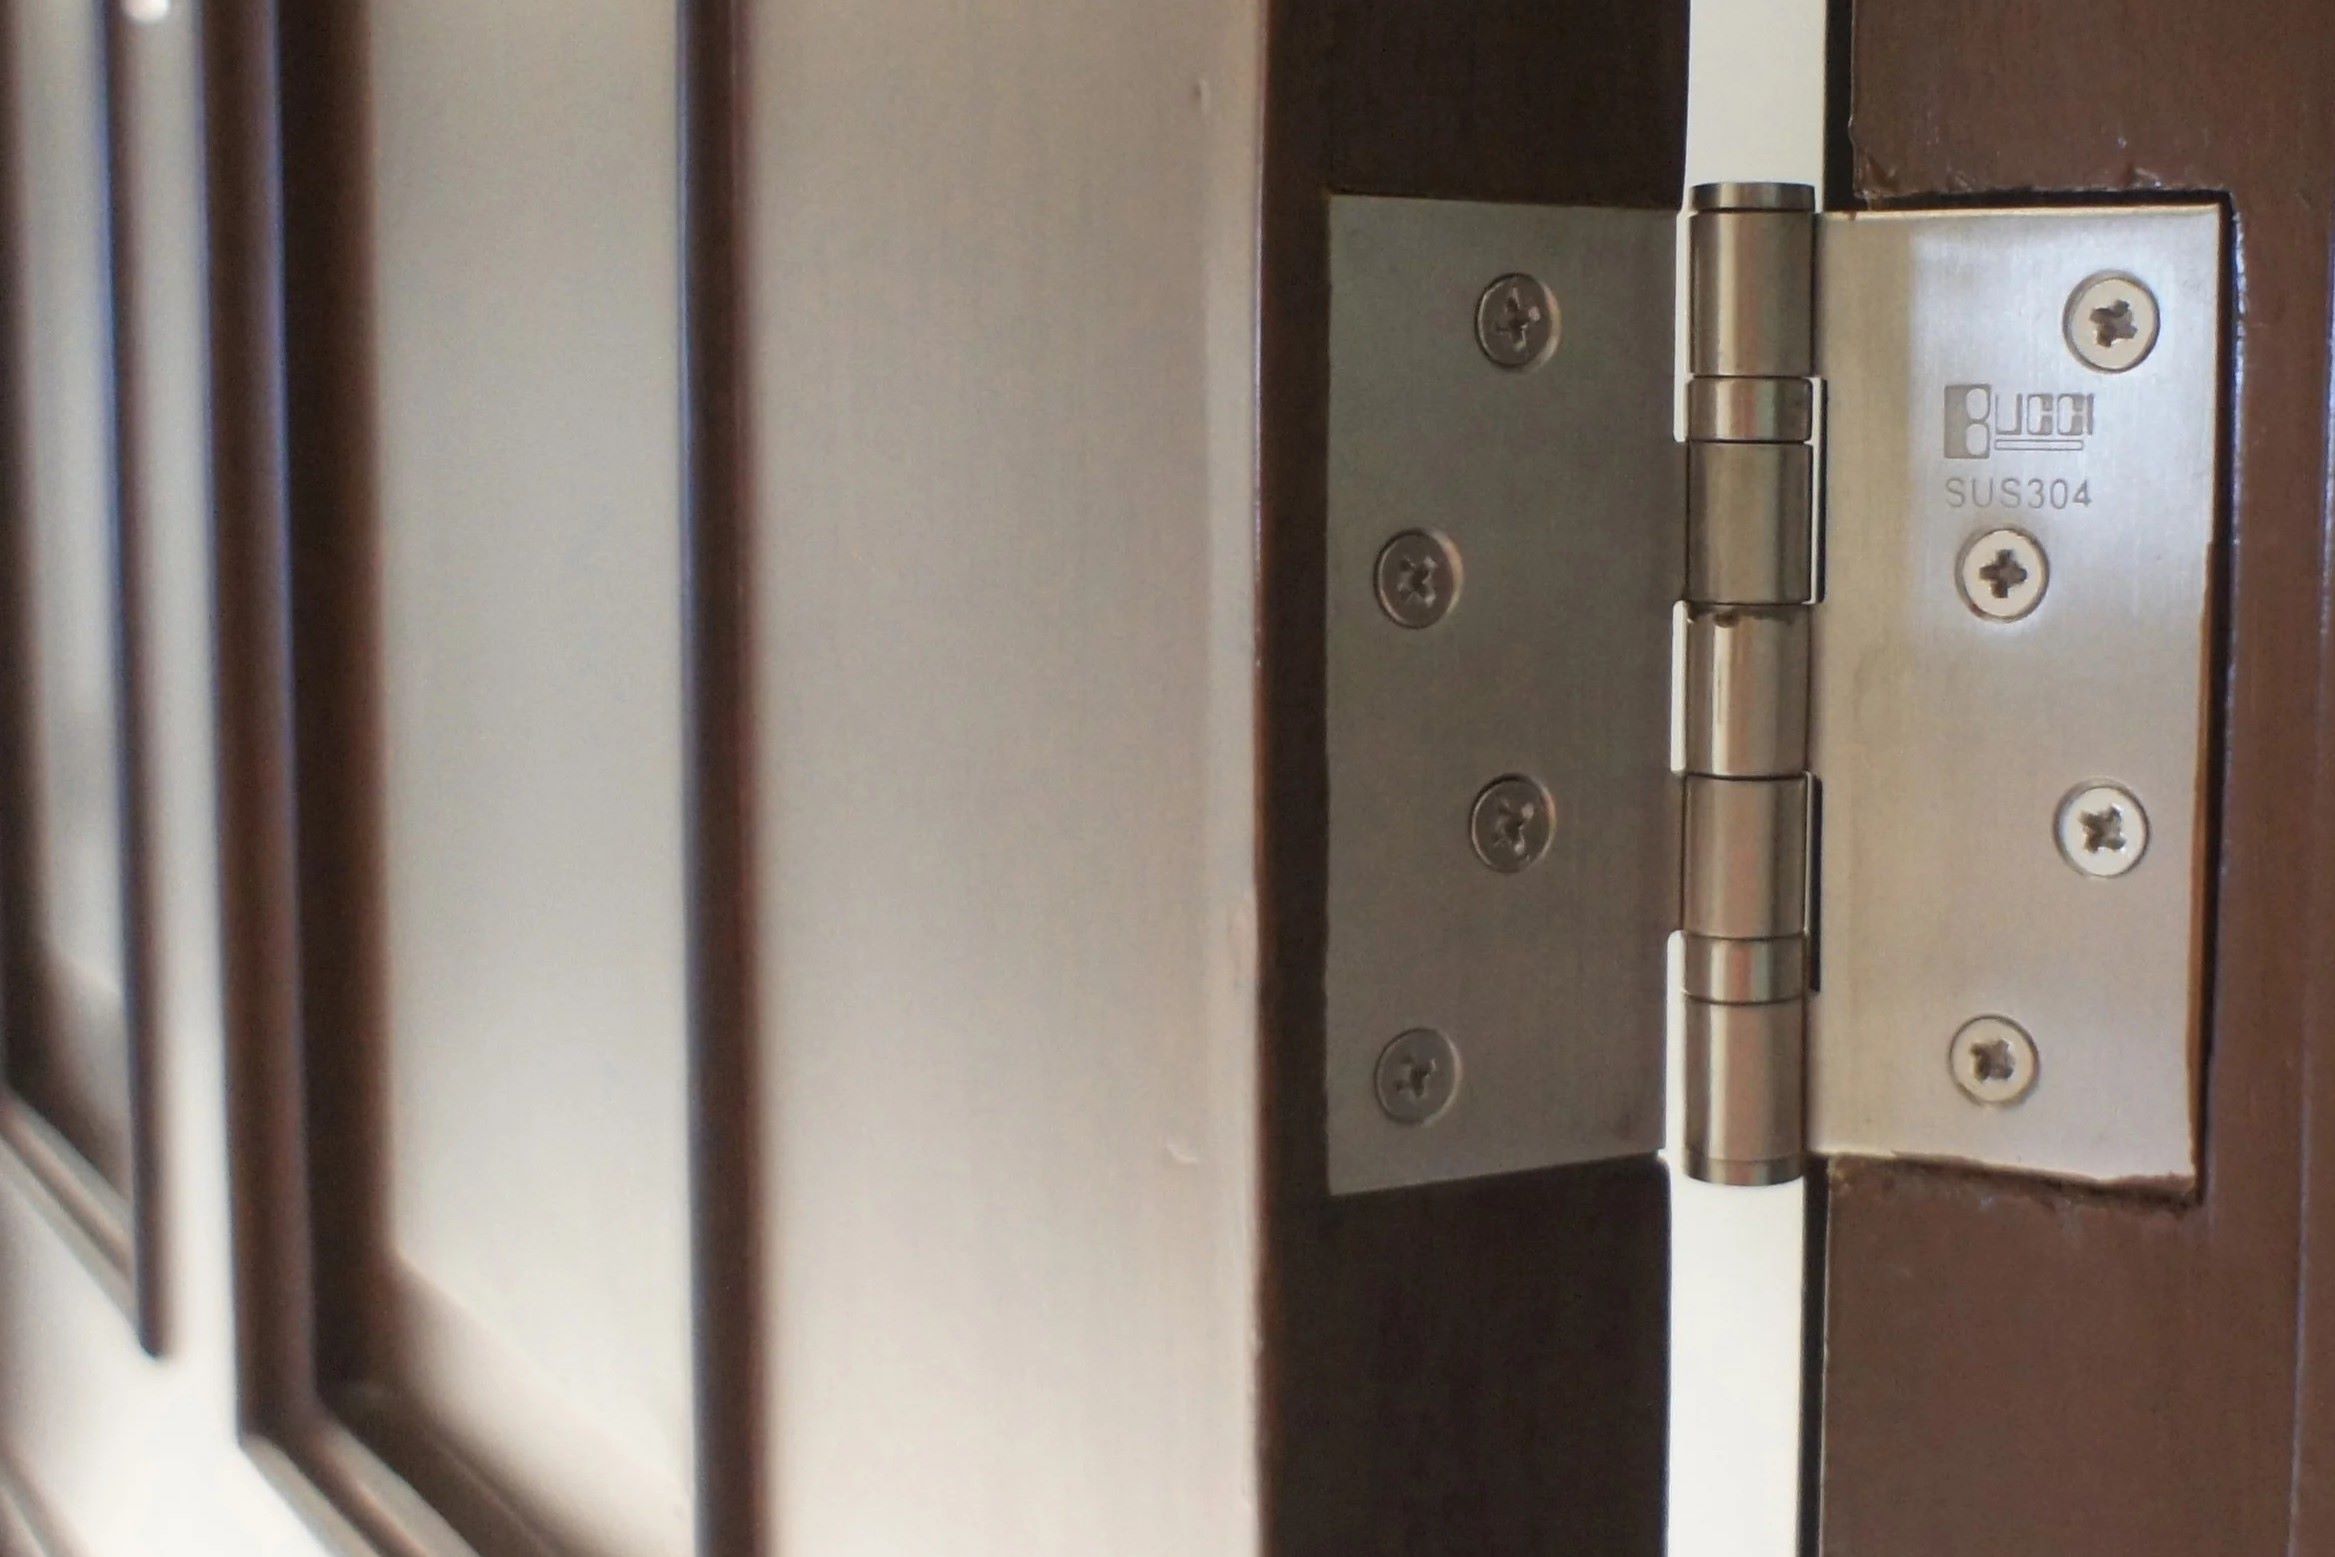
Step 1: Positioning the Hinges
Begin by aligning the hinges with the marked locations on the door. Ensure that the hinges are oriented correctly, with the knuckles facing toward the edge of the door. For each hinge, align the knuckles with the edge of the door and position them precisely within the marked outlines. This step sets the stage for securely attaching the hinges to the door.
Step 2: Securing the Hinges
Using the appropriate screws and a screwdriver, secure the hinges to the door. Start by attaching the screws to the hinge plates, ensuring a firm and snug fit. It's essential to use screws of the appropriate length to prevent protrusion through the door or insufficient anchoring. Carefully drive the screws into place, maintaining alignment and stability as you secure each hinge to the door.
Step 3: Attaching the Hinges to the Frame
With the hinges securely attached to the door, position the door within the door frame. Align the hinges on the door with the corresponding locations on the frame, ensuring a seamless fit. Enlist the assistance of a partner if needed to hold the door in place while you align the hinges with the frame.
Step 4: Securing the Hinges to the Frame
Once the hinges are aligned with the frame, proceed to secure them in place using the appropriate screws. Similar to the process of attaching the hinges to the door, ensure that the screws are driven in securely, anchoring the hinges to the frame with stability and precision.
Read more: How To Put On A Belt Buckle
Step 5: Testing the Door Movement
After the hinges are installed on both the door and the frame, carefully test the door's movement. Open and close the door to verify that it moves smoothly and evenly within the frame. Pay attention to any resistance or misalignment, as these may indicate the need for minor adjustments to the hinge positioning.
By meticulously following these steps, you can achieve a successful installation of the hinges, contributing to the seamless operation and longevity of the door. This phase of the process sets the stage for enjoying a well-hung door that enhances the functionality and aesthetic appeal of your living space.
Testing the door movement
Once the hinges are installed on both the door and the frame, it's crucial to thoroughly test the door's movement to ensure smooth operation and proper alignment. This step is essential for identifying any potential issues and making necessary adjustments before finalizing the installation.
To begin the testing process, gently open the door and observe its movement. Pay close attention to how the door swings and whether it moves smoothly within the frame. Ideally, the door should open and close without any resistance or dragging. If you notice any areas of friction or uneven movement, it's important to address these issues promptly to prevent long-term wear and potential damage to the hinges or the door itself.
As you test the door's movement, listen for any unusual sounds such as scraping or rubbing. These noises may indicate areas of contact between the door and the frame that require adjustment. Additionally, observe the alignment of the door within the frame to ensure that it sits evenly and securely.
If you encounter any resistance or uneven movement, consider the following potential adjustments:
-
Hinge Alignment: Check the alignment of the hinges on both the door and the frame. Misaligned hinges can cause the door to bind or rub against the frame, leading to uneven movement. If misalignment is identified, carefully loosen the screws and make slight adjustments to the hinge positions before re-securing them.
-
Door Clearance: Assess the clearance between the door and the frame. In some cases, the door may require additional trimming or adjustments to ensure proper clearance for smooth movement. Use a plane or sander to carefully adjust the edges of the door if necessary.
-
Lubrication: Apply a small amount of lubricant to the hinge knuckles and pivot points to reduce friction and promote smooth movement. This can be particularly beneficial for older doors or hinges that may have developed minor resistance over time.
-
Hardware Inspection: Verify that the screws securing the hinges are tightened securely. Loose screws can lead to instability and uneven movement, so ensure that all hardware is properly fastened.
After making any necessary adjustments, retest the door's movement to evaluate the effectiveness of the changes. Continue to open and close the door, paying attention to the smoothness of its operation and the absence of any resistance or dragging.
By meticulously testing the door's movement and addressing any potential issues, you can ensure that the hinges are installed to facilitate optimal functionality and longevity. This thorough testing process sets the stage for enjoying a well-hung door that enhances the overall ambiance and convenience of your living space.
Conclusion
In conclusion, mastering the art of putting hinges on a door is a valuable skill that empowers homeowners to enhance the functionality and aesthetic appeal of their living spaces. By following the comprehensive steps outlined in this guide, you can confidently tackle the installation of hinges on various types of doors, whether for interior or exterior applications.
The process begins with meticulous preparation, including assessing the door for imperfections, determining hinge quantity and placement, and meticulously marking and measuring for precise hinge installation. These foundational steps set the stage for a seamless and durable installation, ensuring that the hinges are integrated with the door in a manner that promotes smooth operation and long-term stability.
With the necessary tools and materials at hand, the installation phase involves positioning and securing the hinges on both the door and the frame. Attention to detail is paramount during this phase, as it directly impacts the functionality and longevity of the door. By carefully aligning and securing the hinges, you establish the foundation for a well-hung door that operates smoothly and enhances the overall ambiance of your home.
Following the installation, thorough testing of the door's movement is essential to identify any potential issues and make necessary adjustments. By paying close attention to the door's operation, addressing any areas of resistance or misalignment, and making minor adjustments as needed, you can ensure that the hinges are installed to facilitate optimal functionality and longevity.
Ultimately, mastering the process of putting hinges on a door empowers you to take control of your home improvement projects, contributing to the overall comfort and functionality of your living space. Whether you're replacing old hinges, installing new ones, or undertaking a larger renovation project, the ability to confidently install hinges on doors is a valuable skill that enhances the quality and charm of your home.
By embracing the knowledge and skills gained from this guide, you can embark on future home improvement endeavors with confidence, knowing that you have the expertise to elevate the functionality and visual appeal of your doors. With patience, attention to detail, and a commitment to quality, you can enjoy the satisfaction of seamlessly operating doors that enhance the ambiance and convenience of your living space.