Home>Arts and Culture>How To Draw Hello Kitty
Arts and Culture
How To Draw Hello Kitty
Published: February 26, 2024
Learn how to draw Hello Kitty with step-by-step instructions and unleash your creativity in the world of arts and culture. Master the art of drawing with our easy tutorials.
(Many of the links in this article redirect to a specific reviewed product. Your purchase of these products through affiliate links helps to generate commission for Noodls.com, at no extra cost. Learn more)
Table of Contents
Introduction
Hello Kitty, with her iconic bow and cheerful expression, has captured the hearts of people worldwide for decades. Created by the Japanese company Sanrio, this beloved character has become a cultural phenomenon, adorning everything from stationery to fashion accessories. If you've ever wanted to bring this endearing feline to life on paper, you're in the right place. In this guide, we'll explore the step-by-step process of drawing Hello Kitty, from sketching her distinctive head to adding the final touches.
Whether you're a seasoned artist or just starting your drawing journey, creating Hello Kitty can be a delightful and rewarding experience. This step-by-step tutorial will provide you with the guidance and techniques needed to capture the essence of this beloved character. So, grab your drawing materials and let's embark on this creative adventure together.
Drawing Hello Kitty not only allows you to hone your artistic skills but also offers a chance to connect with a character that has brought joy to millions around the world. As you follow along with the steps, take a moment to appreciate the simplicity and charm of Hello Kitty's design. From her whiskers to her button nose, each element contributes to her timeless appeal.
So, whether you're looking to add a touch of cuteness to your sketchbook or create a personalized greeting card, learning to draw Hello Kitty is a delightful endeavor. With a few simple tools and a dash of creativity, you'll soon bring this beloved character to life on the page. Let's dive in and unleash our creativity as we embark on the journey of drawing Hello Kitty.
Read more: How To Say “Hello” In Tagalog
Materials Needed
To bring Hello Kitty to life on paper, you'll need a few essential materials that will help you capture her iconic features with precision and charm. Before you begin your drawing journey, gather the following items:
-
Drawing Paper: Select a smooth, high-quality drawing paper that is suitable for your preferred drawing medium. The paper should have enough weight to withstand erasing and shading without tearing.
-
Pencils: A set of graphite pencils ranging from 2H to 6B will provide the necessary range for sketching Hello Kitty's outline and adding shading to create depth and dimension.
-
Eraser: A soft, kneaded eraser is ideal for gently removing any initial sketch lines and making adjustments as you refine the details of Hello Kitty's features.
-
Fine-tip Black Pen: Having a fine-tip black pen on hand will allow you to outline and define Hello Kitty's features with precision, adding a polished look to your drawing.
-
Coloring Materials: If you plan to add color to your drawing, gather colored pencils, markers, or watercolor paints in the signature shades of Hello Kitty – bright red for her bow, and soft yellow and white for her fur.
-
Reference Image: While not a physical material, having a reference image of Hello Kitty nearby will help ensure that you capture her distinctive features and proportions accurately.
By assembling these materials, you'll be well-equipped to embark on the delightful journey of drawing Hello Kitty. With these tools at your disposal, you can focus on bringing out the charm and sweetness of this beloved character in your artwork. Now that you have your materials ready, let's move on to the first step of sketching Hello Kitty's head.
Step 1: Sketching the Head
To begin drawing Hello Kitty, start by sketching the basic outline of her head. Using a light pencil, create a large oval shape to form the foundation of her head. Hello Kitty's head is slightly tilted, so keep this in mind as you sketch the oval. Next, add two smaller ovals on either side of the top of the large oval to represent her ears. Ensure that the ears are symmetrical and positioned at a slight angle.
Once the basic head shape and ears are in place, you can proceed to add her iconic bow. Position the bow in the center of Hello Kitty's head, just above where her ears meet the oval. The bow consists of two loops on the sides and a knot in the middle. Take your time to achieve the desired shape and proportions, as the bow plays a significant role in defining Hello Kitty's adorable appearance.
After outlining the head and bow, refine the sketch by adding guidelines for the eyes, nose, and whiskers. Hello Kitty's eyes are large and oval-shaped, positioned in the upper part of her head. The nose is a small, rounded triangle located just below the center of her eyes. Finally, the whiskers extend from either side of her nose, curving gently outward.
As you sketch these details, focus on capturing the gentle and endearing expression that defines Hello Kitty. Pay attention to the placement and size of each feature, ensuring that they align harmoniously with the overall shape of her head. Remember that sketching is a fluid process, so feel free to adjust the proportions and positioning as needed to achieve the desired likeness.
By following these steps and taking your time to refine the sketch, you'll lay the foundation for capturing the unmistakable charm of Hello Kitty's head. Once you're satisfied with the basic outline and proportions, you can proceed to the next step of drawing her body, bringing this beloved character one step closer to coming to life on the page.
Step 2: Drawing the Body
With the head of Hello Kitty sketched out, it's time to move on to drawing her body. Begin by extending two curved lines downward from the bottom of Hello Kitty's head, creating the outline of her body. These lines should gently taper as they descend, reflecting the character's characteristic soft and rounded form. As you shape the body, pay attention to maintaining a sense of balance and symmetry, ensuring that the proportions align with the size of her head.
Once the basic body outline is in place, you can add Hello Kitty's arms and hands. Position the arms on either side of her body, curving them slightly outward to convey a relaxed and welcoming posture. Then, sketch her hands as simple, rounded shapes, keeping them proportional to the size of her body. Hello Kitty's hands often feature three lines to represent her fingers, adding a touch of detail to her endearing appearance.
As you refine the body sketch, take a moment to ensure that the overall pose and proportions convey the gentle and friendly demeanor for which Hello Kitty is known. The character's design is characterized by simplicity and sweetness, so aim to capture these qualities as you bring her body to life on the page.
With the body and hands sketched out, you have successfully captured the essence of Hello Kitty's adorable form. Each curve and line contributes to the character's timeless appeal, setting the stage for the next step of adding her distinctive facial features.
By following these steps and infusing your drawing with care and attention to detail, you're well on your way to creating a charming portrayal of Hello Kitty. As you continue your artistic journey, remember to embrace the joy and creativity that this beloved character embodies, infusing your artwork with the same warmth and charm that have endeared Hello Kitty to fans around the world.
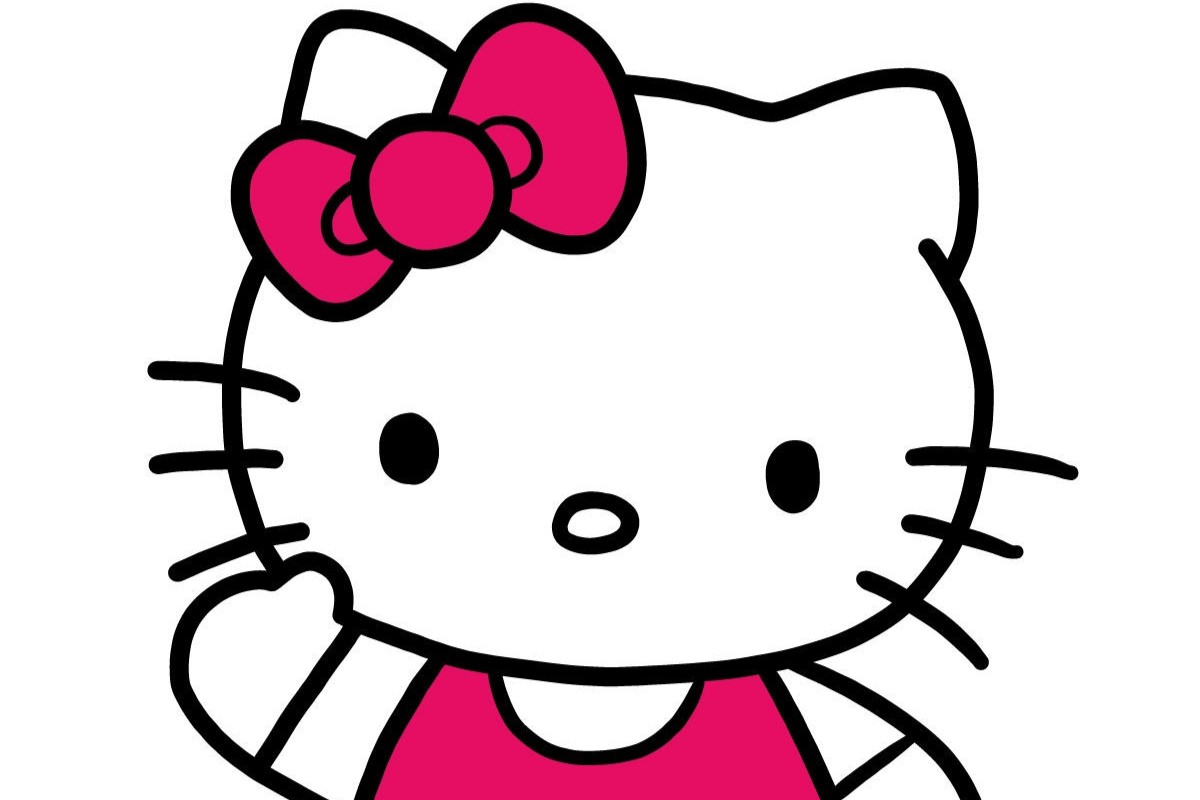
Step 3: Adding the Face
As we delve into the next phase of drawing Hello Kitty, our focus shifts to adding her endearing facial features, which play a pivotal role in capturing her iconic charm. Begin by refining the outline of Hello Kitty's eyes, which are one of her most distinctive attributes. Each eye consists of a large oval shape, positioned in the upper part of her head, conveying a sense of innocence and warmth. Take care to ensure that the eyes are symmetrical and aligned with the overall proportions of her face, as they serve as windows to her sweet and gentle nature.
Following the eyes, proceed to sketch Hello Kitty's nose, a small, rounded triangle located just below the center of her eyes. This subtle feature adds a touch of playfulness to her expression, contributing to the character's timeless appeal. As you refine the nose, pay attention to its size and position, ensuring that it harmonizes with the surrounding elements of her face.
Next, turn your attention to Hello Kitty's whiskers, which are a defining aspect of her adorable visage. These whiskers extend from either side of her nose, curving gently outward and adding a sense of movement and liveliness to her expression. By capturing the graceful curve of the whiskers, you infuse Hello Kitty's face with a sense of playfulness and warmth, reflecting the character's joyful and carefree spirit.
With the eyes, nose, and whiskers in place, you have laid the foundation for Hello Kitty's endearing facial expression. Each element contributes to the character's timeless charm, capturing the essence of innocence and sweetness that has endeared her to fans of all ages. As you refine these features, take a moment to appreciate the delightful personality that begins to emerge on the page, bringing Hello Kitty one step closer to coming to life through your artwork.
By infusing your drawing with attention to detail and a deep appreciation for Hello Kitty's iconic design, you honor the character's legacy while adding your own creative touch to the portrayal. As we move forward to the next step of adding the final details, let's carry this sense of joy and affection into the remaining stages of our drawing journey, celebrating the enduring magic of Hello Kitty.
Read more: How To Draw People
Step 4: Adding Details
As we venture into the intricate phase of adding details to our portrayal of Hello Kitty, we have the opportunity to infuse our artwork with the subtle nuances that define her timeless charm. With the foundational elements of her head, body, and facial features in place, it's time to focus on refining the finer details that will bring our drawing to life.
One of the key details to consider is the texture of Hello Kitty's fur. While her design is characterized by simplicity, adding a hint of texture to her fur can enhance the depth and visual appeal of the drawing. Using light, delicate strokes, create a soft and velvety texture to convey the gentle nature of Hello Kitty. By paying attention to the direction of the strokes and the distribution of shading, you can evoke a sense of warmth and softness, adding a tactile quality to your portrayal.
Moving on to the bow, a signature element of Hello Kitty's appearance, take the time to refine its shape and add subtle folds and creases to convey a sense of fabric. By incorporating gentle curves and shading, you can create the illusion of a three-dimensional bow, infusing it with a sense of lightness and movement. Paying attention to these small details allows you to capture the playful and endearing nature of Hello Kitty's iconic accessory.
In addition to the fur and bow, consider adding a touch of shading and depth to Hello Kitty's eyes and nose. By carefully blending and layering graphite, you can create a sense of depth and dimension, infusing her eyes with a captivating sparkle and bringing a sense of vitality to her expression. Similarly, adding subtle shading to her nose can enhance the overall balance and harmony of her facial features, contributing to the character's timeless appeal.
As you add these details, remember to approach the process with a sense of care and appreciation for the character's enduring legacy. Each stroke and shading technique offers an opportunity to celebrate the beloved qualities that have made Hello Kitty a cherished symbol of sweetness and innocence. By infusing your drawing with these thoughtful details, you honor the character's legacy while adding your own creative touch to the portrayal.
With the addition of these refined details, your drawing of Hello Kitty begins to exude a sense of warmth and charm, capturing the essence of this beloved character with grace and affection. As we prepare to move to the final step of coloring Hello Kitty, let's carry this spirit of joy and creativity forward, embracing the opportunity to infuse our artwork with color and vibrancy, bringing our portrayal of Hello Kitty to its full, delightful realization.
Step 5: Coloring Hello Kitty
With the intricate details of Hello Kitty's portrayal sketched out, it's time to infuse our artwork with color, breathing life and vibrancy into this beloved character. The coloring process offers an opportunity to enhance the charm and sweetness of Hello Kitty, bringing her iconic design to full, delightful realization.
Begin by selecting the signature shades that define Hello Kitty's appearance. A bright, cheerful red is the perfect choice for her iconic bow, infusing it with a sense of playfulness and energy. As you apply the red hue to the bow, consider the interplay of light and shadow, using subtle variations in tone to create depth and dimension, adding a touch of liveliness to this beloved accessory.
Moving on to Hello Kitty's fur, opt for a soft, warm yellow tone that captures the character's gentle and endearing nature. With delicate strokes, apply the yellow hue to her fur, evoking a sense of softness and warmth that mirrors the character's timeless appeal. Pay attention to the distribution of color, allowing the yellow to flow seamlessly across her form, infusing the portrayal with a sense of lightness and joy.
As you bring Hello Kitty to life through color, consider the opportunity to add a touch of brightness and radiance to her eyes and nose. Select a subtle shade to convey the sparkle in her eyes, infusing them with a captivating gleam that reflects her playful and affectionate spirit. Similarly, apply a gentle blush of color to her nose, adding a hint of warmth and vitality to her endearing expression.
Throughout the coloring process, embrace the opportunity to infuse your portrayal of Hello Kitty with a sense of joy and vibrancy, celebrating the character's enduring magic through the interplay of color and light. As you apply each hue with care and attention, consider the impact of color on the overall mood and atmosphere of the drawing, allowing Hello Kitty's charm to shine through with every stroke of your coloring materials.
By infusing your artwork with color, you honor the character's legacy while adding your own creative touch to the portrayal, capturing the essence of innocence and sweetness that has endeared Hello Kitty to fans around the world. As you complete the coloring process, take a moment to appreciate the delightful transformation that has taken place, bringing Hello Kitty to life on the page in all her vibrant and endearing glory.
Conclusion
In conclusion, the journey of drawing Hello Kitty has been a delightful and rewarding experience, allowing us to capture the timeless charm and endearing nature of this beloved character on paper. From sketching her iconic features to infusing the portrayal with color and vibrancy, each step has offered an opportunity to celebrate the joyful spirit that defines Hello Kitty.
As we reflect on the process, it becomes evident that Hello Kitty's design embodies a sense of innocence, warmth, and playfulness that transcends generations. Through the careful placement of her gentle features, from her iconic bow to her captivating eyes and whiskers, we have been able to evoke the character's enduring magic, infusing our artwork with the same sweetness and joy that have made Hello Kitty a cherished symbol of cuteness and affection.
Drawing Hello Kitty has not only allowed us to hone our artistic skills but has also provided a chance to connect with a character that has brought joy to millions around the world. As we navigated each step, from sketching her distinctive head to adding the final touches of color, we embraced the opportunity to celebrate the character's legacy while adding our own creative touch to the portrayal.
Through the process of drawing Hello Kitty, we have been reminded of the power of simplicity and the enduring appeal of characters that embody kindness and warmth. Hello Kitty's design serves as a testament to the idea that joy can be found in the most uncomplicated and heartfelt gestures, resonating with fans of all ages and backgrounds.
As we conclude this artistic journey, let's carry forward the spirit of creativity and affection that Hello Kitty embodies, infusing our future endeavors with the same sense of warmth and charm. Whether we're creating art for personal enjoyment or sharing it with others, the lessons learned from drawing Hello Kitty remind us of the enduring magic of characters that capture the essence of innocence and joy.
In the end, drawing Hello Kitty has been more than a creative exercise; it has been a celebration of the enduring magic of characters that touch our hearts and inspire us to embrace the simple joys of life. As we bid farewell to this delightful drawing journey, let's carry the spirit of Hello Kitty's sweetness and warmth with us, infusing our lives with the same sense of joy and affection that she embodies.