Home>Home and Garden>How To Flush Tankless Water Heater
Home and Garden
How To Flush Tankless Water Heater
Published: March 4, 2024
Learn how to properly flush your tankless water heater for optimal performance and efficiency. Follow these simple steps to keep your home and garden running smoothly.
(Many of the links in this article redirect to a specific reviewed product. Your purchase of these products through affiliate links helps to generate commission for Noodls.com, at no extra cost. Learn more)
Table of Contents
Introduction
Maintaining a tankless water heater is crucial for ensuring its optimal performance and longevity. Over time, mineral deposits, sediment, and other impurities can accumulate within the system, leading to reduced efficiency and potential damage. Flushing the tankless water heater is a fundamental maintenance task that helps to eliminate these deposits and preserve the unit's functionality.
Regular maintenance, including flushing the tankless water heater, can prevent issues such as reduced hot water flow, fluctuating water temperatures, and even system malfunctions. By following a few simple steps, you can effectively flush your tankless water heater and keep it operating at its best.
In the following guide, we will walk you through the step-by-step process of flushing your tankless water heater, ensuring that you can tackle this essential maintenance task with confidence. From preparing the unit for flushing to cleaning the filter and restarting the water heater, each step is designed to help you maintain the efficiency and reliability of your tankless water heater.
Let's dive into the details of how to flush a tankless water heater, empowering you to take proactive measures in preserving the functionality and longevity of this essential home appliance.
Read more: How To Light Pilot Light On Water Heater
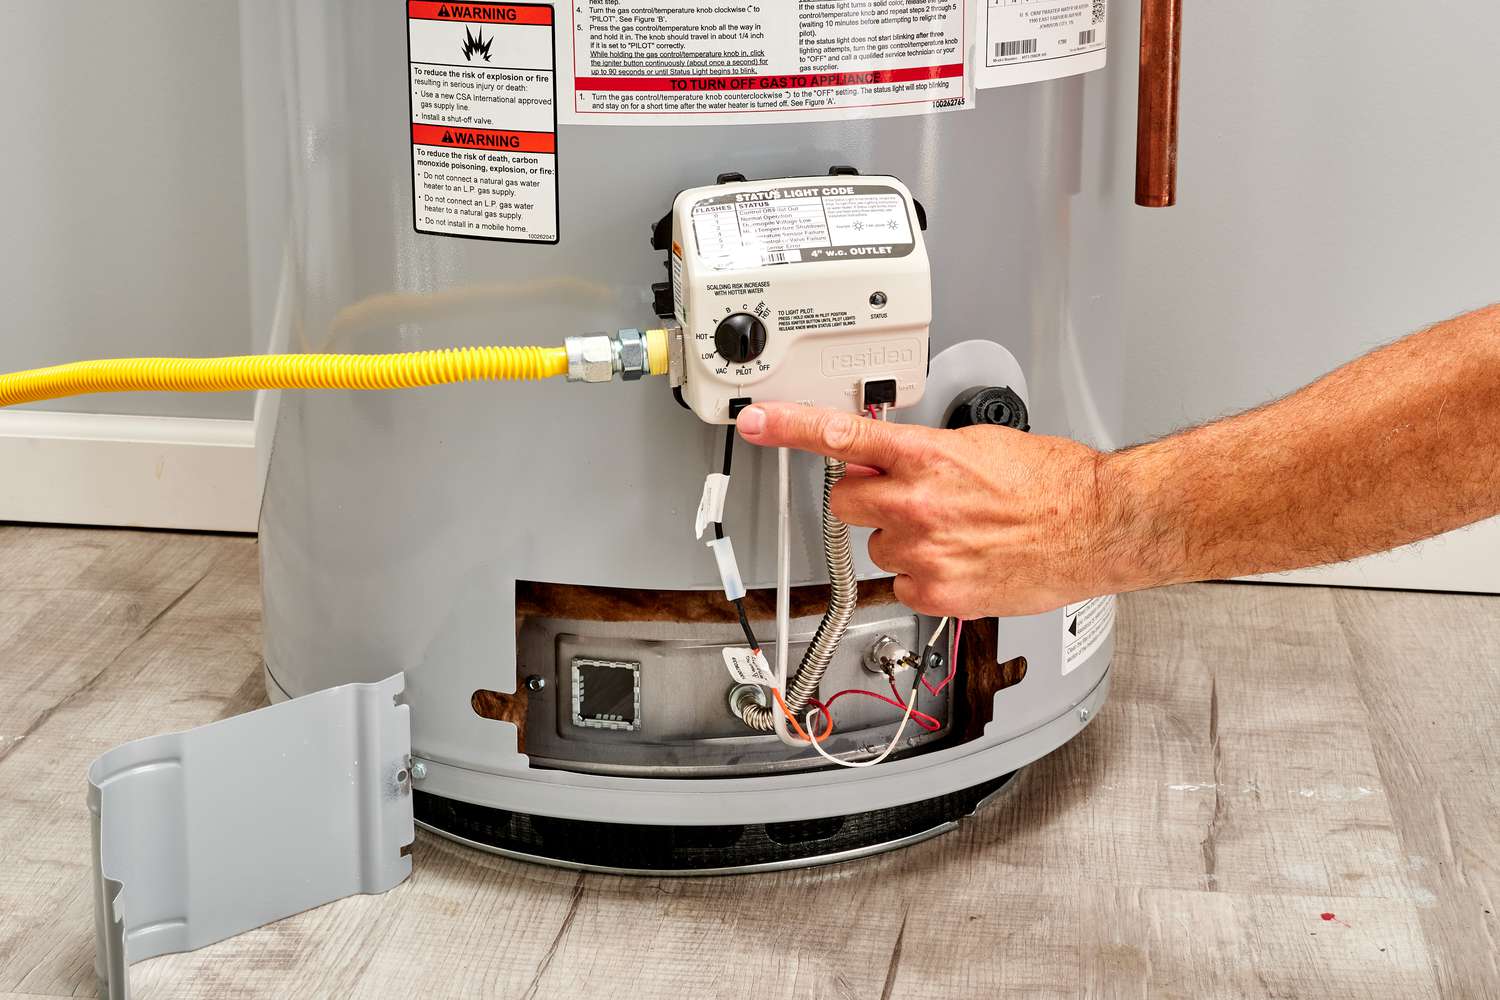
Step 1: Turn Off the Power and Water Supply
Before initiating the flushing process for your tankless water heater, it is crucial to ensure the safety of the system and the individual performing the maintenance. Turning off the power and water supply is the initial step in this essential maintenance procedure.
-
Locate the Power Source: Begin by identifying the power source for your tankless water heater. In most cases, these units are powered by electricity or gas. If your unit is electric, locate the circuit breaker dedicated to the water heater and switch it off. For gas-powered units, locate the gas supply valve and turn it to the "off" position.
-
Shut Off the Water Supply: After securing the power source, it's time to turn off the water supply to the tankless water heater. Locate the shut-off valve connected to the unit and close it to stop the flow of water into the system. This crucial step prevents water from entering the heater during the flushing process, ensuring a safe and effective maintenance procedure.
-
Verify the Power and Water Supply: Once the power and water supply have been turned off, it's important to double-check that both are completely shut off. This verification step helps to prevent any accidental power or water flow during the maintenance process, safeguarding both the unit and the individual performing the flushing.
By following these steps to turn off the power and water supply, you establish a safe and controlled environment for flushing your tankless water heater. This foundational preparation sets the stage for the subsequent steps, allowing you to proceed with confidence and efficiency in maintaining your water heater.
Step 2: Drain the Water Heater
Draining the tankless water heater is a critical step in the maintenance process, as it allows for the removal of any remaining water within the unit, preparing it for the subsequent flushing procedure. Properly draining the water heater ensures that the flushing solution can effectively remove sediment and mineral buildup, promoting the heater's optimal performance.
Steps to Drain the Water Heater:
-
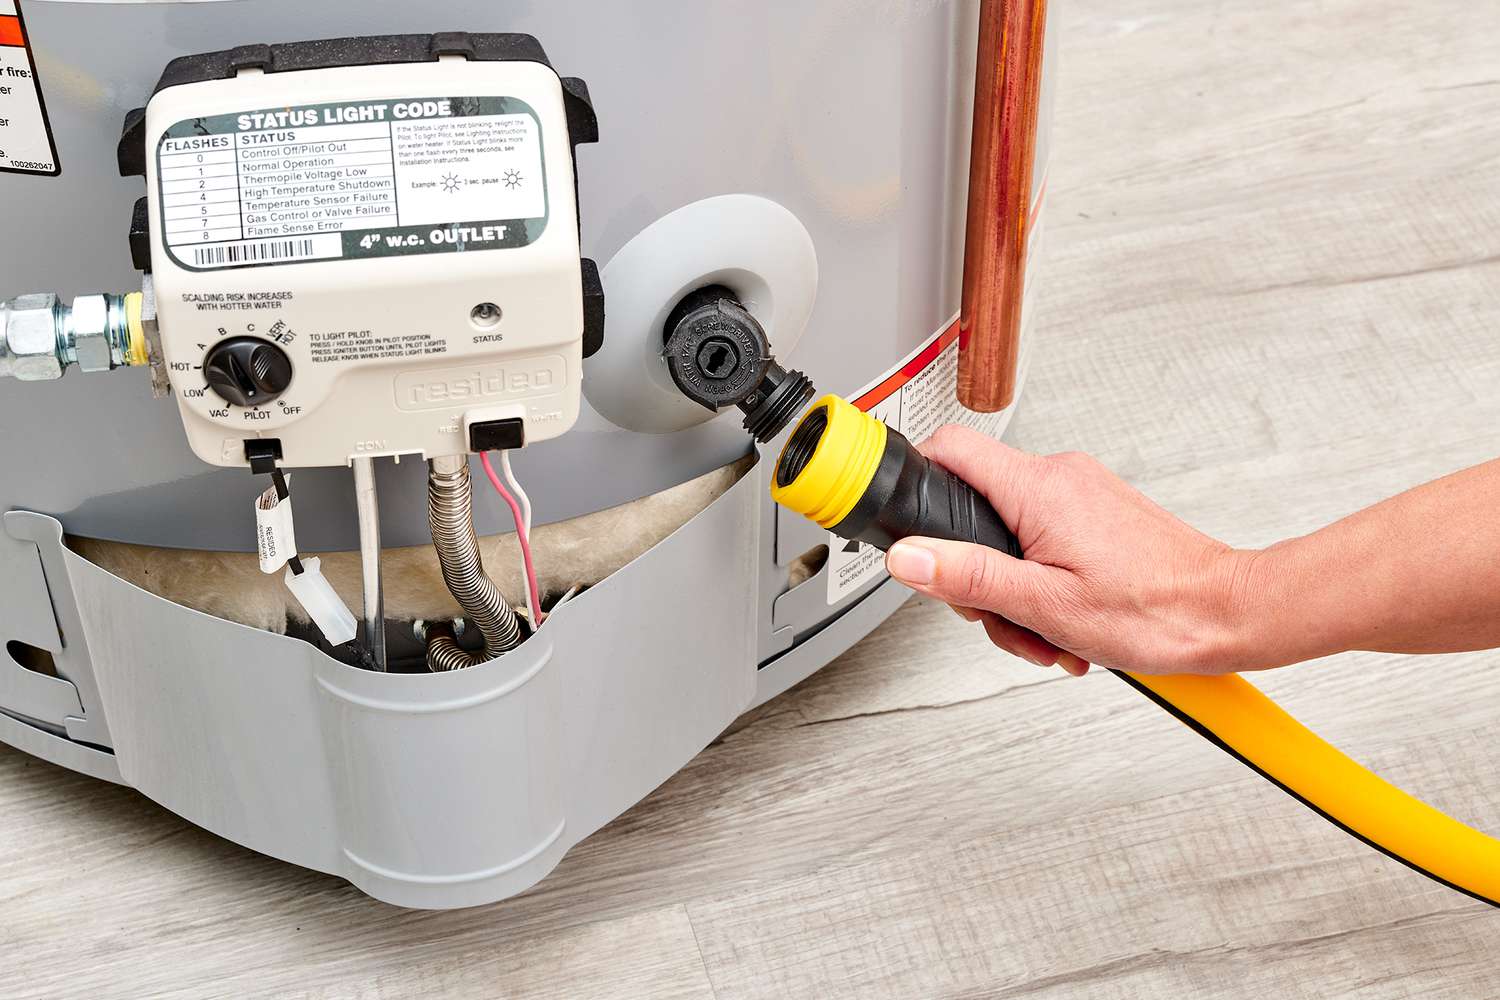
Locate the Drain Valve: Begin by identifying the drain valve on the tankless water heater. This valve is typically located at the bottom of the unit and is designed for easy access during maintenance procedures.
-
Attach a Hose (If Applicable): In some cases, attaching a hose to the drain valve can facilitate the draining process. If your unit is equipped with a threaded connection for a hose, securely attach the hose to the drain valve to direct the water flow to a suitable drainage area.
-
Open the Drain Valve: With the hose in place, carefully open the drain valve to allow the water to flow out of the tankless water heater. If you are not using a hose, ensure that you have a suitable container to collect the water as it drains from the unit.
-
Allow Complete Drainage: Once the drain valve is open, allow the water heater to drain completely. This step is essential to ensure that all residual water, along with any sediment or impurities, is effectively removed from the unit.
-
Close the Drain Valve: After the water heater has fully drained, securely close the drain valve to prevent any further water loss. If you used a hose for drainage, carefully detach the hose from the valve and store it appropriately for future use.
By following these steps to drain the water heater, you prepare the tankless unit for the subsequent flushing process. This foundational step sets the stage for effectively removing sediment and mineral buildup, ultimately contributing to the heater's continued efficiency and longevity.
Step 3: Flush the Tankless Water Heater
Flushing the tankless water heater is a crucial maintenance task that helps to eliminate mineral deposits, sediment, and other impurities that can accumulate within the system over time. This process is essential for restoring the heater's efficiency and ensuring a consistent supply of hot water in your home.
Read more: How To Turn Hot Water Heater Up
Steps to Flush the Tankless Water Heater:
-
Prepare the Flushing Solution: Begin by preparing a descaling solution specifically designed for tankless water heaters. This solution is typically a mixture of white vinegar and water, which effectively breaks down mineral deposits and scale buildup within the unit. The exact ratio of vinegar to water may vary based on the manufacturer's recommendations, so be sure to consult the heater's manual for specific guidelines.
-
Connect the Flushing Kit: Many tankless water heaters are equipped with flushing ports and valves to facilitate the maintenance process. If your unit has these features, connect a suitable flushing kit to the ports, ensuring a secure and leak-free connection. The flushing kit typically includes hoses and connectors designed for this specific purpose, allowing for the controlled circulation of the descaling solution through the water heater.
-
Initiate the Flushing Process: With the flushing kit in place, it's time to initiate the flushing process. Open the necessary valves to create a closed loop for the descaling solution to circulate through the water heater. This controlled circulation allows the solution to reach all parts of the unit, effectively breaking down and loosening any accumulated deposits within the system.
-
Allow the Solution to Circulate: Once the flushing process is underway, allow the descaling solution to circulate through the tankless water heater for the recommended duration. This period may vary based on the severity of scale buildup and the specific recommendations provided by the manufacturer. Allowing sufficient time for the solution to work ensures thorough descaling and effective removal of deposits from the system.
-
Flush with Clean Water: After the descaling solution has circulated for the recommended duration, flush the tankless water heater with clean water to remove any remaining traces of the solution and dislodged deposits. This step helps to ensure that the heater is free from any residual descaling solution, promoting the delivery of clean and uncontaminated hot water in your home.
By following these steps to flush the tankless water heater, you effectively remove mineral deposits and scale buildup, restoring the unit's efficiency and preserving its functionality. This essential maintenance task contributes to the long-term performance and reliability of your tankless water heater, ensuring a consistent supply of hot water for your household needs.
Step 4: Clean the Filter
Cleaning the filter of your tankless water heater is a crucial maintenance step that contributes to the unit's overall performance and longevity. The filter, also known as the inlet water filter, serves as a protective barrier, preventing debris and sediment from entering the water heater and causing potential damage. Over time, the filter can become clogged with impurities, hindering the flow of water and impacting the heater's efficiency. Therefore, regular cleaning of the filter is essential to ensure the uninterrupted operation of your tankless water heater.
Steps to Clean the Filter:
-
Locate the Inlet Water Filter: Begin by locating the inlet water filter on your tankless water heater. The filter is typically situated at the point where the cold water supply enters the unit. Depending on the model, the filter may be housed within a removable casing or directly accessible for cleaning.
-
Turn Off the Water Supply: Before proceeding with the filter cleaning, it is important to turn off the water supply to the tankless water heater. This precautionary step prevents water from flowing into the unit during the maintenance process, ensuring a safe and controlled environment for the filter cleaning.
-
Remove the Filter Housing: If the filter is housed within a casing, carefully remove the housing to access the filter. In some cases, the housing may be secured with screws or clips, so use the appropriate tools to detach it from the unit. For filters that are directly accessible, proceed to the next step without removing any housing.
-
Inspect and Clean the Filter: Once the filter is exposed, inspect it for any signs of debris, sediment, or buildup. If the filter appears dirty or clogged, gently rinse it under running water to remove the accumulated impurities. Avoid using harsh cleaning agents or brushes that may damage the filter. Instead, rely on a gentle stream of water to dislodge and flush out the debris.
-
Reassemble the Filter Housing: After cleaning the filter, carefully reassemble the filter housing if it was removed. Ensure that the housing is securely attached to the unit, maintaining a proper seal to prevent any water leakage once the water supply is restored.
-
Restore the Water Supply: With the filter cleaned and reinstalled, it's time to restore the water supply to the tankless water heater. Turn the water supply valve back on, allowing the flow of water into the unit. Verify that there are no leaks around the filter housing or connections, ensuring the integrity of the system.
By following these steps to clean the filter of your tankless water heater, you contribute to the unit's efficient operation and long-term reliability. Regular maintenance of the filter helps to prevent clogging and ensures a consistent flow of clean water through the heater, ultimately supporting its optimal performance in delivering hot water for your household needs.
Step 5: Refill and Restart the Water Heater
Refilling and restarting the tankless water heater is the final step in the maintenance process, ensuring that the unit is ready to resume its essential function of providing a consistent supply of hot water to your home. This step involves restoring the water supply to the heater, verifying its proper operation, and restarting the system to resume normal functionality.
Steps to Refill and Restart the Water Heater:
-
Open the Water Supply Valve: With the flushing and cleaning processes completed, it's time to open the water supply valve to allow the flow of water into the tankless water heater. Ensure that the valve is fully open, allowing for the unrestricted entry of water into the unit.
-
Check for Leaks: As the water supply is restored, carefully inspect the connections, valves, and the area around the water heater for any signs of leaks. It's important to verify that the system is free from any leaks before proceeding to the next step.
-
Restore Power to the Unit: If the tankless water heater is electric, return to the circuit breaker panel and switch the dedicated breaker back to the "on" position. For gas-powered units, locate the gas supply valve and turn it to the "on" position to restore the gas flow to the heater.
-
Monitor the Restart Process: Once the power and water supply have been restored, monitor the restart process of the tankless water heater. Depending on the model, the unit may display indicators or codes to signify its startup sequence. Pay attention to any error codes or unusual behavior, as this may indicate the need for further inspection or professional maintenance.
-
Verify Hot Water Flow: After the restart process is complete, open a hot water tap in your home to verify that the tankless water heater is delivering hot water as expected. Allow the water to run for a few minutes to ensure a consistent and steady flow of hot water from the heater.
By following these steps to refill and restart the water heater, you complete the maintenance process and ensure that the tankless unit is ready to resume its crucial role in providing hot water for your household needs. This final step signifies the successful completion of the maintenance procedure, allowing you to enjoy the continued efficiency and reliability of your tankless water heater.
Conclusion
In conclusion, maintaining a tankless water heater through regular flushing and cleaning procedures is essential for preserving its efficiency and longevity. By following the step-by-step guide outlined in this article, you can confidently undertake the maintenance tasks required to keep your tankless water heater operating at its best.
Flushing the tankless water heater, which involves draining the unit, circulating a descaling solution, and cleaning the filter, effectively removes mineral deposits, sediment, and impurities that can hinder the heater's performance. This proactive maintenance approach not only ensures a consistent supply of hot water but also contributes to energy efficiency and cost savings over time.
Furthermore, the thorough cleaning of the filter safeguards the unit from potential damage caused by debris and sediment, promoting uninterrupted water flow and optimal functionality. By incorporating these maintenance steps into your home care routine, you can extend the lifespan of your tankless water heater and minimize the risk of malfunctions or reduced performance.
It's important to note that while the maintenance procedures outlined in this guide can be performed by homeowners, seeking professional assistance for more complex issues or if you are unsure about any aspect of the maintenance process is always advisable. Professional service can provide comprehensive inspections, repairs, and maintenance to ensure the long-term reliability of your tankless water heater.
By taking a proactive approach to maintaining your tankless water heater, you not only ensure a consistent supply of hot water for your household needs but also contribute to the overall efficiency and sustainability of your home. Regular maintenance not only protects your investment in the water heater but also supports a comfortable and reliable hot water supply for your daily activities.
Incorporating these maintenance tasks into your home care routine demonstrates a commitment to preserving the functionality and efficiency of your tankless water heater, ultimately enhancing the comfort and convenience of your home environment. With proper maintenance, your tankless water heater can continue to deliver reliable hot water, meeting the demands of your household for years to come.