Home>Technology and Computers>How To Add A Line In Excel
Technology and Computers
How To Add A Line In Excel
Published: February 29, 2024
Learn how to add a line in Excel with our easy-to-follow guide. Enhance your technology and computer skills with this simple tutorial.
(Many of the links in this article redirect to a specific reviewed product. Your purchase of these products through affiliate links helps to generate commission for Noodls.com, at no extra cost. Learn more)
Table of Contents
Introduction
Adding a line in Excel can be a useful and visually appealing way to separate data, emphasize specific information, or enhance the overall presentation of your spreadsheet. Whether you're a seasoned Excel user or just getting started, knowing how to add a line can come in handy for various purposes. In this article, we'll explore three different methods to achieve this, each offering its own unique approach and visual outcome.
By mastering these methods, you'll have the flexibility to customize your Excel sheets according to your specific needs, making your data more comprehensible and visually engaging. So, let's dive into the step-by-step processes of adding lines in Excel using the "Insert" option, the "Borders" option, and the "Shapes" option. Whether you're aiming to enhance the clarity of your data or simply want to add a touch of creativity to your spreadsheets, these methods will equip you with the skills to do so effectively.
Read more: How To Add Columns In Excel
Method 1: Using the "Insert" Option
Adding a line in Excel using the "Insert" option is a straightforward process that allows for precise customization. This method is particularly useful when you want to insert a line that spans across specific cells or columns, providing a clear visual separation within your spreadsheet.
To begin, open your Excel spreadsheet and navigate to the cell where you want to insert the line. Next, follow these step-by-step instructions:
-
Select the Cell: Click on the cell where you want the line to begin. This will ensure that the line is inserted at the desired location within your spreadsheet.
-
Navigate to the "Insert" Tab: At the top of the Excel interface, locate and click on the "Insert" tab. This will reveal a range of options for adding various elements to your spreadsheet.
-
Choose the "Shapes" Option: Within the "Insert" tab, select the "Shapes" option. This will open a dropdown menu featuring a variety of shapes and lines that can be inserted into your spreadsheet.
-
Select the Line Shape: From the dropdown menu, choose the "Line" shape. This will activate the drawing tool, allowing you to create a line of custom length and orientation.
-
Draw the Line: Click and drag your mouse to draw the line across the cells or columns where you want it to appear. Excel provides guidelines to help you align the line precisely, ensuring that it fits seamlessly within your spreadsheet layout.
-
Customize the Line Properties: Once the line is drawn, you can further customize its properties, such as color, thickness, and style, to align with your specific preferences and the overall aesthetic of your spreadsheet.
By following these steps, you can seamlessly integrate a line into your Excel spreadsheet using the "Insert" option. This method offers a high degree of control and precision, allowing you to tailor the line to your exact specifications and enhance the visual organization of your data.
Utilizing the "Insert" option to add a line in Excel empowers you to create a professional and polished spreadsheet that effectively communicates your data. Whether you're highlighting a key section of information or delineating distinct categories, this method provides a versatile and visually impactful way to enhance the presentation of your Excel sheets.
Method 2: Using the "Borders" Option
Adding a line in Excel using the "Borders" option offers a convenient and efficient way to delineate and organize your data. This method is particularly useful when you want to create clear visual boundaries around specific cells, ranges, or the entire spreadsheet. By leveraging the "Borders" option, you can enhance the readability and structure of your Excel sheets with ease.
To utilize the "Borders" option effectively, follow these step-by-step instructions:
-
Select the Cells or Range: Begin by selecting the cells or range where you want to add the line. This could involve highlighting a single cell, a group of adjacent cells, or an entire row or column, depending on your specific requirements.
-
Navigate to the "Home" Tab: At the top of the Excel interface, locate and click on the "Home" tab. This tab houses a variety of formatting options that enable you to customize the appearance of your spreadsheet.
-
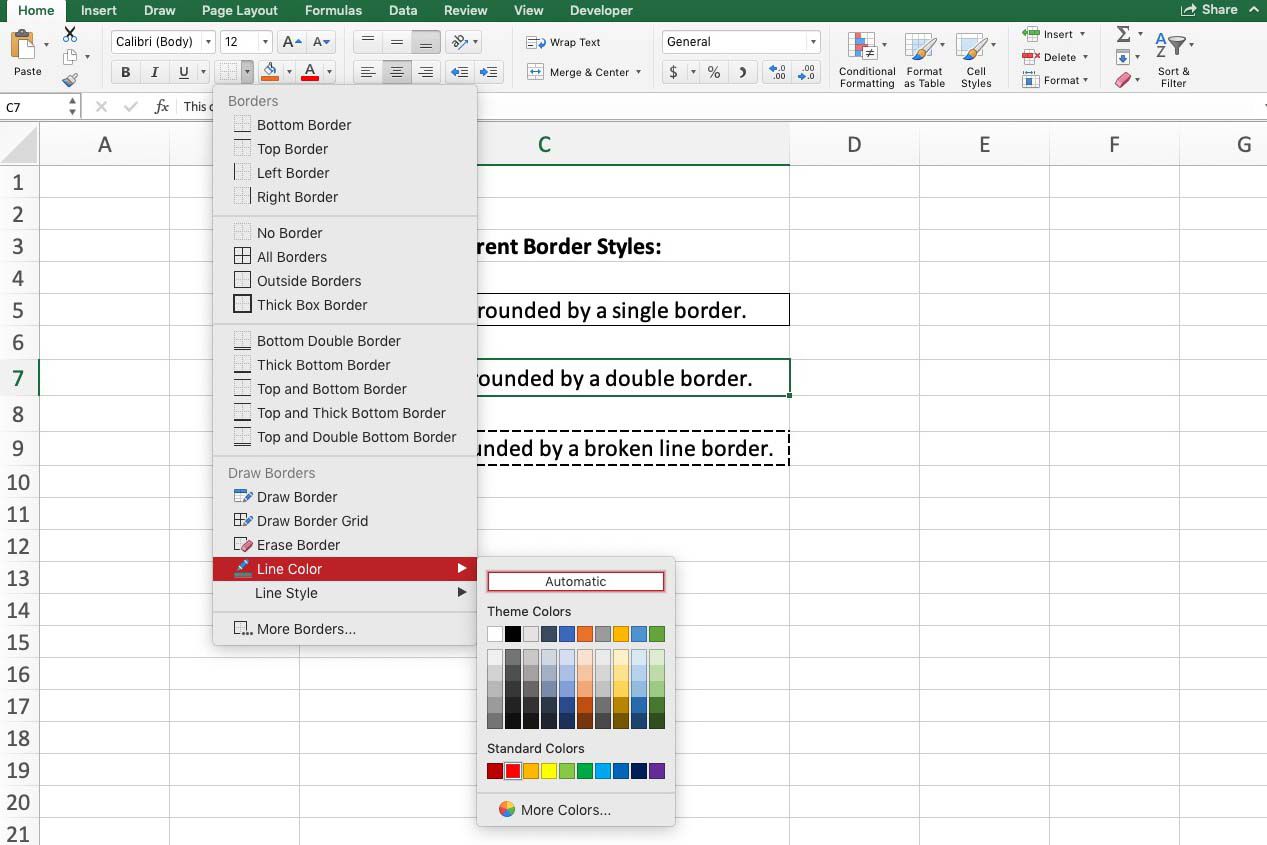
Access the "Borders" Dropdown Menu: Within the "Home" tab, find the "Font" group, which includes the "Borders" option. Click on the small arrow next to "Borders" to open the dropdown menu, revealing a selection of border styles and configurations.
-
Choose the Desired Border Style: From the dropdown menu, select the type of border you want to add. Excel provides options such as "All Borders," "Outside Borders," "Thick Box Border," and more, allowing you to tailor the line style to your specific visual preferences.
-
Apply the Border to the Selected Cells: Once you've chosen the desired border style, click on it to apply the border to the selected cells or range. Excel will instantly add the specified border, visually separating the designated area from the surrounding content.
-
Customize Border Color and Thickness (Optional): If you wish to further customize the border, you can adjust its color and thickness using the additional formatting options available within the "Borders" dropdown menu. This allows you to harmonize the border with the overall aesthetic of your spreadsheet.
By following these steps, you can effectively add a line in Excel using the "Borders" option, enhancing the visual structure and organization of your data. Whether you're creating a table, outlining specific data ranges, or emphasizing key information, this method provides a simple yet impactful way to delineate and highlight content within your Excel sheets.
Utilizing the "Borders" option empowers you to create well-defined visual boundaries that improve the clarity and readability of your spreadsheet. This method is particularly valuable when presenting data to others, as it enhances the professional presentation of your Excel sheets while effectively communicating the information they contain.
Method 3: Using the "Shapes" Option
Adding a line in Excel using the "Shapes" option provides a versatile and creative approach to visually enhancing your spreadsheets. This method offers the flexibility to insert lines of varying styles, lengths, and angles, allowing for precise customization and artistic expression within your Excel sheets.
To utilize the "Shapes" option effectively, follow these step-by-step instructions:
-
Open the Excel Spreadsheet: Begin by opening the Excel spreadsheet where you want to add the line. Navigate to the specific location within the sheet where the line will be inserted.
-
Access the "Insert" Tab: At the top of the Excel interface, locate and click on the "Insert" tab. This tab houses a range of options for adding various elements to your spreadsheet, including shapes, illustrations, and other visual elements.
-
Select the "Shapes" Option: Within the "Insert" tab, find and click on the "Shapes" option. This will reveal a dropdown menu featuring a diverse selection of shapes and lines that can be inserted into your spreadsheet.
-
Choose the Line Shape: From the dropdown menu, select the "Line" shape. This action activates the drawing tool, allowing you to create a line of custom length and orientation within your Excel sheet.
-
Draw the Line: Click and drag your mouse to draw the line in the desired location within the spreadsheet. Excel provides guidelines to assist in aligning the line precisely, ensuring that it fits seamlessly within the layout of your data.
-
Customize the Line Properties: Once the line is drawn, you can further customize its properties, such as color, thickness, and style, to align with your specific preferences and the overall aesthetic of your spreadsheet.
By following these steps, you can seamlessly integrate a line into your Excel spreadsheet using the "Shapes" option. This method empowers you to infuse your spreadsheets with creativity and visual flair, allowing for the insertion of lines that complement the overall design and presentation of your data.
Utilizing the "Shapes" option to add a line in Excel offers a dynamic and visually impactful way to enhance the appearance of your spreadsheets. Whether you're aiming to delineate sections of data, create custom visual elements, or add a touch of artistic expression, this method provides a versatile and engaging approach to customizing your Excel sheets.
Conclusion
In conclusion, mastering the art of adding lines in Excel empowers users to elevate the visual appeal and organization of their spreadsheets. By exploring the three distinct methods – using the "Insert" option, the "Borders" option, and the "Shapes" option – individuals can effectively customize their Excel sheets to suit specific data presentation needs.
The "Insert" option offers precision and control, allowing users to draw lines across specific cells or columns with ease. This method is ideal for creating clear visual separations within the spreadsheet, enhancing the overall clarity of the data. Additionally, the "Borders" option provides a convenient way to delineate and organize data, offering various border styles to emphasize specific cells or ranges. This method significantly improves the readability and structure of Excel sheets, making it particularly valuable for creating tables and highlighting key information.
Furthermore, the "Shapes" option introduces a creative and versatile approach to visually enhancing spreadsheets. By leveraging this method, users can insert lines of varying styles, lengths, and angles, adding a touch of artistic expression to their Excel sheets. This flexibility allows for the creation of custom visual elements that complement the overall design and presentation of the data.
Incorporating lines into Excel spreadsheets not only enhances the visual organization of data but also contributes to a more professional and polished presentation. Whether it's delineating sections of information, emphasizing key data points, or simply adding a touch of creativity, the ability to add lines in Excel equips users with the tools to effectively communicate their data in a visually engaging manner.
By understanding and utilizing these methods, individuals can tailor their Excel sheets to suit specific requirements, whether for personal use, professional presentations, or collaborative projects. The seamless integration of lines within Excel not only improves the visual appeal of spreadsheets but also enhances the overall user experience, making data comprehension more accessible and engaging.
In essence, the ability to add lines in Excel serves as a valuable skill that empowers users to transform their data into visually compelling and organized presentations, ultimately enhancing the effectiveness and impact of their spreadsheets.