Home>Technology and Computers>How To Change Your Number On IPhone
Technology and Computers
How To Change Your Number On IPhone
Published: March 5, 2024
Learn how to change your phone number on iPhone with our easy step-by-step guide. Keep your technology and computers up to date with our helpful tips.
(Many of the links in this article redirect to a specific reviewed product. Your purchase of these products through affiliate links helps to generate commission for Noodls.com, at no extra cost. Learn more)
Table of Contents
Introduction
Changing your phone number on your iPhone can be necessary for various reasons, such as getting a new number from your service provider or switching to a different carrier. Whether you've moved to a new area code or simply want to update your contact information, knowing how to change your number on your iPhone is essential for staying connected. Fortunately, Apple has made this process straightforward, allowing you to update your phone number with just a few simple steps.
In this guide, we'll walk you through the process of changing your number on your iPhone, ensuring that you can seamlessly transition to your new contact information. By following these steps, you'll be able to update your phone number and ensure that your friends, family, and colleagues can reach you without any interruptions. So, let's dive into the steps to change your number on your iPhone and keep your communication channels open and up to date.
Step 1: Open Settings
To change your phone number on your iPhone, the first step is to open the Settings app. This app serves as the control center for all the settings and configurations on your device, making it the perfect place to start the process of updating your phone number.
To open the Settings app, simply locate the gear-shaped icon on your home screen and tap on it. This action will launch the Settings app, presenting you with a wide array of options to customize and manage your iPhone's settings.
Once you've accessed the Settings app, you'll be ready to proceed to the next step in the process of changing your phone number on your iPhone. This initial step sets the stage for the subsequent actions that will enable you to seamlessly update your contact information and ensure that your new phone number is accurately reflected on your device.
With the Settings app now open, you're one step closer to successfully changing your phone number on your iPhone. This straightforward process allows you to take control of your contact details and maintain accurate and up-to-date information on your device.
Step 2: Tap on Phone
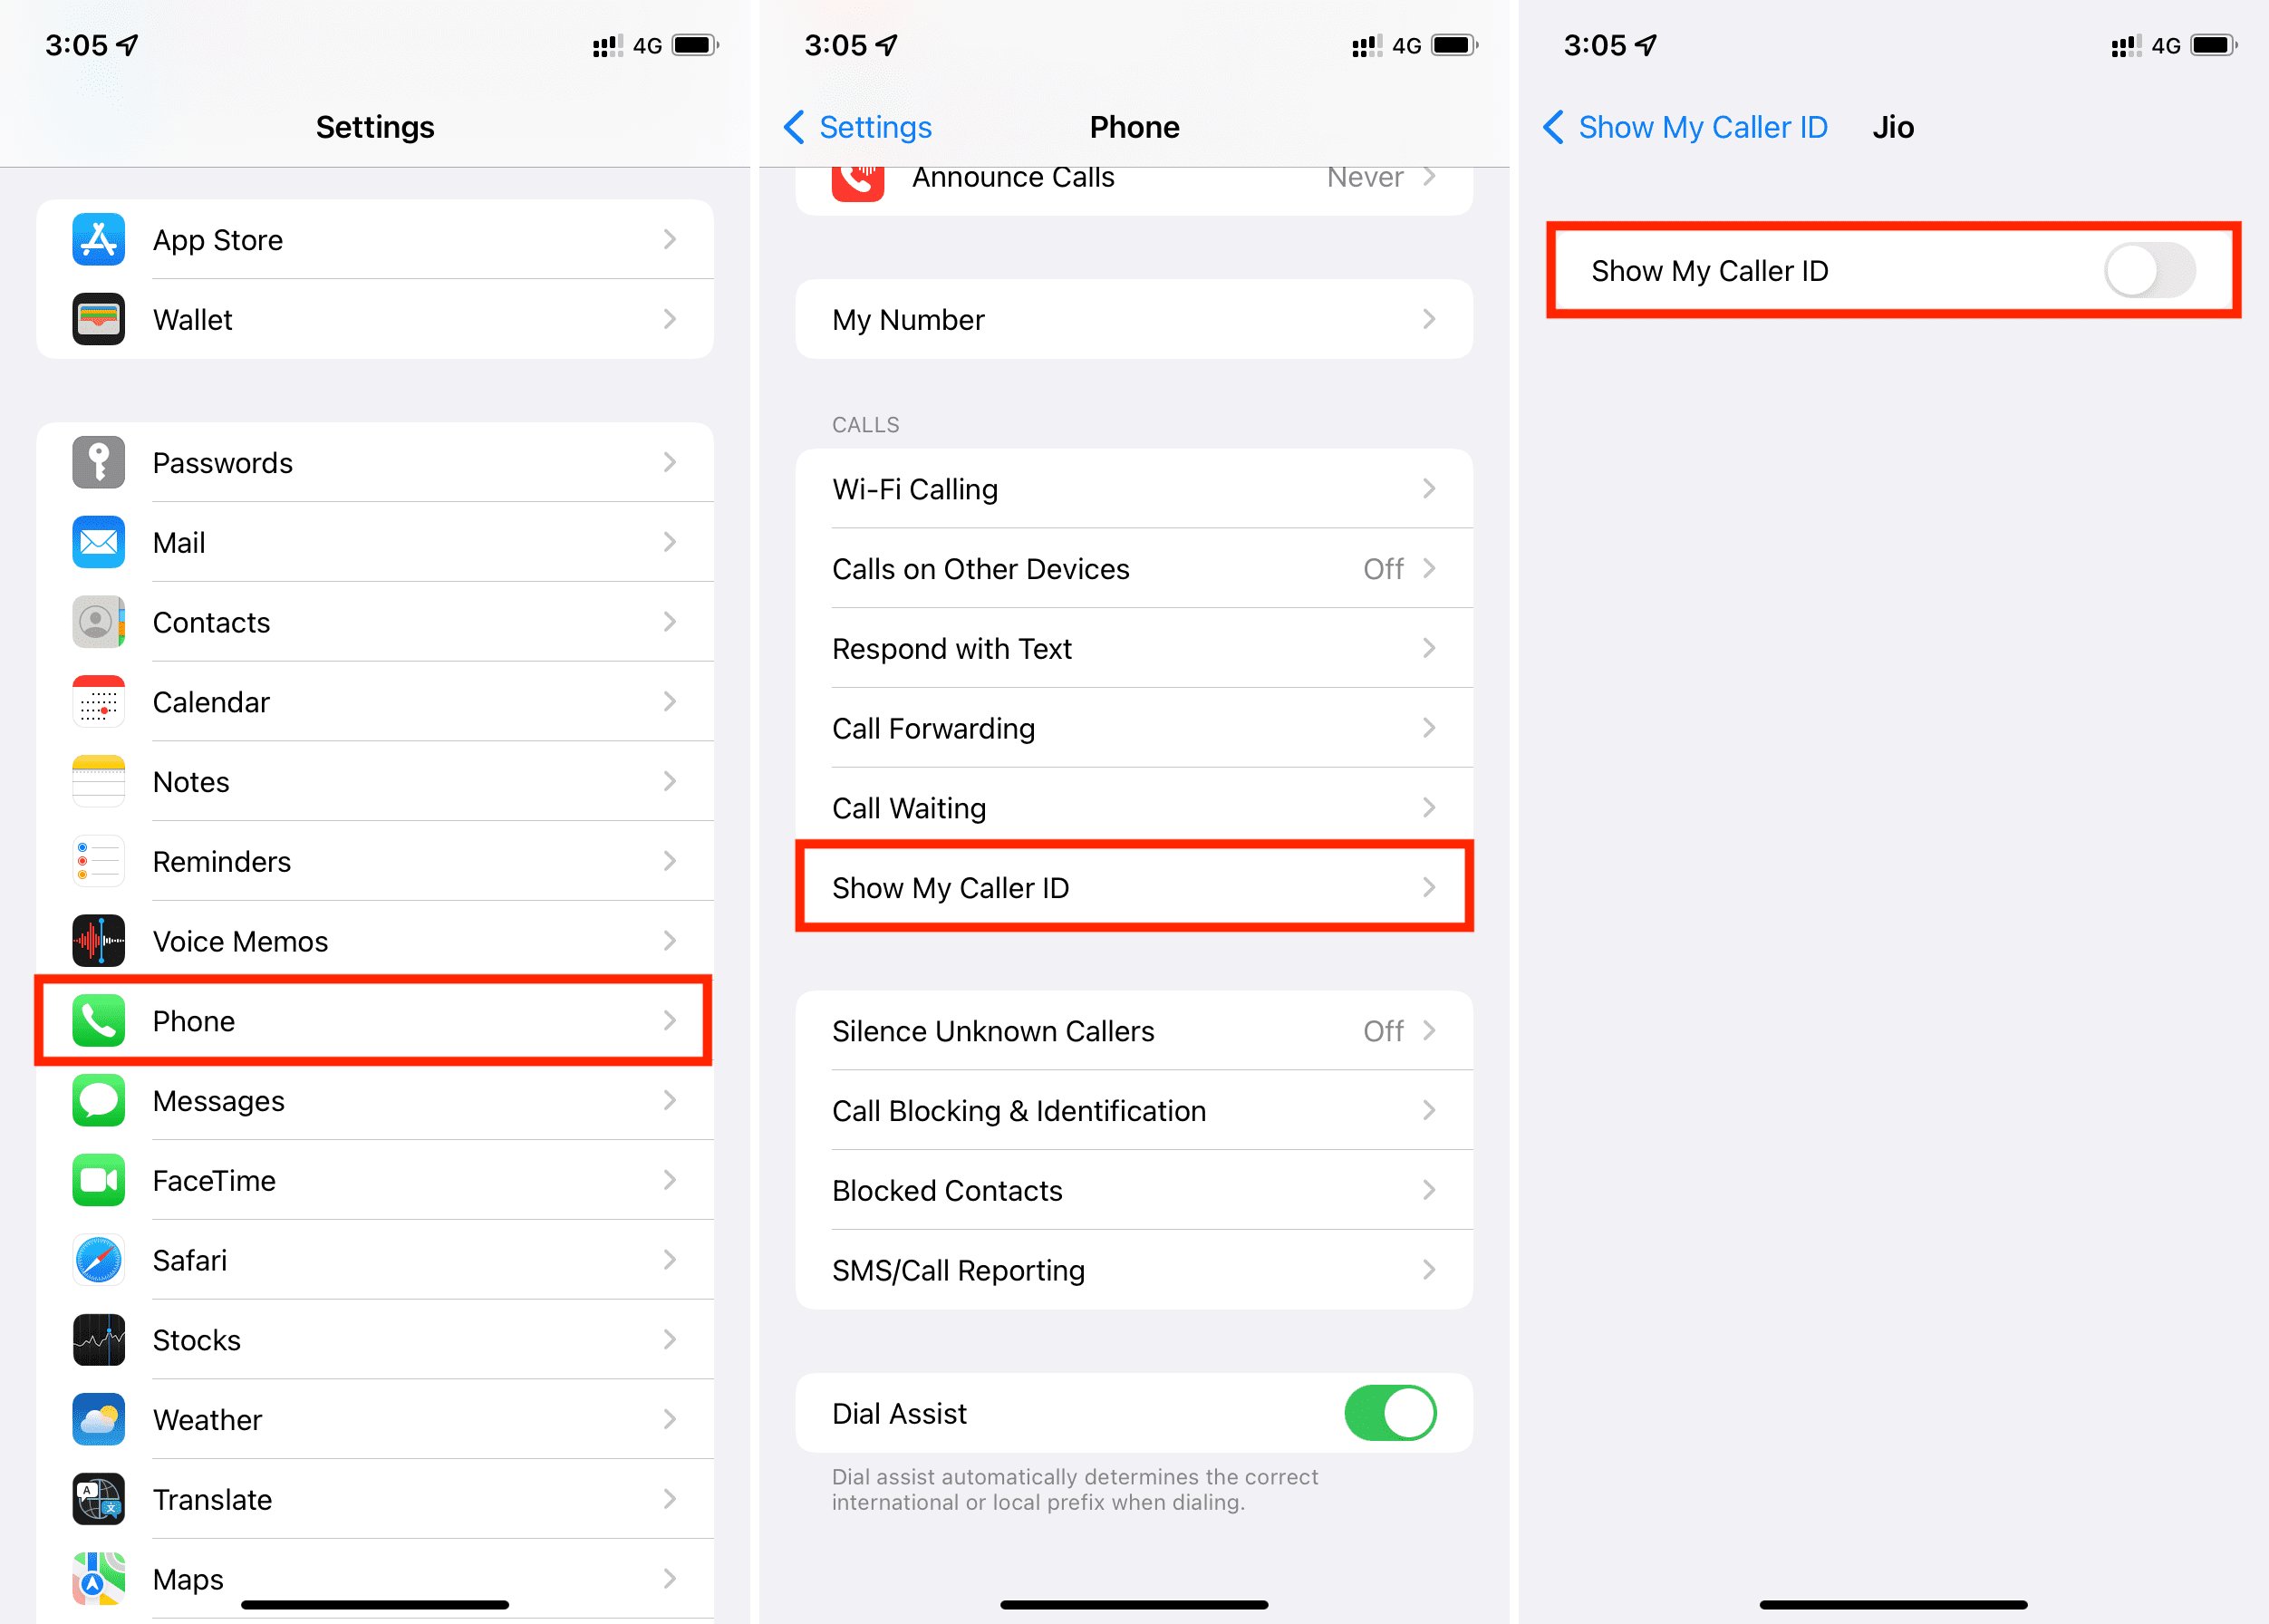
After opening the Settings app, the next step in changing your phone number on your iPhone is to tap on the "Phone" option. This action will direct you to a range of phone-related settings and configurations, including the ability to manage your phone number and associated details.
Upon tapping on the "Phone" option within the Settings app, you will be presented with a variety of settings related to your iPhone's calling functionality. This section allows you to customize call-related features, such as call forwarding, caller ID, and additional settings specific to your phone service.
By tapping on the "Phone" option, you are one step closer to updating your phone number on your iPhone. This action brings you closer to the specific settings that are crucial for managing your contact information and ensuring that your new phone number is seamlessly integrated into your device.
The "Phone" section within the Settings app serves as a central hub for all call-related configurations, providing you with the necessary tools to manage your phone number and associated settings. This step sets the stage for the subsequent actions that will enable you to smoothly transition to your new phone number and maintain accurate contact information on your iPhone.
With the "Phone" section now accessed, you are well-positioned to proceed to the next steps in the process of changing your phone number on your iPhone. This pivotal action brings you closer to successfully updating your contact details and ensuring that your new phone number is reflected across your device's calling features.
Tapping on the "Phone" option within the Settings app is a crucial step in the process of changing your phone number on your iPhone. This action grants you access to the essential settings and configurations that are integral to managing your contact information, ultimately allowing you to seamlessly transition to your new phone number with ease.
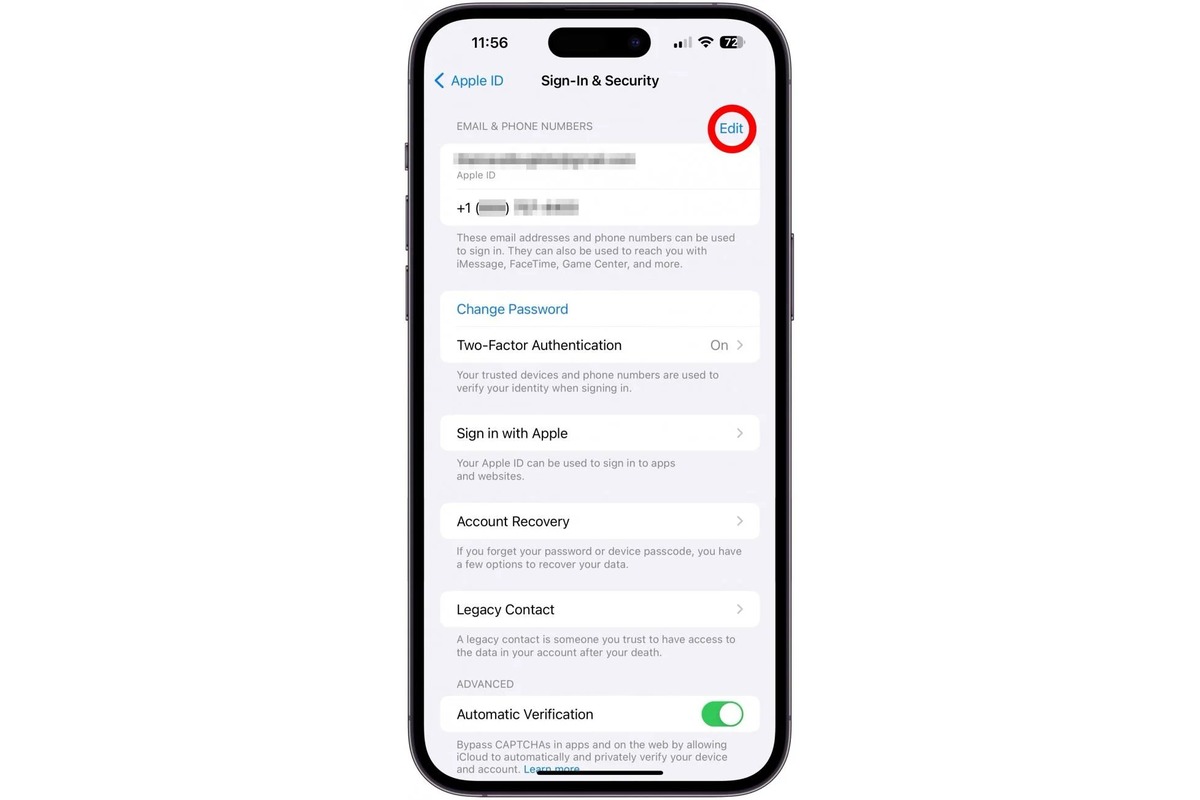
Step 3: Tap on My Number
Once you have navigated to the "Phone" section within the Settings app, the next crucial step in the process of changing your phone number on your iPhone is to tap on the "My Number" option. This action directs you to the specific setting where your current phone number is displayed, allowing you to update it with your new contact information.
Tapping on "My Number" within the "Phone" settings unveils the current phone number associated with your iPhone. This information serves as a reference point, indicating the existing phone number that is currently linked to your device. By accessing this setting, you gain the ability to modify and replace the displayed number with your new phone number, ensuring that your contact information is accurately reflected on your iPhone.
Upon tapping on "My Number," you will be presented with a text field where you can input your new phone number. This intuitive interface allows you to seamlessly enter your updated contact information, enabling you to swiftly transition to your new phone number without any complications. By leveraging this straightforward process, you can ensure that your iPhone reflects the most current and accurate contact details, facilitating uninterrupted communication with your contacts.
The "My Number" setting within the "Phone" section serves as a pivotal point in the process of updating your phone number on your iPhone. This step empowers you to take control of your contact information, providing you with the means to effortlessly integrate your new phone number into your device. By tapping on "My Number," you are one step closer to finalizing the update of your contact details, ensuring that your iPhone accurately reflects your new phone number across its calling features and associated functionalities.
With the "My Number" setting now accessed, you are well-positioned to proceed to the subsequent steps in the process of changing your phone number on your iPhone. This essential action brings you closer to seamlessly updating your contact information, allowing you to maintain accurate and up-to-date details on your device. By tapping on "My Number," you are actively engaging in the process of ensuring that your new phone number is seamlessly integrated into your iPhone, enabling you to stay connected with ease.
Tapping on "My Number" within the "Phone" settings is a pivotal step in the process of updating your phone number on your iPhone. This action grants you direct access to the specific setting where your current phone number is displayed, providing you with the opportunity to effortlessly input your new contact information. By leveraging this intuitive process, you can ensure that your iPhone accurately reflects your updated phone number, facilitating uninterrupted communication and seamless connectivity with your contacts.
Step 4: Enter New Number
Upon tapping on "My Number" within the "Phone" settings, you will be presented with a text field where you can input your new phone number. This intuitive interface allows you to seamlessly enter your updated contact information, enabling you to swiftly transition to your new phone number without any complications. By leveraging this straightforward process, you can ensure that your iPhone reflects the most current and accurate contact details, facilitating uninterrupted communication with your contacts.
When entering your new phone number, it is crucial to input the digits accurately to avoid any discrepancies in your contact information. Take the time to carefully type in your new phone number, double-checking each digit to guarantee its precision. This meticulous approach ensures that your updated contact information is correctly reflected on your iPhone, minimizing the potential for communication errors or misattributed contacts.
As you input your new phone number, consider any relevant area codes or country codes that may be necessary for ensuring the correct formatting of your contact information. Depending on your location and the specifics of your new phone number, including the appropriate codes is essential for accurately updating your contact details. By incorporating these codes as needed, you can ensure that your phone number is correctly formatted and ready for seamless integration into your iPhone's calling features.
Furthermore, as you enter your new phone number, it is important to verify the accuracy of the input to prevent any discrepancies. Once you have input the new number, take a moment to review and confirm its correctness before proceeding. This simple yet crucial step can help you avoid potential issues related to incorrect contact information, ensuring that your new phone number is accurately reflected on your iPhone.
By following these steps and entering your new phone number with precision and attention to detail, you can seamlessly update your contact information on your iPhone. This meticulous approach guarantees that your new phone number is accurately integrated into your device, allowing for uninterrupted communication and seamless connectivity with your contacts.
Read more: How To Change IPhone Name
Step 5: Confirm Changes
After entering your new phone number, the final step in the process of changing your number on your iPhone is to confirm the changes. This pivotal action ensures that your updated contact information is seamlessly integrated into your device, allowing for uninterrupted communication and connectivity with your contacts.
Upon entering your new phone number, it is essential to review the input and verify its accuracy before proceeding. Take a moment to double-check each digit and ensure that the number is correctly formatted, including any relevant area codes or country codes as needed. This meticulous approach minimizes the potential for discrepancies and guarantees that your new phone number is accurately reflected on your iPhone.
Once you have confirmed the accuracy of the entered number, proceed to save the changes. Depending on your iPhone model and software version, the specific steps to save the updated phone number may vary. However, look for an option to save or apply the changes within the settings interface, ensuring that your new phone number is officially updated and stored on your device.
After saving the changes, it is advisable to restart your iPhone to ensure that the updated contact information is fully implemented. A quick restart of your device allows the system to refresh and apply the modified settings, ensuring that your new phone number is seamlessly integrated into your iPhone's calling features and associated functionalities.
Following the restart, test your updated phone number by making a test call or sending a text message to verify that the changes have been successfully applied. By engaging in a brief communication test, you can confirm that your new phone number is accurately reflected in your device's calling and messaging capabilities, allowing for uninterrupted connectivity with your contacts.
By following these steps and confirming the changes, you can seamlessly update your phone number on your iPhone, ensuring that your contact information is accurate and up to date. This straightforward process empowers you to take control of your communication channels, allowing for seamless connectivity and uninterrupted access to your updated contact details.