Home>Technology and Computers>How To Change Home Address On IPhone
Technology and Computers
How To Change Home Address On IPhone
Published: March 5, 2024
Learn how to easily change your home address on iPhone with our step-by-step guide. Keep your technology and computers up to date with our helpful tips.
(Many of the links in this article redirect to a specific reviewed product. Your purchase of these products through affiliate links helps to generate commission for Noodls.com, at no extra cost. Learn more)
Table of Contents
Introduction
Changing your home address on your iPhone is a simple yet essential task that ensures your device reflects your current location accurately. Whether you've moved to a new house or need to update your address for location-based services, keeping this information up to date is crucial. Fortunately, Apple has made it easy for users to modify their home address directly from their iPhone, eliminating the need for complex procedures or external assistance.
By following a few straightforward steps within the Settings app, you can seamlessly update your home address and ensure that your iPhone accurately reflects your current location. This not only enhances the functionality of location-based services but also ensures that emergency services can locate you accurately in case of an unforeseen event.
In the following sections, we will guide you through the step-by-step process of changing your home address on your iPhone. Whether you're a new iPhone user or simply need a refresher on this essential task, this guide will equip you with the knowledge and confidence to update your home address effortlessly. Let's dive into the simple yet impactful process of ensuring that your iPhone reflects your current home address accurately.
Read more: How To Find The MAC Address Of An IPhone
Step 1: Open the Settings app
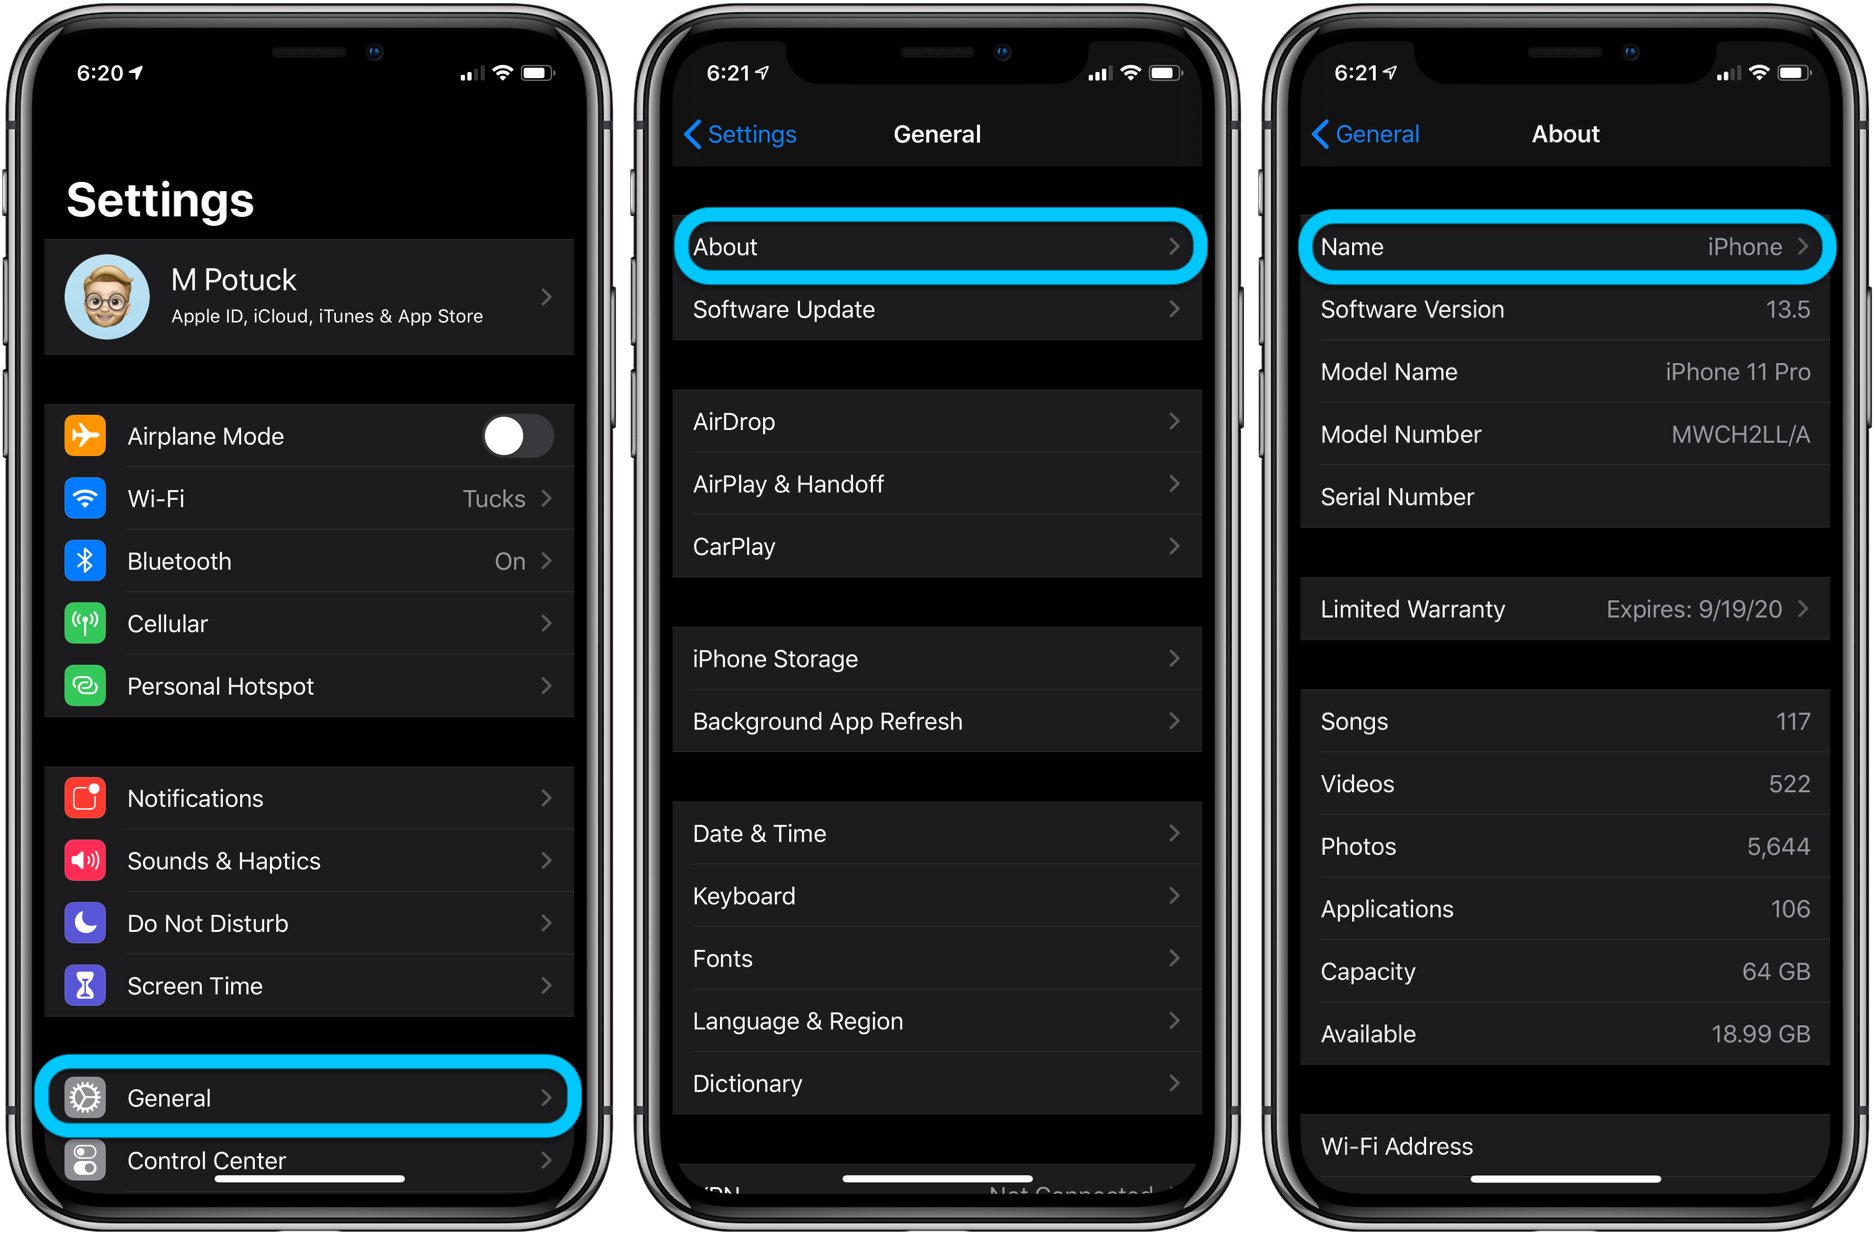
To begin the process of changing your home address on your iPhone, you'll first need to open the Settings app. This app serves as the central hub for customizing various aspects of your device, including network settings, notifications, privacy preferences, and more. Here's how you can easily access the Settings app:
-
Locate the Settings Icon: On your iPhone's home screen, look for the Settings icon. It's recognizable by its gear-shaped symbol and is typically located among your other app icons. Once you've spotted the Settings icon, tap on it to launch the app.
-
Navigate to the Settings App: If you have many apps installed and can't find the Settings icon on your home screen, you can use the search feature. Swipe down from the middle of the home screen to reveal the search bar, then type "Settings" in the search field. The Settings app should appear in the search results. Tap on it to open the app.
-
Accessing the Control Center: Another quick way to access the Settings app is by swiping down from the top-right corner of the screen to open the Control Center. Then, tap the Wi-Fi or Bluetooth icon to open the Settings app directly.
Once you've successfully opened the Settings app, you're ready to proceed to the next step in the process of updating your home address on your iPhone. By familiarizing yourself with the location and various methods for accessing the Settings app, you've taken the crucial first step toward ensuring that your device accurately reflects your current home address.
Step 2: Tap on your Apple ID
After successfully launching the Settings app on your iPhone, the next step in the process of updating your home address involves tapping on your Apple ID. Your Apple ID serves as the gateway to a multitude of essential features and settings, including your personal information, payment methods, iCloud settings, and more. Here's a detailed walkthrough of how to locate and access your Apple ID within the Settings app:
-
Locate and Tap on Your Apple ID: Upon opening the Settings app, you'll find your Apple ID profile at the top of the screen. It is represented by your name and profile picture, if you've set one. Tap on your Apple ID to access a comprehensive range of options and settings associated with your account.
-
Scroll Down to Find "Name, Phone Numbers, Email": Once you've tapped on your Apple ID, you'll be directed to a screen that displays various details and options related to your account. To proceed with updating your home address, scroll down to locate and select the "Name, Phone Numbers, Email" option. This step is crucial as it allows you to access and modify the specific details associated with your personal information.
-
Accessing Account Information: By tapping on "Name, Phone Numbers, Email," you'll be directed to a screen that provides access to your account information. This section is designed to offer a convenient way to manage and update essential details associated with your Apple ID, ensuring that your account remains accurate and up to date.
By following these steps, you've successfully navigated to the section where you can manage your personal information, including your home address. This sets the stage for the subsequent steps in the process, allowing you to seamlessly update your home address on your iPhone. With a clear understanding of how to access your Apple ID and navigate to the relevant section within the Settings app, you're well-equipped to proceed with the next steps and ensure that your device accurately reflects your current home address.
Step 3: Select "Name, Phone Numbers, Email"
Once you've tapped on your Apple ID and accessed the account settings within the Settings app, the next crucial step in updating your home address on your iPhone involves selecting "Name, Phone Numbers, Email." This section serves as the gateway to managing and modifying the specific details associated with your personal information, including your home address. Here's a detailed exploration of this essential step:
-
Accessing Personal Information: Upon selecting "Name, Phone Numbers, Email," you'll be directed to a screen that provides comprehensive access to your personal information. This includes your name, phone numbers, email addresses, and other essential details associated with your Apple ID. By navigating to this section, you gain the ability to review and update the information that is crucial for accurate identification and communication.
-
Managing Contact Details: Within the "Name, Phone Numbers, Email" section, you'll find a range of options for managing your contact details. This includes the ability to add, remove, or modify phone numbers and email addresses associated with your Apple ID. While the primary focus at this stage is on updating your home address, it's important to recognize the broader scope of personal information management that this section offers.
-
Ensuring Accuracy and Relevance: The "Name, Phone Numbers, Email" section empowers you to ensure that your personal information remains accurate and relevant. By providing a user-friendly interface for managing contact details, Apple enables users to maintain up-to-date information, reflecting changes in their personal circumstances, such as a new home address.
-
Navigating Privacy and Security Settings: In addition to managing contact details, this section also provides access to privacy and security settings associated with your Apple ID. This includes options for managing two-factor authentication, trusted phone numbers, and email addresses, enhancing the overall security and integrity of your account.
By selecting "Name, Phone Numbers, Email" within the Settings app, you've taken a significant step toward updating your home address on your iPhone. This section serves as a central hub for managing crucial personal information, reflecting Apple's commitment to user empowerment and data accuracy. With a clear understanding of this pivotal section, you're well-prepared to proceed with the subsequent steps and ensure that your iPhone accurately reflects your current home address.
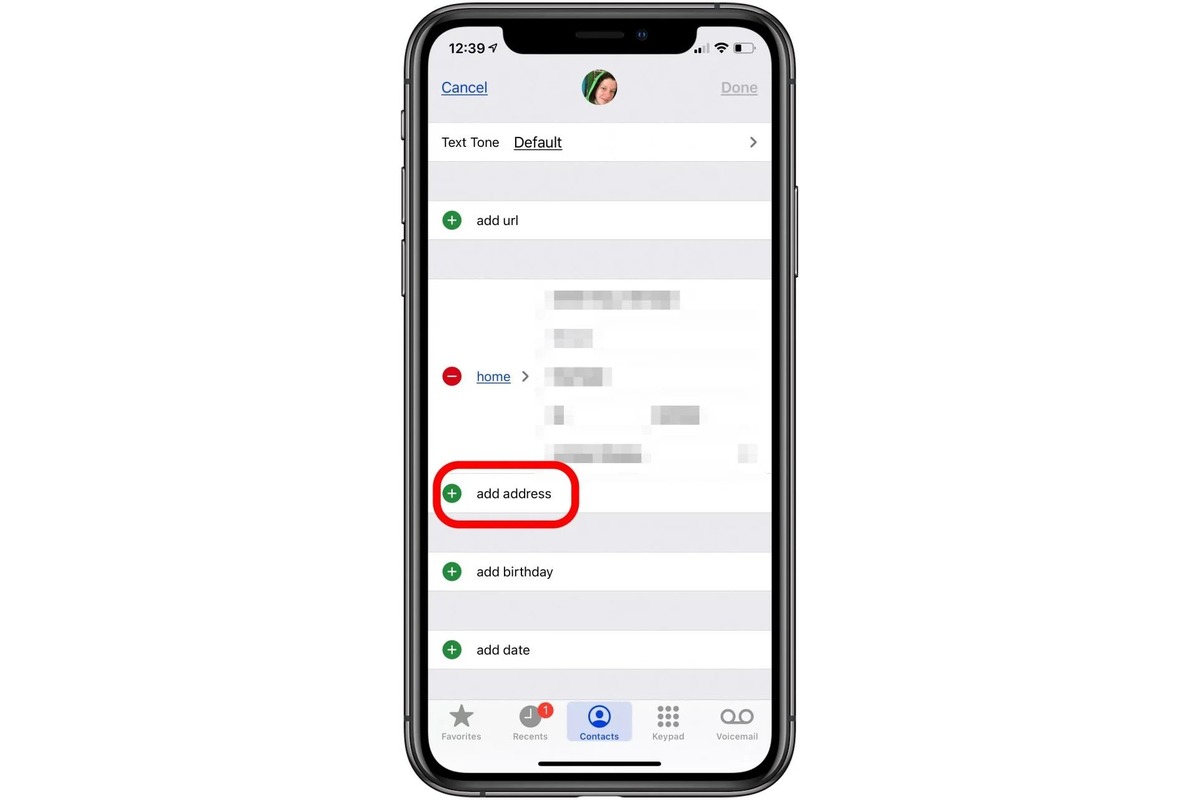
Step 4: Tap on "Edit" next to "Home Address"
After navigating to the "Name, Phone Numbers, Email" section within your Apple ID settings, the next crucial step in updating your home address on your iPhone involves tapping on "Edit" next to "Home Address." This pivotal action serves as the gateway to modifying and updating your current home address, ensuring that your iPhone accurately reflects your residential location. Here's a detailed exploration of this essential step:
-
Locating the "Home Address" Field: Upon accessing the "Name, Phone Numbers, Email" section, you'll find the "Home Address" field, which displays your current residential address. This field is designed to provide a convenient overview of the address associated with your Apple ID, serving as a reference point for ensuring accuracy and relevance.
-
Initiating the Editing Process: To update your home address, tap on the "Edit" option located next to the "Home Address" field. This action signals your intent to modify the existing address, initiating the editing process and enabling you to input your new residential details.
-
User-Friendly Editing Interface: Tapping on "Edit" opens a user-friendly interface that allows you to enter and modify your home address with ease. This interface is designed to streamline the updating process, ensuring that users can input their new address seamlessly without encountering unnecessary complexities.
-
Ensuring Accuracy and Precision: By accessing the "Edit" option next to "Home Address," you gain the ability to ensure the accuracy and precision of your residential information. This step is crucial, especially if you've recently moved to a new location or need to update your address to align with your current residence accurately.
-
Reflecting Personal Circumstances: The "Edit" option next to "Home Address" acknowledges the dynamic nature of personal circumstances, such as relocation or changes in residential details. By providing a straightforward method for updating this information, Apple empowers users to maintain accurate and relevant details within their Apple ID settings.
By tapping on "Edit" next to "Home Address," you've initiated the process of updating your residential information on your iPhone. This step underscores the user-centric approach adopted by Apple, ensuring that users can effortlessly manage and modify essential personal details to align with their current circumstances. With a clear understanding of this pivotal action, you're well-prepared to proceed with entering your new home address and ensuring that your iPhone accurately reflects your updated residential location.
Read more: How To Change Your Number On IPhone
Step 5: Enter your new home address
After tapping on "Edit" next to "Home Address," you will be prompted to enter your new home address. This step is crucial for ensuring that your iPhone accurately reflects your current residential location. Here's a detailed walkthrough of the process of entering your new home address:
-
Input Field for Home Address: Upon initiating the editing process, you will encounter an input field where you can enter your new home address. This user-friendly interface is designed to accommodate the input of detailed residential information, including the street address, city, state, and postal code.
-
Accuracy and Precision: When entering your new home address, it's essential to ensure accuracy and precision. Double-check the details to avoid any errors or discrepancies, as an accurately entered address is vital for location-based services, navigation, and emergency assistance.
-
Reflecting Current Residence: Whether you've recently moved to a new house, apartment, or location, entering your new home address ensures that your iPhone reflects your current residence accurately. This is particularly important for services that rely on location data, such as weather updates, mapping applications, and location-based reminders.
-
Seamless Updating Process: Apple has streamlined the process of entering your new home address, ensuring that users can update their residential information seamlessly. The intuitive interface and clear input fields make it easy to input your new address without encountering unnecessary complexities.
-
Address Verification: As you enter your new home address, take a moment to verify the details for completeness and correctness. This includes confirming the street name, house or apartment number, city, state, and postal code to ensure that all relevant information is accurately captured.
-
Completing the Update: Once you've entered your new home address, proceed to save the changes by tapping on "Done." This finalizes the updating process, ensuring that your iPhone reflects your updated residential location accurately.
By entering your new home address, you've taken a significant step toward ensuring that your iPhone accurately reflects your current residential location. This straightforward yet essential process empowers you to maintain accurate and relevant details within your device, enhancing the functionality of location-based services and ensuring that your iPhone aligns with your current circumstances. With a clear understanding of this pivotal step, you've successfully updated your home address on your iPhone, reflecting your current residence accurately.
Step 6: Tap on "Done" to save the changes
After entering your new home address, the final step in the process of updating your residential information on your iPhone involves tapping on "Done" to save the changes. This seemingly simple action holds significant importance, as it signifies the completion of the updating process and ensures that your iPhone accurately reflects your updated home address. Here's a detailed exploration of the significance and implications of tapping on "Done" to save the changes:
-
Finalizing the Update: Tapping on "Done" serves as the conclusive action that finalizes the update of your home address. This step is crucial for ensuring that the newly entered residential information is saved and applied to your Apple ID settings, reflecting your current residence accurately.
-
Committing the Changes: By tapping on "Done," you commit to the changes made to your home address, signaling your intent to update and save the modified information within your device. This action is essential for ensuring that your iPhone aligns with your current circumstances and accurately reflects your residential location.
-
Seamless Integration: Upon tapping on "Done," the updated home address seamlessly integrates into your device's settings, ensuring that location-based services, mapping applications, and emergency assistance features utilize the new residential information for enhanced accuracy and relevance.
-
User Confirmation: Tapping on "Done" serves as a user confirmation of the updated home address, providing a clear indication that the entered details are accurate and ready for implementation within your iPhone's settings. This user-centric approach ensures that users have the final say in confirming the changes to their personal information.
-
Enhanced Functionality: Saving the changes by tapping on "Done" enhances the overall functionality of your iPhone, particularly in scenarios where location data is utilized. The updated home address ensures that services and applications reliant on location information provide accurate and relevant results based on your current residence.
-
Reflecting Current Circumstances: By completing the process with the action of tapping on "Done," you ensure that your iPhone reflects your current circumstances accurately. This includes recent relocations, changes in residential details, and the need to align your device with your updated home address seamlessly.
By tapping on "Done" to save the changes, you've successfully completed the process of updating your home address on your iPhone. This final step ensures that your device accurately reflects your current residential location, empowering you to navigate location-based services, emergency features, and other location-dependent functionalities with confidence and precision.
Conclusion
In conclusion, the process of changing your home address on your iPhone is a straightforward yet essential task that ensures your device accurately reflects your current residential location. By following the step-by-step guide outlined in this article, you've gained the knowledge and confidence to seamlessly update your home address within the Settings app, aligning your iPhone with your current circumstances.
The journey begins with accessing the Settings app, where you navigate to your Apple ID and select "Name, Phone Numbers, Email" to manage your personal information. Tapping on "Edit" next to "Home Address" initiates the process of entering your new residential details, ensuring accuracy and relevance. By inputting your new home address and tapping on "Done" to save the changes, you've successfully updated your residential information on your iPhone.
This simple yet impactful process holds significant implications for the functionality of location-based services, navigation, and emergency assistance features. By maintaining an accurate home address within your device, you enhance its ability to provide relevant and precise information based on your current residence.
Furthermore, the user-centric approach adopted by Apple ensures that the updating process is intuitive and accessible, empowering users to manage their personal information with ease. The seamless integration of the updated home address into your device's settings reflects Apple's commitment to user empowerment and data accuracy.
Ultimately, by updating your home address on your iPhone, you contribute to the overall accuracy and relevance of location-dependent functionalities, enhancing your device's ability to cater to your specific needs based on your current residential location. Whether you've recently moved to a new house, apartment, or location, ensuring that your iPhone accurately reflects your current circumstances is essential for a seamless and personalized user experience.
With the completion of the updating process, you can navigate your iPhone with confidence, knowing that its functionality aligns with your current residential details. This simple yet impactful task exemplifies the user-centric design and functionality that Apple strives to deliver, ensuring that your iPhone remains a reliable and personalized companion in your daily life.