Home>Technology and Computers>How To Change IPhone Name
Technology and Computers
How To Change IPhone Name
Published: February 24, 2024
Learn how to change your iPhone name easily with our step-by-step guide. Stay updated with the latest technology and computer tips. Unlock the potential of your device today!
(Many of the links in this article redirect to a specific reviewed product. Your purchase of these products through affiliate links helps to generate commission for Noodls.com, at no extra cost. Learn more)
Table of Contents
Introduction
Changing the name of your iPhone can be a simple yet impactful way to personalize your device. Whether you want to distinguish it from other devices in your household, add a touch of creativity, or simply update the name to reflect a new owner, customizing your iPhone's name is a quick and easy process. By following a few straightforward steps, you can give your iPhone a unique identity that resonates with your personality or preferences.
The name of your iPhone is visible when you connect it to other devices via Bluetooth or Wi-Fi, making it a recognizable identifier in various settings. Additionally, when you back up your iPhone to iCloud or sync it with your computer, the device's name is displayed, making it convenient to differentiate between multiple devices. Therefore, changing the name of your iPhone not only adds a personal touch but also enhances its practical functionality.
In the following steps, you will learn how to change the name of your iPhone using the device's settings. This process is designed to be user-friendly and accessible to individuals with varying levels of technical expertise. Whether you're a tech-savvy enthusiast or a casual iPhone user, you can easily navigate through the settings to modify your device's name. Let's embark on this journey to customize your iPhone and make it uniquely yours.
Read more: How To Change The IPhone Alarm Sound
Step 1: Open Settings
To begin the process of changing your iPhone's name, you'll need to access the device's settings. The Settings app serves as the control center for customizing various aspects of your iPhone, including its name. Here's a detailed guide on how to open the Settings app:
-
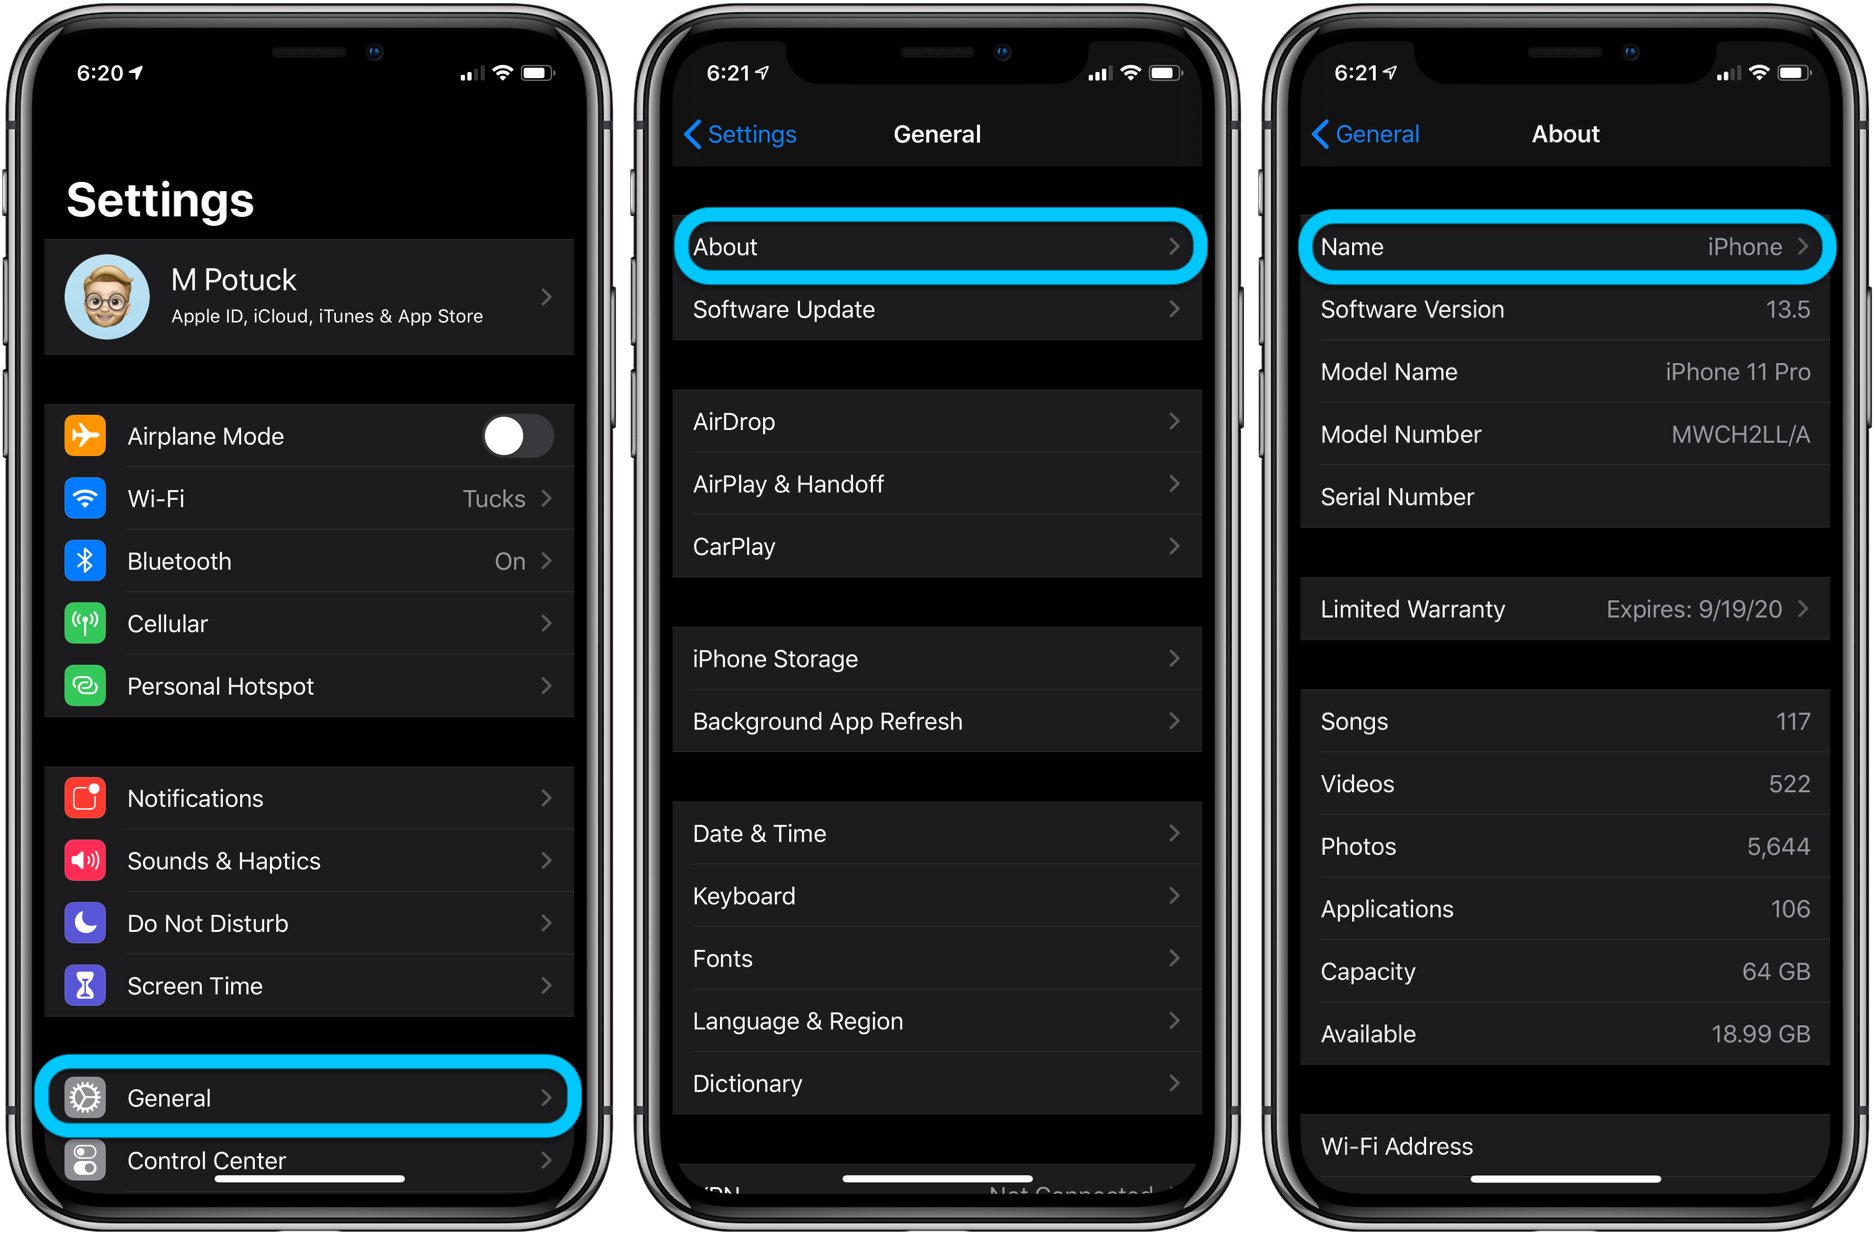
Locate the Settings App: On your iPhone's home screen, look for the Settings app icon. It is recognizable by its gear-shaped symbol and is typically located in the first few rows of icons. If you have trouble finding it, you can use the search feature by swiping down on the home screen and entering "Settings" in the search bar.
-
Tap on the Settings Icon: Once you've located the Settings app, tap on the icon to open the app. This action will launch the Settings interface, which provides access to a wide range of configuration options for your iPhone.
-
Navigate Through the Settings: Upon opening the Settings app, you will be greeted with a series of categorized options, such as General, Display & Brightness, Privacy, and more. These categories allow you to delve into specific settings related to different aspects of your iPhone. For the purpose of changing your iPhone's name, you will need to navigate through the General settings, which is where the device's name configuration is located.
By following these steps, you will successfully open the Settings app on your iPhone, setting the stage for the subsequent steps in the process of changing your device's name. The Settings app serves as a central hub for managing your iPhone's preferences and configurations, making it an essential tool for personalizing your device to suit your individual style and preferences.
Step 2: Tap on General
After successfully opening the Settings app on your iPhone, the next step in the process of changing your device's name is to navigate to the General settings. The General settings encompass a wide array of essential configurations that govern the overall behavior and functionality of your iPhone. Here's a detailed guide on how to access the General settings and proceed with the name-changing process:
-
Locate the General Option: Within the Settings app interface, scroll through the list of available settings until you find the option labeled "General." The General settings serve as a pivotal area where you can manage fundamental aspects of your iPhone, ranging from software updates and device management to accessibility and language preferences.
-
Tap on General: Once you've located the "General" option, tap on it to enter the General settings interface. This action will transition you to a new screen that presents a comprehensive range of configuration options related to the general functionality and management of your iPhone.
-
Explore the General Settings: Upon entering the General settings, take a moment to familiarize yourself with the various categories and options available. You'll encounter diverse settings such as Software Update, Storage, Language & Region, and more. These settings play a crucial role in tailoring your iPhone to align with your specific requirements and preferences.
-
Prepare for the Next Step: While in the General settings, it's essential to ensure that you're in the right location to proceed with the name-changing process. Familiarize yourself with the layout of the General settings interface, as this will facilitate a seamless transition to the subsequent steps involved in customizing your iPhone's name.
By tapping on the "General" option within the Settings app, you've successfully positioned yourself to delve into the core settings that govern the overall functionality and behavior of your iPhone. This pivotal step sets the stage for the subsequent actions required to modify your device's name, allowing you to infuse a personalized touch into your iPhone's identity.
Step 3: Tap on About
Having navigated to the General settings within the Settings app on your iPhone, the next crucial step in the process of changing your device's name is to access the "About" section. The "About" section serves as a repository of essential information pertaining to your iPhone, including details about the device's software, hardware, network, and various identifiers. Here's a comprehensive guide on how to tap on "About" and proceed with the name-changing process:
-
Locate the "About" Option: Within the General settings interface, scroll through the list of available options until you find the "About" option. This section typically contains vital details such as the device's name, model, capacity, software version, and more. Tapping on "About" will grant you access to a wealth of information that is integral to understanding and managing your iPhone's configuration.
-
Tap on "About": Once you've located the "About" option, tap on it to enter the "About" section. This action will transition you to a screen that presents a comprehensive array of essential information about your iPhone. You'll encounter details such as the device's name, model, serial number, software version, and other pertinent identifiers.
-
Explore the "About" Section: Upon entering the "About" section, take a moment to familiarize yourself with the wealth of information presented. This section offers valuable insights into your iPhone's specifications, enabling you to gain a deeper understanding of its hardware and software attributes. Additionally, you'll be able to review the current name of your iPhone, setting the stage for the subsequent step of modifying this identifier.
-
Prepare for the Next Step: While in the "About" section, it's essential to ensure that you're in the right location to proceed with the name-changing process. Familiarize yourself with the layout of the "About" section, as this will facilitate a seamless transition to the subsequent steps involved in customizing your iPhone's name.
By tapping on the "About" option within the General settings, you've positioned yourself to access vital information about your iPhone, setting the stage for the subsequent actions required to modify your device's name. This pivotal step lays the groundwork for infusing a personalized touch into your iPhone's identity, allowing you to align the device's name with your individual style and preferences.
Step 4: Tap on Name
Upon entering the "About" section within the General settings of your iPhone, the next critical step in the process of changing your device's name is to locate and tap on the "Name" field. This pivotal action will grant you access to the current name of your iPhone, enabling you to initiate the modification process. Here's a detailed exploration of how to tap on "Name" and proceed with the name-changing process:
-
Locate the "Name" Field: Within the "About" section of the General settings, scroll through the displayed information until you identify the "Name" field. This field typically contains the current name of your iPhone, serving as the primary identifier for the device. The "Name" field is a crucial element that allows you to customize and personalize your iPhone's identity to align with your individual preferences.
-
Tap on "Name": Once you've located the "Name" field, tap on it to initiate the name-changing process. This action will prompt the field to become editable, enabling you to input a new name for your iPhone. By tapping on "Name," you signal your intent to modify the device's identifier, setting the stage for the subsequent step of entering a new name.
-
Prepare to Enter a New Name: Upon tapping on the "Name" field, the interface will transition to an editable mode, indicating that you can now input a new name for your iPhone. This phase marks a pivotal moment where you can infuse a personalized touch into your device's identity, reflecting your unique style, preferences, or creative flair. As you prepare to enter a new name, consider the significance of this customization and the impact it will have on how your iPhone is perceived and recognized in various contexts.
By tapping on the "Name" field within the "About" section of the General settings, you've positioned yourself to modify the primary identifier of your iPhone. This essential step paves the way for infusing a personalized touch into your device's identity, allowing you to align the name with your individual style and preferences. As you proceed to enter a new name, you embark on a journey of customization that will resonate with your personal expression and enhance the distinctiveness of your iPhone.
Read more: How To Change Your Number On IPhone
Step 5: Enter New Name
As you embark on the pivotal step of entering a new name for your iPhone, you are presented with an opportunity to infuse a personalized touch into the device's identity. The process of entering a new name is straightforward and empowers you to align the device's identifier with your individual style, preferences, or creative flair.
Upon tapping on the "Name" field within the "About" section of the General settings, the interface transitions to an editable mode, signifying that you can now input a new name for your iPhone. This phase marks a pivotal moment where you can infuse a personalized touch into your device's identity, reflecting your unique style, preferences, or creative flair.
When entering a new name for your iPhone, consider the significance of this customization and the impact it will have on how your device is perceived and recognized in various contexts. Whether you opt for a name that reflects your personality, a meaningful phrase, or a distinctive identifier, the choice is yours to make.
To enter a new name for your iPhone, simply tap on the existing name within the editable field and use the keyboard to input your desired identifier. Take this opportunity to express your individuality and make your iPhone uniquely yours. Whether you prefer a whimsical moniker, a name that resonates with your interests, or a simple yet distinctive identifier, the process of entering a new name empowers you to personalize your device in a manner that aligns with your preferences.
As you finalize the entry of the new name, take a moment to review and ensure that the identifier accurately reflects your intent. Once you are satisfied with the new name, proceed to save the changes, thereby solidifying the personalized identity of your iPhone.
By entering a new name for your iPhone, you have successfully personalized the device's identifier, infusing it with a touch of individuality and aligning it with your unique preferences. This customization not only enhances the distinctiveness of your iPhone but also reflects your personal expression, making the device truly yours.
Conclusion
In conclusion, the process of changing the name of your iPhone is a simple yet impactful way to personalize and customize your device. By following the intuitive steps outlined in this guide, you have gained the ability to infuse a touch of individuality into your iPhone's identity, aligning it with your unique style, preferences, or creative flair.
The journey to modify your iPhone's name began with the fundamental step of opening the Settings app, where you gained access to a plethora of configuration options. Navigating to the General settings and tapping on the About section provided valuable insights into your device's specifications and identifiers, setting the stage for the pivotal action of tapping on the Name field.
As you entered a new name for your iPhone, you embarked on a journey of personal expression, considering the significance of this customization and the impact it would have on how your device is perceived and recognized in various contexts. Whether you opted for a name that reflects your personality, a meaningful phrase, or a distinctive identifier, the choice was yours to make, empowering you to personalize your device in a manner that resonates with your preferences.
The process of changing your iPhone's name not only enhances the distinctiveness of your device but also reflects your personal expression, making the device truly yours. Whether you prefer a whimsical moniker, a name that resonates with your interests, or a simple yet distinctive identifier, the ability to customize your iPhone's name empowers you to align the device's identity with your individual style and preferences.
By following the steps outlined in this guide, you have successfully navigated through the process of changing your iPhone's name, infusing it with a touch of individuality and aligning it with your unique preferences. This customization not only enhances the distinctiveness of your iPhone but also reflects your personal expression, making the device truly yours.