Home>Automotive>How To Add Coolant To Car
Automotive
How To Add Coolant To Car
Published: February 26, 2024
Learn the step-by-step process of adding coolant to your car to keep your automotive system running smoothly. Find out the best practices for maintaining your vehicle's cooling system.
(Many of the links in this article redirect to a specific reviewed product. Your purchase of these products through affiliate links helps to generate commission for Noodls.com, at no extra cost. Learn more)
Table of Contents
Introduction
Adding coolant to your car is a crucial aspect of vehicle maintenance that ensures your engine runs smoothly and efficiently. Coolant, also known as antifreeze, plays a vital role in regulating the temperature of the engine, preventing it from overheating or freezing in extreme weather conditions. By following a few simple steps, you can easily top up the coolant level in your car, promoting optimal engine performance and longevity.
Ensuring that your car's cooling system is functioning properly is essential for preventing costly repairs and breakdowns. Over time, coolant levels can deplete due to evaporation or minor leaks, making it necessary to periodically check and replenish the coolant. By familiarizing yourself with the process of adding coolant to your car, you can confidently address this maintenance task and contribute to the overall health of your vehicle.
In the following steps, we will guide you through the process of adding coolant to your car, providing clear instructions to help you complete this task safely and effectively. Whether you are a seasoned car enthusiast or a novice driver, understanding how to add coolant to your car is a valuable skill that empowers you to take proactive measures in maintaining your vehicle's performance and reliability. Let's dive into the step-by-step process to ensure your car's cooling system remains in optimal condition.
Read more: How To Add Folder On IPhone
Step 1: Park the car and let it cool down
Before adding coolant to your car, it's crucial to ensure that the engine has cooled down. This step is essential for your safety and the effectiveness of the coolant replenishment process. When the engine is hot, the cooling system is pressurized, and opening the radiator or coolant reservoir can lead to the release of scalding steam or hot coolant. Therefore, it's imperative to follow these guidelines to safely park the car and allow it to cool down:
-
Find a Safe Location: Park your car in a safe and level area, away from traffic and on a surface that can withstand potential fluid spills. It's advisable to choose a location with ample ventilation to allow the engine to cool more efficiently.
-
Turn Off the Engine: Once you have parked the car, turn off the engine and engage the parking brake. This prevents the vehicle from moving and ensures that the engine remains stationary during the cooling process.
-
Allow Sufficient Cooling Time: Depending on the engine's temperature, it's recommended to wait at least 30 minutes for the engine to cool down. This duration allows the internal components to reach a safe temperature for handling.
-
Check the Temperature Gauge: If your vehicle is equipped with a temperature gauge, observe it to ensure that the engine has reached a safe and cool temperature. The gauge should indicate that the engine is no longer operating at a high temperature before proceeding to the next step.
By patiently waiting for the engine to cool down, you are prioritizing safety and setting the stage for a successful coolant replenishment process. This initial step lays the foundation for the subsequent actions, ensuring that you can add coolant to your car without encountering any safety hazards or complications related to a hot engine.
Step 2: Locate the coolant reservoir
The coolant reservoir, also known as the overflow tank or expansion tank, is a key component of the vehicle's cooling system. Its primary function is to provide a designated space for the coolant to expand and contract as the engine temperature fluctuates. Locating the coolant reservoir is essential for effectively adding coolant to your car. Here's a detailed guide on how to locate the coolant reservoir:
-
Consult the Owner's Manual: If you are unsure about the location of the coolant reservoir in your specific vehicle model, the owner's manual is an invaluable resource. It provides detailed diagrams and descriptions of the various components under the hood, including the coolant reservoir's precise location.
-
Identify the Coolant Reservoir Cap: The coolant reservoir is typically a translucent plastic container with a clearly marked "MAX" and "MIN" level indicator. It is connected to the radiator or the cooling system through hoses. The cap of the reservoir is often color-coded and can be distinguished by its pressure release mechanism.
-
Inspect Near the Radiator: In many vehicles, the coolant reservoir is located near the radiator or adjacent to the firewall. It may be positioned on either side of the engine compartment, depending on the vehicle's make and model. Look for a container that resembles a small, translucent tank with hoses connected to it.
-
Follow the Coolant Hoses: If the coolant reservoir is not immediately visible, tracing the coolant hoses from the radiator can lead you to the reservoir. These hoses are designed to transport coolant between the radiator, engine, and the reservoir, providing a visual guide to locate the reservoir.
-
Check Under the Hood: Open the hood of your car and secure it in place using the designated support rod or latch. Once the hood is open, take a moment to familiarize yourself with the layout of the engine compartment. Look for the coolant reservoir in the vicinity of the radiator and engine, keeping an eye out for the distinctive translucent tank.
By following these steps and utilizing the resources available, you can confidently locate the coolant reservoir in your car. Understanding the precise location of the coolant reservoir sets the stage for the subsequent steps, allowing you to proceed with the coolant replenishment process smoothly and efficiently.
Step 3: Check the coolant level
Once you have located the coolant reservoir, the next crucial step in the process of adding coolant to your car is to check the current level of coolant in the reservoir. This step is essential for assessing whether the coolant level is within the recommended range and determining the amount of coolant needed to achieve the optimal level. Here's a detailed guide on how to check the coolant level in your car:
-
Visual Inspection: Begin by visually inspecting the coolant reservoir. The reservoir is typically made of translucent plastic, allowing you to see the coolant level without opening the cap. The reservoir is marked with "MAX" and "MIN" indicators, representing the maximum and minimum acceptable coolant levels. Ensure that the coolant level is visible and assess whether it falls within the designated range.
-
Check When Cold: It's important to check the coolant level when the engine is cold to obtain an accurate reading. The coolant expands as it heats up, which can lead to misleading readings if the engine is still warm. Waiting for the engine to cool down ensures that the coolant has settled to its normal level, providing an accurate indication of the current coolant level.
-
Compare with "MAX" and "MIN" Markings: If the coolant level is below the "MIN" marking, it indicates that the coolant needs to be topped up. Conversely, if the level is close to or at the "MAX" marking, the coolant level is within the recommended range, and no immediate action is required. Comparing the current coolant level with the designated markings offers a clear understanding of whether additional coolant is needed.
-
Assess for Discoloration or Contamination: While inspecting the coolant level, take note of the coolant's color and clarity. Fresh coolant typically has a vibrant color, such as green, red, or orange, depending on the type used in your vehicle. If the coolant appears discolored, cloudy, or contaminated, it may indicate the presence of impurities or a need for a coolant flush and replacement.
-
Record the Coolant Level: It's beneficial to keep a record of the coolant level for future reference. If the coolant level is consistently decreasing over time, it could signal an underlying issue, such as a coolant leak or internal engine problems. By documenting the coolant level during each inspection, you can monitor any fluctuations and address potential concerns promptly.
By following these steps, you can accurately assess the coolant level in your car and determine whether additional coolant is required. This proactive approach empowers you to maintain the optimal coolant level, safeguarding your vehicle's cooling system and overall performance.
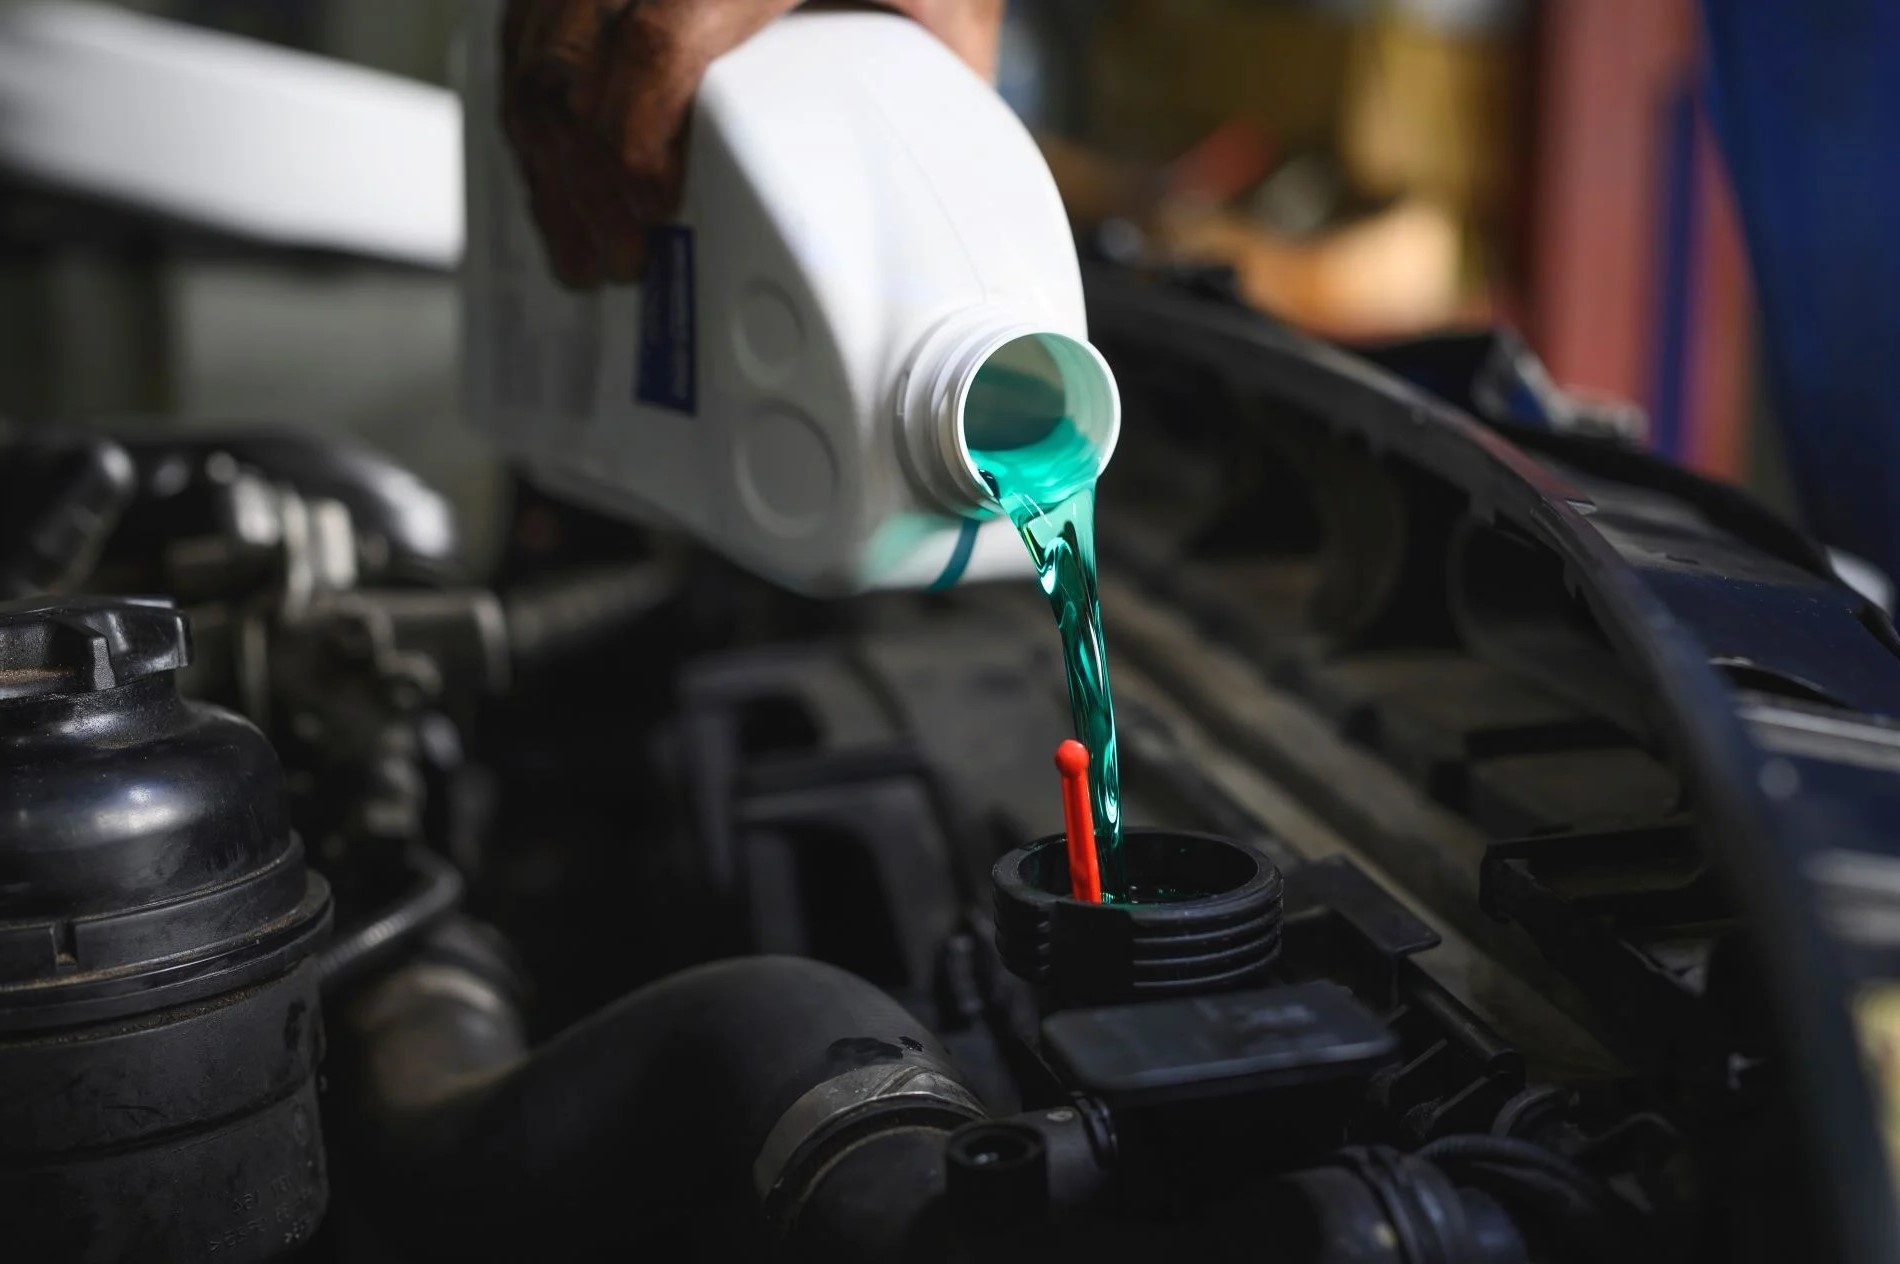
Step 4: Add the coolant
After confirming that the coolant level in the reservoir is below the "MAX" marking and assessing the need for additional coolant, the next step is to add the appropriate coolant to the reservoir. This process involves carefully pouring the coolant into the reservoir to achieve the optimal level, ensuring that the cooling system is adequately replenished. Here's a detailed guide on how to add coolant to your car:
-
Select the Correct Coolant: It's essential to use the appropriate type of coolant recommended for your vehicle. Different vehicles may require specific coolant formulations, such as ethylene glycol-based or propylene glycol-based coolants, each tailored to the engine's requirements. Consult your owner's manual or seek guidance from a professional to determine the compatible coolant for your car.
-
Prepare the Coolant: If you are using concentrated coolant, it needs to be mixed with an appropriate ratio of water before adding it to the reservoir. The recommended coolant-to-water ratio varies depending on the type of coolant and the climate conditions in your region. Pre-mixed coolant, available at automotive supply stores, provides a convenient alternative if you prefer to avoid the mixing process.
-
Open the Coolant Reservoir Cap: Before adding the coolant, carefully remove the reservoir cap to access the interior of the reservoir. It's important to perform this step cautiously, especially if the engine has recently been running, as the cooling system may still be pressurized. Slowly twist the cap counterclockwise to release any built-up pressure, and then lift it off to expose the reservoir opening.
-
Pour the Coolant: Using a funnel to prevent spills, slowly pour the prepared coolant into the reservoir. Take care to pour the coolant steadily and avoid overfilling the reservoir, as excessive coolant can lead to overflow and wastage. Monitor the coolant level as you pour, ensuring that it gradually reaches the optimal level between the "MIN" and "MAX" markings on the reservoir.
-
Check for Air Bubbles: After adding the coolant, gently tap the reservoir to dislodge any air bubbles that may have formed during the pouring process. Air pockets can hinder the proper circulation of coolant within the system, potentially affecting the cooling efficiency. By eliminating air bubbles, you promote the uninterrupted flow of coolant throughout the engine and radiator.
-
Secure the Reservoir Cap: Once the coolant has been added and the level is within the recommended range, carefully place the reservoir cap back onto the opening. Ensure that the cap is securely tightened to prevent any coolant leaks or pressure loss. The cap's sealing mechanism plays a crucial role in maintaining the integrity of the cooling system.
By following these steps, you can effectively add coolant to your car, contributing to the optimal functioning of the cooling system. This proactive maintenance task supports the engine's longevity and performance, safeguarding your vehicle against potential overheating and related issues.
Read more: How To Add A Line In Excel
Step 5: Secure the reservoir cap
Securing the reservoir cap is the final step in the process of adding coolant to your car, and it plays a critical role in maintaining the integrity of the cooling system. As the primary access point to the coolant reservoir, the cap serves as a protective barrier, safeguarding the coolant from external contaminants and preserving the system's optimal pressure. Here's a detailed exploration of the significance of securing the reservoir cap and the essential steps to ensure its proper installation:
Importance of Proper Sealing
The reservoir cap is designed with a sealing mechanism that prevents coolant leakage and maintains the necessary pressure within the cooling system. A secure cap effectively seals the reservoir, preventing the escape of coolant and the intrusion of air or debris. This sealing action is vital for sustaining the cooling system's efficiency and preventing potential issues associated with coolant loss or system depressurization.
Steps to Secure the Reservoir Cap
-
Alignment and Placement: When replacing the reservoir cap, ensure that it is correctly aligned with the reservoir opening. The cap typically features alignment marks or indicators that guide its placement. Aligning the cap properly sets the stage for a secure and effective seal.
-
Twisting and Locking: With the cap aligned, gently press it down onto the reservoir opening and begin twisting it clockwise. As you twist the cap, you will feel resistance, indicating that the cap's sealing mechanism is engaging. Continue twisting until the cap is securely locked in place.
-
Verify Tightness: After securing the cap, perform a visual and tactile inspection to verify its tightness. Ensure that the cap is firmly seated on the reservoir and that there are no gaps or misalignments. A properly tightened cap provides the necessary seal to contain the coolant and maintain the system's pressure.
-
Pressure Release Test: Once the cap is secured, it's advisable to conduct a brief pressure release test to confirm its effectiveness. Press down on the cap and release it to ensure that it rebounds with resilience. This action verifies that the cap's pressure release mechanism is functioning correctly, allowing for the controlled release of excess pressure within the cooling system.
-
Final Inspection: Take a moment to visually inspect the reservoir cap and surrounding area to confirm that no coolant spills or leaks are present. A thorough inspection ensures that the cap's installation has been executed accurately, minimizing the risk of coolant loss or system contamination.
By meticulously following these steps, you can confidently secure the reservoir cap, fortifying the integrity of the cooling system and completing the process of adding coolant to your car. This final action signifies the culmination of your proactive maintenance efforts, contributing to the sustained performance and reliability of your vehicle's cooling system.
Conclusion
In conclusion, the process of adding coolant to your car is a fundamental aspect of vehicle maintenance that directly contributes to the optimal performance and longevity of the engine's cooling system. By following the step-by-step guidelines outlined in this article, you have gained valuable insights into the essential procedures for safely and effectively replenishing the coolant in your car.
Ensuring that your car's engine is adequately cooled and maintaining the proper coolant level in the reservoir are pivotal measures that safeguard the engine against overheating and related complications. By patiently allowing the engine to cool down and meticulously checking the coolant level, you have demonstrated a proactive approach to maintaining your vehicle's cooling system.
Locating the coolant reservoir and understanding its significance in the overall cooling system has empowered you to navigate the under-the-hood components with confidence. By identifying the reservoir and assessing the coolant level, you have taken proactive steps to monitor and address the coolant requirements of your car.
The process of adding the appropriate coolant to the reservoir, while adhering to the recommended guidelines, exemplifies your commitment to preserving the engine's efficiency and performance. By selecting the correct coolant, preparing it as needed, and carefully pouring it into the reservoir, you have actively contributed to the sustained health of your vehicle's cooling system.
Securing the reservoir cap serves as the final act in completing the coolant replenishment process, signifying your attention to detail and commitment to maintaining the system's integrity. By ensuring the proper sealing of the reservoir, you have fortified the cooling system against potential leaks and external contaminants, reinforcing the system's efficiency.
By embracing these maintenance practices and understanding the significance of each step, you have positioned yourself as a proactive and informed vehicle owner, dedicated to preserving the optimal performance and reliability of your car's cooling system. Your commitment to regular maintenance and attention to detail will undoubtedly contribute to the sustained health and longevity of your vehicle.
Incorporating these maintenance tasks into your regular vehicle care routine not only promotes the efficient operation of the engine but also provides peace of mind, knowing that you are actively contributing to the overall well-being of your car. By mastering the process of adding coolant to your car, you have equipped yourself with a valuable skill that enhances your ability to care for and maintain your vehicle's essential components.