Home>Technology and Computers>How To Fix Stick Drift
Technology and Computers
How To Fix Stick Drift
Published: March 2, 2024
Learn how to fix stick drift on your gaming controller and improve your gaming experience. Get expert tips and solutions for technology and computer issues.
(Many of the links in this article redirect to a specific reviewed product. Your purchase of these products through affiliate links helps to generate commission for Noodls.com, at no extra cost. Learn more)
Table of Contents
Introduction
Stick drift is a frustrating issue that many gamers and tech enthusiasts encounter when using controllers or joysticks. It occurs when the controller's analog stick registers movement even when it's not being touched, leading to erratic behavior and a less-than-ideal gaming experience. This problem can be a major annoyance, causing characters to move on their own, camera angles to shift unexpectedly, and overall gameplay to become unpredictable.
Stick drift can affect various types of controllers, including those used with gaming consoles, PCs, and other devices. It's a widespread issue that can arise in both new and older controllers, often catching users off guard and disrupting their gaming sessions. Fortunately, there are effective methods for addressing stick drift, allowing users to regain precise control and enjoy a seamless gaming experience once again.
In this comprehensive guide, we will delve into the intricacies of stick drift, exploring its causes and providing a step-by-step solution to fix this common problem. By understanding the underlying factors contributing to stick drift and learning how to rectify them, you can restore your controller's functionality and bid farewell to the frustrations of erratic movement during gameplay. Whether you're an avid gamer, a tech enthusiast, or simply someone seeking to resolve this issue, this guide will equip you with the knowledge and tools needed to tackle stick drift effectively.
Stick drift doesn't have to be a permanent nuisance, and with the right approach, you can overcome this issue and get back to enjoying your favorite games with precision and control. So, let's dive into the world of stick drift and discover the solutions that will elevate your gaming experience.
Read more: How To Make Sticks In Minecraft
Understanding Stick Drift
Stick drift is a prevalent issue that affects gaming controllers and joysticks, causing them to register unintended movement even when the user is not actively manipulating the analog stick. This phenomenon can manifest in various ways, such as the on-screen character moving without input, camera angles shifting unexpectedly, or menu selections scrolling uncontrollably. The root cause of stick drift lies within the analog stick mechanism, which comprises sensors and components responsible for translating physical movement into digital signals.
The analog stick's mechanism consists of potentiometers, which are variable resistors that detect the stick's position and movement. Over time, these potentiometers can wear out or become misaligned, leading to inaccurate readings and unintended input. Additionally, dust, debris, or residue accumulation within the analog stick assembly can interfere with its functionality, exacerbating the issue of stick drift.
Furthermore, the design and quality of the analog stick components can also contribute to stick drift. Lower-quality materials or manufacturing defects may result in premature wear and tear, leading to erratic behavior and diminished precision. Environmental factors, such as temperature fluctuations and humidity, can also impact the performance of the analog stick, potentially exacerbating stick drift issues.
It's important to note that stick drift can occur in various types of controllers, including those used with gaming consoles, PCs, and other devices. While it is commonly associated with gaming controllers, the underlying principles of stick drift apply to a wide range of input devices that utilize analog sticks or joysticks.
Understanding the intricacies of stick drift is crucial for effectively addressing the issue and implementing the appropriate solutions. By gaining insight into the underlying causes and mechanisms at play, users can approach the troubleshooting process with clarity and confidence, ultimately restoring their controller's functionality and reclaiming a seamless gaming experience.
Common Causes of Stick Drift
Stick drift can stem from various factors, each contributing to the erratic behavior of analog sticks and joysticks. Understanding these common causes is essential for diagnosing and addressing the issue effectively. Here are the primary factors that can lead to stick drift:
-
Wear and Tear: Over time, the internal components of analog sticks, particularly the potentiometers, can experience wear and tear due to regular use. This can result in diminished accuracy and responsiveness, leading to stick drift. Additionally, the mechanical components within the analog stick assembly may degrade, further exacerbating the issue.
-
Accumulated Debris: Dust, dirt, and debris can accumulate within the analog stick mechanism, interfering with its smooth operation. This accumulation can disrupt the sensors and components responsible for detecting the stick's movement, causing erratic behavior and unintended input.
-
Manufacturing Defects: In some cases, manufacturing defects or inconsistencies in the production of analog sticks can lead to premature wear or misalignment of internal components. Lower-quality materials or suboptimal assembly processes may contribute to the development of stick drift in controllers.
-
Environmental Factors: Environmental conditions, such as temperature fluctuations and humidity, can impact the performance of analog sticks. Extreme temperatures or exposure to moisture can affect the internal components, potentially leading to stick drift issues.
-
Intensive Usage: Controllers that are subjected to intensive or prolonged usage, particularly in high-intensity gaming scenarios, may experience accelerated wear of the analog stick components. This can hasten the onset of stick drift, affecting the overall precision and responsiveness of the controller.
By recognizing these common causes of stick drift, users can gain insight into the underlying factors contributing to the issue. This understanding serves as a foundation for implementing targeted solutions to rectify stick drift and restore the optimal functionality of controllers and joysticks.
Tools and Materials Needed
To effectively address stick drift and restore the functionality of your controller, you will need a set of tools and materials to facilitate the repair process. These essential items will enable you to disassemble the controller, access the analog stick assembly, and implement the necessary adjustments and cleaning procedures. Here's a comprehensive list of the tools and materials needed to fix stick drift:
Tools:
-
Precision Screwdriver Set: A precision screwdriver set with various interchangeable heads is essential for removing the screws securing the controller's casing and accessing the internal components.
-
Plastic Opening Tools: Non-conductive plastic opening tools are crucial for prying open the controller's casing without causing damage to the exterior or internal components.
-
Compressed Air Duster: A can of compressed air duster allows you to remove dust, debris, and residue from the analog stick assembly and other intricate parts of the controller.
-
Isopropyl Alcohol: Isopropyl alcohol, preferably in a high-purity form, is used for cleaning the internal components, including the analog stick mechanism and circuit board.
-
Lint-Free Microfiber Cloth: A lint-free microfiber cloth is ideal for wiping and cleaning delicate components within the controller, ensuring a thorough and gentle cleaning process.
-
Tweezers: Precision tweezers aid in handling small components and removing debris from intricate areas within the controller.
-
Cotton Swabs: Cotton swabs, also known as Q-tips, are useful for applying isopropyl alcohol and cleaning hard-to-reach areas within the controller's interior.
Read more: How To Hold A Pool Stick
Materials:
-
Replacement Analog Stick Module: Depending on the severity of the stick drift issue, you may need to acquire a replacement analog stick module compatible with your controller model.
-
Replacement Potentiometers (Optional): In some cases, replacing the potentiometers within the analog stick assembly may be necessary to address severe wear and drift-related issues.
-
Protective Work Surface: A clean and soft work surface, such as a microfiber cloth or a dedicated electronics work mat, provides a secure and scratch-resistant area for disassembling and working on the controller.
By ensuring that you have these tools and materials at your disposal, you can proceed with confidence and precision when addressing stick drift in your controller. These items are essential for executing the step-by-step repair process effectively, allowing you to restore the optimal functionality of your controller and eliminate the frustrations of stick drift during gameplay.
Step-by-Step Guide to Fix Stick Drift
-
Prepare Your Workspace: Begin by setting up a clean and well-lit workspace with ample room to maneuver. Lay down a protective work surface, such as a microfiber cloth or an electronics work mat, to prevent scratches and provide a secure area for disassembling the controller.
-
Gather Your Tools and Materials: Ensure that you have all the necessary tools and materials at hand, including a precision screwdriver set, plastic opening tools, compressed air duster, isopropyl alcohol, lint-free microfiber cloth, tweezers, cotton swabs, and any replacement components required, such as an analog stick module or potentiometers.
-
Power Off and Disassemble the Controller: Power off the controller and remove any batteries or power sources. Using the appropriate precision screwdriver, carefully remove the screws securing the controller's casing. Utilize plastic opening tools to gently pry open the casing, taking care not to damage the exterior or internal components.
-
Access the Analog Stick Assembly: Once the controller is disassembled, locate the analog stick assembly. Depending on the controller model, the analog stick assembly may be secured by additional screws or clips. Carefully detach any securing mechanisms to access the analog stick assembly.
-
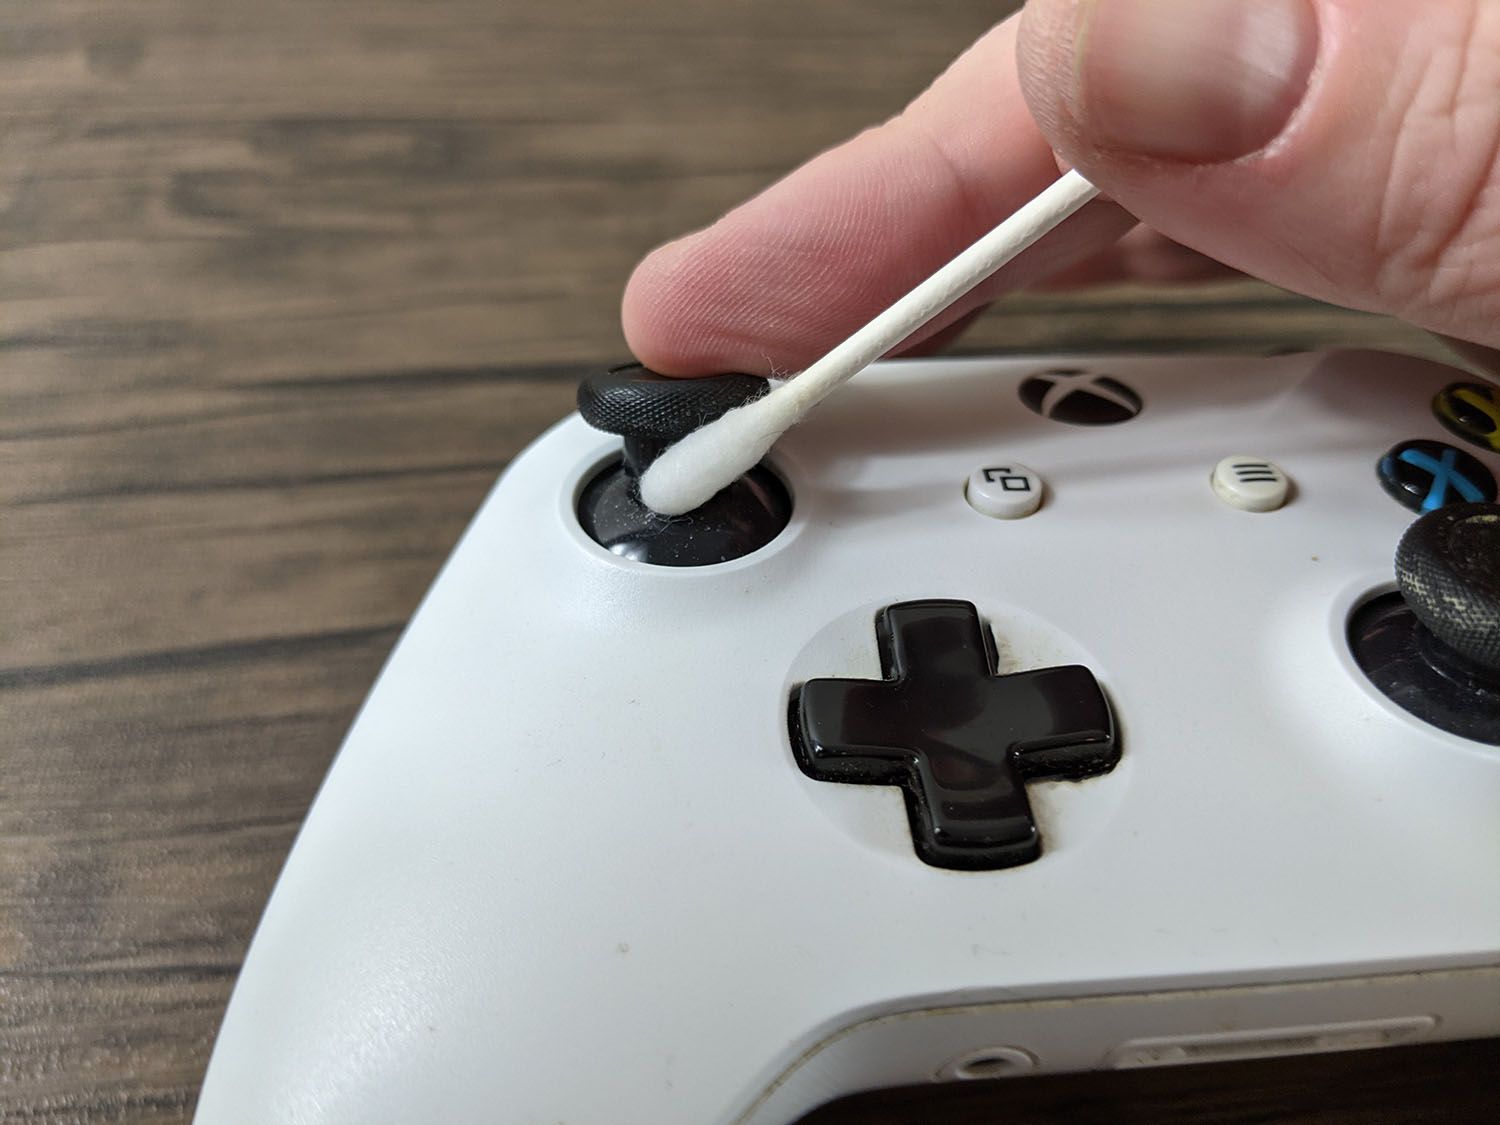
Inspect and Clean the Analog Stick Mechanism: With the analog stick assembly exposed, visually inspect the components for any signs of debris, dust, or residue. Use a can of compressed air duster to remove any accumulated particles, ensuring that the analog stick mechanism is free from obstructions.
-
Clean with Isopropyl Alcohol: Dampen a lint-free microfiber cloth or a cotton swab with isopropyl alcohol. Gently clean the potentiometers, sensors, and surrounding areas within the analog stick assembly, removing any stubborn residue or contaminants. Exercise caution to avoid excessive moisture and ensure thorough drying.
-
Replace the Analog Stick Module (if necessary): If the stick drift issue persists after cleaning, consider replacing the analog stick module with a compatible replacement component. Carefully disconnect the existing analog stick module and install the new module according to the manufacturer's instructions.
-
Reassemble the Controller: Once the necessary adjustments and replacements have been made, carefully reassemble the controller by securing the casing and reinserting any screws. Ensure that all components are properly aligned and seated before tightening the screws.
-
Testing and Calibration: Power on the controller and test the analog stick for any remaining signs of drift. If the issue has been successfully resolved, proceed to calibrate the controller according to the manufacturer's guidelines to ensure optimal performance.
-
Final Inspection and Adjustment: Conduct a final inspection of the controller to verify that the stick drift has been effectively addressed. Make any additional adjustments or fine-tuning as needed to achieve precise and responsive analog stick functionality.
By following this step-by-step guide, you can effectively address stick drift in your controller and restore its optimal performance, allowing you to enjoy a seamless gaming experience without the frustrations of unintended movement or erratic behavior.
Testing and Calibration
After completing the repair process to address stick drift in your controller, it is crucial to conduct thorough testing and calibration to ensure that the issue has been effectively resolved. Testing the controller's analog stick functionality and performing calibration procedures are essential steps to verify the success of the repair and optimize its performance.
Testing the Analog Stick
Begin by powering on the controller and navigating to a menu or interface where the analog stick's input can be observed. Move the analog stick through its full range of motion, paying close attention to any signs of unintended movement or erratic behavior. Test both the horizontal and vertical axes of the analog stick to assess its responsiveness and accuracy.
During the testing phase, observe the on-screen response to the analog stick's input, ensuring that the movements are precise and correspond directly to your physical manipulation of the stick. Look for any residual signs of stick drift, such as the on-screen cursor or character moving without input, and note any irregularities in the analog stick's behavior.
Read more: How To Fix Scratched Sunglasses
Calibration Procedures
If the initial testing reveals persistent signs of stick drift or if the analog stick's responsiveness is not optimal, consider performing calibration procedures to fine-tune its performance. Many gaming consoles and devices offer built-in calibration tools that allow users to adjust the sensitivity and dead zones of analog sticks, optimizing their functionality.
Navigate to the controller settings or calibration menu on your gaming console or device, and follow the on-screen instructions to initiate the calibration process. This typically involves centering the analog stick and adjusting its sensitivity to eliminate any residual drift or erratic behavior. Calibration procedures may vary depending on the specific gaming platform and controller model, so refer to the manufacturer's guidelines for detailed instructions.
Fine-Tuning and Re-Testing
After performing calibration procedures, fine-tune the analog stick's settings based on your preferences and the specific requirements of the games you play. Adjust sensitivity, dead zones, and other relevant parameters to achieve the desired level of precision and responsiveness.
Once the calibration and fine-tuning adjustments have been made, re-test the analog stick's functionality in various gaming scenarios, including different genres and gameplay styles. Pay attention to the controller's performance in fast-paced action sequences, precise aiming tasks, and other demanding gameplay situations to ensure that the stick drift issue has been effectively resolved.
By meticulously testing and calibrating the controller's analog stick, you can confirm the success of the repair process and optimize its performance for a wide range of gaming experiences. This thorough approach ensures that the controller delivers precise and reliable input, allowing you to immerse yourself in gameplay without the disruptions of stick drift.
This meticulous testing and calibration process serves as the final step in the comprehensive repair and optimization of your controller, providing assurance that the stick drift issue has been effectively addressed and allowing you to fully enjoy the gaming experience with restored precision and control.
Additional Tips and Troubleshooting
In addition to the core repair process for addressing stick drift, there are several additional tips and troubleshooting strategies that can further enhance the functionality of your controller and mitigate the risk of future issues. These supplementary measures aim to optimize the performance of the analog stick, maintain its longevity, and provide users with a seamless gaming experience. Here are some valuable tips and troubleshooting techniques to consider:
-
Regular Maintenance: Implement a routine maintenance schedule for your controller to prevent the accumulation of dust, debris, and residue within the analog stick assembly. Periodically clean the controller's exterior and interior components using compressed air dusters, lint-free cloths, and appropriate cleaning solutions to ensure optimal functionality.
-
Avoid Extreme Conditions: Protect your controller from extreme temperatures, high humidity, and exposure to moisture, as these environmental factors can impact the performance of the analog stick and contribute to stick drift. Store the controller in a controlled environment and avoid subjecting it to harsh conditions.
-
Invest in Quality Controllers: When purchasing new controllers or replacement components, prioritize quality and reliability. Opt for controllers with durable analog stick mechanisms and reputable manufacturing standards to minimize the risk of premature wear and stick drift issues.
-
Firmware Updates: Stay informed about firmware updates and software patches released by the controller's manufacturer. Updating the controller's firmware can address underlying performance issues and enhance its compatibility with gaming platforms and titles.
-
Professional Repair Services: If the stick drift issue persists despite your best efforts, consider seeking professional repair services from authorized technicians or reputable electronics repair specialists. Professional diagnosis and repair may be necessary for complex or severe analog stick issues.
-
Replacement Parts Availability: Familiarize yourself with the availability of replacement analog stick modules, potentiometers, and other essential components for your specific controller model. Having access to genuine replacement parts can expedite the repair process and ensure the long-term functionality of your controller.
-
User Community Resources: Engage with online user communities, forums, and support channels dedicated to gaming and controller maintenance. These platforms often provide valuable insights, troubleshooting tips, and user-generated solutions for addressing stick drift and related issues.
By incorporating these additional tips and troubleshooting strategies into your controller maintenance and repair approach, you can proactively safeguard against stick drift and optimize the performance of your gaming controller. These measures contribute to a reliable and enduring gaming experience, allowing you to immerse yourself in gameplay without the disruptions of analog stick issues.
Conclusion
In conclusion, addressing stick drift in gaming controllers and joysticks is a multifaceted process that requires a combination of technical knowledge, precision, and attention to detail. By delving into the intricacies of stick drift, understanding its common causes, and following a comprehensive repair process, users can effectively rectify this prevalent issue and restore the optimal functionality of their controllers.
The journey to fix stick drift begins with a thorough understanding of the underlying mechanisms and factors contributing to this problem. Wear and tear, accumulated debris, manufacturing defects, environmental influences, and intensive usage are among the primary causes of stick drift. Recognizing these factors empowers users to diagnose the issue accurately and implement targeted solutions.
Equipped with the necessary tools and materials, users can embark on the step-by-step repair process, which involves disassembling the controller, accessing the analog stick assembly, inspecting and cleaning the internal components, and, if necessary, replacing the analog stick module. This meticulous approach ensures that the analog stick is free from obstructions and contaminants, allowing for precise and reliable input during gameplay.
Following the repair process, thorough testing and calibration are essential to verify the success of the repair and optimize the controller's performance. By meticulously testing the analog stick's functionality and performing calibration procedures, users can confirm that the stick drift issue has been effectively addressed and fine-tune the controller to their preferences and gaming requirements.
Additionally, incorporating additional tips and troubleshooting strategies, such as regular maintenance, environmental protection, and awareness of replacement parts availability, contributes to the long-term reliability and functionality of gaming controllers, mitigating the risk of future stick drift issues.
Ultimately, by embracing a holistic approach to addressing stick drift and implementing the insights and techniques outlined in this guide, users can reclaim a seamless gaming experience characterized by precise control, responsive input, and freedom from the disruptions of stick drift. This comprehensive journey culminates in the restoration of the controller's optimal functionality, allowing users to immerse themselves in gameplay with confidence and enjoyment.