Home>Home and Garden>How To Clean Chains
Home and Garden
How To Clean Chains
Published: March 3, 2024
Learn the best techniques for cleaning chains at home with our expert tips and advice. Keep your home and garden looking great with our easy-to-follow cleaning methods.
(Many of the links in this article redirect to a specific reviewed product. Your purchase of these products through affiliate links helps to generate commission for Noodls.com, at no extra cost. Learn more)
Table of Contents
Introduction
Cleaning the chain of your bicycle is an essential maintenance task that not only prolongs the life of the chain but also ensures a smooth and efficient riding experience. Over time, dirt, grime, and old lubricant can accumulate on the chain, leading to increased friction, wear, and a decrease in overall performance. By regularly cleaning and lubricating the chain, you can prevent premature wear, maintain smooth gear shifting, and improve the longevity of your bike's drivetrain components.
A clean chain not only enhances the efficiency of your bike but also contributes to a quieter and more enjoyable riding experience. Whether you're an avid cyclist, a casual rider, or someone who uses their bike for commuting, knowing how to properly clean and maintain your chain is a valuable skill that can save you money on costly repairs and replacements in the long run.
In this comprehensive guide, we will walk you through the step-by-step process of cleaning your bike chain, providing you with the knowledge and confidence to tackle this essential maintenance task. From the tools and materials needed to the detailed cleaning and lubrication process, you'll gain valuable insights into preserving the performance and longevity of your bike's drivetrain.
So, grab your cleaning supplies and let's dive into the world of bike chain maintenance. By the end of this guide, you'll have the expertise to keep your chain in prime condition, ensuring a smoother, quieter, and more enjoyable ride every time you hop on your bike.
Tools and materials needed
Before embarking on the task of cleaning your bike chain, it's essential to gather the necessary tools and materials to ensure a thorough and effective cleaning process. Here's a comprehensive list of items you'll need:
-
Chain cleaning tool: This specialized tool is designed to fit onto the chain and facilitate the cleaning process. It typically consists of rotating brushes or scrubbing pads that help remove dirt and grime from the chain's links.
-
Degreaser: A high-quality degreaser is crucial for breaking down old lubricant, dirt, and grime that have accumulated on the chain. Look for a degreaser specifically formulated for bike chains to ensure optimal cleaning performance.
-
Brushes: Stiff-bristled brushes, such as a small scrub brush or an old toothbrush, are essential for scrubbing the chain and reaching into the nooks and crannies between the links. Additionally, a larger brush can be useful for cleaning the cassette and chainrings.
-
Chain lubricant: After cleaning the chain, it's important to reapply lubricant to ensure smooth operation and protection against corrosion. Choose a lubricant designed for bike chains, taking into account factors such as weather conditions and riding frequency.
-
Rags or cloths: Have a supply of clean, lint-free rags or cloths on hand for wiping down the chain and removing excess degreaser and dirt. Old t-shirts or microfiber cloths work well for this purpose.
-
Protective gloves: Cleaning the chain can be a messy task, so wearing protective gloves can help keep your hands clean and protect your skin from harsh chemicals in the degreaser.
-
Chain checker tool (optional): If you have a chain wear indicator or checker tool, it's a good idea to have it on hand to assess the condition of the chain and determine if it needs replacement.
-
Work stand or bike stand (optional): While not essential, having a work stand or bike stand can make the cleaning process more convenient by elevating the bike to a comfortable working height and allowing the wheels to spin freely during cleaning and lubrication.
By ensuring you have these tools and materials ready, you'll be well-equipped to tackle the task of cleaning your bike chain effectively and efficiently. With the right supplies at your disposal, you can maintain the performance and longevity of your bike's drivetrain, ensuring a smoother and more enjoyable riding experience.
Step 1: Remove the chain from the bike
Removing the chain from your bike is the first step in the process of thoroughly cleaning and maintaining it. While it may seem like a daunting task, especially for those new to bike maintenance, following a systematic approach can make the process straightforward and hassle-free.
-
Prepare the Workspace: Find a well-lit and spacious area to work on your bike. If you have a work stand or bike stand, use it to elevate the bike to a comfortable working height. If not, you can simply flip the bike over and rest it on its handlebars and saddle, ensuring stability and accessibility.
-
Gather the Necessary Tools: Before removing the chain, ensure you have the required tools and materials at hand, including a chain tool (also known as a chain breaker), which is essential for separating the chain. Additionally, have a pair of protective gloves ready to keep your hands clean and protected.
-
Shift to the Smallest Chainring and Sprocket: To make the chain removal process easier, shift the bike's gears so that the chain is positioned on the smallest chainring at the front and the smallest sprocket at the rear. This relieves tension on the chain, making it simpler to disconnect.
-
Identify the Master Link or Pin: Examine the chain to locate the master link, which is a special type of link designed for easy removal and reconnection. If your chain does not have a master link, identify the connecting pin that holds the chain together.
-
Use the Chain Tool: If your chain has a master link, use the chain tool to release the link by pressing the side plates together and sliding the link out. For chains without a master link, use the chain tool to push the connecting pin partially out of the chain, allowing you to separate it.
-
Carefully Remove the Chain: Once the master link or connecting pin is disengaged, carefully remove the chain from the front chainring and rear sprockets. Take care to avoid getting grease and grime on other bike components or your clothing.
By following these steps, you can successfully remove the chain from your bike in preparation for thorough cleaning and maintenance. With the chain detached, you can proceed to the next steps of cleaning, degreasing, and lubricating it to ensure optimal performance and longevity.
Step 2: Clean the chain with degreaser
Cleaning the chain with a high-quality degreaser is a critical step in the maintenance process, as it effectively removes built-up grime, old lubricant, and stubborn dirt from the chain's links and rollers. This thorough cleaning not only improves the chain's performance but also prepares it for the application of fresh lubricant, ensuring smooth operation and protection against corrosion.
To clean the chain with degreaser, follow these steps:
-
Prepare the Workspace: Find a well-ventilated area to work on the chain cleaning process. Lay down a protective covering, such as a drop cloth or old newspapers, to catch any drips or splatters from the degreaser. It's important to work in a space where you can easily access the chain and have room to maneuver during the cleaning process.
-
Apply the Degreaser: Using a dedicated bike chain degreaser, generously apply the degreaser to the chain, ensuring that it thoroughly coats the links and rollers. You can use a spray-on degreaser or apply it with a brush or rag, ensuring that all parts of the chain are adequately covered. Allow the degreaser to penetrate and break down the accumulated grime and old lubricant for a few minutes, allowing it to work its magic.
-
Scrub the Chain: With the degreaser applied, use a chain cleaning tool or a stiff-bristled brush to scrub the chain thoroughly. Work the brush or cleaning tool along the entire length of the chain, focusing on each individual link to dislodge stubborn dirt and grime. Pay particular attention to the areas between the rollers and pins, as these areas can harbor the most buildup.
-
Repeat as Needed: For heavily soiled chains, you may need to repeat the application of degreaser and the scrubbing process to ensure a thorough cleaning. Stubborn deposits may require additional attention, so be patient and persistent in your efforts to restore the chain to a clean and pristine condition.
-
Wipe Off Excess Degreaser: After scrubbing the chain, use a clean rag or cloth to wipe off the excess degreaser and dislodged grime. Ensure that you remove as much of the degreaser and dirt as possible, leaving the chain clean and ready for the next steps in the maintenance process.
By cleaning the chain with degreaser, you effectively remove the accumulated grime and old lubricant, setting the stage for the subsequent steps of rinsing, drying, and lubricating the chain. This thorough cleaning process ensures that the chain operates smoothly, quietly, and efficiently, contributing to a more enjoyable and trouble-free riding experience.
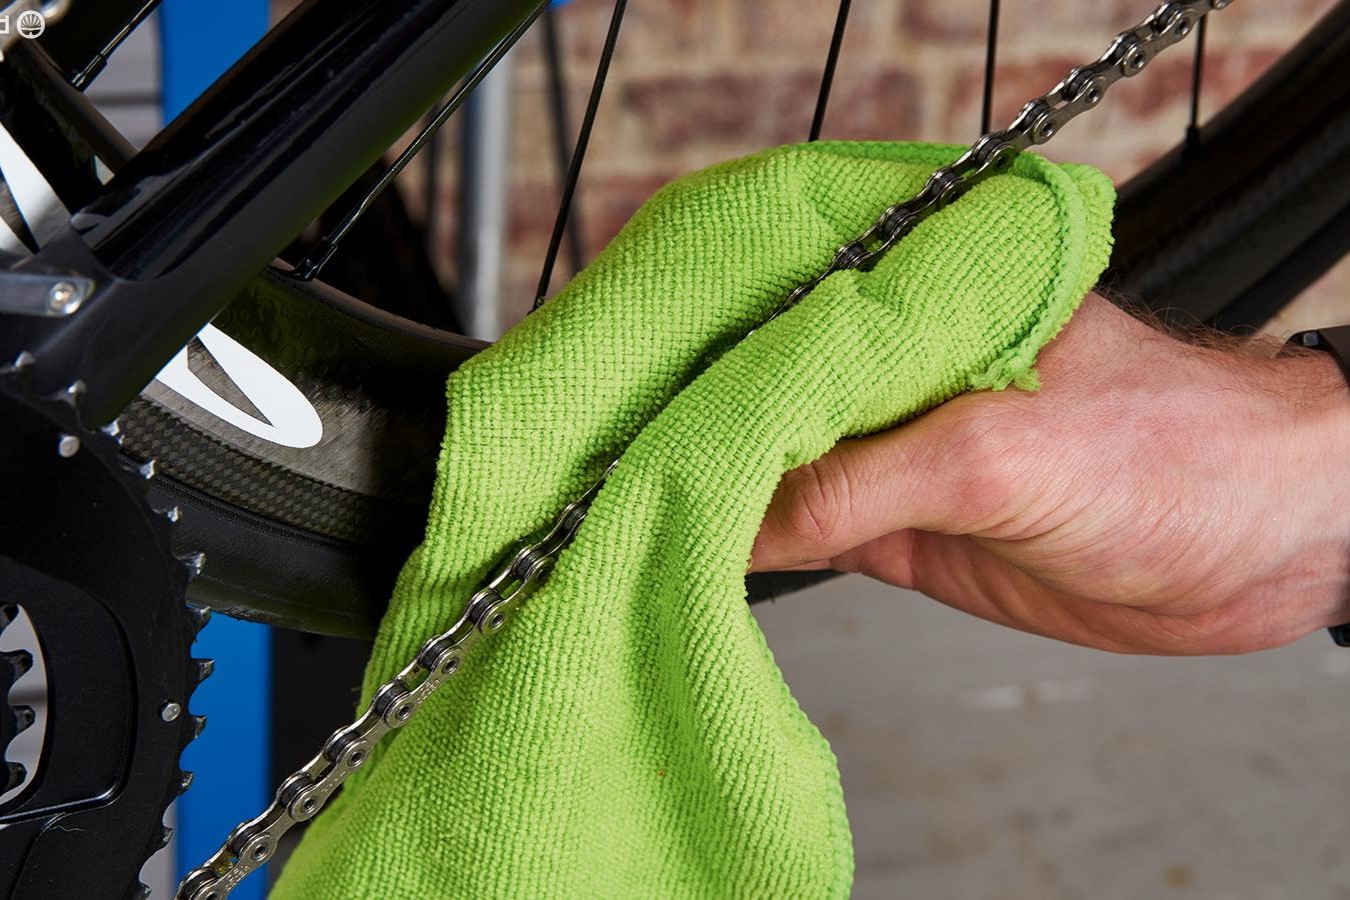
Step 3: Scrub the chain with a brush
After applying the degreaser and allowing it to penetrate the accumulated grime and old lubricant, the next crucial step in the chain cleaning process is to thoroughly scrub the chain with a brush. This step is essential for dislodging stubborn dirt and grime from the chain's links and rollers, ensuring a comprehensive cleaning that prepares the chain for optimal performance and longevity.
When scrubbing the chain with a brush, it's important to follow a systematic approach to ensure that all parts of the chain receive thorough attention. Here's a detailed breakdown of the process:
-
Select a Stiff-Bristled Brush: Choose a brush with stiff bristles that can effectively penetrate the spaces between the chain's links and rollers. An old toothbrush or a dedicated chain cleaning brush can work well for this purpose. The bristles should be firm enough to dislodge stubborn deposits but gentle enough to avoid causing damage to the chain.
-
Work Along the Entire Length of the Chain: Starting at one end of the chain, use the brush to scrub along the entire length of the chain. Focus on each individual link, ensuring that the bristles reach into the spaces between the rollers and pins. By systematically working through the chain, you can effectively dislodge dirt and grime that may have accumulated in hard-to-reach areas.
-
Pay Attention to Stubborn Deposits: For areas of the chain with particularly stubborn deposits, apply additional pressure with the brush to dislodge the grime. Rotating the pedals backward can help facilitate the scrubbing process, allowing you to access different sections of the chain with ease.
-
Repeat as Needed: Depending on the level of soiling, you may need to repeat the scrubbing process to ensure a thorough cleaning. Stubborn deposits may require multiple passes with the brush, so be patient and meticulous in your efforts to restore the chain to a clean and pristine condition.
-
Inspect and Wipe Off Excess Grime: Periodically stop to inspect the chain and assess the effectiveness of the scrubbing process. Use a clean rag or cloth to wipe off the dislodged grime and excess degreaser, ensuring that the chain is progressively cleaned as you work through the scrubbing process.
By systematically scrubbing the chain with a brush, you ensure that all parts of the chain receive the attention needed to dislodge dirt and grime, setting the stage for the subsequent steps of rinsing, drying, and lubricating the chain. This meticulous cleaning process is essential for maintaining the chain's smooth operation, reducing friction, and prolonging its overall lifespan.
Read more: How To Clean A Toaster
Step 4: Rinse and dry the chain
Once the chain has been thoroughly cleaned with degreaser and scrubbed with a brush to dislodge dirt and grime, the next crucial step is to rinse and dry the chain to remove any remaining residue and moisture. This process is essential for ensuring that the chain is free from contaminants and properly prepared for the application of fresh lubricant, which is vital for smooth operation and protection against corrosion.
To rinse and dry the chain effectively, follow these steps:
-
Rinse with Clean Water: Using a gentle stream of clean water from a hose or a bucket, thoroughly rinse the chain to remove any remaining degreaser, dirt, and grime. Ensure that the water reaches all parts of the chain, flushing out any lingering residue. If possible, rotate the pedals backward to facilitate the rinsing process, allowing the water to reach into the spaces between the links and rollers.
-
Inspect for Residue: After rinsing, visually inspect the chain to ensure that it is free from any remaining residue. Pay particular attention to areas where dirt and grime may have accumulated, such as between the rollers and pins. If necessary, use a brush or a gentle stream of water to target specific areas and ensure thorough cleaning.
-
Dry the Chain Thoroughly: Once the chain has been rinsed, use clean, lint-free cloths or rags to dry it thoroughly. Gently wipe the chain to remove excess water, taking care to reach into the nooks and crannies between the links. It's important to ensure that the chain is completely dry before proceeding to the next step, as any remaining moisture can hinder the effectiveness of the lubricant.
-
Allow for Air Drying: For optimal results, allow the chain to air dry for a short period. This allows any residual moisture to evaporate, leaving the chain clean and dry. If time permits, you can leave the chain to air dry for a few minutes before proceeding to the final step of lubricating the chain.
By diligently rinsing and drying the chain, you ensure that it is free from contaminants and moisture, setting the stage for the application of fresh lubricant. This meticulous process prepares the chain for optimal performance, smooth operation, and enhanced longevity, contributing to a quieter, more efficient, and more enjoyable riding experience.
Step 5: Lubricate the chain
After the chain has been thoroughly cleaned, rinsed, and dried, the final and crucial step in the maintenance process is to apply a high-quality lubricant to ensure smooth operation and protection against corrosion. Proper lubrication not only reduces friction and wear on the chain but also helps maintain the overall efficiency and longevity of the bike's drivetrain components.
To effectively lubricate the chain, follow these steps:
-
Choose the Right Lubricant: Select a lubricant specifically formulated for bike chains, taking into account factors such as weather conditions and riding frequency. For dry conditions, a dry lube is suitable, while wet conditions may require a wet lube. Additionally, consider environmentally friendly options that minimize the impact on the surroundings.
-
Apply the Lubricant: Hold the lubricant bottle steady and apply a small, steady stream of lubricant to the inside of the lower run of the chain while rotating the pedals backward. Ensure that the entire length of the chain receives a thin, even coating of lubricant. Avoid over-lubricating, as excess lubricant can attract dirt and lead to a messy buildup.
-
Allow the Lubricant to Penetrate: After applying the lubricant, allow it to penetrate the chain for a few minutes. This allows the lubricant to work its way into the rollers and pins, ensuring smooth and consistent coverage. During this time, the lubricant will displace any remaining moisture and create a protective barrier against friction and corrosion.
-
Wipe Off Excess Lubricant: Using a clean, lint-free cloth or rag, gently wipe off any excess lubricant from the chain's exterior. This helps remove any surplus lubricant that has not penetrated the chain, reducing the likelihood of attracting dirt and grime during subsequent rides.
By following these steps, you ensure that the chain is adequately lubricated, promoting smooth and efficient operation while providing protection against wear and corrosion. Proper lubrication is essential for maintaining the performance and longevity of the chain and the bike's drivetrain, contributing to a quieter, more efficient, and more enjoyable riding experience.
With the chain now thoroughly cleaned, lubricated, and ready for reinstallation, you have completed the essential maintenance process, ensuring that your bike's drivetrain operates at its best.
Reinstall the chain on the bike
Reinstalling the chain on the bike is the final step in the comprehensive process of cleaning and maintaining your bike's drivetrain. Proper reinstallation ensures that the chain operates smoothly, engages with the gears effectively, and contributes to a seamless riding experience. Follow these steps to reinstall the chain with precision and care:
-
Position the Bike: Place the bike in a stable position, either on a work stand or by flipping it over to rest on its handlebars and saddle. Ensuring stability and accessibility is crucial for a hassle-free reinstallation process.
-
Thread the Chain onto the Front Chainring: Begin by threading the chain onto the front chainring, ensuring that it engages with the teeth smoothly and evenly. Position the chain on the appropriate chainring based on your riding conditions and terrain.
-
Guide the Chain onto the Rear Sprockets: Carefully guide the chain onto the rear sprockets, ensuring that it aligns with the gear teeth without any twists or kinks. As you guide the chain, rotate the pedals to facilitate the process, allowing the chain to settle into place.
-
Engage the Chain with the Derailleur: If your bike is equipped with a rear derailleur, carefully guide the chain through the derailleur's pulley wheels, ensuring that it follows the correct path and tension. Proper engagement with the derailleur is essential for smooth gear shifting and overall drivetrain performance.
-
Reconnect the Chain: If your chain features a master link, reattach it by aligning the link's pins with the corresponding holes and applying gentle pressure to snap it into place. For chains without a master link, use a chain tool to press the connecting pin back into position, ensuring a secure and reliable connection.
-
Check the Chain Tension: Once the chain is reinstalled, check the tension to ensure that it is neither too loose nor too tight. Proper chain tension is crucial for smooth and efficient power transfer from the pedals to the rear wheel.
-
Test the Gear Shifting: With the chain reinstalled, test the gear shifting by cycling through the different gears. Ensure that the chain engages smoothly with each gear, and there are no issues with skipping or chain slippage.
By following these steps, you can confidently reinstall the chain on your bike, ensuring that it operates at its best and contributes to a smooth, efficient, and enjoyable riding experience. With the chain securely in place and the drivetrain properly maintained, you're ready to hit the road with confidence and peace of mind.
Conclusion
In conclusion, mastering the art of cleaning and maintaining your bike chain is a valuable skill that can significantly enhance your riding experience and prolong the lifespan of your bike's drivetrain components. By following the step-by-step process outlined in this guide, you've gained valuable insights into the essential maintenance tasks required to keep your chain in prime condition.
Regularly cleaning your bike chain not only ensures a smoother and more efficient ride but also contributes to a quieter and more enjoyable cycling experience. The removal of dirt, grime, and old lubricant from the chain's links and rollers reduces friction, minimizes wear, and promotes optimal gear shifting performance. Additionally, the application of fresh lubricant provides essential protection against corrosion and ensures smooth power transfer from the pedals to the rear wheel.
By investing time and effort in maintaining your bike chain, you're not only preserving the performance and longevity of your bike but also saving money on costly repairs and replacements in the long run. A well-maintained chain translates to improved overall bike performance, fewer mechanical issues, and a more enjoyable riding experience for cyclists of all levels.
Furthermore, the satisfaction and sense of accomplishment that come with performing your own bike maintenance are invaluable. Taking the time to care for your bike and its components fosters a deeper connection with your machine, allowing you to appreciate the intricacies of its mechanics and gain a greater understanding of how each part contributes to the overall functionality of the bike.
As you continue to hone your bike maintenance skills, remember that regular cleaning and lubrication of the chain are essential for preserving its performance and ensuring a smooth ride. By integrating these maintenance tasks into your regular bike care routine, you'll be rewarded with a bike that operates at its best, allowing you to explore new routes, tackle challenging terrain, and enjoy the freedom and exhilaration that cycling has to offer.
So, grab your cleaning supplies, follow the steps outlined in this guide, and embark on the journey of maintaining your bike chain with confidence and expertise. With a well-maintained chain, you're poised for countless miles of smooth, trouble-free riding, whether you're commuting, exploring scenic trails, or pushing your limits on challenging rides.