Home>Technology and Computers>How To Freeze A Row In Excel

Technology and Computers
How To Freeze A Row In Excel
Published: February 28, 2024
Learn how to freeze a row in Excel with this easy-to-follow guide. Keep your data organized and easily accessible. Perfect for technology and computer enthusiasts.
(Many of the links in this article redirect to a specific reviewed product. Your purchase of these products through affiliate links helps to generate commission for Noodls.com, at no extra cost. Learn more)
Table of Contents
Introduction
Excel is a powerful tool that offers a wide range of functionalities to help users manage and analyze data effectively. When working with large datasets, it's common to encounter the need to scroll through numerous rows and columns to view specific information. This can be time-consuming and cumbersome, especially when dealing with extensive spreadsheets. However, Excel provides a convenient solution to this challenge through the "Freeze Panes" feature, which allows users to lock specific rows or columns in place while scrolling through the rest of the worksheet.
In this article, we will delve into the intricacies of freezing rows in Excel, exploring the reasons behind the need to utilize this feature and providing a comprehensive guide on how to implement it. Whether you're a seasoned Excel user or just starting to explore its capabilities, understanding how to freeze rows can significantly enhance your efficiency and productivity when working with large datasets.
By mastering the art of freezing rows in Excel, you can streamline your workflow, improve data visibility, and gain better control over your spreadsheet navigation. Additionally, we will share valuable tips and tricks to help you make the most of this feature, empowering you to harness the full potential of Excel for your data management needs. So, let's embark on this journey to unravel the secrets of freezing rows in Excel and discover how it can revolutionize the way you interact with your spreadsheets.
Read more: How To Move Rows In Excel
Understanding the Need to Freeze Rows in Excel
When working with large datasets in Excel, it's common to encounter spreadsheets with numerous rows and columns containing vital information. Navigating through such extensive data can be challenging, often requiring users to scroll through the worksheet to access specific details. However, this process can lead to a loss of context, as the headers or key information in the top rows become hidden from view as the user scrolls down.
The need to freeze rows in Excel arises from the necessity to maintain the visibility of essential information while navigating through extensive datasets. By freezing specific rows, users can ensure that crucial headers, labels, or summary data remain visible at all times, regardless of the scrolling actions within the spreadsheet. This feature is particularly valuable when dealing with datasets where the top rows contain important column headers, titles, or key information that users need to reference continuously.
Freezing rows in Excel not only enhances the user experience by providing constant access to critical data but also contributes to improved efficiency and accuracy in data analysis and management. It allows users to maintain a clear understanding of the data structure and context, facilitating seamless navigation and interpretation of the information within the spreadsheet.
Moreover, freezing rows in Excel can significantly enhance the presentation of data when sharing or presenting the spreadsheet to others. By ensuring that essential headers or labels remain visible, the frozen rows contribute to a more organized and professional appearance, enabling recipients to comprehend the data more effectively.
In essence, the need to freeze rows in Excel stems from the fundamental requirement to maintain the visibility of crucial information, streamline data navigation, and enhance the overall user experience when working with extensive datasets. By understanding the significance of this feature, users can leverage it to optimize their workflow, improve data interpretation, and elevate the presentation of their spreadsheets.
How to Freeze a Row in Excel
Freezing a row in Excel is a straightforward yet powerful technique that can greatly enhance the usability of large spreadsheets. Whether you're working with financial data, inventory records, or any other type of information, the ability to keep essential row headers visible as you scroll through your data can significantly improve your workflow. Here's a step-by-step guide on how to freeze a row in Excel:
Step 1: Open Your Excel Spreadsheet
Begin by opening the Excel spreadsheet containing the data you want to work with. Navigate to the worksheet where you need to freeze a specific row.
Step 2: Select the Row to Freeze
Identify the row that contains the headers or labels you want to keep visible. Click on the row number to select the entire row. This can be done by clicking on the row number on the left-hand side of the spreadsheet.
Read more: How To Delete A Row In Excel
Step 3: Access the Freeze Panes Option
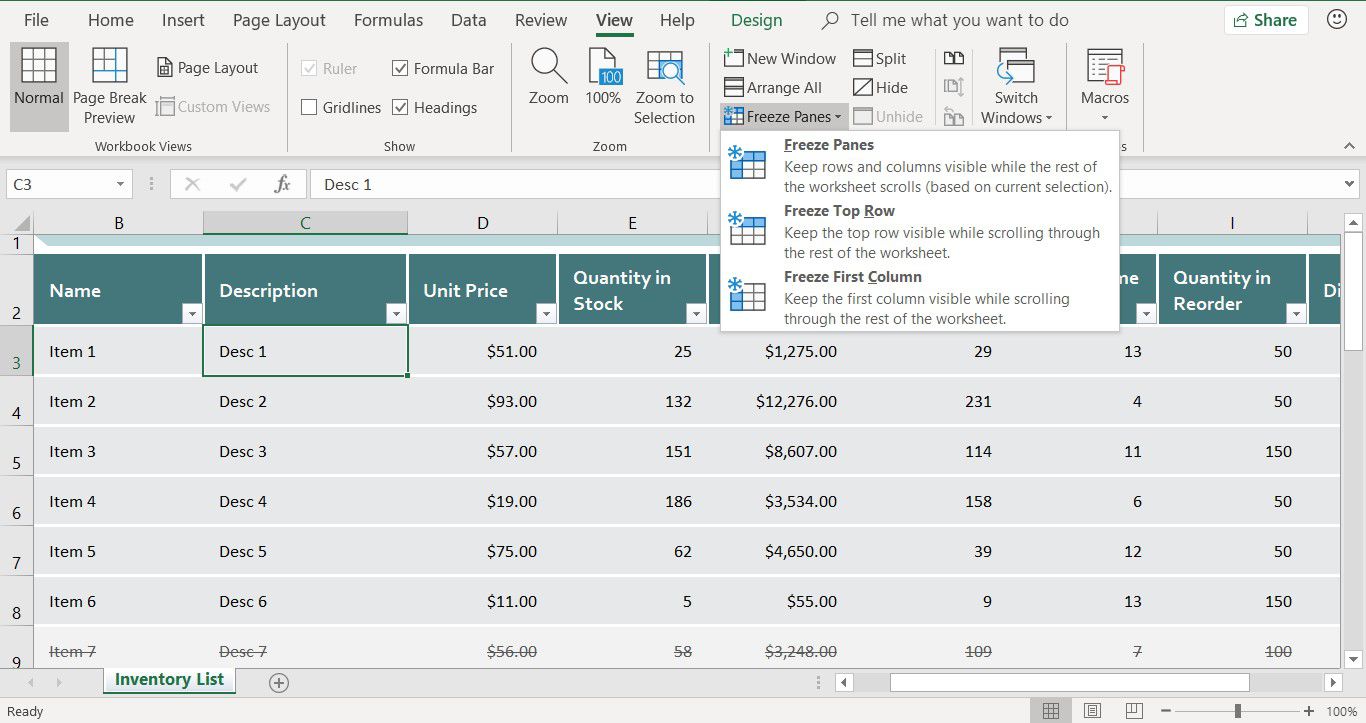
Once the row is selected, navigate to the "View" tab on the Excel ribbon at the top of the window. In the "Window" group within the "View" tab, locate the "Freeze Panes" option.
Step 4: Freeze the Selected Row
Click on the "Freeze Panes" option, and from the dropdown menu, select "Freeze Top Row." This action will lock the selected row in place, ensuring that it remains visible as you scroll through the rest of the spreadsheet.
Step 5: Verify the Frozen Row
After freezing the top row, scroll through the spreadsheet to confirm that the selected row remains fixed at the top of the worksheet, regardless of the scrolling actions. This allows you to maintain a clear view of the essential headers or labels while navigating through the data.
Step 6: Unfreezing Rows (Optional)
If you need to unfreeze the row at any point, simply revisit the "Freeze Panes" option and select "Unfreeze Panes" from the dropdown menu. This action will remove the frozen state, allowing the rows to scroll normally with the rest of the spreadsheet.
By following these steps, you can effectively freeze a row in Excel, providing continuous visibility to crucial headers or labels while working with extensive datasets. This simple yet impactful feature empowers users to streamline data navigation, enhance data interpretation, and optimize the presentation of their spreadsheets.
Remember, mastering the art of freezing rows in Excel can significantly improve your efficiency and productivity when managing and analyzing data, making it a valuable skill for Excel users across various industries and roles.
Read more: How To Create A Total Row In Excel
Tips and Tricks for Freezing Rows Effectively
1. Utilize Freeze Panes for Multiple Rows
When working with complex spreadsheets containing several rows of important data, it's essential to know that Excel allows users to freeze multiple rows simultaneously. To achieve this, select the row below the last row you want to freeze, and then choose the "Freeze Panes" option. This ensures that all the selected rows, including the top row, remain visible as you navigate through the spreadsheet, providing continuous access to critical information.
2. Freezing Columns for Enhanced Data Analysis
In addition to freezing rows, Excel offers the flexibility to freeze columns, enabling users to keep specific columns visible while scrolling horizontally through the spreadsheet. This feature is particularly useful when dealing with wide datasets where maintaining visibility of key columns, such as date or category headers, is crucial for comprehensive data analysis. By leveraging the "Freeze Panes" option and selecting "Freeze First Column," users can enhance their ability to interpret and analyze data effectively.
3. Adjusting Freeze Panes for Dynamic Data
When working with dynamic datasets that frequently undergo updates or changes, it's important to understand how to adjust freeze panes to accommodate evolving data structures. Excel allows users to modify the frozen panes as needed, enabling them to adapt to changes in the spreadsheet layout without compromising data visibility. By revisiting the "Freeze Panes" option and selecting "Unfreeze Panes," users can reposition or update the frozen rows or columns to align with the modified data, ensuring continuous access to the relevant information.
Read more: How To Insert Multiple Rows In Excel
4. Utilize Freeze Panes for Print Layouts
Freezing rows and columns in Excel can significantly improve the print layout of spreadsheets, especially when dealing with large datasets that span multiple pages. By freezing specific rows and columns that contain essential headers or labels, users can ensure that the frozen elements remain visible across all printed pages, enhancing the readability and comprehensibility of the printed documents. This feature is particularly valuable when preparing reports, financial statements, or any printed materials derived from Excel data.
5. Combine Freeze Panes with Split Panes for Comprehensive Data Navigation
Excel offers the option to split the worksheet window into multiple panes, allowing users to view different sections of the same worksheet simultaneously. By combining the freeze panes and split panes functionalities, users can create a comprehensive data navigation setup that provides continuous visibility to specific rows and columns while simultaneously viewing different areas of the spreadsheet. This integrated approach enhances the overall user experience and facilitates seamless data analysis and management.
By implementing these tips and tricks, users can harness the full potential of the freeze panes feature in Excel, optimizing their ability to navigate, interpret, and present data effectively. Whether working with extensive datasets, preparing printed materials, or adapting to dynamic data changes, mastering the art of freezing rows and columns empowers users to elevate their Excel proficiency and streamline their data management processes.
Conclusion
In conclusion, mastering the art of freezing rows in Excel is a valuable skill that can significantly enhance the efficiency, productivity, and overall user experience when working with large datasets. By understanding the need to maintain the visibility of crucial information and leveraging the powerful "Freeze Panes" feature, users can streamline their workflow, improve data interpretation, and elevate the presentation of their spreadsheets.
The ability to freeze specific rows in Excel empowers users to keep essential headers, labels, or summary data visible at all times, regardless of scrolling actions within the spreadsheet. This not only contributes to improved efficiency and accuracy in data analysis and management but also enhances the presentation of data when sharing or presenting the spreadsheet to others.
By following a simple step-by-step process, users can effectively freeze rows in Excel, providing continuous visibility to crucial headers or labels while working with extensive datasets. Additionally, the flexibility to freeze multiple rows and columns, adjust freeze panes for dynamic data, and optimize print layouts further amplifies the impact of this feature on data navigation and presentation.
Furthermore, the integration of freeze panes with split panes offers a comprehensive approach to data navigation, enabling users to view different sections of the same worksheet simultaneously while maintaining continuous visibility to specific rows and columns.
In essence, freezing rows in Excel goes beyond just keeping data visible; it empowers users to maintain context, streamline navigation, and enhance the overall user experience when interacting with extensive datasets. Whether analyzing financial data, managing inventory records, or preparing reports, the ability to freeze rows in Excel is a versatile tool that can benefit users across various industries and roles.
By implementing the tips and tricks shared in this article, users can harness the full potential of the freeze panes feature in Excel, optimizing their ability to navigate, interpret, and present data effectively. As a result, mastering the art of freezing rows in Excel becomes a valuable asset for individuals seeking to elevate their proficiency in data management and analysis.
In conclusion, the knowledge and application of freezing rows in Excel not only contribute to improved workflow efficiency but also empower users to present data in a clear, organized, and professional manner, ultimately enhancing the overall impact and effectiveness of their spreadsheet-based endeavors.
