Home>Technology and Computers>How To Insert A PDF Into Excel
Technology and Computers
How To Insert A PDF Into Excel
Published: March 6, 2024
Learn how to easily insert a PDF into Excel and streamline your technology and computer workflow. Enhance your productivity today!
(Many of the links in this article redirect to a specific reviewed product. Your purchase of these products through affiliate links helps to generate commission for Noodls.com, at no extra cost. Learn more)
Table of Contents
Introduction
Inserting a PDF into an Excel spreadsheet can be a valuable skill, especially when you want to combine different types of data or create comprehensive reports. While Excel doesn't have a direct feature for embedding PDFs, there are effective workarounds to achieve this. In this guide, we'll explore a step-by-step approach to seamlessly integrate a PDF file into an Excel document. By following these instructions, you'll be able to enhance the functionality and visual appeal of your spreadsheets, making them more dynamic and informative.
The process involves converting the PDF into an image, inserting the image into the Excel sheet, adjusting its size and position, and finally, linking the image to the original PDF file. This method allows you to maintain the integrity of the PDF content while incorporating it into your Excel workbook. Whether you're a business professional, a student, or an enthusiast looking to streamline your data management, this tutorial will equip you with the necessary skills to accomplish this task efficiently.
Let's dive into the details of each step, providing clear and concise instructions along with helpful tips to ensure a smooth and successful integration of PDF files into your Excel spreadsheets. With these techniques at your disposal, you'll have the flexibility to create comprehensive and visually appealing documents that effectively communicate your data and insights.
Read more: How To Insert Multiple Rows In Excel
Step 1: Convert PDF to Image
Converting a PDF to an image is the first crucial step in integrating a PDF file into an Excel spreadsheet. This process ensures that the content of the PDF is preserved and easily insertable into the Excel document. Here's how to accomplish this:
-
Select the PDF Conversion Tool: Begin by choosing a reliable PDF conversion tool. There are various software options available, such as Adobe Acrobat, Smallpdf, or online converters like Zamzar and PDF2PNG. Select a tool that best suits your preferences and requirements.
-
Upload the PDF File: Once you've chosen your preferred conversion tool, upload the PDF file that you want to insert into the Excel spreadsheet. Most conversion tools have a simple drag-and-drop interface, making it easy to upload the PDF document.
-
Choose the Image Format: After uploading the PDF, select the image format in which you want to convert the file. Common image formats include JPEG, PNG, and TIFF. Consider the quality and resolution of the image format, as this will impact the visual clarity of the content in the Excel document.
-
Initiate the Conversion: Once you've selected the image format, initiate the conversion process. The PDF conversion tool will then transform the PDF pages into individual images, ensuring that each page is accurately represented in the image format of your choice.
-
Download the Image Files: After the conversion is complete, download the resulting image files to your computer. It's advisable to organize the images in a dedicated folder to streamline the subsequent steps of inserting them into the Excel spreadsheet.
By following these steps, you'll successfully convert the PDF into image format, laying the foundation for seamlessly integrating the PDF content into your Excel document. This process ensures that the visual integrity and clarity of the original PDF are maintained, allowing for a smooth transition into the Excel environment.
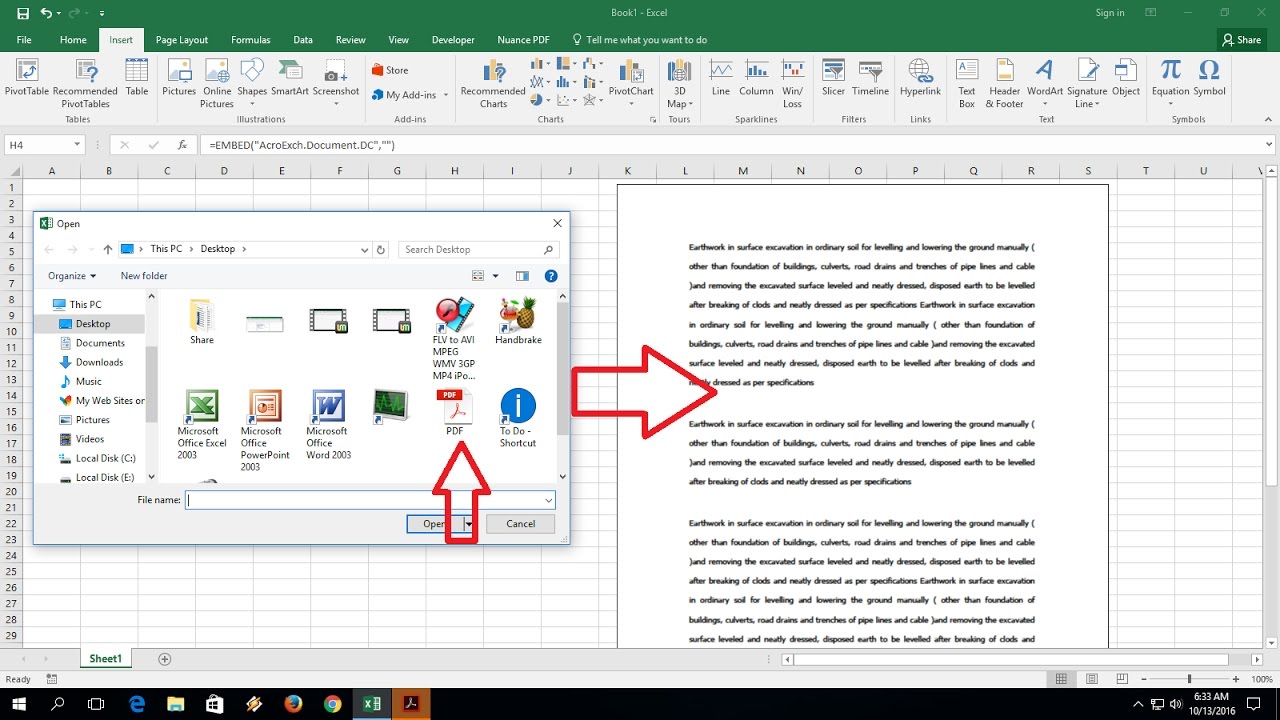
Step 2: Insert Image into Excel
Now that you have successfully converted the PDF into image format, the next step is to insert these images into your Excel spreadsheet. This process allows you to seamlessly integrate the visual content of the PDF into your Excel document, creating a comprehensive and dynamic presentation of your data. Here's a detailed guide on how to accomplish this:
-
Open Your Excel Workbook: Begin by opening the Excel workbook in which you want to insert the PDF images. Navigate to the specific worksheet where the images will be incorporated, ensuring that you have the necessary permissions to edit the document.
-
Select the Insert Tab: In Excel, locate and select the "Insert" tab from the top menu. This tab contains various options for adding different types of content to your spreadsheet, including images, shapes, and charts.
-
Choose the Image Insertion Option: Within the "Insert" tab, look for the "Pictures" or "Pictures from File" option, depending on your Excel version. Click on this option to initiate the process of inserting the PDF images into the spreadsheet.
-
Navigate to the Image Files: A dialog box will appear, prompting you to navigate to the folder where you saved the converted PDF images. Select the first image that you want to insert into the Excel document and click "Insert."
-
Adjust Image Size and Position: Once the image is inserted, you can resize and reposition it within the worksheet. Excel provides intuitive tools for adjusting the dimensions and placement of the inserted images, allowing you to customize their appearance to suit your presentation needs.
-
Repeat the Insertion Process: If your PDF consists of multiple pages, repeat the insertion process for each page, ensuring that the images are placed sequentially within the Excel worksheet. This step is essential for maintaining the continuity of the PDF content within the spreadsheet.
By following these steps, you'll effectively insert the PDF images into your Excel workbook, creating a visually engaging and informative document that combines the strengths of both formats. This seamless integration allows you to leverage the visual clarity of the PDF content within the structured environment of an Excel spreadsheet, enhancing the overall presentation of your data.
Step 3: Adjust Image Size and Position
After inserting the PDF images into your Excel spreadsheet, it's essential to fine-tune their size and position to ensure a cohesive and visually appealing presentation. Excel provides intuitive tools for adjusting the dimensions and placement of the inserted images, allowing you to customize their appearance to suit your specific requirements.
Resizing Images
To resize an inserted image in Excel, simply click on the image to select it. You will notice small squares, known as sizing handles, at the corners and sides of the image. Click and drag these sizing handles to adjust the dimensions of the image. By holding down the Shift key while resizing, you can maintain the original aspect ratio of the image, preventing distortion. This feature is particularly useful for maintaining the visual integrity of the PDF content as it transitions into the Excel environment.
Read more: How To Insert A New Line In An Excel Cell
Positioning Images
Excel offers precise control over the positioning of images within a worksheet. After selecting an inserted image, you can click and drag it to reposition it anywhere within the worksheet. Additionally, the alignment options in Excel enable you to align images with respect to the cells or other objects on the spreadsheet, ensuring a consistent layout. This level of control allows you to seamlessly integrate the PDF images into the existing data and design elements within the Excel document.
Grouping and Layering
In more complex Excel documents, you may need to manage multiple images and other objects. Excel provides the capability to group images together, allowing you to move and resize them as a single unit. This feature is particularly useful when working with multi-page PDFs, as it enables you to maintain the relative positioning of images across different sheets within the workbook. Furthermore, Excel allows you to layer images, bringing forward or sending backward specific elements to achieve the desired visual hierarchy.
By meticulously adjusting the size and position of the inserted images, you can create a cohesive and visually engaging Excel document that seamlessly integrates the PDF content. These customization options empower you to craft a presentation that effectively communicates your data and insights while maintaining the visual clarity and integrity of the original PDF.
Step 4: Link Image to PDF File
Linking the inserted images in your Excel spreadsheet to the original PDF file is a crucial step that ensures seamless access to the source content. By establishing these links, you create a dynamic connection between the visual representation of the PDF content in Excel and the comprehensive information stored within the PDF document. Here's a detailed guide on how to accomplish this essential task:
Establishing Hyperlinks
In Excel, you can create hyperlinks that directly connect the inserted images to the corresponding PDF file. To do this, select an inserted image within the spreadsheet and right-click to access the context menu. From the menu, choose the "Hyperlink" option, which will open a dialog box where you can specify the target destination of the hyperlink.
Read more: How To Sign PDF On IPhone
Navigating to the PDF File
Within the hyperlink dialog box, navigate to the location of the original PDF file on your computer or network. Select the PDF file and confirm the hyperlink, effectively establishing a direct connection between the image in the Excel spreadsheet and the source PDF document. This process enables users to access the complete content of the PDF with a simple click on the linked image.
Testing the Hyperlinks
After creating the hyperlinks, it's essential to test their functionality to ensure that they accurately link to the respective PDF pages. By clicking on the linked images within the Excel document, you can verify that they seamlessly open the associated PDF file, allowing for convenient access to the detailed content. This verification step ensures that the established links provide a smooth transition between the visual representation in Excel and the comprehensive information contained in the PDF.
Enhancing Accessibility and Navigation
By linking the inserted images to the original PDF file, you enhance the accessibility and navigation capabilities of your Excel spreadsheet. Users can effortlessly delve into the detailed content of the PDF by interacting with the linked images, providing a seamless transition between the visual summary in Excel and the comprehensive data within the PDF document. This dynamic connection empowers users to explore the complete information while leveraging the structured presentation of the Excel spreadsheet.
By following these steps, you'll successfully link the inserted images in your Excel document to the original PDF file, creating a dynamic and interactive experience for users. This integration ensures that the visual representation in Excel serves as a gateway to the comprehensive content of the PDF, enhancing the functionality and usability of your data-driven documents.