Home>Home and Garden>How To Drain A Washing Machine
Home and Garden
How To Drain A Washing Machine
Published: March 5, 2024
Learn how to drain a washing machine with our step-by-step guide. Keep your home and garden in top condition with our expert tips and advice.
(Many of the links in this article redirect to a specific reviewed product. Your purchase of these products through affiliate links helps to generate commission for Noodls.com, at no extra cost. Learn more)
Table of Contents
Introduction
When it comes to home appliances, the washing machine is a true workhorse, diligently handling loads of laundry day in and day out. However, there are times when it becomes necessary to drain the washing machine, whether for routine maintenance or to address a malfunction. Knowing how to drain a washing machine is a valuable skill that can save you time and money, as well as prevent potential water damage to your home.
In this comprehensive guide, we will walk you through the step-by-step process of draining a washing machine safely and efficiently. By following these instructions, you can effectively remove excess water from the machine and address any underlying issues that may be causing drainage problems. Whether you're a seasoned DIY enthusiast or a novice homeowner, mastering this essential task will empower you to maintain your washing machine and keep it running smoothly for years to come.
So, let's roll up our sleeves and delve into the process of draining a washing machine. From turning off the power and water supply to cleaning the drain filter, each step is crucial in ensuring a successful drainage operation. By the end of this guide, you'll have the knowledge and confidence to tackle this task with ease, keeping your washing machine in optimal condition and minimizing the risk of potential water-related mishaps.
Now, without further ado, let's embark on this journey to learn the ins and outs of draining a washing machine, empowering you to take control of your home maintenance and keep your appliances in top-notch shape.
Step 1: Turn off the power and water supply
Before embarking on the process of draining your washing machine, it's crucial to prioritize safety by turning off the power and water supply. This initial step serves as a fundamental precautionary measure to prevent electrical mishaps and water leakage during the drainage procedure.
To begin, locate the power cord of your washing machine and unplug it from the electrical outlet. This action effectively cuts off the power source, ensuring that the machine is completely disconnected from the electrical grid. By doing so, you mitigate the risk of electrical shocks or malfunctions while working on the appliance.
Next, identify the water supply valves connected to the washing machine. These valves are typically located behind or adjacent to the appliance. Rotate the valves in a clockwise direction to shut off the water flow to the washing machine. This action halts the influx of water into the machine, preventing any potential leaks or spills during the drainage process.
By turning off the power and water supply, you create a secure environment to proceed with the subsequent steps of draining the washing machine. This proactive approach not only safeguards your well-being but also minimizes the likelihood of water damage to the surrounding area.
Remember, safety should always be the top priority when dealing with home appliances. By diligently following this crucial first step, you set the stage for a smooth and secure drainage process, laying the groundwork for a successful maintenance endeavor.
With the power and water supply effectively turned off, you are now ready to move on to the next step in draining your washing machine, bringing you closer to ensuring its optimal performance and longevity.
Step 2: Locate the drain hose
Once the power and water supply are safely turned off, the next crucial step in draining your washing machine is to locate the drain hose. The drain hose is a vital component responsible for carrying the wastewater out of the machine during the drainage process. It is essential to identify the precise location of the drain hose to effectively remove the accumulated water from the washing machine.
In most washing machines, the drain hose is situated at the back of the appliance. It is typically a flexible, ribbed tube made of durable materials such as rubber or plastic. The drain hose is designed to expel the used water from the washing machine, directing it towards the drainage point, such as a utility sink, standpipe, or floor drain.
To locate the drain hose, carefully move the washing machine away from the wall, creating ample space to access the back of the appliance. Once you have clear access to the rear panel, visually inspect the area for a protruding hose. The drain hose is often distinguishable by its diameter and the presence of a curved or U-shaped segment, which is designed to prevent wastewater from flowing back into the machine.
In some models, the drain hose may be secured in place with clips or brackets. Take note of any fastenings and gently detach the hose from its fixtures, allowing you to maneuver it for the drainage process. Additionally, be mindful of any kinks, twists, or obstructions in the hose that may impede the smooth flow of water during the draining procedure.
As you locate the drain hose, take a moment to familiarize yourself with its structure and positioning. This understanding will be invaluable as you progress through the subsequent steps of draining the washing machine, ensuring that you can effectively manipulate the hose to facilitate the removal of water from the appliance.
By successfully identifying and preparing the drain hose for the drainage process, you are laying the groundwork for a seamless and efficient operation. With the drain hose in sight, you are now poised to proceed to the next steps, bringing you closer to resolving any drainage issues and maintaining the optimal functionality of your washing machine.
Step 3: Position a bucket or container
With the power and water supply safely turned off and the drain hose located, the next pivotal step in draining your washing machine is to position a suitable bucket or container to collect the expelled water. This strategic placement ensures that the wastewater is contained and effectively diverted away from the surrounding area, preventing potential spills and facilitating a controlled drainage process.
Select a sturdy and capacious bucket or container that can accommodate the volume of water expected to be discharged from the washing machine. Ideally, opt for a container with a wide opening and a substantial capacity to effectively capture the water without risk of overflow. Additionally, ensure that the chosen receptacle is clean and free from any contaminants, maintaining the integrity of the drained water and preventing any potential damage to the surrounding environment.
Position the bucket or container near the washing machine, strategically placing it to align with the end of the drain hose. This precise positioning allows for a seamless flow of water from the hose into the receptacle, minimizing the likelihood of splashes or leaks. If necessary, elevate the bucket or container to align with the height of the drain hose outlet, promoting a smooth and unhindered transfer of water.
Furthermore, consider placing a towel or absorbent material beneath the bucket or container to capture any stray drips or spills, ensuring that the surrounding area remains clean and dry throughout the drainage process. This proactive measure serves as an additional safeguard against potential water damage, providing a protective barrier against unexpected leaks or splashes.
By thoughtfully positioning a suitable bucket or container, you are proactively preparing for the efficient collection of the expelled water, mitigating the risk of any untoward spills or mess. This strategic placement sets the stage for a controlled and organized drainage operation, allowing you to effectively manage the wastewater from your washing machine while maintaining a clean and orderly workspace.
With the bucket or container securely positioned and ready to receive the discharged water, you are now poised to progress to the subsequent steps, bringing you closer to successfully draining your washing machine and addressing any underlying drainage concerns.
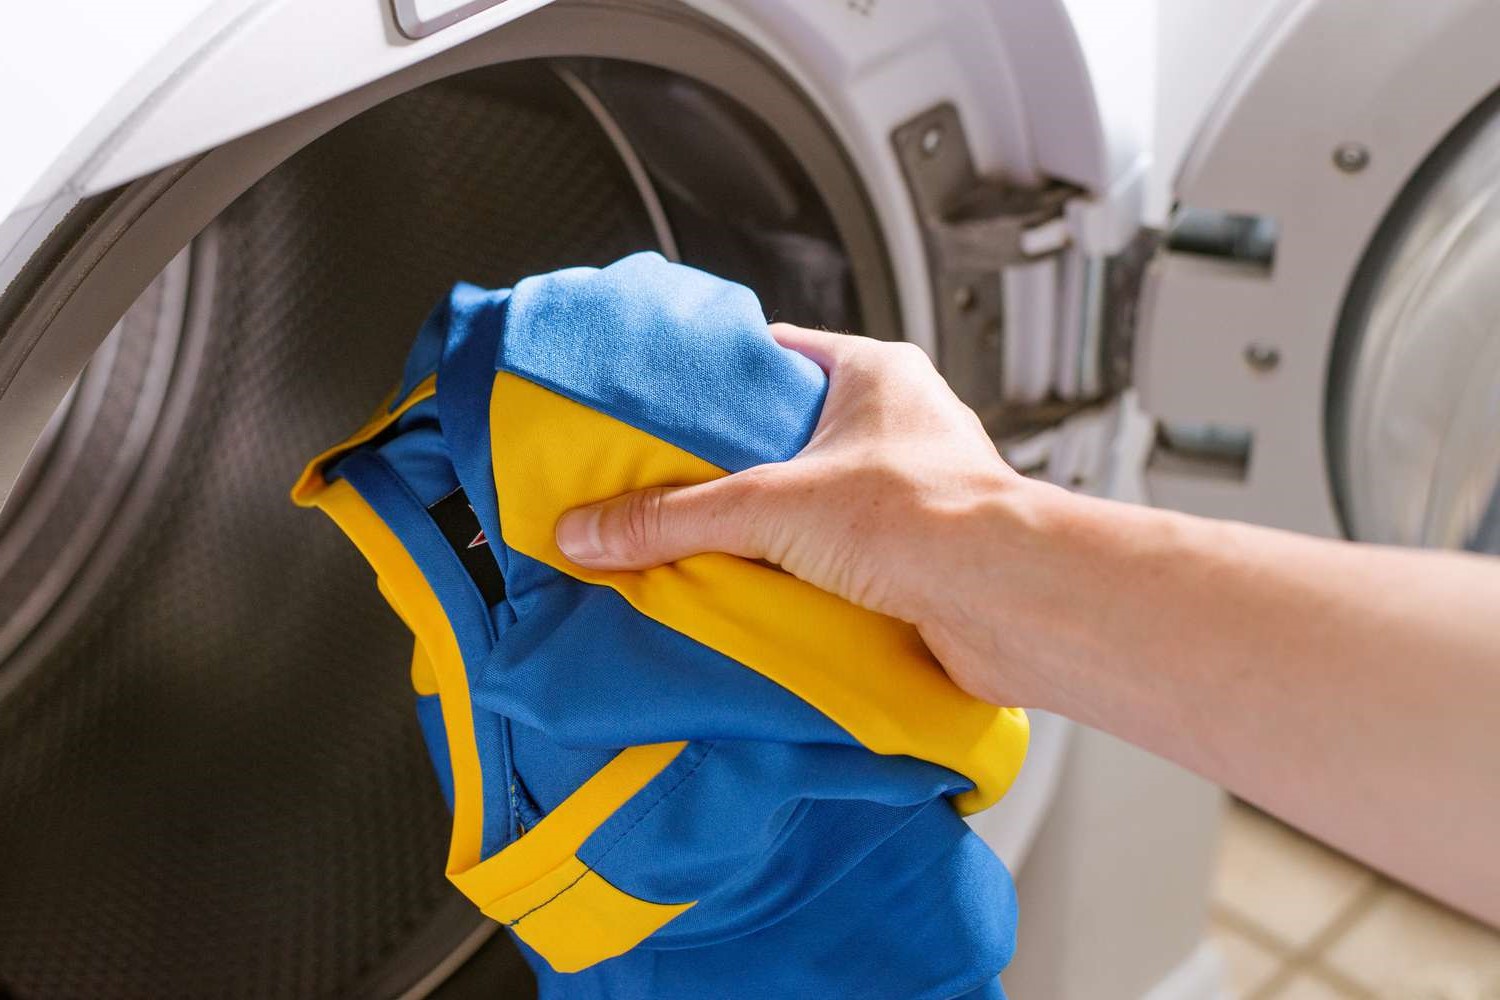
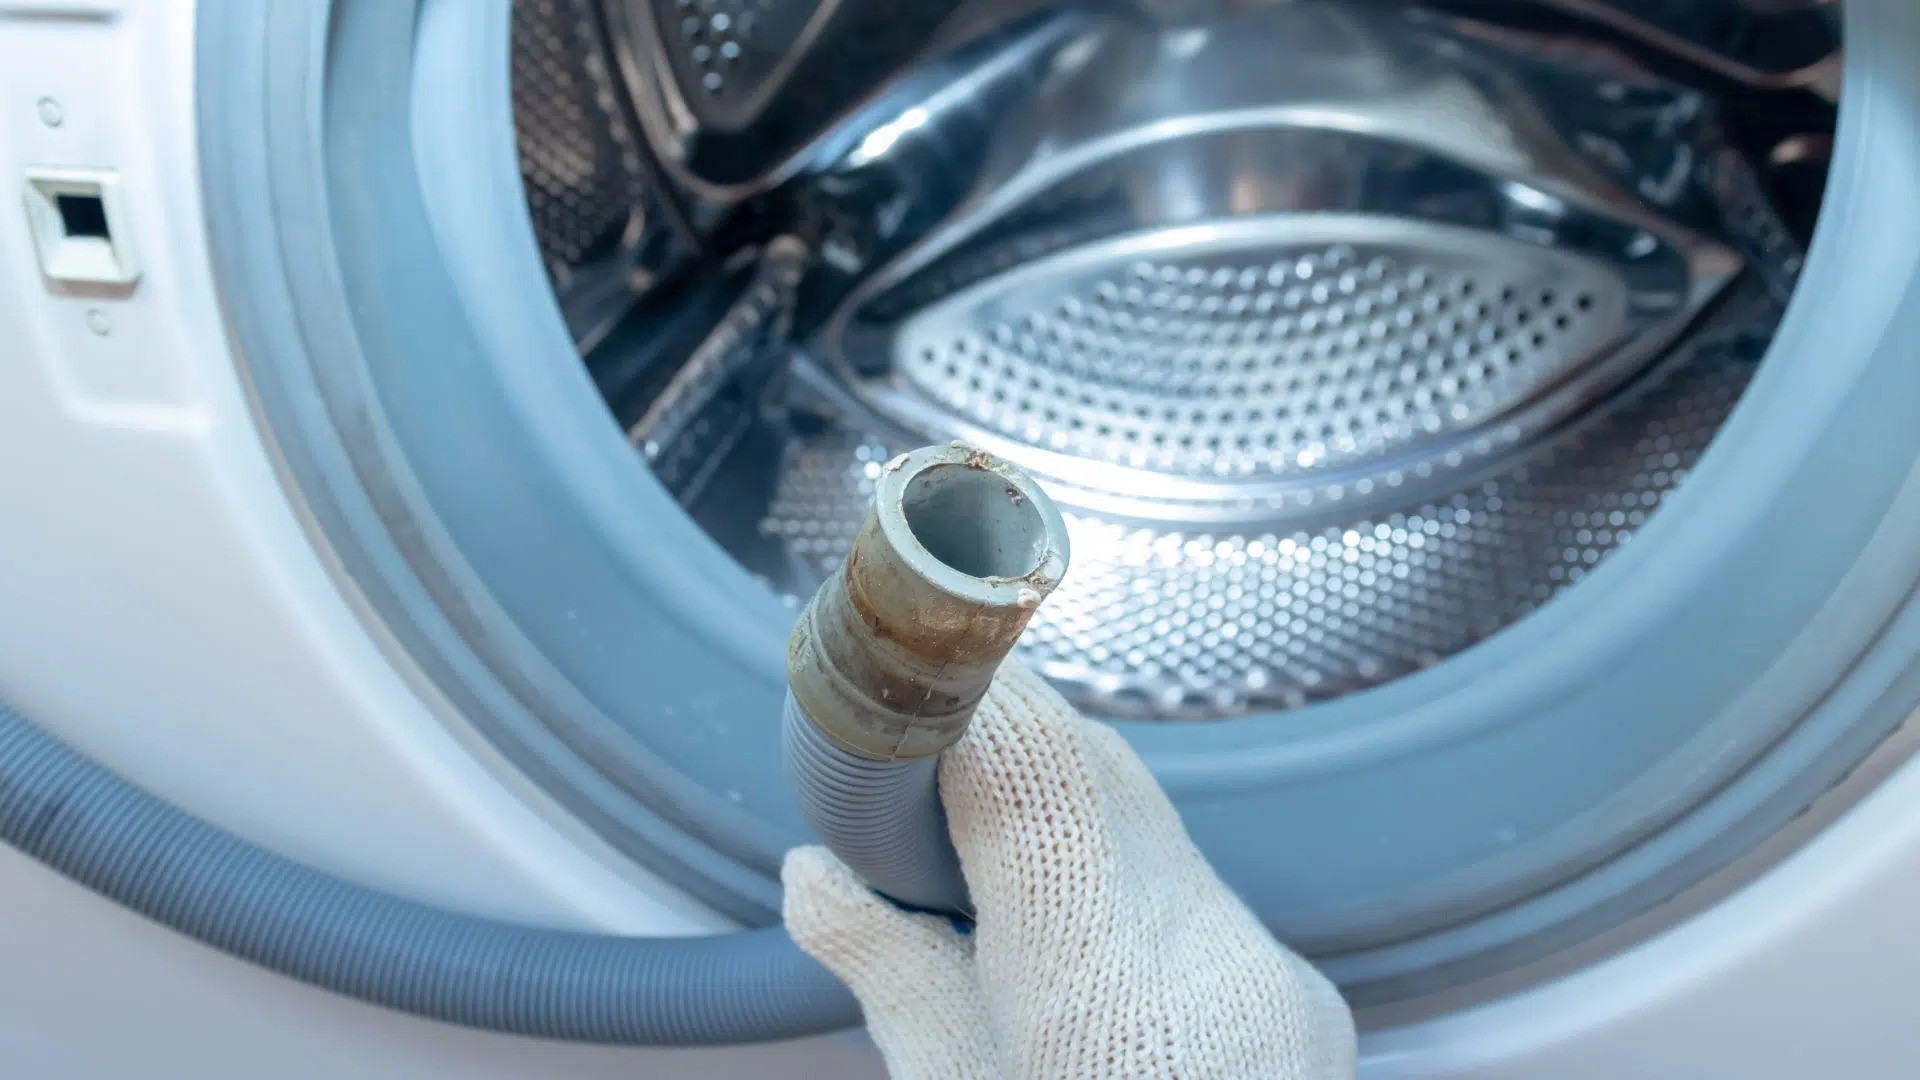
Step 4: Remove the drain hose and drain the water
With the bucket or container strategically positioned to collect the expelled water, it's time to proceed with removing the drain hose from the washing machine and initiating the drainage process. This step is pivotal in facilitating the smooth and efficient removal of accumulated water, allowing you to address any underlying issues affecting the machine's drainage capabilities.
To begin, carefully detach the drain hose from its connection point on the washing machine. Depending on the model, the hose may be secured with a clamp, clip, or simply inserted into a designated outlet. Exercise caution and use appropriate tools, if necessary, to loosen any fastenings and gently disconnect the hose from the machine.
Once the drain hose is detached, direct the open end towards the positioned bucket or container. Ensure that the hose is securely positioned to facilitate the unhindered flow of water, minimizing the risk of spills or splashes. With the hose poised for drainage, proceed to initiate the process by gently elevating the open end or creating a downward slope to encourage the water to flow out of the machine.
As the water begins to discharge from the drain hose, monitor the flow and adjust the positioning of the bucket or container as needed to accommodate the volume of water. Exercise vigilance to prevent any potential overflow or spillage, maintaining a controlled and organized drainage operation.
Throughout the drainage process, observe the expelled water for any signs of discoloration, unusual odors, or debris, as these may indicate underlying issues with the washing machine. By actively monitoring the drained water, you can gain valuable insights into the condition of the appliance and identify any potential maintenance requirements.
As the water steadily empties from the washing machine, allow the drainage process to continue until the flow ceases, indicating that the majority of the accumulated water has been successfully removed. Once the drainage is complete, carefully lower the open end of the drain hose and reposition it as necessary, ensuring that any residual water is effectively captured by the receptacle.
By methodically removing the drain hose and initiating the drainage process, you have taken a significant step towards addressing any drainage issues affecting your washing machine. With the accumulated water successfully removed, you are now prepared to proceed to the subsequent steps, bringing you closer to resolving any underlying concerns and restoring the optimal functionality of your appliance.
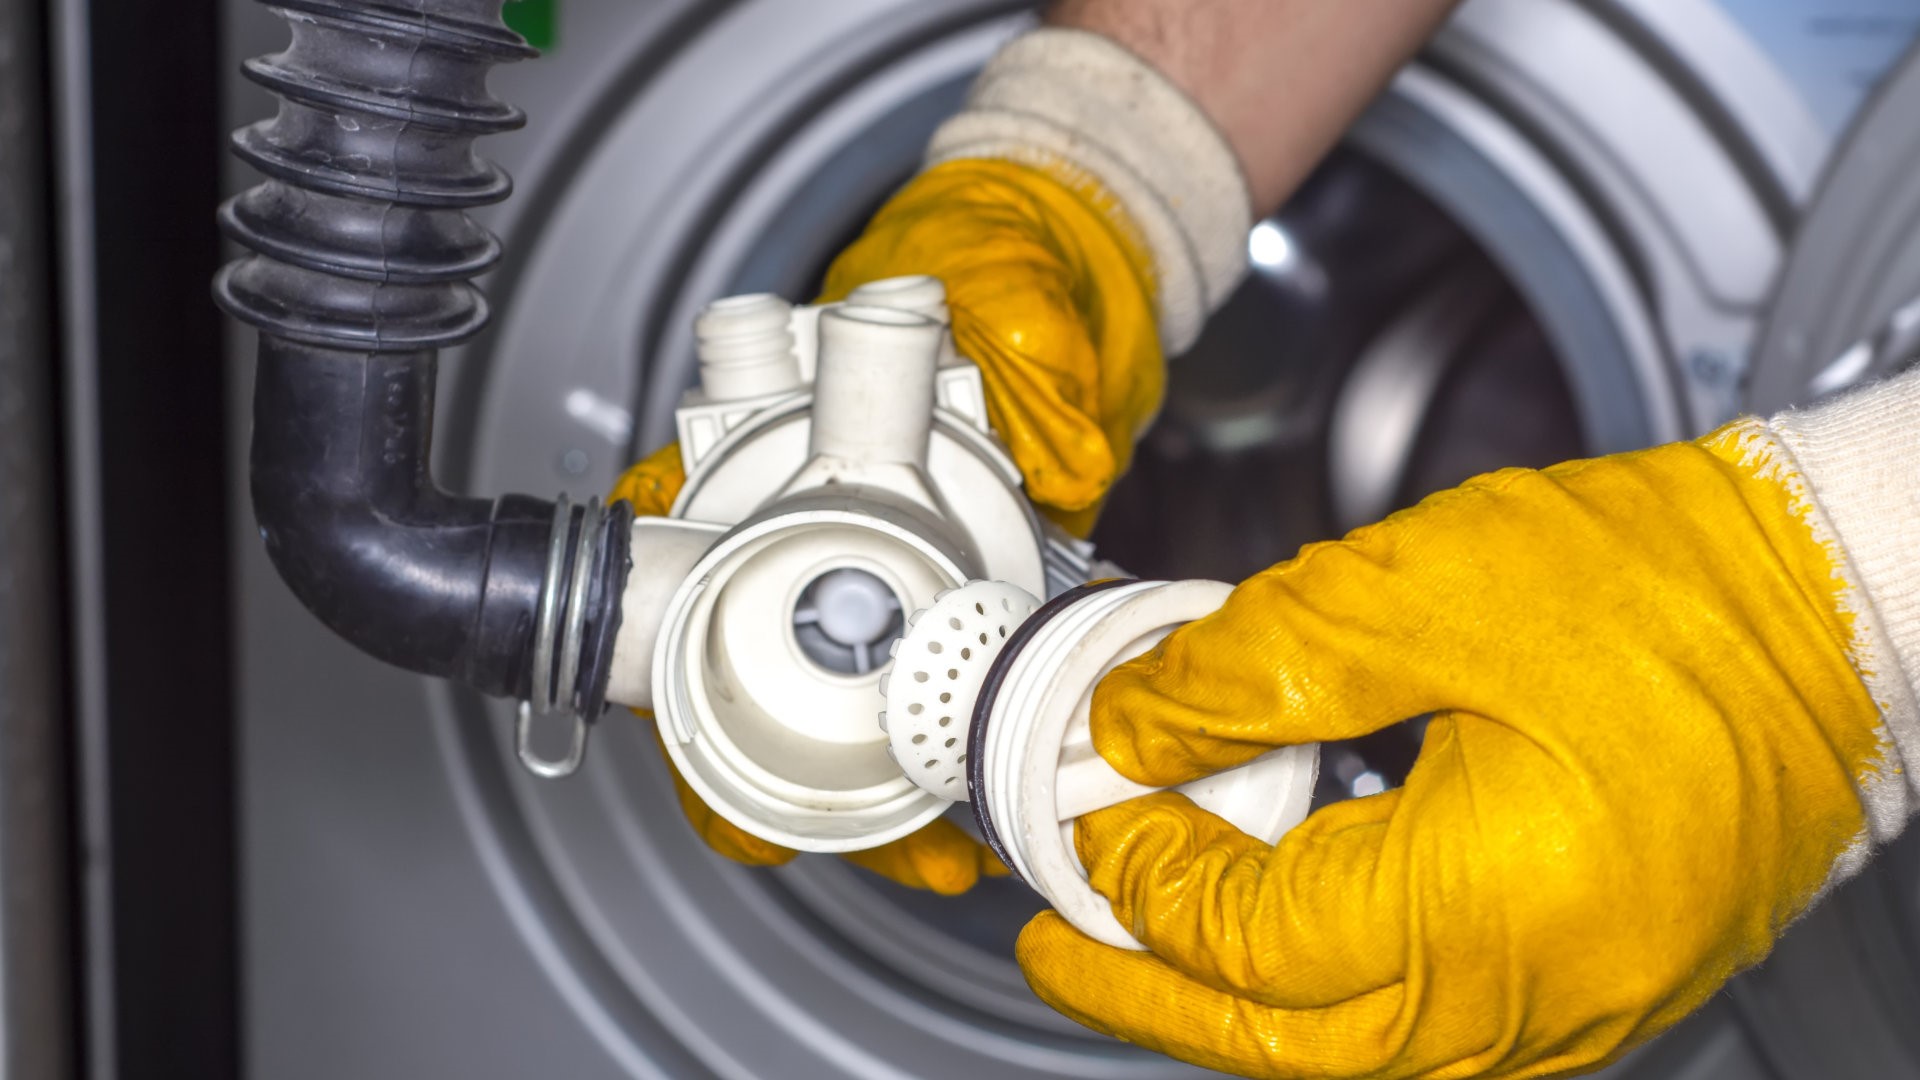
Step 5: Clean the drain filter
After successfully draining the washing machine, it's essential to address another critical component that can significantly impact its performance: the drain filter. The drain filter serves as a protective barrier, capturing lint, debris, and foreign objects to prevent them from clogging the drainage system and impeding the flow of water. Over time, the accumulation of lint, fabric remnants, and other residues can obstruct the drain filter, compromising the machine's ability to expel water efficiently. Therefore, cleaning the drain filter is a vital maintenance task that promotes optimal drainage and preserves the overall functionality of the washing machine.
To access the drain filter, refer to the manufacturer's instructions or the appliance manual to locate its specific position within the washing machine. In most models, the drain filter is situated near the bottom front of the machine, typically behind a small access panel or flap. Carefully open the access panel to reveal the drain filter, ensuring that you have a towel or container ready to capture any residual water that may be released during the cleaning process.
Once the drain filter is accessible, inspect it for any visible debris, lint, or obstructions. Using a pair of gloves, carefully remove any accumulated debris from the filter, taking care to dispose of it properly. Additionally, consider using a soft-bristled brush or a cloth to gently wipe the filter and remove any stubborn residues that may be clinging to its surface.
After clearing the visible debris, it's advisable to rinse the drain filter under running water to dislodge any remaining particles and ensure thorough cleanliness. As you rinse the filter, visually inspect it to confirm that it is free from any lingering debris and appears clean and unobstructed.
Once the drain filter is meticulously cleaned and free from debris, carefully reinsert it into its designated position within the washing machine. Ensure that the filter is securely fitted and properly aligned, as its effective functioning is integral to the machine's drainage capabilities.
By diligently cleaning the drain filter, you are proactively safeguarding the washing machine against potential drainage issues and preserving its long-term efficiency. This essential maintenance task promotes uninterrupted water flow, mitigates the risk of clogs, and contributes to the overall well-being of the appliance.
With the drain filter meticulously cleaned and reinstalled, you have successfully completed a crucial maintenance step that enhances the washing machine's drainage performance and contributes to its sustained functionality. This proactive approach to maintaining the appliance ensures that it remains in optimal condition, ready to tackle the demands of daily laundry with efficiency and reliability.
Step 6: Reconnect the drain hose
With the washing machine successfully drained and the drain filter cleaned, the next pivotal step is to reconnect the drain hose to the appliance. This crucial task ensures that the drainage system is restored to its operational state, allowing the washing machine to expel wastewater effectively and maintain its optimal functionality.
To begin, carefully position the open end of the drain hose back into its designated outlet on the washing machine. Depending on the model, the hose may feature a specific connector or attachment point that facilitates a secure and snug fit. Align the hose with the outlet and gently guide it into place, ensuring that it is properly seated and free from any kinks or twists that may impede the flow of water.
Once the drain hose is securely reconnected, inspect the surrounding area to verify that there are no loose connections or potential points of leakage. Take a moment to ensure that the hose is positioned in a manner that promotes smooth water flow and minimizes the risk of dislodgment during the machine's operation.
After reattaching the drain hose, it is advisable to conduct a brief visual inspection to confirm that all components are properly aligned and secured. This proactive measure serves to preemptively address any potential issues that may compromise the machine's drainage capabilities, ensuring that the reconnection process is thorough and effective.
Furthermore, consider running a brief test cycle to verify that the washing machine expels water through the drain hose without any leaks or disruptions. This practical assessment allows you to confirm that the reconnection has been executed successfully and that the drainage system is functioning as intended.
By meticulously reattaching the drain hose, you are actively restoring the washing machine's integral components to their operational state, ensuring that the appliance is poised to handle future laundry loads with efficiency and reliability. This conscientious approach to reconnection promotes the seamless functionality of the drainage system, contributing to the overall performance and longevity of the washing machine.
With the drain hose securely reconnected and the drainage system reinstated, you have effectively completed a pivotal step in the process of draining and maintaining your washing machine. This proactive endeavor ensures that the appliance is primed for continued use, equipped to handle the demands of daily laundry while upholding its optimal functionality.
Step 7: Turn the power and water supply back on
With the washing machine successfully drained, the final step in this comprehensive process is to restore the power and water supply to the appliance. This pivotal action marks the culmination of the drainage procedure, ensuring that the washing machine is ready to resume its essential role in handling laundry tasks with efficiency and reliability.
To begin, locate the power cord of the washing machine and carefully plug it back into the electrical outlet. This deliberate action restores the power source to the appliance, enabling it to function as intended. As you reconnect the power cord, take a moment to ensure that the connection is secure and that the cord is free from any damage or fraying that may compromise its integrity.
Next, proceed to the water supply valves connected to the washing machine. Rotate the valves in a counterclockwise direction to reopen the water flow to the appliance. This deliberate action reinstates the influx of water into the machine, ensuring that it is equipped to handle future laundry loads effectively.
As the water supply is restored, take a moment to inspect the area around the washing machine for any potential leaks or irregularities. Verify that the water supply valves are functioning as intended and that there are no signs of water seepage or drips that may indicate a faulty connection.
Furthermore, consider running a brief test cycle on the washing machine to confirm that both the power and water supply restoration have been executed successfully. This practical assessment allows you to verify that the appliance powers on without issues and that it effectively fills with water as part of its standard operation.
By diligently turning the power and water supply back on, you are actively reinstating the essential elements that enable the washing machine to fulfill its primary function. This conscientious approach ensures that the appliance is ready to resume its role in managing laundry tasks, equipped with the necessary power and water supply to operate efficiently.
With the power and water supply effectively restored, you have successfully completed the comprehensive process of draining and maintaining your washing machine. This proactive endeavor ensures that the appliance is primed for continued use, poised to handle the demands of daily laundry while upholding its optimal functionality.
Conclusion
In conclusion, mastering the art of draining a washing machine is a valuable skill that empowers homeowners to proactively maintain their appliances and address potential drainage issues. By following the step-by-step process outlined in this comprehensive guide, you have gained the knowledge and confidence to effectively drain your washing machine, ensuring its optimal functionality and longevity.
Throughout this guide, we embarked on a journey to understand the intricacies of draining a washing machine, beginning with the crucial steps of turning off the power and water supply. By prioritizing safety and creating a secure environment, you set the stage for a smooth and secure drainage process, mitigating the risk of potential mishaps.
Locating the drain hose and positioning a suitable bucket or container were pivotal steps that facilitated the efficient removal of accumulated water from the washing machine. By strategically preparing the workspace and effectively collecting the expelled water, you ensured a controlled and organized drainage operation.
Removing the drain hose, cleaning the drain filter, and meticulously reattaching the hose were essential tasks that addressed potential obstructions and enhanced the machine's drainage capabilities. By proactively maintaining these integral components, you safeguarded the washing machine against potential issues and preserved its long-term efficiency.
Finally, by turning the power and water supply back on, you reinstated the essential elements that enable the washing machine to fulfill its primary function. This conscientious approach ensured that the appliance was ready to resume its role in managing laundry tasks, equipped with the necessary power and water supply to operate efficiently.
By diligently following these steps, you have not only successfully drained your washing machine but also gained valuable insights into its maintenance and functionality. This newfound knowledge empowers you to take control of your home maintenance, ensuring that your appliances remain in top-notch condition and ready to tackle the demands of daily life.
In essence, mastering the process of draining a washing machine is a proactive endeavor that contributes to the overall well-being of your home and the longevity of your appliances. By incorporating these maintenance practices into your routine, you can uphold the optimal functionality of your washing machine, minimize the risk of potential issues, and enjoy the peace of mind that comes with a well-maintained home environment.