Home>Home and Garden>How To Remove Sink Stopper
Home and Garden
How To Remove Sink Stopper
Published: March 5, 2024
Learn how to remove a sink stopper easily with our step-by-step guide. Keep your home and garden in top shape with our helpful tips and tricks.
(Many of the links in this article redirect to a specific reviewed product. Your purchase of these products through affiliate links helps to generate commission for Noodls.com, at no extra cost. Learn more)
Table of Contents
Introduction
Removing a sink stopper may seem like a daunting task, but with the right guidance and tools, it can be a straightforward process. Whether you're dealing with a pop-up, drop-in, or push-pull sink stopper, understanding the proper removal techniques is essential for maintaining a functional and clean sink. Over time, sink stoppers can become clogged with debris, making it necessary to remove and clean them to ensure proper drainage and hygiene in your kitchen or bathroom.
In this comprehensive guide, we will walk you through the step-by-step process of removing different types of sink stoppers, providing you with the knowledge and confidence to tackle this task with ease. By following these instructions, you can effectively maintain your sink's functionality and cleanliness, ultimately enhancing the overall appeal and functionality of your home.
Let's dive into the essential tools and materials needed for this project, and then explore the specific methods for removing pop-up, drop-in, and push-pull sink stoppers. Whether you're a seasoned DIY enthusiast or a novice homeowner, this guide will equip you with the expertise to handle sink stopper removal and maintenance like a pro.
Read more: How To Clean A Porcelain Sink
Tools and Materials Needed
Before embarking on the task of removing a sink stopper, it's crucial to gather the necessary tools and materials. Having the right equipment at your disposal will streamline the process and ensure a successful outcome. Here's a comprehensive list of items you'll need:
Tools:
- Adjustable Wrench: This versatile tool will come in handy for loosening and tightening various components of the sink stopper assembly.
- Needle-Nose Pliers: These are essential for reaching and manipulating small parts within the sink drain.
- Screwdriver Set: A set of flathead and Phillips screwdrivers will enable you to tackle different types of fasteners that secure the sink stopper in place.
- Plumber's Putty Knife: This tool is useful for removing old plumber's putty and ensuring a clean surface when resealing the sink stopper.
- Bucket or Container: Having a container to collect water and debris from the sink will help prevent mess and facilitate easy cleanup.
Materials:
- Plumber's Putty: This waterproof sealing compound is necessary for creating a watertight seal when reinstalling the sink stopper.
- Replacement Gaskets or Washers: Depending on the condition of the existing gaskets or washers, it's prudent to have replacements on hand to ensure a proper seal after reinstallation.
- Cleaning Solution: A mild cleaning solution or vinegar can be used to clean the sink stopper and its components, removing any accumulated grime and debris.
- Rags or Towels: These will be useful for wiping down the sink and surrounding areas, keeping them clean and dry throughout the process.
- Rubber Gloves: Protect your hands from dirt, grime, and cleaning solutions by wearing rubber gloves during the removal and cleaning process.
By ensuring that you have these tools and materials readily available, you'll be well-prepared to tackle the task of removing a sink stopper. With these essentials at your disposal, you can proceed with confidence, knowing that you have everything needed to complete the job efficiently and effectively.
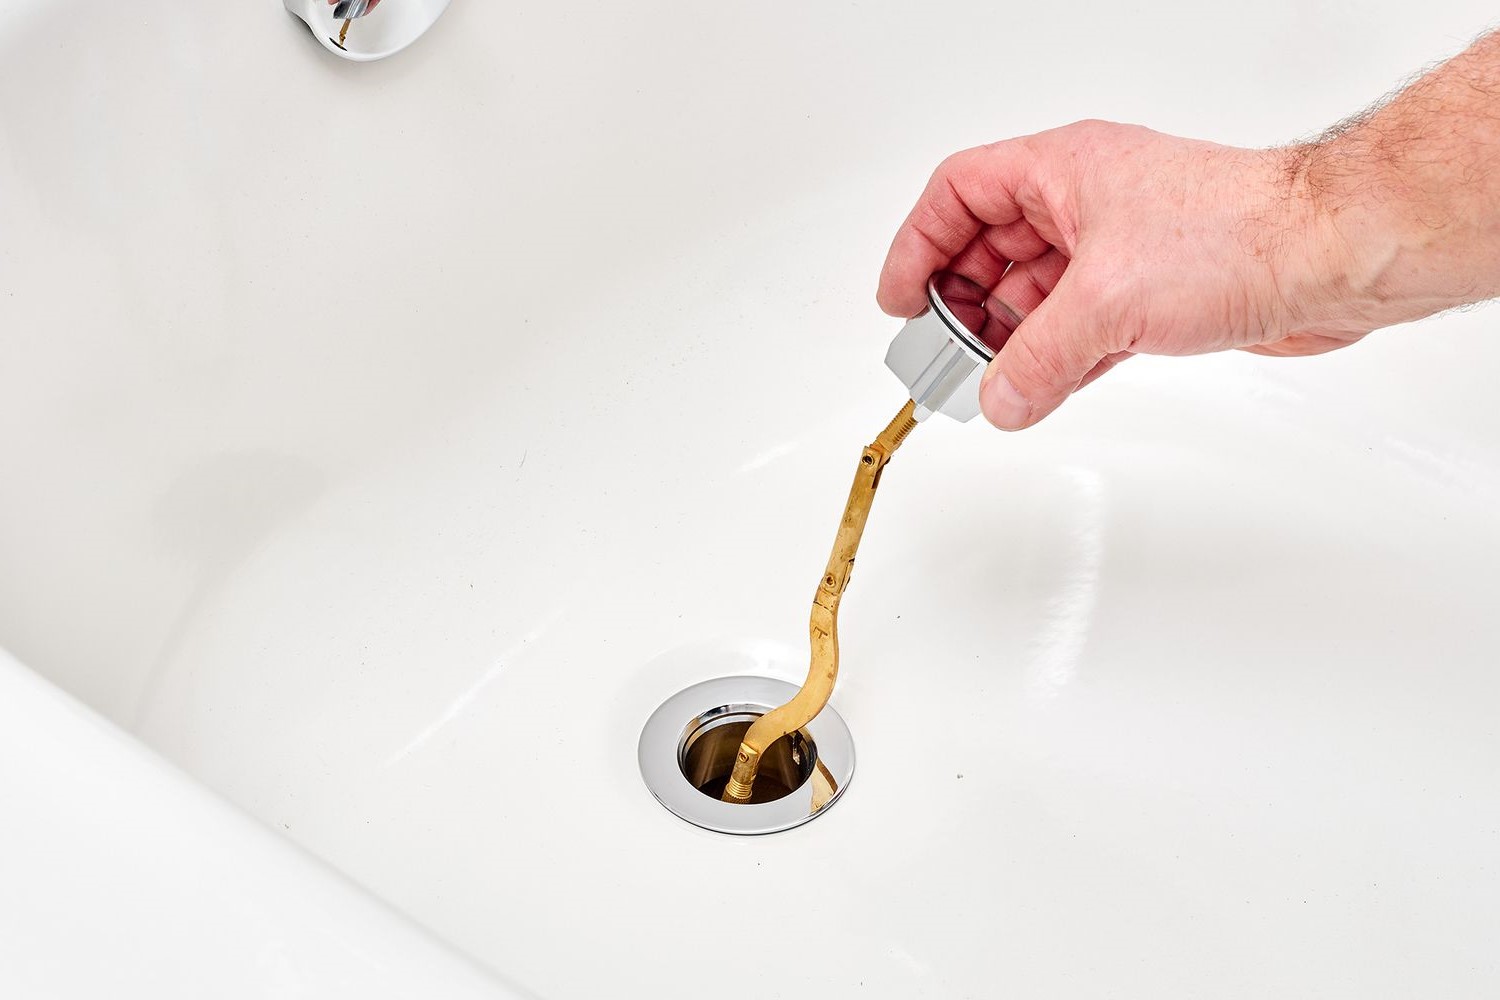
Removing a Pop-Up Sink Stopper
Removing a pop-up sink stopper requires a systematic approach to disassemble the components and access the stopper mechanism. Here's a detailed guide on how to remove a pop-up sink stopper:
-
Clear the Area: Begin by clearing out the space under the sink to provide ample room to work comfortably. Place a bucket or container beneath the P-trap to catch any water or debris that may spill during the process.
-
Locate the Pivot Rod: Under the sink, identify the pivot rod connected to the horizontal rod of the stopper assembly. Loosen the pivot rod nut using an adjustable wrench and disconnect the pivot rod from the clevis strap.
-
Remove the Clevis Strap: Once the pivot rod is detached, remove the clevis strap by unhooking it from the pivot rod. This will free the horizontal rod and allow you to maneuver the stopper assembly.
-
Access the Stopper: With the pivot rod and clevis strap removed, you can now access the top of the stopper assembly. Depending on the design, there may be a pivot nut securing the horizontal rod to the tailpiece. Use pliers or a wrench to loosen and remove the pivot nut, allowing the horizontal rod and stopper to be lifted out of the drain.
-
Clean and Inspect: After removing the stopper assembly, thoroughly clean all components with a mild cleaning solution to remove any accumulated grime or debris. Inspect the rubber gasket or O-ring for signs of wear and tear, and replace it if necessary to ensure a proper seal upon reinstallation.
By following these steps, you can successfully remove a pop-up sink stopper and access the drain for cleaning or maintenance. This process allows you to address any blockages or issues within the drain and ensures that the stopper assembly can be effectively cleaned and reinstalled for optimal functionality.
Remember to keep track of the removed components and take note of their arrangement to facilitate smooth reassembly. With the pop-up sink stopper removed, you can proceed with cleaning and, if needed, replacing any worn parts before reinserting the stopper assembly and reattaching the pivot rod and clevis strap.
Read more: Ruben Patterson How Kobe Stopper Was Created
Removing a Drop-In Sink Stopper
Removing a drop-in sink stopper involves a different approach compared to a pop-up stopper. Here's a detailed guide on how to remove a drop-in sink stopper:
-
Clear the Area: Before starting the removal process, ensure that the area under the sink is clear and accessible. Place a bucket or container beneath the P-trap to catch any water or debris that may spill during the removal.
-
Identify the Stopper: A drop-in sink stopper is typically a rubber or plastic plug that sits directly in the drain opening. It may be connected to a lift rod or have a simple, standalone design.
-
Lift and Twist: Depending on the design, the drop-in stopper can be lifted directly out of the drain. In some cases, it may require a slight twist to disengage it from the drain opening. Apply gentle upward pressure while twisting if necessary to release the stopper from the drain.
-
Inspect and Clean: Once the stopper is removed, inspect it for any accumulated debris or grime. Clean the stopper thoroughly using a mild cleaning solution or vinegar to ensure that it is free from any blockages or buildup.
-
Clean the Drain: With the stopper removed, take the opportunity to clean the drain opening and surrounding areas. Use a brush or cloth to remove any debris or residue that may have accumulated, ensuring that the drain is clear and free-flowing.
-
Replace or Reinstall: If the drop-in stopper shows signs of wear or damage, consider replacing it with a new one. Alternatively, if the stopper is in good condition, it can be reinstalled after cleaning the drain and stopper thoroughly.
By following these steps, you can effectively remove a drop-in sink stopper, clean the drain, and address any issues related to blockages or accumulated debris. This process allows for proper maintenance of the sink and ensures that the stopper can be reinstalled for continued functionality.
Remember to handle the removed stopper and any related components with care, and keep track of their arrangement to facilitate smooth reinstallation. With the drop-in sink stopper removed, you can proceed with cleaning and, if necessary, replacing the stopper before reinserting it into the drain opening.
Removing a Push-Pull Sink Stopper
Removing a push-pull sink stopper involves a straightforward process that allows for easy access to the drain for cleaning and maintenance. Here's a detailed guide on how to remove a push-pull sink stopper:
-
Clear the Area: Before initiating the removal process, ensure that the area under the sink is clear and accessible. Place a bucket or container beneath the P-trap to catch any water or debris that may spill during the removal.
-
Identify the Stopper Mechanism: A push-pull sink stopper is characterized by a knob or handle on the faucet that can be pulled up or pushed down to open or close the drain. The stopper mechanism is typically located at the back of the sink, near the faucet.
-
Access the Stopper Mechanism: Depending on the design, the stopper mechanism may be concealed by a cover or cap. Remove the cover to expose the stopper assembly and mechanism underneath.
-
Detach the Stopper: Once the stopper mechanism is accessible, locate the connecting rod or linkage that extends from the knob to the stopper assembly. Disconnect the linkage or rod from the stopper assembly by releasing any retaining clips or screws that secure it in place.
-
Remove the Stopper Assembly: With the linkage detached, the stopper assembly can be lifted out of the drain opening. Depending on the specific design, the stopper may be threaded onto the connecting rod or secured by a retaining nut. Unscrew or unthread the stopper to remove it completely from the drain.
-
Clean and Inspect: After removing the stopper assembly, thoroughly clean all components with a mild cleaning solution to remove any accumulated grime or debris. Inspect the rubber gasket or O-ring for signs of wear and tear, and replace it if necessary to ensure a proper seal upon reinstallation.
By following these steps, you can successfully remove a push-pull sink stopper and access the drain for cleaning or maintenance. This process allows you to address any blockages or issues within the drain and ensures that the stopper assembly can be effectively cleaned and reinstalled for optimal functionality.
Remember to keep track of the removed components and take note of their arrangement to facilitate smooth reassembly. With the push-pull sink stopper removed, you can proceed with cleaning and, if needed, replacing any worn parts before reinserting the stopper assembly and reattaching the linkage or rod.
This comprehensive guide equips you with the knowledge and confidence to tackle the task of removing a push-pull sink stopper, ultimately contributing to the maintenance and functionality of your sink.
Cleaning and Replacing the Sink Stopper
After successfully removing the sink stopper, it's essential to focus on cleaning and, if necessary, replacing any worn or damaged components. This crucial step ensures that the sink stopper functions optimally and maintains a hygienic environment in your kitchen or bathroom.
Cleaning the Sink Stopper and Components
Begin by thoroughly cleaning the removed sink stopper and its associated components. Use a mild cleaning solution or a mixture of vinegar and water to dissolve any accumulated grime, soap scum, or debris. A small brush or old toothbrush can be useful for scrubbing hard-to-reach areas and crevices. Ensure that all surfaces are cleaned and rinsed to remove any residue, leaving the components fresh and free from buildup.
Inspect the rubber gasket, O-ring, or any sealing components for signs of wear, damage, or deterioration. If these parts appear worn or compromised, it's advisable to replace them to maintain a proper seal and prevent potential leaks or drainage issues in the future.
Replacing Worn Components
If the rubber gasket, O-ring, or other sealing components show signs of wear or damage, it's prudent to replace them with new, compatible parts. This ensures that the sink stopper creates a watertight seal when reinstalled, preventing water leakage and maintaining efficient drainage.
When replacing these components, ensure that they are the correct size and type for your specific sink stopper assembly. Apply a small amount of plumber's putty to the underside of the new gasket or O-ring before installing it to enhance the seal and prevent water from seeping through.
Reattaching and Testing
Once the sink stopper and its components are thoroughly cleaned and, if necessary, replaced, it's time to reattach the stopper assembly to the drain. Follow the reverse of the removal process, ensuring that all connections are secure and properly aligned. Tighten any retaining nuts or screws as needed to secure the components in place.
After reinstallation, test the sink stopper by operating the lift rod, push-pull knob, or other mechanism to ensure that it opens and closes the drain effectively. Check for any signs of water leakage around the stopper assembly and make adjustments as necessary to achieve a watertight seal.
By thoroughly cleaning and, if needed, replacing worn components, you can ensure that the sink stopper functions optimally and maintains a clean and efficient drainage system. This proactive maintenance contributes to the overall functionality and hygiene of your sink, enhancing the comfort and convenience of your home.
Conclusion
In conclusion, the process of removing a sink stopper is an essential aspect of maintaining a functional and hygienic kitchen or bathroom. By following the step-by-step guides provided for removing pop-up, drop-in, and push-pull sink stoppers, homeowners can effectively address blockages, clean the drain, and ensure that the stopper assembly operates optimally. This proactive approach not only enhances the overall functionality of the sink but also contributes to a clean and pleasant environment within the home.
The thorough cleaning and inspection of the removed sink stopper and its components are crucial steps in this maintenance process. By utilizing mild cleaning solutions and replacing worn or damaged gaskets and O-rings, homeowners can prevent potential leaks and drainage issues, ultimately prolonging the lifespan of the sink stopper assembly.
Furthermore, the reinstallation and testing phase allows for the verification of a watertight seal and proper functionality of the sink stopper. This ensures that the reassembled components operate seamlessly, providing efficient drainage and contributing to a hassle-free experience for users.
By equipping homeowners with the knowledge and confidence to handle sink stopper removal and maintenance, this guide empowers individuals to take proactive measures in caring for their home's essential fixtures. The utilization of common tools and materials, coupled with a systematic approach to the removal and cleaning process, makes this maintenance task accessible to a wide range of DIY enthusiasts and homeowners.
Ultimately, the successful removal, cleaning, and reinstallation of a sink stopper not only contribute to the functionality and hygiene of the sink but also enhance the overall appeal and comfort of the home. By incorporating these maintenance practices into regular home care routines, individuals can ensure that their kitchen and bathroom sinks remain in optimal condition, providing a clean and efficient environment for daily use.