Home>Technology and Computers>How To Set Up Call Forwarding On Your IPhone

Technology and Computers
How To Set Up Call Forwarding On Your IPhone
Published: March 4, 2024
Learn how to easily set up call forwarding on your iPhone with our step-by-step guide. Stay connected and never miss an important call. Perfect for those who love technology and computers!
(Many of the links in this article redirect to a specific reviewed product. Your purchase of these products through affiliate links helps to generate commission for Noodls.com, at no extra cost. Learn more)
Table of Contents
Introduction
Setting up call forwarding on your iPhone can be incredibly useful in ensuring that you never miss an important call, even when you're unable to answer your phone. Whether you're in a meeting, traveling, or simply unable to take calls, call forwarding allows you to redirect incoming calls to another number, ensuring that you stay connected at all times.
With the call forwarding feature, you can seamlessly redirect calls to another phone number, voicemail, or any other desired destination. This can be particularly handy for individuals who need to maintain accessibility for work, personal, or emergency reasons.
In this comprehensive guide, we will walk you through the step-by-step process of setting up call forwarding on your iPhone. By following these simple instructions, you can customize your call forwarding preferences and ensure that you never miss an important call again. Let's dive into the details and get your call forwarding set up in no time!
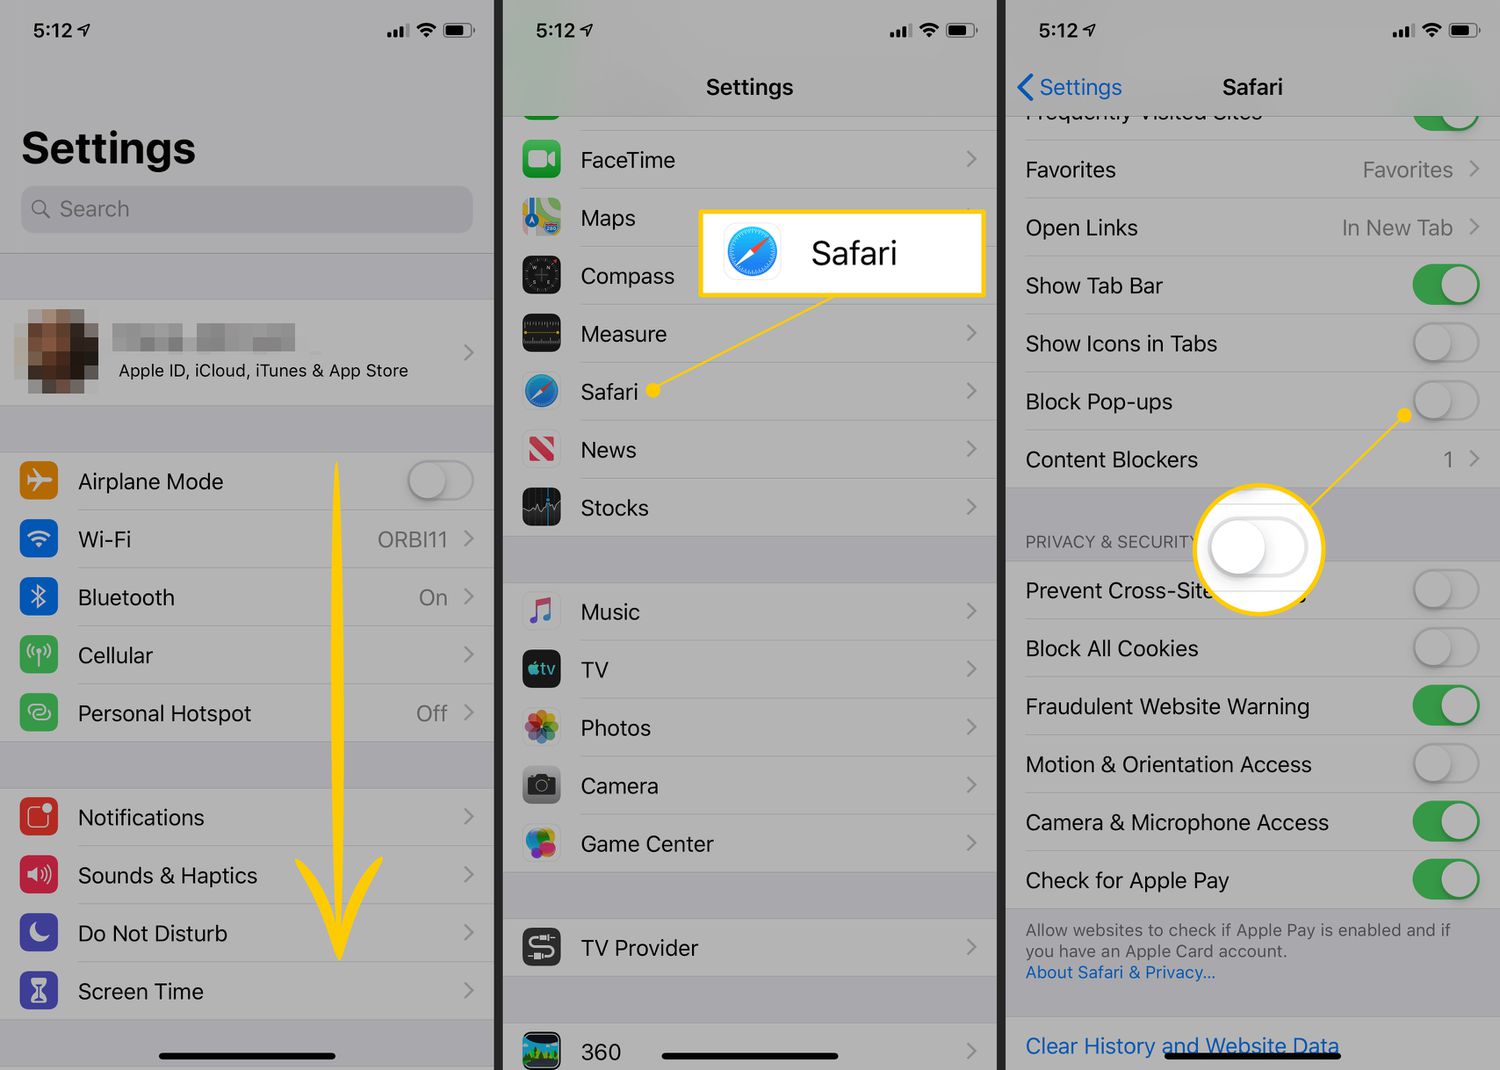
Step 1: Open the Settings App
To begin the process of setting up call forwarding on your iPhone, you'll need to open the Settings app. The Settings app serves as the central hub for customizing various features and preferences on your device, making it the perfect starting point for configuring call forwarding.
-
Locate the Settings App: On your iPhone's home screen, look for the Settings app icon. It typically features a gear-shaped symbol and is commonly found on the first page of apps. Once you've located the icon, tap on it to open the Settings app.
-
Navigate to the Phone Settings: Within the Settings app, you'll find a range of options for adjusting different aspects of your device. To proceed with setting up call forwarding, scroll through the available settings and locate the "Phone" option. This is where you'll find the settings related to your phone's calling features.
-
Access the Phone Settings: Upon tapping the "Phone" option, you'll be directed to a new screen dedicated to phone-related settings. Here, you can configure various calling features, including call forwarding, call waiting, and caller ID settings.
By successfully navigating to the "Phone" settings within the Settings app, you've completed the first crucial step in the process of setting up call forwarding on your iPhone. With the Settings app as your starting point, you're now ready to proceed to the next step and continue customizing your call forwarding preferences.
Remember, the Settings app is a versatile tool that allows you to personalize your iPhone experience, so feel free to explore its various options and features beyond call forwarding settings. With the ability to adjust a wide range of preferences, the Settings app empowers you to tailor your device to suit your unique needs and preferences.
Step 2: Tap on Phone
After successfully accessing the Settings app, the next step in setting up call forwarding on your iPhone involves tapping on the "Phone" option within the Settings menu. This action allows you to delve into the specific calling-related settings that are essential for configuring call forwarding.
Upon tapping on the "Phone" option, you will be presented with a dedicated screen that houses a variety of calling features and preferences. This is where you can fine-tune your calling experience, including setting up call forwarding, adjusting call waiting settings, and managing caller ID preferences.
The "Phone" settings screen provides a centralized platform for customizing your calling preferences, ensuring that you have full control over how your iPhone handles incoming and outgoing calls. This level of customization empowers you to tailor your device to suit your unique communication needs, whether for personal or professional use.
Within the "Phone" settings, you may also encounter additional options related to voicemail, blocked contacts, and other calling-related features. While these settings may not be directly related to call forwarding, they offer valuable insights into the comprehensive calling capabilities of your iPhone.
By tapping on the "Phone" option within the Settings app, you are taking a significant step towards optimizing your calling experience. This action signifies your proactive approach to leveraging the advanced calling features of your iPhone, ensuring that you can seamlessly manage your calls and maintain accessibility at all times.
As you navigate through the "Phone" settings, take a moment to familiarize yourself with the various options available. This will enable you to gain a deeper understanding of the calling capabilities of your iPhone, allowing you to make informed decisions when configuring call forwarding and other calling preferences.
With the "Phone" settings at your fingertips, you are well-positioned to proceed to the next steps in the call forwarding setup process. By tapping on "Phone," you have unlocked a realm of calling customization options, setting the stage for a personalized and efficient calling experience on your iPhone.
Step 3: Select Call Forwarding
Upon tapping the "Phone" option within the Settings app, you will navigate to a screen that presents various calling-related settings. Among these options, you will find "Call Forwarding," a pivotal feature that enables you to redirect incoming calls to another number of your choice. Selecting the "Call Forwarding" option allows you to delve into the specific settings associated with this feature, empowering you to customize call forwarding according to your preferences.
When you tap on "Call Forwarding," you will be directed to a new screen dedicated to configuring call forwarding settings. Here, you will have the opportunity to activate call forwarding and input the desired forwarding number. This step is crucial in ensuring that incoming calls are seamlessly redirected to the designated destination, whether it's another phone number, voicemail, or a specialized call handling service.
The "Call Forwarding" settings screen provides a user-friendly interface that simplifies the process of customizing call forwarding preferences. By selecting this option, you are taking a proactive step towards optimizing your accessibility and ensuring that you never miss an important call, regardless of your current availability.
Within the "Call Forwarding" settings, you will encounter intuitive controls that allow you to enable or disable call forwarding with ease. Additionally, you will have the opportunity to input the specific phone number to which calls will be forwarded. This level of customization ensures that you have full control over how call forwarding is implemented, enabling you to tailor this feature to suit your unique communication needs.
As you navigate through the "Call Forwarding" settings, take a moment to familiarize yourself with the available options and controls. This will empower you to make informed decisions when configuring call forwarding, ensuring that the feature aligns with your specific requirements and preferences.
By selecting "Call Forwarding" within the "Phone" settings, you are embarking on a journey to enhance the efficiency and effectiveness of your iPhone's calling capabilities. This proactive approach to customizing call forwarding underscores your commitment to maintaining seamless accessibility, regardless of your current circumstances or location.
With the "Call Forwarding" settings at your disposal, you are well-equipped to proceed to the next steps in the call forwarding setup process. By selecting "Call Forwarding," you are harnessing the full potential of this feature, leveraging its capabilities to ensure uninterrupted connectivity and communication on your iPhone.
Step 4: Turn on Call Forwarding
After selecting the "Call Forwarding" option within the "Phone" settings on your iPhone, the next pivotal step is to turn on call forwarding. This action activates the call forwarding feature, allowing you to seamlessly redirect incoming calls to a designated number or destination of your choice.
To turn on call forwarding, you will encounter a straightforward toggle switch within the "Call Forwarding" settings screen. This toggle switch serves as the primary control for enabling or disabling call forwarding, providing a user-friendly mechanism for customizing this essential feature.
By simply tapping the toggle switch, you can activate call forwarding, signaling to your iPhone that incoming calls should be redirected to the specified forwarding number. This intuitive control empowers you to swiftly enable call forwarding whenever the need arises, ensuring that you can effortlessly manage your accessibility and connectivity.
The ability to turn on call forwarding with a single tap exemplifies the user-centric design of iPhone calling features, prioritizing simplicity and efficiency in the customization process. This streamlined approach allows you to take immediate action in configuring call forwarding, aligning with the overarching goal of maintaining seamless communication and accessibility.
As you activate call forwarding, you are effectively leveraging the advanced capabilities of your iPhone to adapt to varying circumstances and communication needs. Whether you're in a meeting, traveling, or simply unable to answer calls, turning on call forwarding ensures that you remain connected and reachable, regardless of your current availability.
Furthermore, the seamless nature of enabling call forwarding underscores the user-centric design philosophy that permeates the iPhone experience. By prioritizing intuitive controls and straightforward customization processes, Apple empowers users to effortlessly manage essential features such as call forwarding, enhancing the overall usability and effectiveness of the device.
With call forwarding turned on, you have successfully initiated the process of redirecting incoming calls to a designated number, voicemail, or alternative destination. This proactive step underscores your commitment to maintaining accessibility and connectivity, reflecting the adaptability and versatility of the iPhone's calling capabilities.
By turning on call forwarding, you are harnessing the power of this feature to ensure that you never miss an important call, even in situations where immediate responsiveness may be challenging. This proactive approach to call forwarding customization aligns with the overarching goal of optimizing communication and connectivity on your iPhone, empowering you to stay connected in any scenario.
Step 5: Enter the Number to Forward Calls to
Once you have turned on call forwarding, the next crucial step involves entering the specific number to which you want your incoming calls to be forwarded. This number could be another mobile phone, a landline, a colleague's phone, or any other destination where you prefer to receive your calls.
Upon selecting the "Enter Phone Number" option within the call forwarding settings, you will be prompted to input the desired forwarding number. This user-friendly interface simplifies the process of specifying the forwarding destination, allowing you to seamlessly customize your call forwarding preferences.
When entering the forwarding number, it's essential to ensure accuracy and double-check the digits to avoid any potential errors. This step is pivotal in guaranteeing that your calls are redirected to the intended destination, providing you with the assurance that you will not miss any important communications.
Additionally, the call forwarding settings may offer the option to customize additional parameters, such as the duration of call forwarding or specific conditions under which calls should be redirected. These advanced customization options empower you to tailor the call forwarding feature to align with your unique communication needs and preferences.
By entering the number to forward calls to, you are actively shaping the accessibility and responsiveness of your iPhone, ensuring that incoming calls are efficiently directed to the designated destination. This level of customization reflects your proactive approach to managing your communication preferences, underscoring the adaptability and versatility of the iPhone's calling capabilities.
As you input the forwarding number, take a moment to consider the specific scenarios in which call forwarding will be beneficial to you. Whether it's during business trips, personal commitments, or times when you need to prioritize certain calls, customizing the forwarding number enables you to maintain seamless connectivity and accessibility.
With the forwarding number successfully entered, you have completed a pivotal stage in the call forwarding setup process, solidifying your control over how incoming calls are managed on your iPhone. This proactive step aligns with the overarching goal of optimizing your communication experience, ensuring that you can stay connected and responsive in any situation.
By customizing the forwarding number, you are leveraging the advanced capabilities of your iPhone to adapt to varying circumstances and communication needs, reflecting your proactive approach to maintaining accessibility and connectivity.
Step 6: Verify Call Forwarding is Enabled
After completing the essential steps of setting up call forwarding on your iPhone, it is crucial to verify that the feature is successfully enabled. This verification process ensures that incoming calls are seamlessly redirected to the designated forwarding number, providing you with the assurance that your call forwarding preferences are accurately configured and operational.
To verify that call forwarding is enabled, you can initiate a test call from another device or ask a friend or colleague to place a call to your iPhone number. By doing so, you can confirm whether the incoming call is efficiently redirected to the specified forwarding number, validating that the call forwarding feature is functioning as intended.
Upon receiving the test call, observe whether the call is seamlessly redirected to the designated destination. If the call forwarding is successfully enabled, you should notice that the incoming call is directed to the specified forwarding number, allowing you to answer the call and engage in the conversation as you normally would.
Additionally, you can verify call forwarding by accessing the call forwarding settings within the "Phone" settings on your iPhone. By reviewing these settings, you can confirm that call forwarding is activated and that the correct forwarding number is specified. This proactive approach allows you to double-check the call forwarding configuration, ensuring that it aligns with your intended preferences.
Furthermore, you may consider testing call forwarding in various scenarios to validate its effectiveness in different contexts. For example, you can simulate scenarios where you are unable to answer calls and assess whether the call forwarding feature reliably redirects incoming calls to the designated destination.
By verifying that call forwarding is enabled and operational, you are actively ensuring that your communication preferences are accurately reflected in your iPhone's settings. This proactive validation process empowers you to maintain control over how incoming calls are managed, providing you with the confidence that you can stay connected and accessible, regardless of your current availability.
In essence, verifying call forwarding is a pivotal step that underscores your commitment to optimizing your communication experience on your iPhone. By confirming the successful activation of call forwarding, you are leveraging the advanced capabilities of your device to adapt to varying circumstances and communication needs, ensuring uninterrupted connectivity and accessibility.
Conclusion
In conclusion, setting up call forwarding on your iPhone empowers you to maintain seamless accessibility and connectivity, ensuring that you never miss an important call, regardless of your current circumstances. By following the step-by-step process outlined in this guide, you have gained the knowledge and proficiency to customize your call forwarding preferences, aligning them with your unique communication needs and preferences.
The journey of setting up call forwarding begins with accessing the Settings app, where you navigate to the "Phone" settings and select the "Call Forwarding" option. From there, you can turn on call forwarding and input the specific number to which you want your incoming calls to be redirected. This meticulous customization process reflects your proactive approach to managing your communication preferences, underscoring the adaptability and versatility of the iPhone's calling capabilities.
Upon completing the setup process, it is essential to verify that call forwarding is successfully enabled, ensuring that incoming calls are efficiently redirected to the designated forwarding number. This verification step provides you with the confidence that your call forwarding preferences are accurately configured and operational, reinforcing your control over how incoming calls are managed on your iPhone.
By embracing the call forwarding feature, you are harnessing the advanced capabilities of your iPhone to adapt to varying circumstances and communication needs. Whether you're in a meeting, traveling, or simply unable to answer calls, call forwarding ensures that you remain connected and reachable, reflecting your commitment to maintaining accessibility and responsiveness.
Furthermore, the user-centric design philosophy that permeates the iPhone experience prioritizes simplicity and efficiency in the customization process. The intuitive controls and straightforward customization options empower you to effortlessly manage essential features such as call forwarding, enhancing the overall usability and effectiveness of the device.
In essence, the ability to set up call forwarding on your iPhone exemplifies your proactive approach to optimizing your communication experience. By leveraging the advanced capabilities of your device, you are ensuring uninterrupted connectivity and accessibility, reflecting your commitment to staying connected in any scenario.
As you continue to explore the diverse features and capabilities of your iPhone, the knowledge and proficiency gained from setting up call forwarding will serve as a foundation for maximizing the effectiveness and efficiency of your communication experience. Whether for personal or professional use, the ability to seamlessly manage your calls and maintain accessibility underscores the transformative impact of call forwarding on your iPhone.